
Shipment Lanes
Configure your network for shipment lane management.
About shipment lanes
Your organization may need to manage your fulfillment center shipment lanes to ensure packages are sorted and loaded onto the correct carrier's trailer. Shipium supports configuration of shipment lanes to help you manage which package goes onto which trailer on the same calendar day for the same carrier service method.
Fulfillment contexts
In order to use Shipium’s APIs, your organization needs to establish your fulfillment network configurations within the Shipium platform. We refer to these configurations as Fulfillment Contexts. A fulfillment context allows you to configure the characteristics for your network origins, carrier contracts, label augmentations, third party billing, injection shipping, and tenants, in addition to other feature settings. Shipment lanes are optional but can be established for a fulfillment context.
Shipment lane assumptions
- Any number of shipment lanes may be added to a shipment lane sort configuration and any number of shipment lane sort configurations may be added to an origin so long as they do not share the same carrier definition.
- Within a shipment lane sort configuration, postal codes can only be configured on one lane by default. To allow multiple lanes within the same configuration to share postal code coverage, enable Allow Overlapping Postal Codes on the configuration. Attempting to upload conflicting postal codes when this setting is disabled will result in an error.
- A ZIP code can only be configured for one
partnerLaneIdper carrier service method, unless Allow Overlapping Postal Codes is enabled for the Lane Sort Configuration. - Shipment lanes require a schedule by day of week. Custom carrier cutoff time exceptions can be set for a shipment lane. Holidays configured for the fulfillment center and Shipium-configured carrier holidays will be honored at the shipment lane level.
- Once a shipment lane is created with a given destination type (Default, All Postal Codes, or Configure by Postal Codes), the destination type cannot be changed. To change a lane's destination type, you must delete and recreate the lane.
- An API call response will only include shipment lane fields if the shipment was filtered by your configuration.
Configure your account to manage shipment lanes
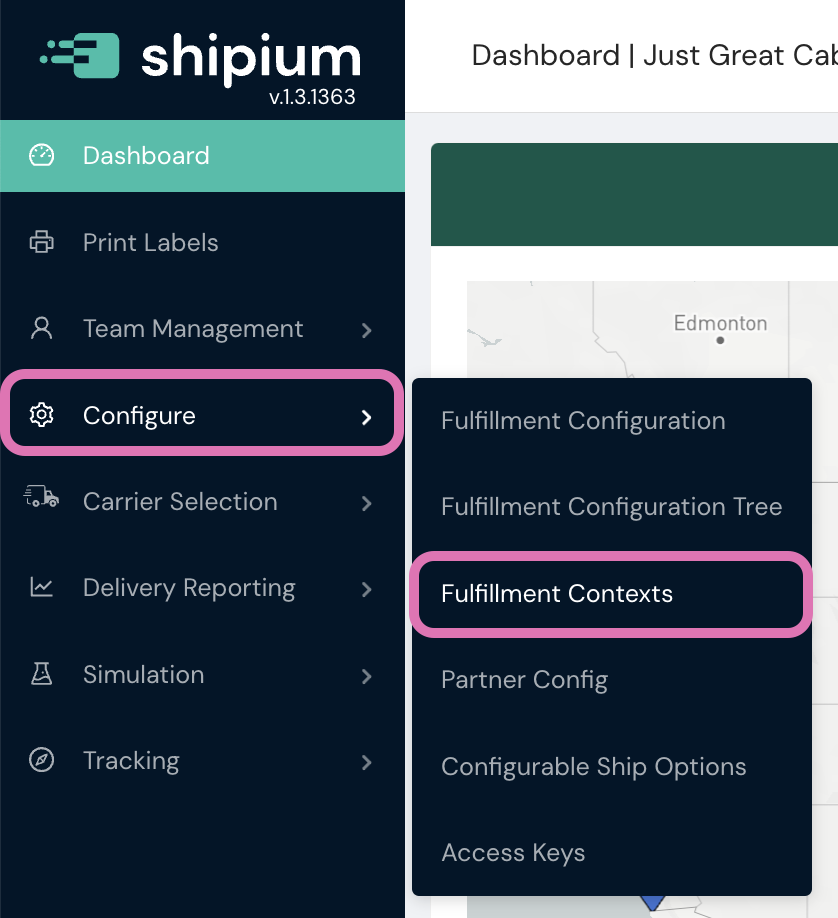
In order to configure shipment lanes for a fulfillment context, you'll need to access Fulfillment Contexts in the Configure section of the lefthand navigation menu within the Shipium Console. These instructions assume you've already established a fulfillment context in the Shipium platform. If you haven't yet set up a fulfillment context, you can find guidance for how to do so in the fulfillment contexts documentation.
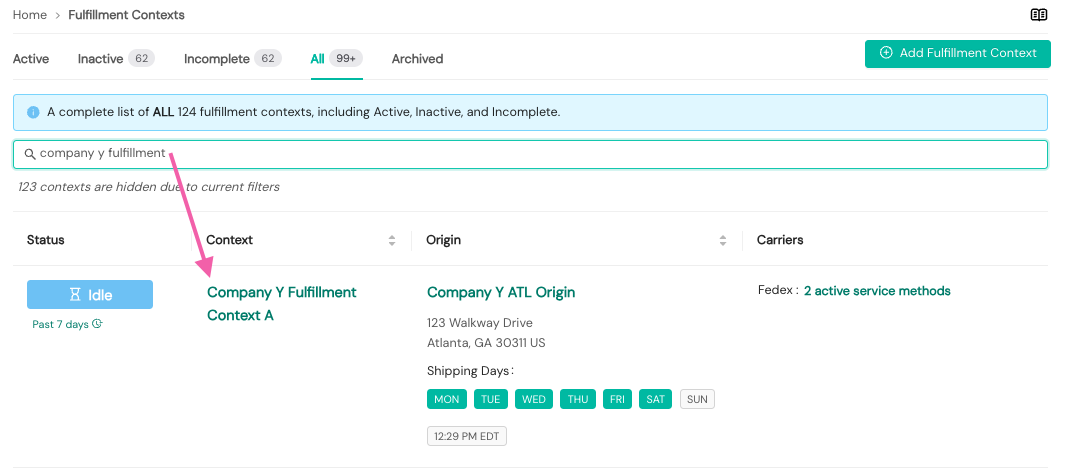
To locate the fulfillment context for which you wish to configure shipment lanes, you can use the search bar at the top of the Fulfillment Contexts homepage or simply scroll through a list of the available contexts. Once you've located the desired context, you can access it by clicking on its name.
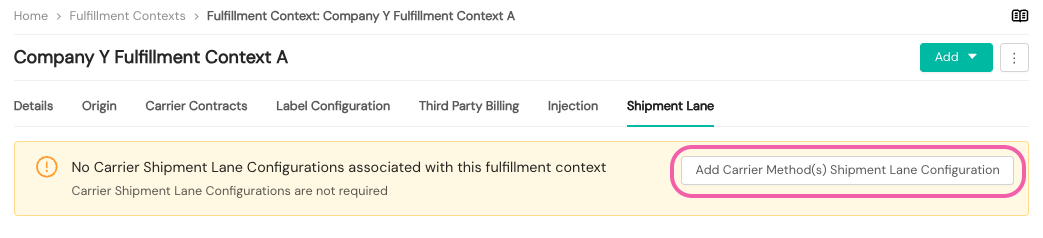
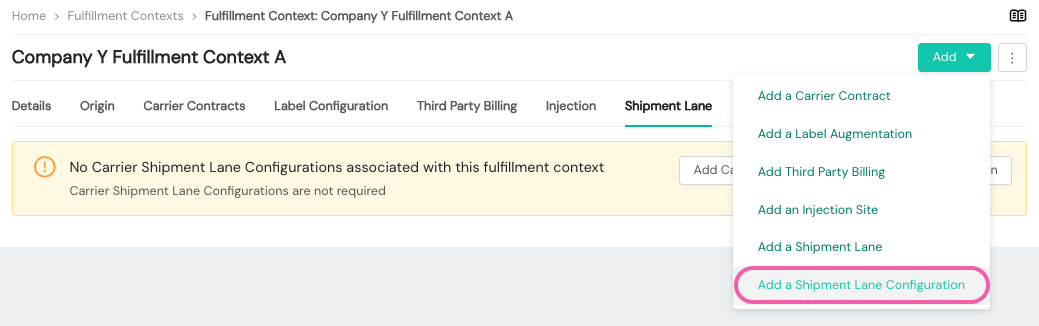
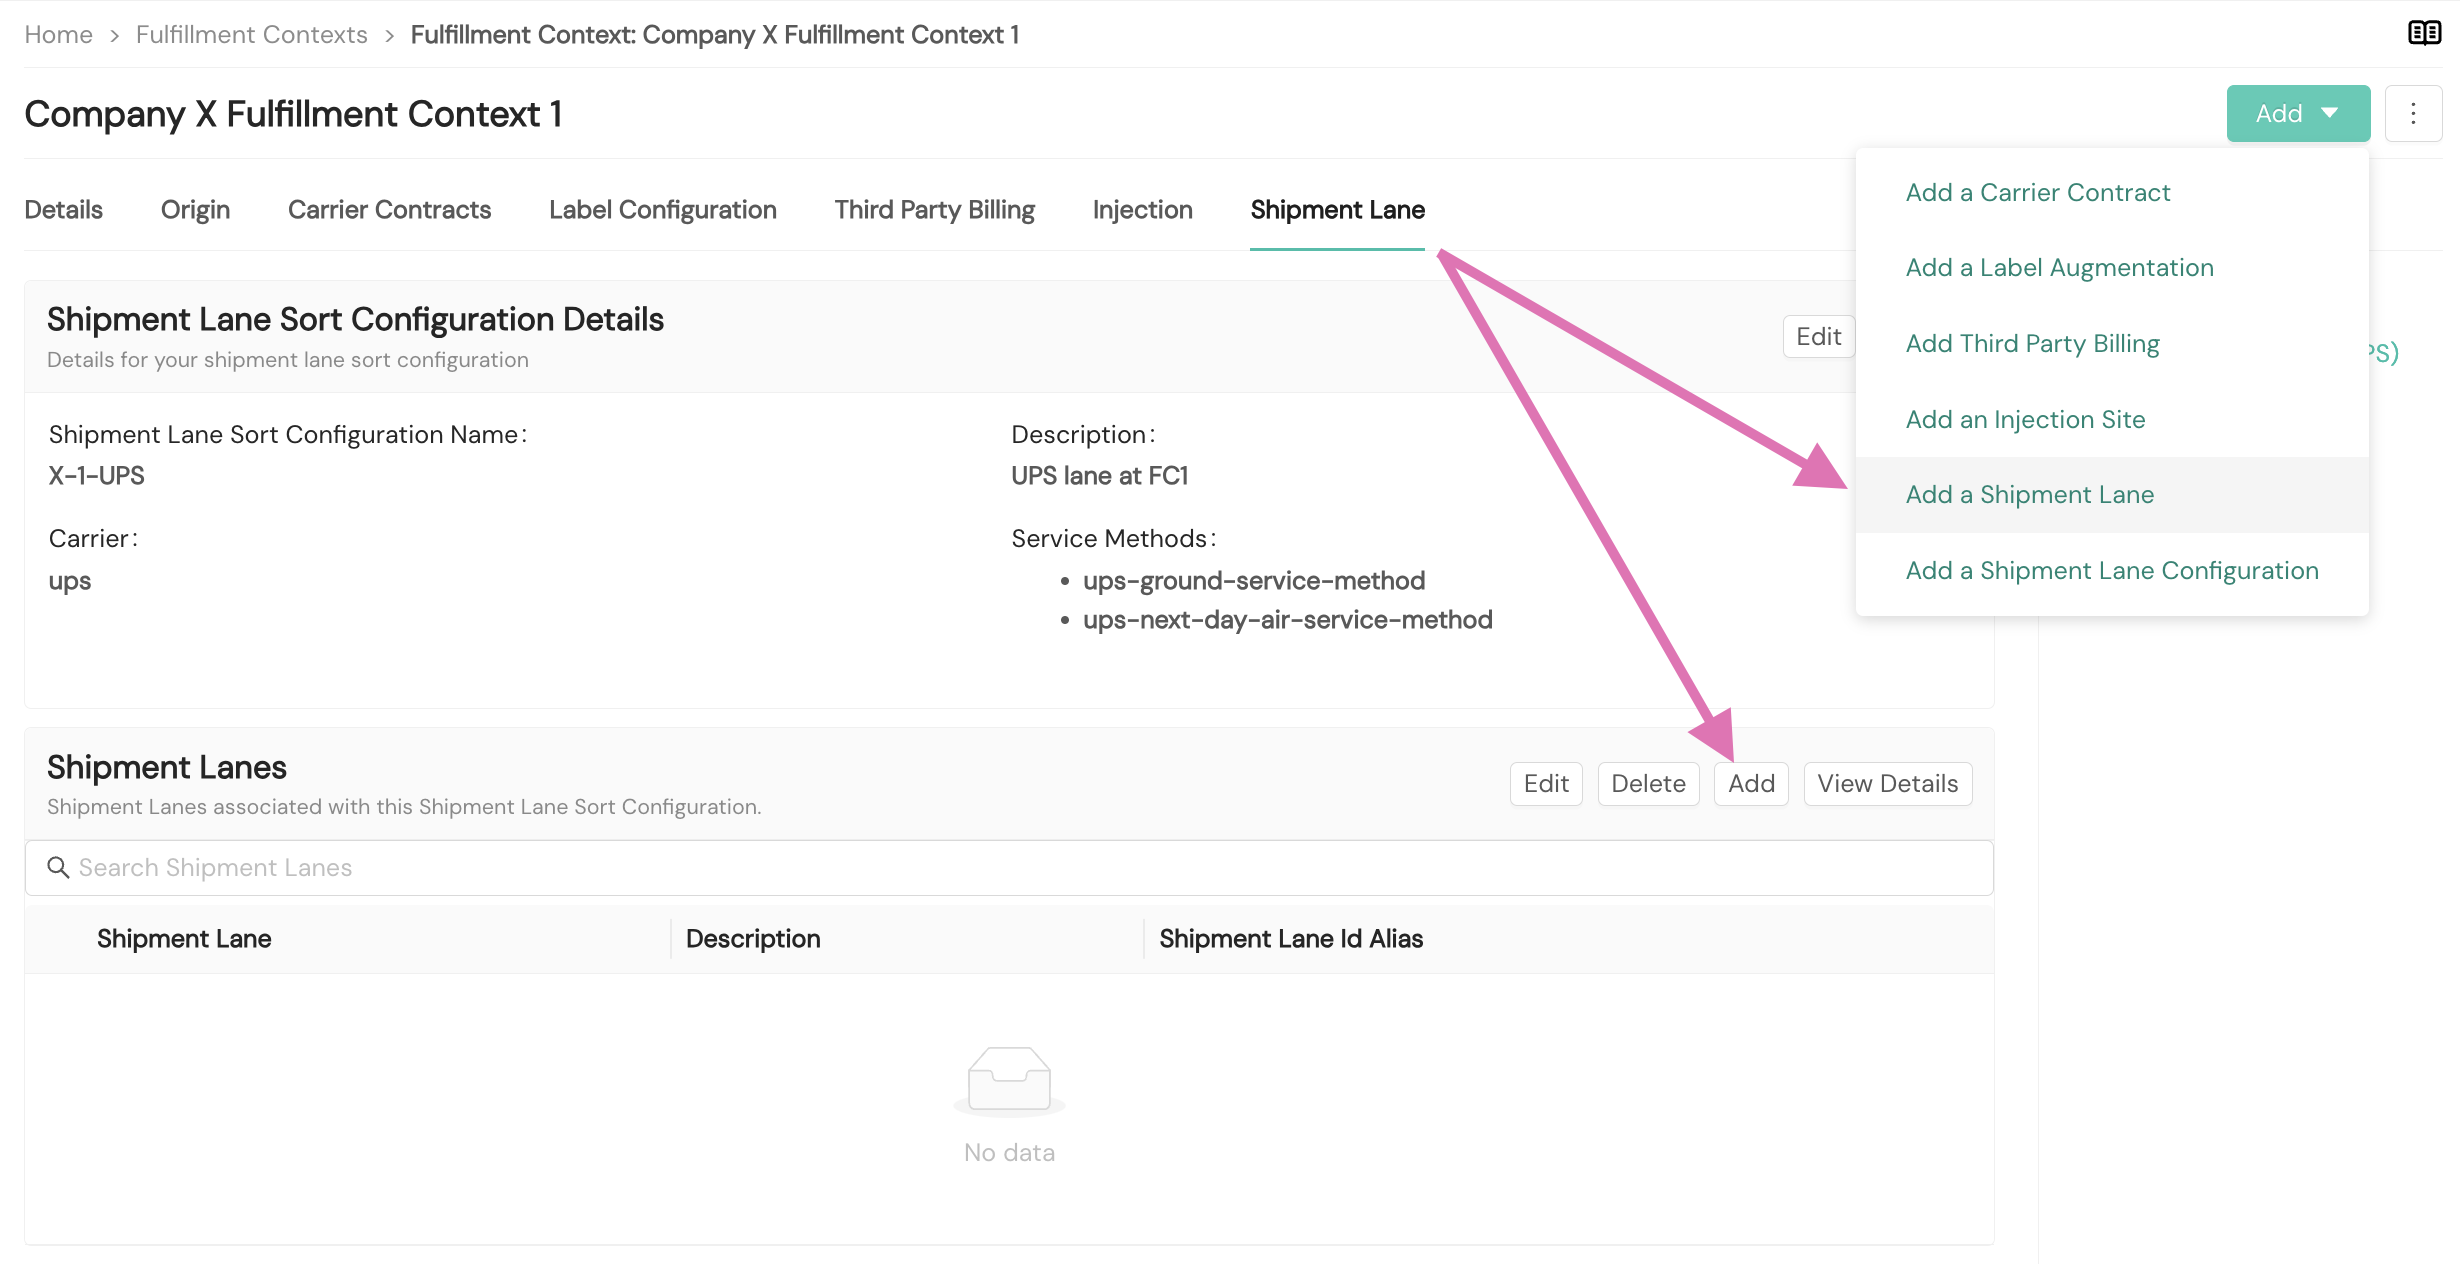
Within the Shipment Lane tab of the context, you can add a shipment lane configuration by selecting the Add Carrier Method(s) Shipment Lane Configuration button within the message that there is no carrier shipment lane configuration associated with the fulfillment context or by selecting Add a Shipment Lane Configuration from the dropdown menu at the right of the screen.
Shipment lane landing page
Once you have one or more shipment lanes configured for a Lane Sort Configuration, the Shipment Lanes section of the configuration displays your lanes organized by cutoff time, with controls for searching, filtering, and navigating to individual lane details.

Key landing page features:
- Lanes grouped by cutoff time. Lanes are organized into collapsible groups based on their shipping schedule. Use the Today view to see only lanes shipping today, or Full Week to see all schedule patterns.
- Search across groups. The search bar filters lanes by name, Partner Provided ID, or description across every group on the page.
- Default and All Postal Codes badges. Lanes designated as the default for the configuration display a Default badge. Lanes covering all postal codes display an All Postal Codes badge and are sorted to the top of their group.
- No Schedule warning group. Lanes without a configured schedule appear in a separate group with a warning indicator. These lanes are not used for routing until a schedule is added.
- Lane Enabled toggle. Each lane row has a Lane Enabled toggle that controls whether the lane can be assigned to a shipment.
- Limits column. The Limits column shows each lane's count limits. In the Today view, it shows the lane's count for the day against the strictest active limit, displayed as count over maximum (e.g., 0 / 100), or No limit when the lane has no active limit. A calendar icon in the column opens a view of the lane's limits. See Shipment Count Limits for details.
- Direct lane navigation. Click a lane name to open its detail page directly.
- Expand and collapse controls. Collapse or expand individual groups, or use the chevron control to expand or collapse all groups at once.
Enable or disable a shipment lane
Each shipment lane has a Lane Enabled state that controls whether the lane can be assigned to a shipment. Disabling a lane prevents that lane from being assigned; the lane's carrier and service method remain eligible for selection. You can change a lane's state from the Lane Enabled toggle on its row on the shipment lane landing page. A change takes effect at the next shipment lane configuration refresh, which can take a brief time to apply during carrier selection.
Shipment lane sort configuration
To create a shipment lane, you'll first establish a shipment lane sort configuration, which combines individual shipment lanes. You'll provide details to be associated with the new shipment lane sort configuration, as shown in the following screenshot and detailed below.
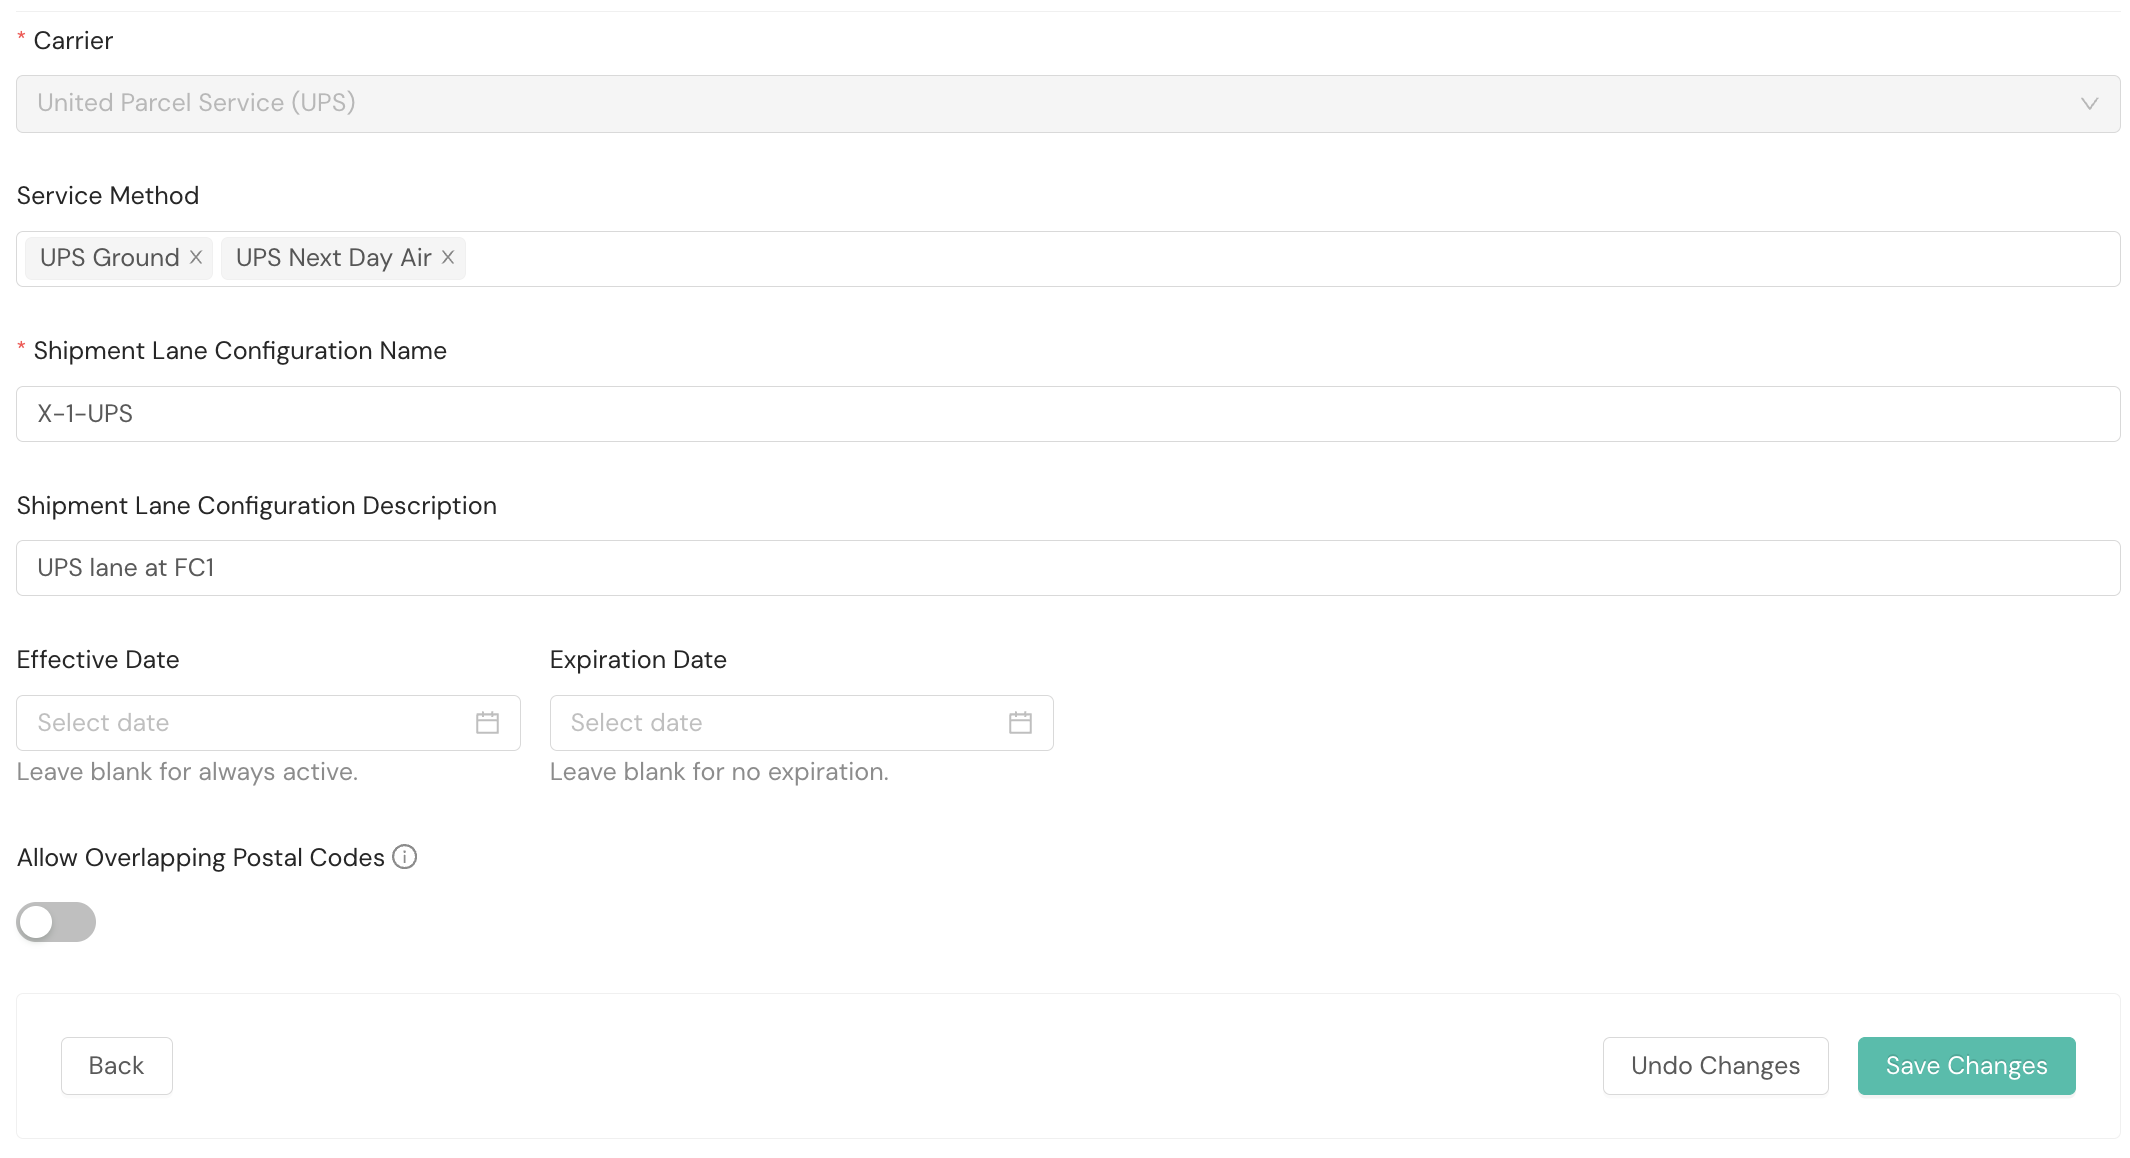
- Carrier. Required. You'll select the desired carrier for the shipment lane sort configuration from a dropdown menu. Once you do so, you can select the desired carrier service method(s). In addition, available shipment lanes for the selected carrier within your configured fulfillment network will appear.
- Service Method. Optional. You can select specific service methods for this carrier that you wish to associate with the shipment lane sort configuration.
- Shipment Lane Configuration Name. Required. A human-readable name your organization will use to refer to the shipment lane sort configuration
- Shipment Lane Configuration Description. Optional. An optional description your organization can use to help you organize your shipment lane sort configurations
- Effective Date. Optional. The date the configuration begins to be used during carrier selection. When no date is set, the configuration displays as Always active.
- Expiration Date. Optional. The date the configuration stops being used during carrier selection. When no date is set, the configuration displays as No expiration.
- Allow Overlapping Postal Codes. Optional. When enabled, multiple lanes within this configuration can share the same postal codes. This allows cascading lane configurations where shipments fail over between lanes with overlapping coverage. When disabled (the default), each postal code in the configuration must belong to exactly one lane. See Best Practices for Uploading Postal Codes for guidance on when to enable this setting.
Configuration lifecycle
Configurations are grouped by lifecycle status so you can see which are in effect:
- Active. The configuration is within its effective and expiration window and is used during carrier selection.
- Upcoming. The configuration has an effective date in the future and is not yet used during carrier selection.
- Expired. The configuration's expiration date has passed and it is no longer used during carrier selection.
A configuration's status is evaluated against the shipment's ship date, and a configuration is used during carrier selection only while it is Active.
Shipment lane
Once you've established a shipment lane sort configuration, you can create a shipment lane. Within the Shipment Lane section of the Shipment Lane tab of the fulfillment context, you'll select the Add button; or, you can select Add a Shipment Lane from the dropdown menu.
About the default laneA default lane acts as a fallback within a Lane Sort Configuration; it handles any shipments not matched by another lane in the same configuration. Only one lane can be marked as default per Sort Configuration. Once a lane's destination type is set (including Default), it cannot be changed; to change a lane's destination type, you must delete and recreate the lane. See Best Practices for Uploading Postal Codes for guidance on when to use a default lane.
To create a shipment lane, you'll provide details to be associated with it, as shown in the following screenshot and detailed below.
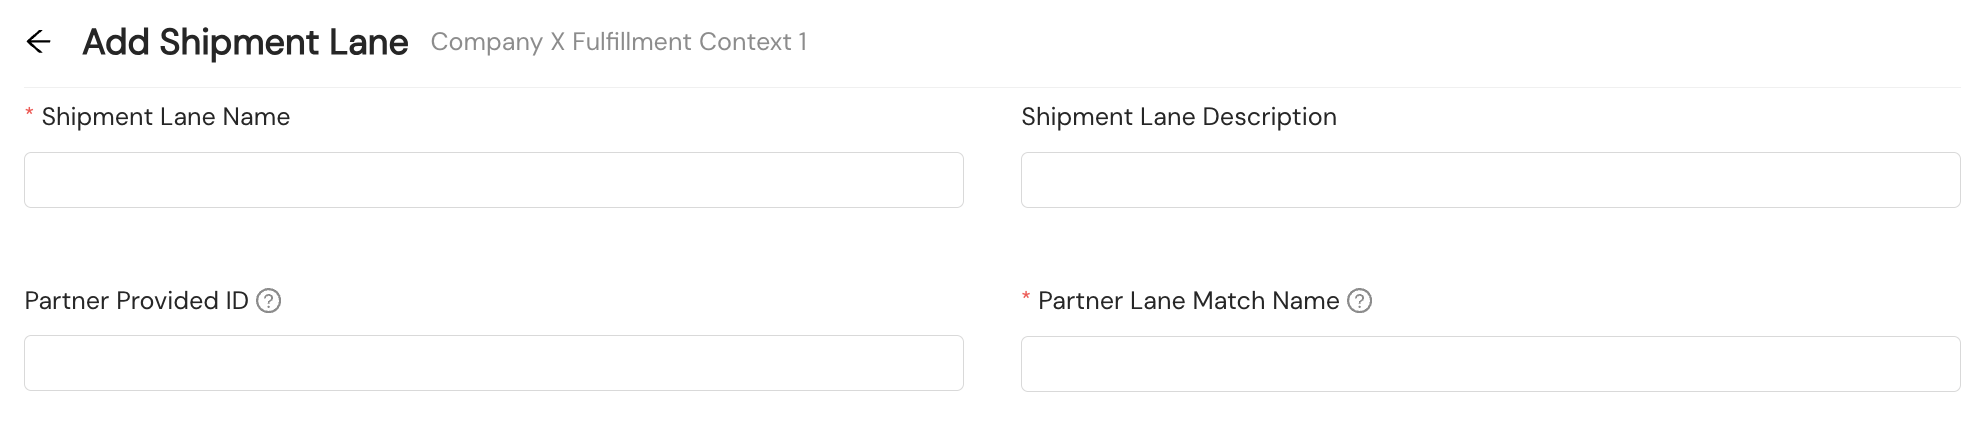
- Shipment Lane Name. Required. A human-readable name your organization will use to refer to the shipment lane
- Shipment Lane Description. Optional. An optional description your organization can use to help you organize your shipment lanes
- Partner Provided ID. Optional. A unique ID your organization can provide to identify this shipment lane. This value must be unique to only one shipment lane in your network. It is case sensitive. In the lane list, this value is currently labeled Shipment Lane ID Alias.
- Partner Lane Match Name. Required. An ID your organization provides to reference in API call responses. This value does not need to be unique to only one shipment lane. It is case sensitive.
Next, you'll provide Schedule information.
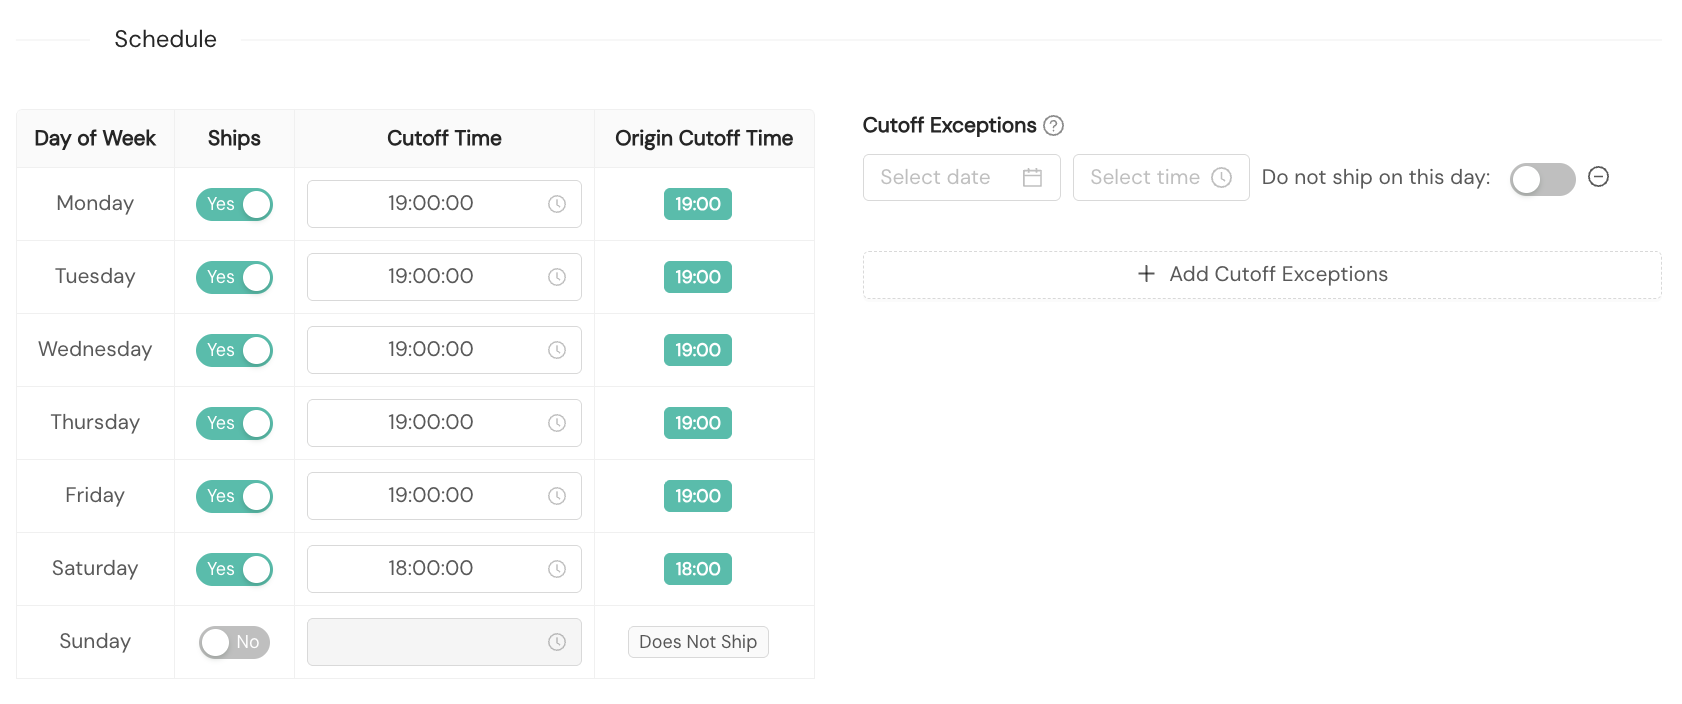
- Ships. Required. You'll toggle the button to either Yes or No depending on if your fulfillment center ships on that day of the week.
- Cutoff Time. Optional. By default, the carrier cutoff time will be the origin cutoff time configured for the fulfillment center. If the carrier cutoff time differs from the origin cutoff time, you can establish carrier cutoff times for each day of the week. Any configured carrier cutoff time supersedes the origin cutoff time.
- Origin Cutoff Time. Display only. The origin cutoff time for each day of the week is displayed for reference when configuring the carrier cutoff times.
- Cutoff Exceptions. Optional. Override cutoff times for specific dates, such as holidays or peak days. You can also opt not to ship on a cutoff exception day.
Finally, you'll provide Routing information.
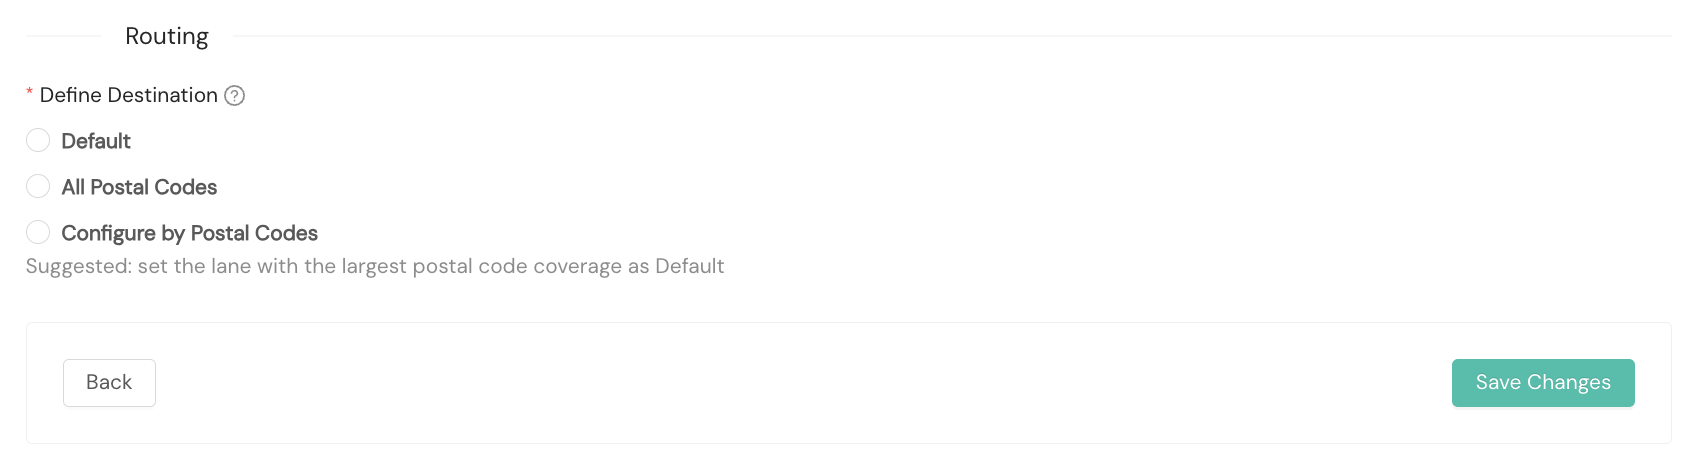
- Define Destination. Required. Choose one of three destination types:
- Default. The lane acts as a fallback for any shipment within the parent Lane Sort Configuration that is not matched by another lane (specific or All Postal Codes). Only one lane per Sort Configuration can be marked as default.
- All Postal Codes. The lane is eligible for any destination the carrier services. No postal code upload is required; Shipium validates that the carrier and service method can deliver to the destination before the lane is selected. Use this when the carrier defines its own coverage area (e.g., a regional carrier).
- Configure by Postal Codes. The lane matches only the postal codes you upload via CSV. Use this when you need to specify exactly which destinations a lane covers.
For detailed guidance on choosing between these options and on uploading postal code sets, see Best Practices for Uploading Postal Codes.
Shipment lane detail page
To view details for a configured shipment lane, click the lane name from the landing page. The detail page shows the lane's full configuration.
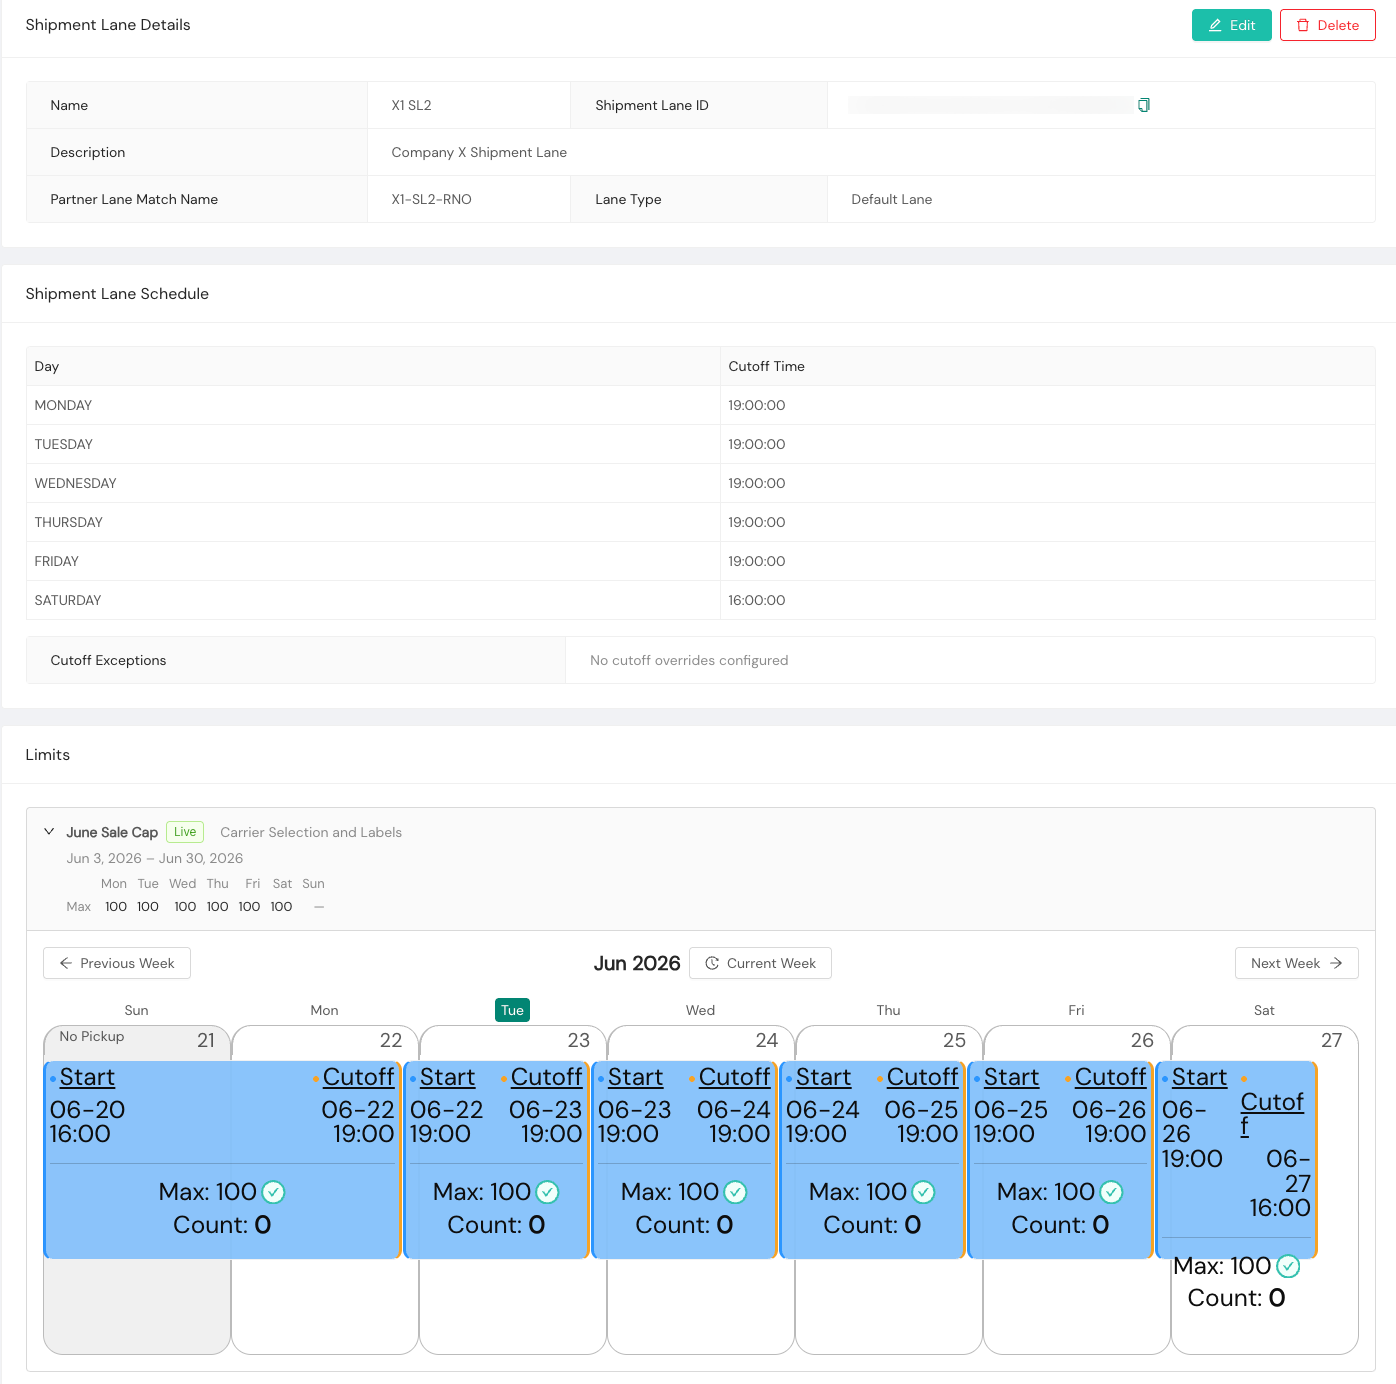
The detail page includes:
- Lane configuration. Name, Shipment Lane ID, description, Partner Lane Match Name, and Lane Type (e.g., Default Lane). The Shipment Lane ID has a copy-to-clipboard button.
- Schedule. A table of the lane's cutoff times by day of week, plus any configured cutoff exceptions.
- Postal codes. For lanes configured with Configure by Postal Codes, you can download the configured postal codes as a CSV.
- Limits. Any shipment count limits scoped to the lane appear here, each showing its name, status, what it applies to, date range, and per-day maximum, with a weekly calendar view of counts. See Limits on a Shipment Lane.
- Edit and Delete. Edit and Delete buttons in the header let you update or remove the lane. Deleting requires confirmation in a modal that displays the lane name.
Limits on a shipment lane
Applying a shipment count limit to a lane is optional. Lanes are used during carrier selection whether or not they have a limit; a limit is an add-on for managing capacity on a lane.
Limits are added after a lane is created, not during initial lane creation. To add or manage a lane's limits, open the lane, select Edit, and use the Limits section at the bottom of the edit view. Select Add Limit to create one.
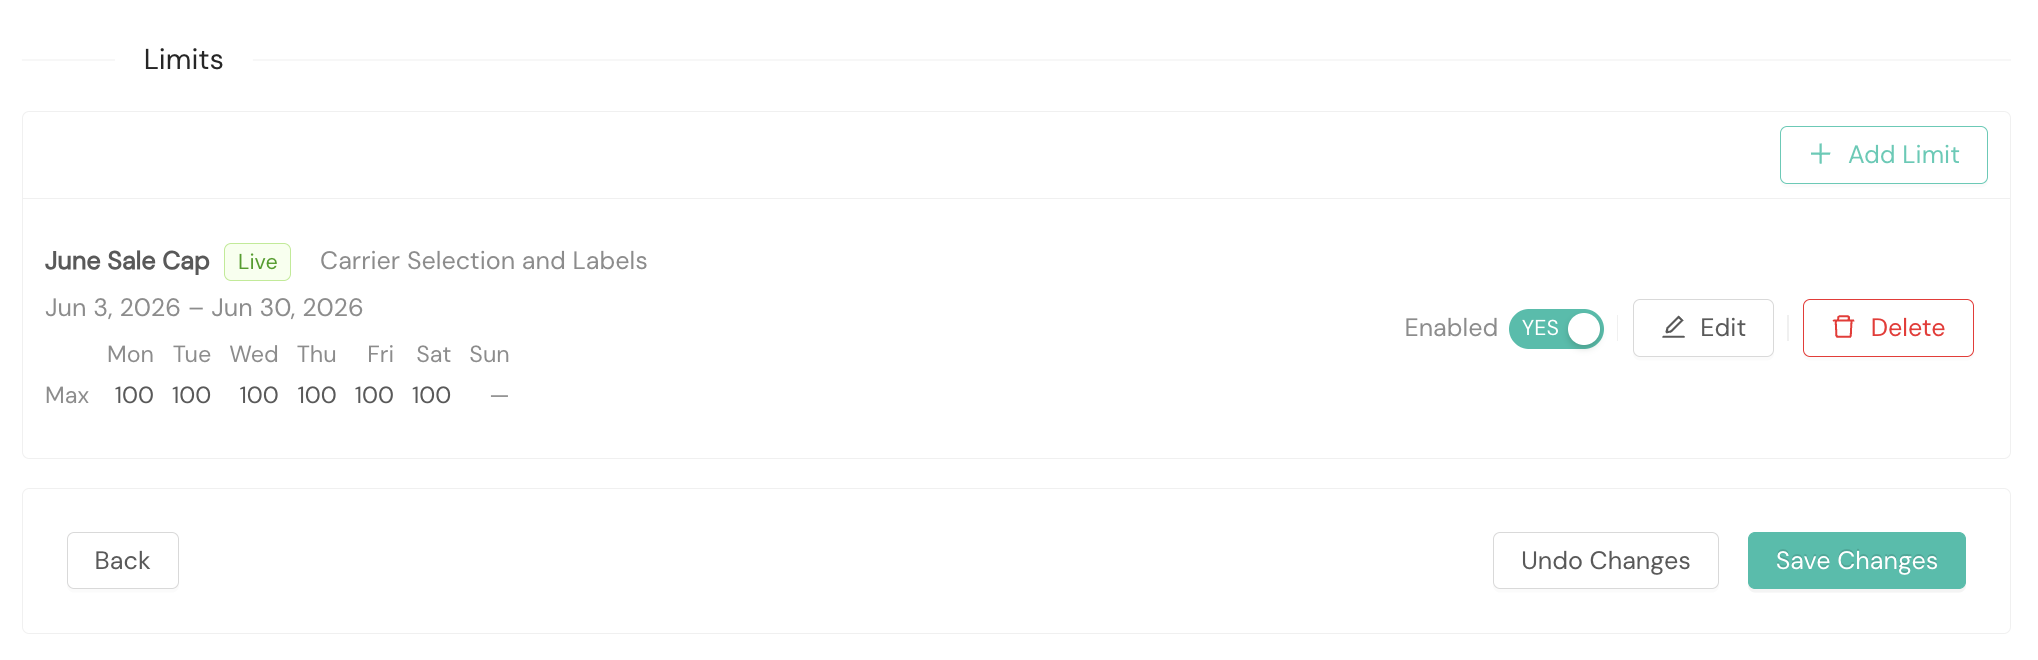
A popup modal will appear for you to set the limit's name, dates, the days it applies to, and a Maximum Limit for those days. A lane with no limits shows No limits configured.
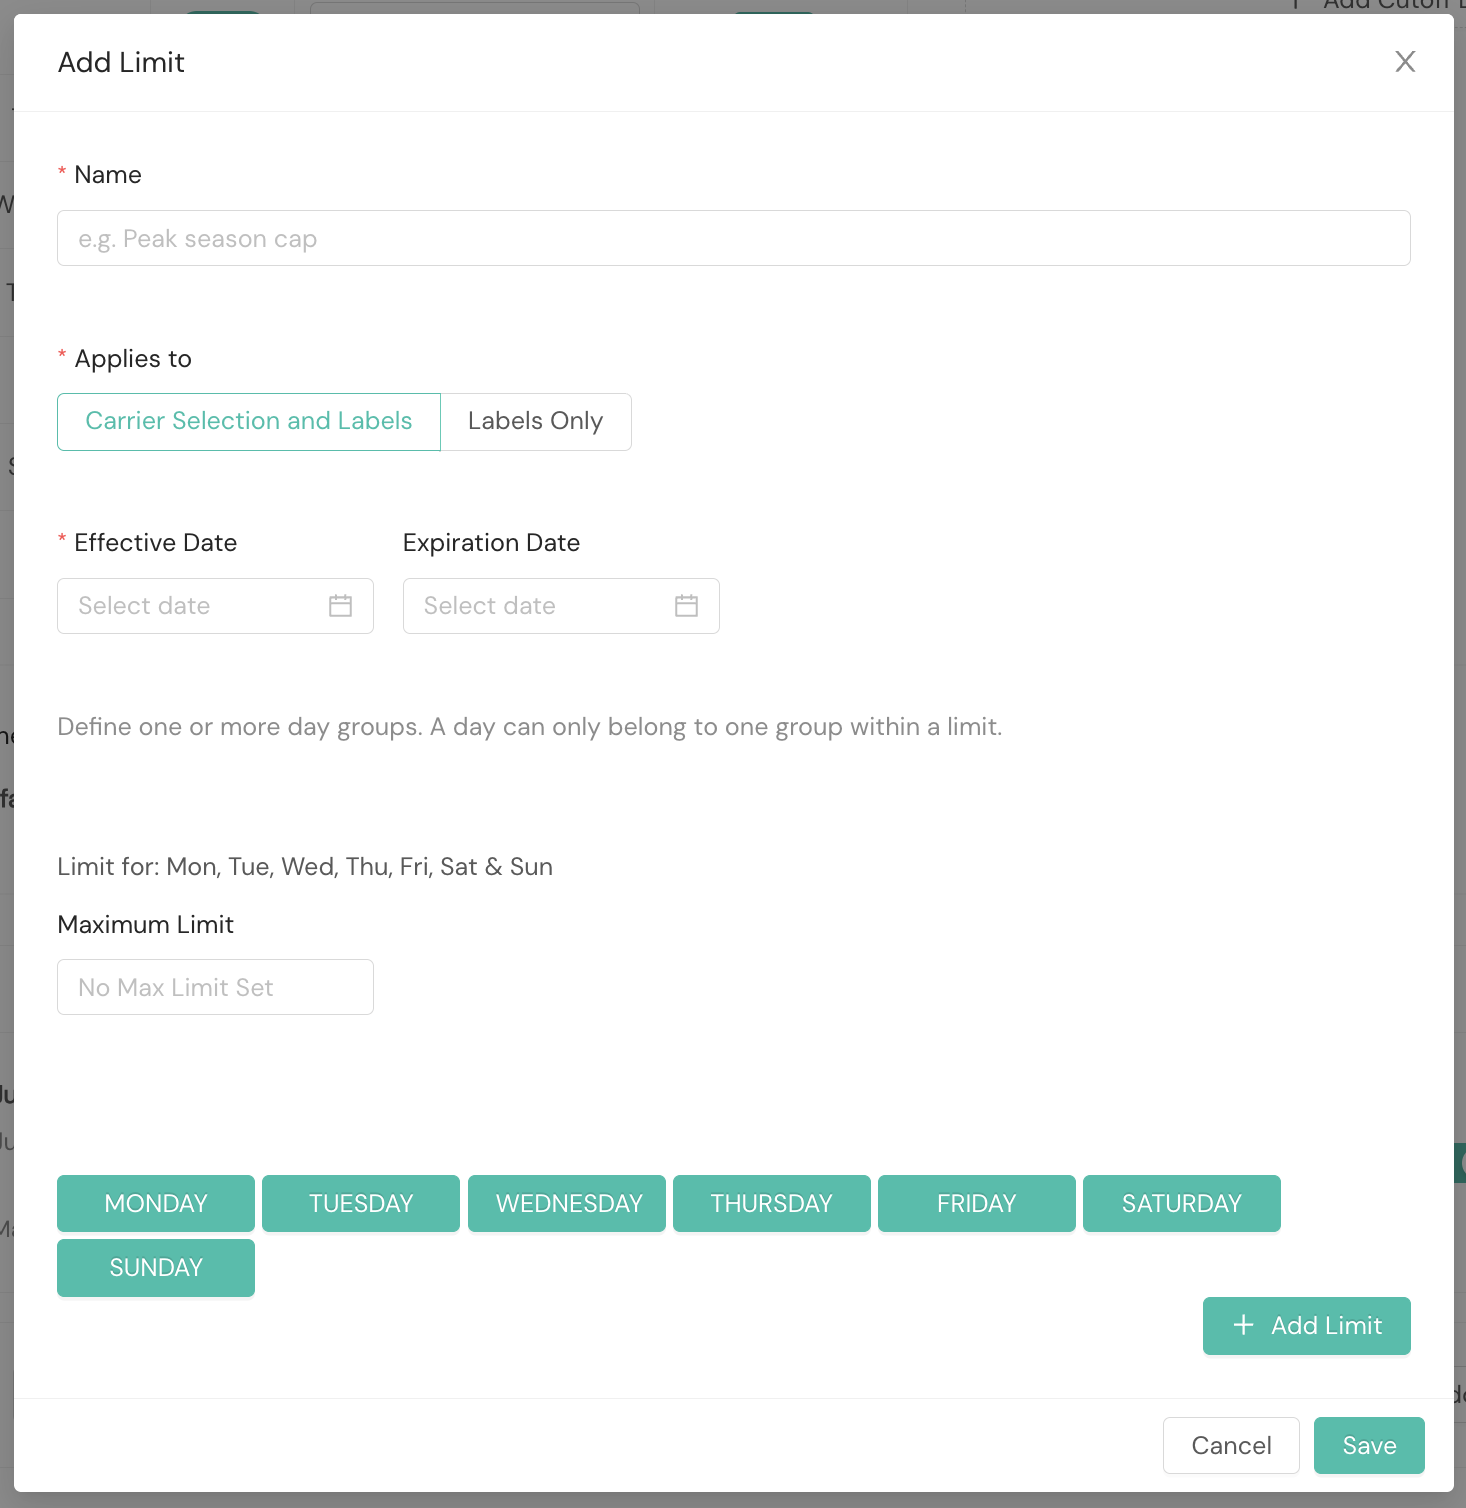
Each configured limit displays its name, its status, the counts it applies to (Carrier Selection and Labels or Labels Only), its effective and expiration date range, and the Maximum for each day included in the limit. You can enable or disable, edit, or delete a limit from its row. Lane-scoped limits set a maximum only; they do not use a minimum. For how lane-scoped count limits behave, including how to define the days a limit applies to and how lane limits interact with origin-scoped and carrier-scoped limits, see Shipment Count Limits.
Best practices for uploading postal codes
This guide describes how to configure postal codes on your lanes in a way that keeps your configuration small, fast to evaluate, and easy to maintain. Following these practices reduces the size of your uploaded postal code sets and prevents common configuration mistakes. This guidance is intended for partners who configure lanes and upload postal codes to Shipium.
The core principle: Upload as few postal codes as possible
The single most important guideline is to keep your uploaded postal code set as small as you can while still expressing the routing you need. Very large postal code lists can lead to a minor increase in carrier-selection latency, and they are harder to maintain over time.
There are three levers you can use to reduce the size of your upload:
- Use All Postal Codes instead of enumerating every postal code a carrier services.
- Use a Default lane as a catch-all instead of listing every postal code that should fall through to it.
- Use shorter postal code prefixes instead of full postal codes whenever the routing is the same across the prefix.
The rest of this guide explains each in detail.
Choose the destination type carefully — it can't be changed later
When you create a lane, you choose one of three destination types:
- Default. The catch-all lane within a configuration
- All Postal Codes. Eligible everywhere the carrier services
- Configure by Postal Codes. Eligible only for the postal codes you upload
Destination type is permanentOnce a lane is created with a given destination type, that setting cannot be updated. If you need to switch a lane from one destination type to another (e.g., from Configure by Postal Codes to All Postal Codes), you must delete the lane and recreate it with the new setting.
Because of this, it is worth taking a moment up front to choose the right type:
- If the carrier on this lane defines its own coverage area, choose All Postal Codes.
- If this lane should serve as the fallback for shipments not covered by any other lane in the configuration, choose Default.
- Otherwise, choose Configure by Postal Codes and upload the postal code set you want the lane to cover.
The next two sections go deeper on the difference between Default and All Postal Codes, since they are the two most often confused.
All Postal Codes vs. Default
These two concepts are often confused. They are not the same thing, and choosing the right one for the right situation is the difference between a clean configuration and one that grows uncontrollably.
All Postal Codes
A lane configured as All Postal Codes does not require you to upload any postal codes at all. The lane is eligible for any destination, but only where the carrier and service method on that lane can actually deliver.
This is the important nuance: All Postal Codes does not mean the lane will be selected for every postal code regardless of whether the carrier services it. Carrier selection still validates that the carrier and service method on the lane can deliver to the destination postal code before the lane is selected.
Example. Veho only delivers to a select set of postal codes in the United States. If you create a Veho lane and mark it as All Postal Codes, you do not need to upload Veho's serviceable postal code list. The lane effectively means "matches all the postal codes that Veho delivers to"; carrier selection will filter out destinations Veho cannot reach.
Use All Postal Codes when:
- The carrier on the lane defines its own serviceable area, and you want the lane to be eligible everywhere that carrier can deliver.
- You would otherwise be uploading a long list of postal codes that simply mirrors the carrier's coverage map.
Default lane
A Default lane is a catch-all within your own Lane Sort Configuration. It is the lane that gets used when none of your other lanes' postal code mappings match the destination postal code.
A default lane is the right tool when you have several lanes with specific postal code configurations and you want one more lane to handle "everything else."
Example. Suppose you have:
- Lane A configured with 3-character prefixes
100–199(Northeast U.S.) - Lane B configured with 3-character prefixes
900–999(West Coast U.S.) - Lane C marked as the default lane
A shipment to postal code 60601 (Chicago) does not match Lane A or Lane B. Instead of uploading every postal code in the country that is not already on Lane A or Lane B, you mark Lane C as the default lane, and it catches the rest.
Use a Default lane when:
- You have specific lanes covering specific regions, and you want a single fallback lane for everything else.
- You want to avoid uploading large negative-space postal code lists ("all the postal codes that aren't in the other lanes").
Quick comparison
| Concept | What it does | When to use it |
|---|---|---|
| All Postal Codes | Lane is eligible anywhere the carrier services, with no postal codes uploaded | Carrier defines its own coverage (e.g., regional carriers like Veho) |
| Default | Lane catches anything not matched by other lanes' explicit postal code mappings | You have several specific lanes and want one fallback |
The two are not mutually exclusive in concept, but they solve different problems. Reach for All Postal Codes first when the carrier itself defines coverage; reach for a Default lane when you are defining coverage with multiple specific lanes and need a fallback.
Allow Overlapping Postal Codes
By default, each postal code in a Lane Sort Configuration belongs to exactly one lane. Enabling Allow Overlapping Postal Codes on the configuration lifts that restriction: multiple lanes within the same configuration can share the same postal codes.
When enabled, multiple lanes can share the same postal codes. This allows cascading lane configurations where shipments fail over between lanes with overlapping coverage.

When to enable it
Enable Allow Overlapping Postal Codes when you want cascading lane selection — that is, when you want a primary lane to be tried first for a given postal code, with one or more backup lanes available if the primary lane is not eligible at selection time (e.g., the lane's schedule has cut off).
When to leave it disabled
Leave Allow Overlapping Postal Codes off (the default) when you want each postal code to map deterministically to a single lane within the configuration. This is simpler to reason about and is the right setting for most configurations.
Interaction with other settings
- Lanes marked All Postal Codes are unaffected by this toggle. They remain eligible everywhere the carrier services regardless of overlap settings.
- The Default lane still acts as a catch-all only for postal codes that no other lane covers; it is not a fallback for overlapping coverage.
- This toggle is scoped to a single Lane Sort Configuration. It does not affect other configurations.
Postal code length
Shipium accepts postal codes at any length, from a single character up to the full postal code format used by the destination country (for example, the 9-character ZIP+4 in the United States). The lookup is prefix-based, so a shorter entry covers all longer postal codes that begin with it.
For example, in the United States, uploading the single entry 9 covers every postal code starting with 9, from 90001 to 99999. Uploading 902 covers 90200–90299. Uploading 90210 covers only that exact 5-digit postal code.
Choose the shortest length that expresses your routing
The general rule: upload the shortest prefix that produces the routing you want. If a whole 3-character region routes to the same lane, upload the 3-character prefix, not the 100 underlying 5-character postal codes. If a whole 1-character region routes the same way, upload the 1-character prefix.
| Length | U.S. example | Approximate U.S. coverage |
|---|---|---|
| 1 character | 9 | ~1/10 of the country |
| 3 characters | 902 | A sectional center area (often a metro region) |
| 5 characters | 90210 | A single delivery area |
| 9 characters | 90210-1234 | A specific delivery point |
Why shorter is better
Shorter prefixes express the same routing with far fewer entries, which keeps your configuration easier to review and maintain. Whenever a shorter prefix expresses the same routing as a longer list of full postal codes, prefer it.
When you genuinely need full or extended postal codes
There are legitimate cases:
- A carrier services some full postal codes within a shorter prefix but not others, and you cannot rely on the carrier-services check alone.
- You have extended-postal-code routing rules (e.g., ZIP+4 in the U.S.) driven by sortation or final-mile partners.
These cases are real, but they should be the exception. Before uploading at full or extended postal code granularity, ask whether the same outcome can be expressed by:
- Marking the lane All Postal Codes and letting the carrier-services filter handle exclusions.
- Defining a Default lane to absorb the residual.
- Uploading a shorter prefix that covers most of the area, plus a small number of full-postal-code exceptions.
A decision checklist before you upload
Before you click upload, these questions might be helpful to ask yourself:
- Have I picked the right destination type? Default, All Postal Codes, or Configure by Postal Codes (this can't be changed after the lane is created).
- Is this carrier defining its own coverage area? If yes, choose All Postal Codes; do not upload the carrier's serviceable postal code list.
- Do I have one lane that should catch "everything else"? If yes, mark it as the Default lane instead of uploading every postal code not covered by other lanes.
- Do I need cascading fallback between lanes that share coverage? If yes, enable Allow Overlapping Postal Codes on the configuration.
- Can I express this with a shorter prefix? If the routing is uniform across a prefix, upload the prefix, not every full postal code underneath it.
- Am I about to upload more than a few thousand postal codes? If yes, re-check 1–5. There is almost always a shorter way.
Summary
- Choose the destination type carefully when you create a lane. It cannot be updated later. To change it, you must delete and recreate the lane.
- Keep uploaded postal code sets as small as possible. Very large lists can result in a minor increase in carrier-selection latency.
- All Postal Codes makes a lane eligible everywhere the carrier services. It does not bypass the carrier-services check. Use it for carriers that define their own coverage.
- A Default lane is a catch-all for shipments that don't match any of your specific lanes' postal code mappings. Use it instead of uploading negative-space postal code lists.
- Enable Allow Overlapping Postal Codes when you want multiple lanes in the same configuration to share coverage and cascade as fallbacks for one another.
- Upload the shortest postal code prefix that expresses your routing. Prefer shorter prefixes over full postal codes; avoid extended postal codes (e.g., ZIP+4) unless you genuinely need that level of routing.
Shipment lane information returned in API response
Shipium returns shipment lane information in calls to the Carrier and Method Selection & Shipment Label API when the network information in the call matched a shipment lane you configured in the Shipium Console. The lane match appears in two places on the response:
carrierSelection.laneMatchreports the lane chosen during carrier selection.carrierLabel.laneMatchreports the lane for the label that was created.
On a typical shipment, both blocks report the same lane. They can report different lanes after a label failover, because carrier selection and the printed label can use different carriers. For how the two relate during failover, see Carrier Failover.
| Response attribute | Field properties | Description |
|---|---|---|
carrierSelection.laneMatch.laneId | String Ex: asdqwdq-qwd123ds-123asdwd-123asd | The laneId of the lane chosen during carrier selection; returned only when the shipment matched a configured lane |
carrierSelection.laneMatch.partnerLaneId | String Ex: myCustomId | The Partner Lane Match Name for the lane chosen during carrier selection; returned only when the shipment matched a configured lane and a Partner Lane Match Name is set |
carrierLabel.laneMatch.laneId | String Ex: asdqwdq-qwd123ds-123asdwd-123asd | The laneId of the lane used for the label that was created; matches carrierSelection.laneMatch.laneId except after a label failover; returned only when the shipment matched a configured lane |
carrierLabel.laneMatch.partnerLaneId | String Ex: myCustomId | The Partner Lane Match Name for the lane used for the label that was created; returned only when the shipment matched a configured lane and a Partner Lane Match Name is set |
Shipment lane API response code sample
The following example includes the shipment lane information returned in the API call response. Here, the shipment shipped on its originally selected carrier, so both blocks report the same lane.
ShipmentResponse : {
  ...
  "carrierSelection" : {
    ...
    "laneMatch" : {
      "laneId" : "123145-asdasd1-23123asd12",
      "partnerLaneId" : "UPS-Chicago"
    }
    ...
  },
  "carrierLabel" : {
    ...
    "laneMatch" : {
      "laneId" : "123145-asdasd1-23123asd12",
      "partnerLaneId" : "UPS-Chicago"
    }
    ...
  }
  ...
}
Lane selection on the shipment detail page
When you open a shipment on the shipment detail page in the Shipium Console, the Lane Selection category shows how your shipment lanes were evaluated for that shipment.
The matched lane appears at the top with a Matched tag in the Status column. Lanes that were evaluated but not used appear below with a Filtered tag, along with the reason each was filtered, such as the lane being disabled, its schedule having cut off, or the destination postal code not matching. Configuration tags identify how each lane is set up, including Default lane, All Postal Codes, Disabled, and No Postal Code Match.
The Lane Selection details reflect the carrier service method actually used for the shipment. If a label failover sends the shipment to a different carrier service method, the lane associated with the method that produced the label is displayed. This matches the carrierLabel.laneMatch value on the API response. For the lane values returned on the API, see Shipment Lane Information Returned in API Response. For how lane match relates to failover, see Carrier Failover.
Resources
Your Shipium team member is available to help along the way. However, you might find these resources helpful: