
Account Users and Roles
Manage your Shipium account users.
About Shipium account users and roles
The Shipium platform uses a role-based access control system to manage user permissions. Each user is assigned a role that determines which actions they can perform and which pages they can access in the Shipium Console. Your organization's users will manage your account via the Shipium Console, which includes the following user roles, which are described in greater detail in this document:
- Administrator (Admin)
- Editor
- Viewer
Other user roles are specific to the Shipium Pack App:
- Administrator (Admin). Administrators in the Pack App have the most user permissions.
- Site Manager. The Site Manager has more user permissions than the Site Associate but less than the Administrator.
- Site Associate. Site Associates (Packers and Shippers) have the most basic user permissions, with less than the Administrator and Site Manager.
More details about these Pack App roles are provided in the Shipium Pack App documentation. The rest of this document focuses on user roles for the Shipium Console in general.
Admin
The Administrator role is responsible for managing user accounts, system configurations, and integrations:
- Bulk actions. Admins can perform bulk label void and shipment export actions.
- Configuration. Admins can configure their organization's preferred network settings, carrier selection and label webhooks, tracking webhooks, access keys, fulfillment centers, carriers, packaging, and label settings.
- Rule sets and fulfillment contexts. Admins can manage rule sets and have comprehensive control over fulfillment contexts, including creation, editing, and viewing details.
- User and team management. Admins can manage users and configure partner security.
Admin users have all permissions of the Editor and Viewer roles.
Editor
The Editor role focuses on operational tasks, data entry, and managing specific limits and simulations:
- Configuration and simulation. Editors can manage ship options and can create, detail, and run simulations.
- Label and shipment management. Editors can print labels and manage carrier limits and shipment cost limits.
- Reporting and search. Editors have access to shipment details.
Editor users have all permissions of the Viewer role.
Viewer
The Viewer role provides read-only access to various reports and system statuses:
- Account and service status. Viewers can view their own account settings and the overall service status.
- Configuration viewing. Viewers can view configuration trees and workflow details without making changes.
- Reporting. Viewers have access to delivery performance reports, carrier selection shipping reports, and costing reports, and can download manifest reports.
- Schedules. Viewers can view and create carrier schedules.
- Tracking and search. Viewers can track shipments and search for shipment details.
Role permissions matrix
The following table provides a summary of the permissions for each role. Please note that this is not an exhaustive list and is based on the current configuration of the Shipium platform.
| Action | Administrator | Editor | Viewer |
|---|---|---|---|
| User Management | |||
| Manage Users & Roles | ✅ | ❌ | ❌ |
| Configuration | |||
| Create/Edit Fulfillment Contexts | ✅ | ❌ | ❌ |
| Create/Edit Ship Options | ✅ | ✅ | ❌ |
| Create/Edit Rulesets | ✅ | ❌ | ❌ |
| Manage Access Keys | ✅ | ❌ | ❌ |
| Reporting | |||
| View Most Reports | ✅ | ✅ | ✅ |
| Simulations | |||
| Create/Edit Simulations | ✅ | ✅ | ❌ |
| General | |||
| View Most Pages | ✅ | ✅ | ✅ |
Manage users and roles
Within the Shipium Console, you'll access Team Management and then Manage Users from the lefthand navigation menu.

Clicking on Manage Users will open the portion of the console that allows you to add new users, remove existing users, or modify users as needed. For each account user, you can view the name, email, and role. If you are an Administrator and want to add new team members, this is the place to do it.

Add a new user
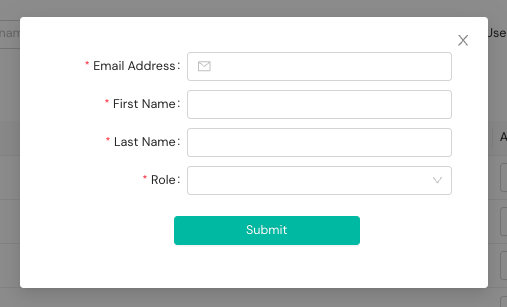
To add a new user (regardless of permissions), you first click on the Add User button in the top right portion of the page.

This will then open a modal window that will allow you to enter details of the new user, including their email, first and last names, and user role.
Modify existing users
If you need to change details for an existing user, including name or role, you first click on Modify User within the Actions dropdown next to the user you wish to modify.

This will bring open the same modal for adding a new user (as above), but with the values for this user already populated. You can edit them as needed, with the exception of the email address, and select the Submit button to save your changes.
Email address can't be changedBecause a user's email address is used as a unique identifier, you cannot edit it. If you have a user who needs to have their email address changed, remove them and add a new user for them with the new email address.
Remove existing users
Administrators may remove existing users by clicking on the Remove User link within the Actions dropdown next to the user you wish to remove.

After selecting Remove User, you'll be asked to confirm that you really want to remove this user. Once you confirm, the user will be removed permanently. You cannot undo this action.

Removing a user is permanentRemoving an existing user from your organization's account is a permanent action. You can, of course, always add a new user with the same email address and name, but any information specifically associated with the original user will not transfer to the newly created user.
Reset passwords
Password resets are completely self-service and can be done by clicking on the Forgot Password link on the login page for the Shipium Console.

"Access Denied" errors
If you see an "Access Denied" error message, it means that your current role does not have the necessary permissions to perform the action you are trying to do. For example, a user with a "viewer" role will see an "Access Denied" error if they try to create or edit a fulfillment context.
How to resolve access issues
If you need to perform an action that is not allowed by your current role, you will need to contact an administrator within your own organization. Administrators can manage user roles and can grant you the necessary permissions.
For security reasons, Shipium support cannot change user roles for a partner organization.
Resources
Your Shipium team member is available to help along the way. However, you might find these resources helpful: