
Carrier Selection Rules
Configure your organization's delivery zone rules.
About carrier selection rules
Carrier selection rules enable your organization to configure delivery zone rules to specify a set of one or more carriers to cover a delivery zone as well as establish other criteria for those deliveries.
You can add new and modify existing rules within your network, including changing the priority order for your rules. The priority order determines the rules that are being followed. For example, if you have a postal code included in two rules, one in the priority 1 position and the other in the priority 3 position, Shipium will select rule 1 because its priority is first.
In addition, rules can be terminal or continuing. A status of terminal for a rule means that no additional rules are processed after the rule. If a rule has a continue status, after the rule is processed, the system will continue to evaluate other rules to determine if any criteria match in order to process the additional qualifying rule(s). In the Console, you'll set this using the Continue Processing toggle: choose Stop for a terminal rule or Continue for a continuing rule.
Rules have a status of either active (enabled) or inactive. A rule must be enabled to be evaluated.
Tenants are optional for your workflowIf your organization doesn't include tenants in your network, you won't see tenants in your Carrier Selection rules workflow and you can disregard information about tenants in this documentation.
Set up and enable carrier selection rules
To enable carrier selection rules for your network, you'll first need to configure the rules in the Shipium Console.
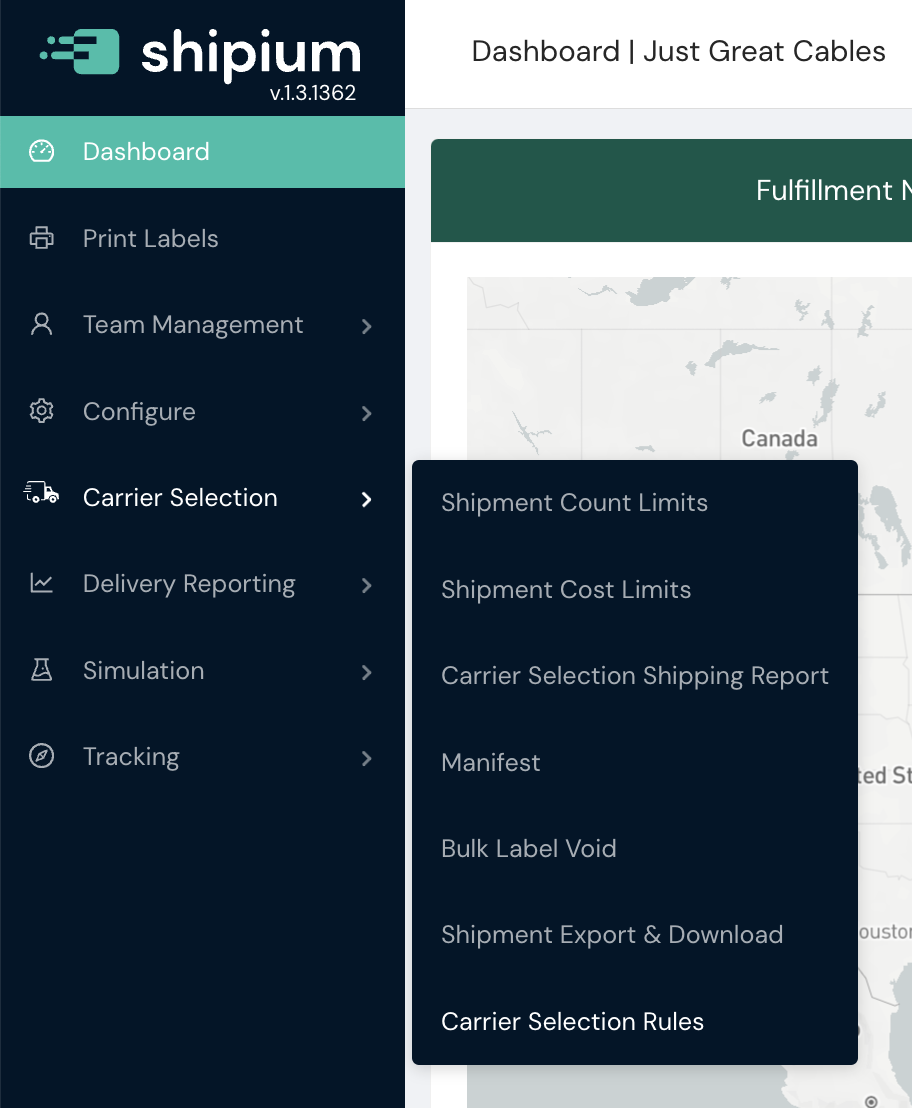
After logging into the console, you'll select Carrier Selection and then Carrier Selection Rules from the lefthand navigation menu.
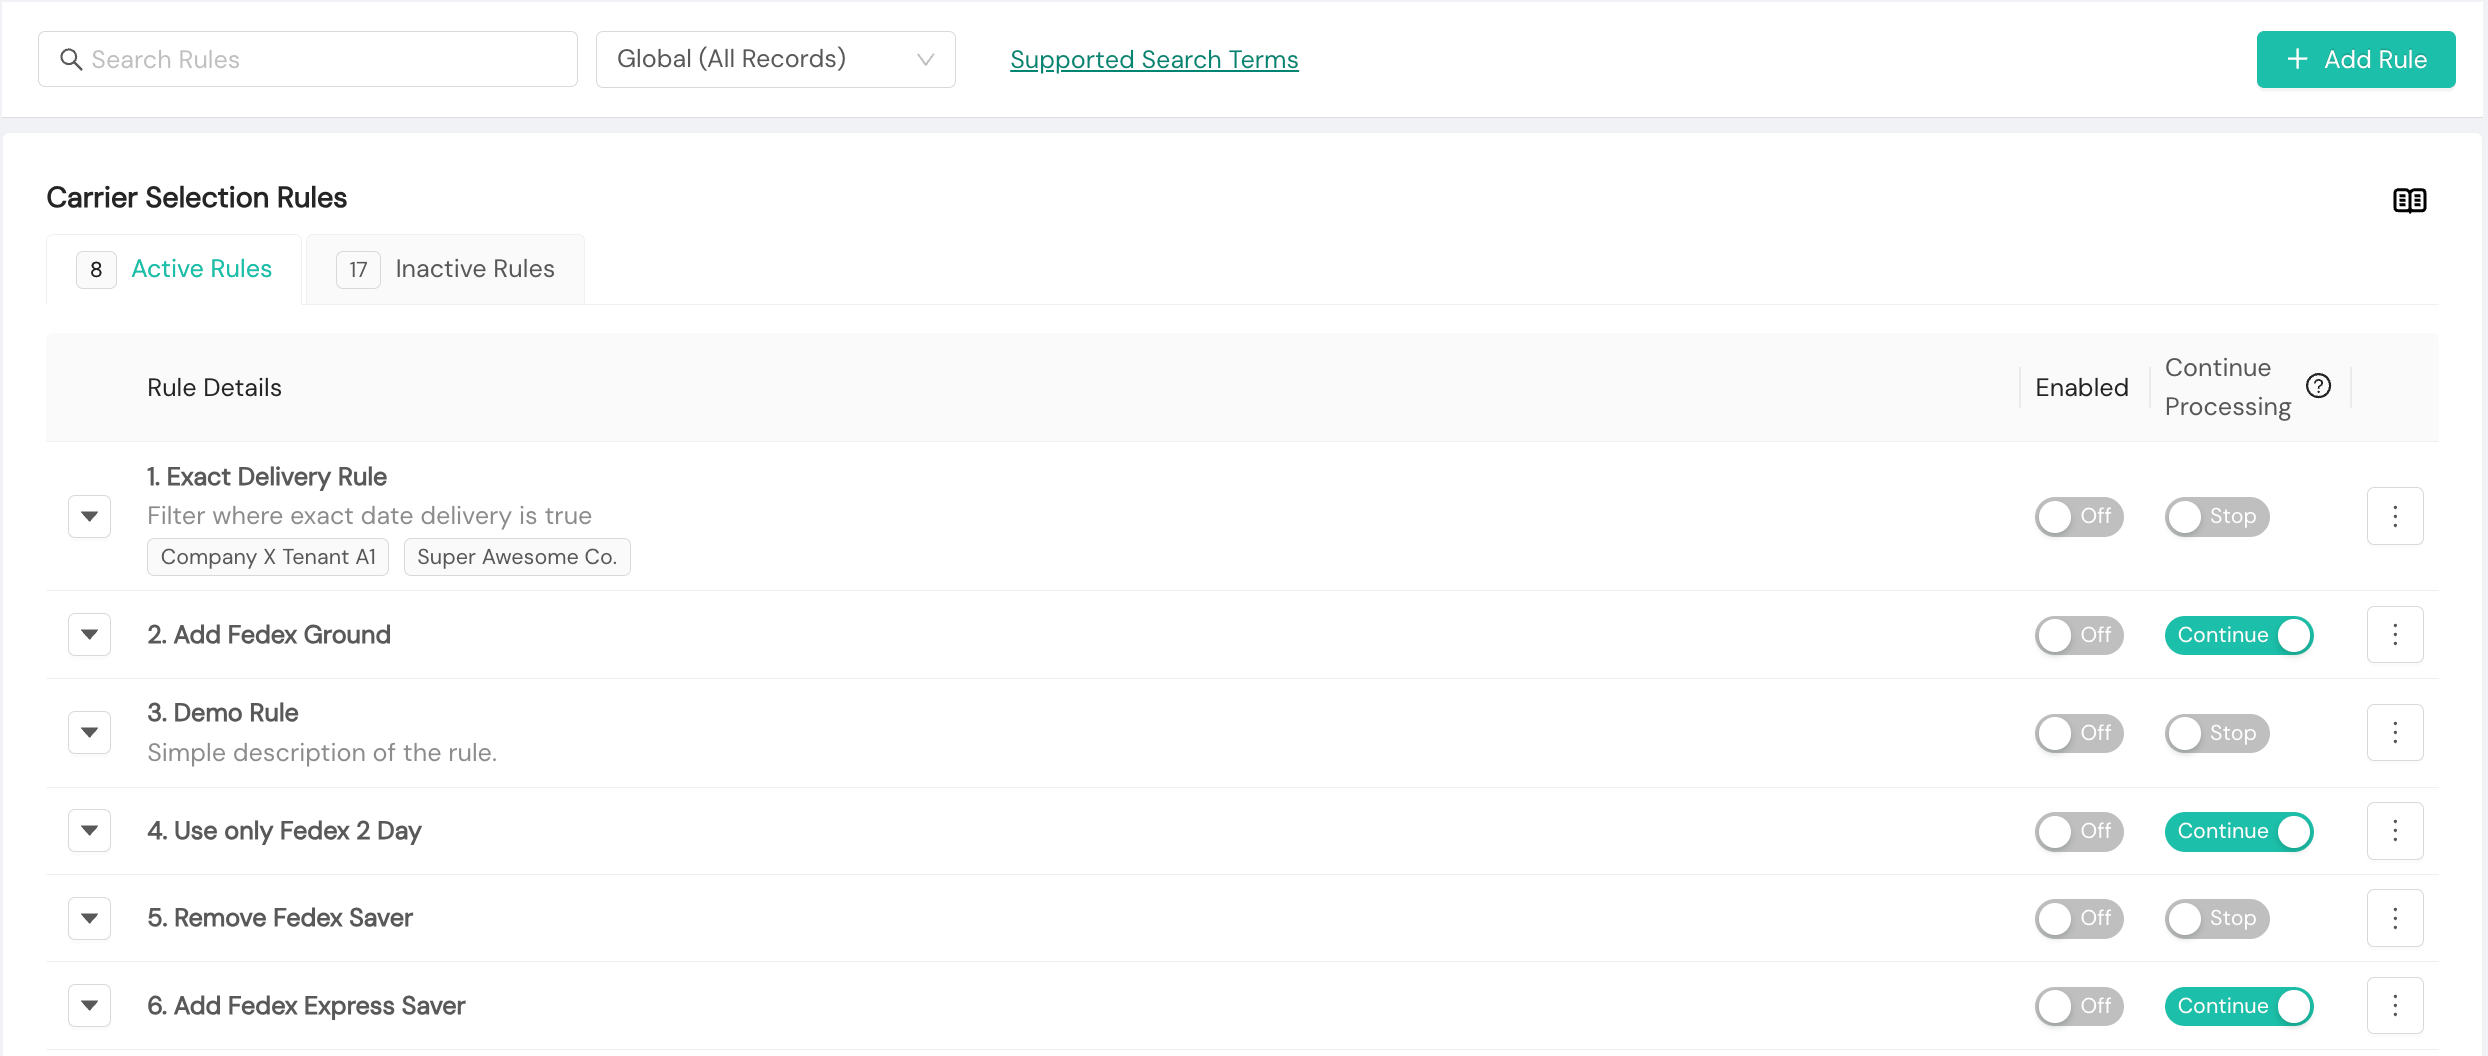
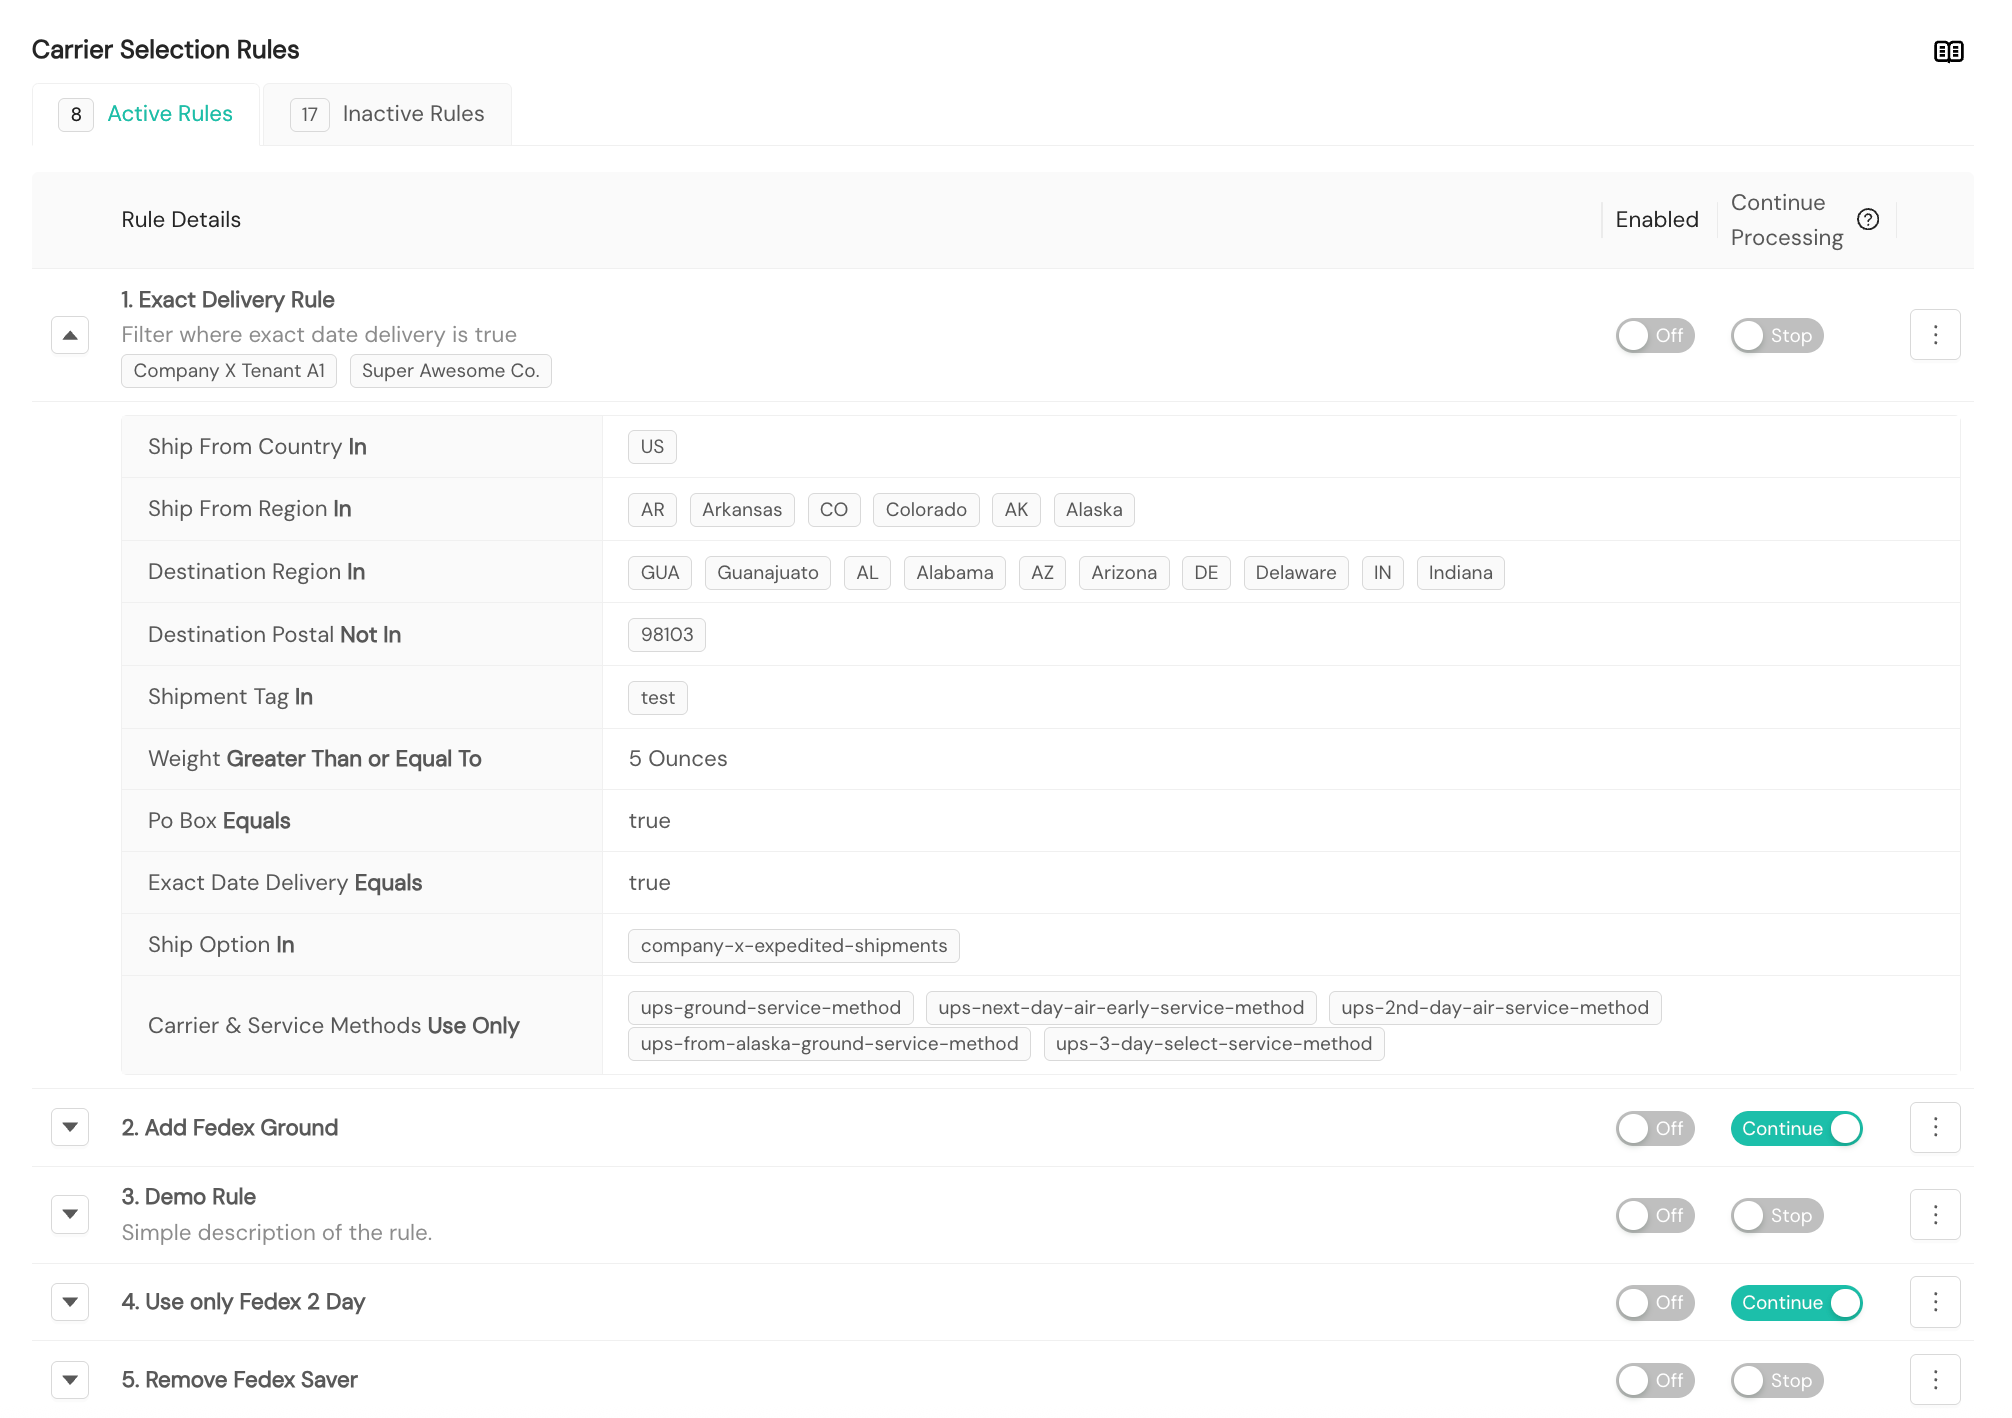
To add a new rule, you'll need to select the + Add Rule button, as shown in the following screenshot. Any existing rules will appear in the Active Rules or Inactive Rules tab, depending on their active/inactive status. To be considered during rules processing, a rule must be toggled to Enabled.
Once you select + Add Rule, you'll be directed to the Carrier Selection rules screen, where you'll be asked to provide the Carrier Selection Rule Details, Selection Criteria, and Carrier Criteria.
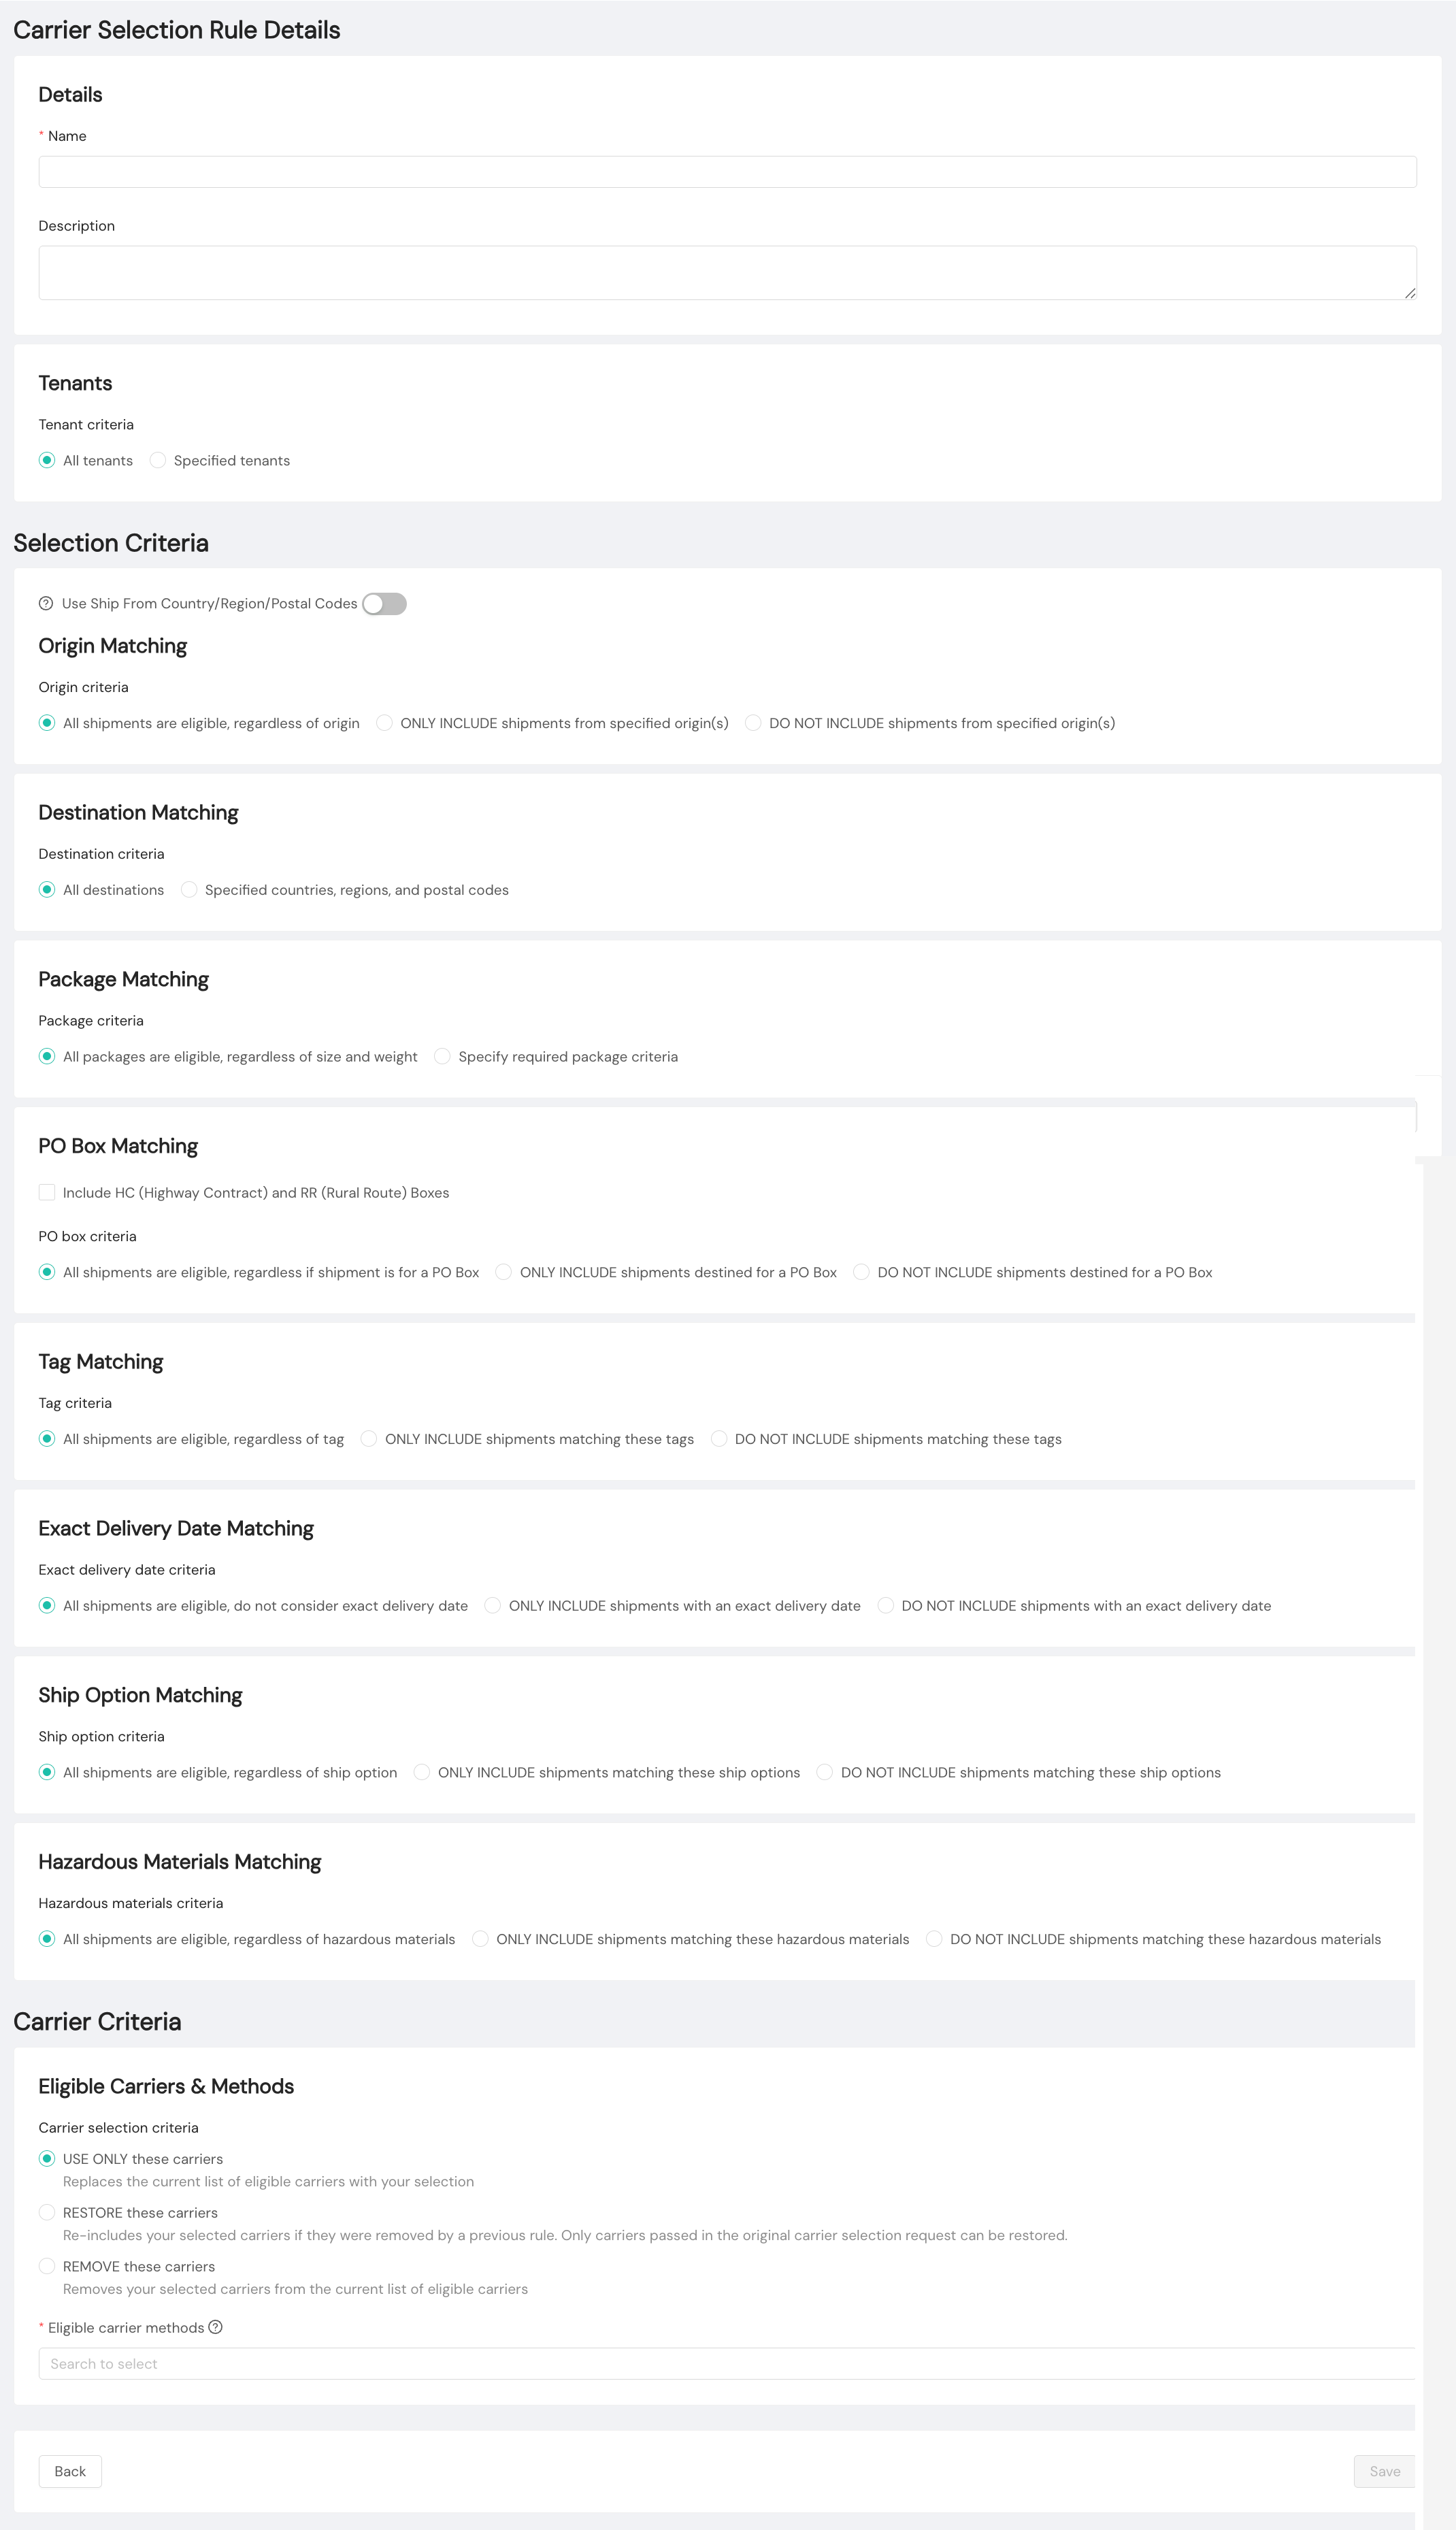
Within Carrier Selection Rule Details, you'll provide a unique Name for your rule as well as an optional Description.

To add a rule, you must enable at least one selection criterionWhen adding a Carrier Selection rule, you must have at least one criterion in the Selection Criteria in order to create the rule successfully.
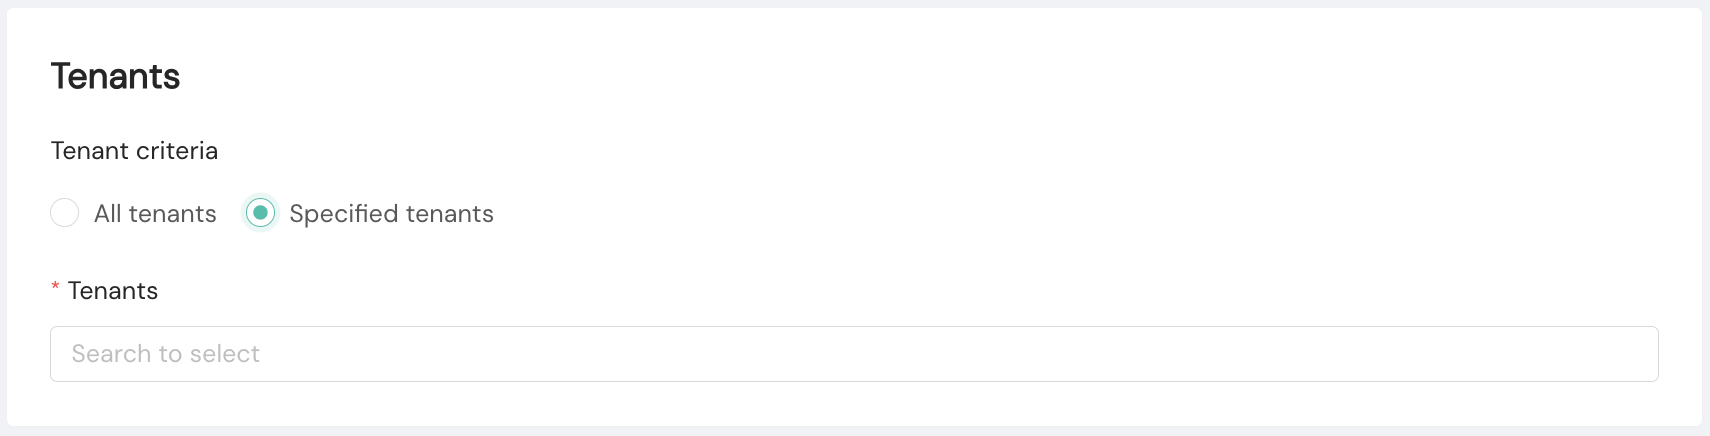
For Tenants, you can opt to apply to All Tenants or Specified Tenants. If you select Specified Tenants, you'll need to choose the tenants for which you wish to apply the new rule from the dropdown menu. If your organization doesn't use tenants, you can disregard instructions regarding tenants; they will not be part of your workflow for creating a Carrier Selection rule.
Within Selection Criteria, you can establish rule matching settings related to Ship From, Destination, Package, PO Box, Tag, Exact Delivery Date, Ship Option, and Hazardous Materials.
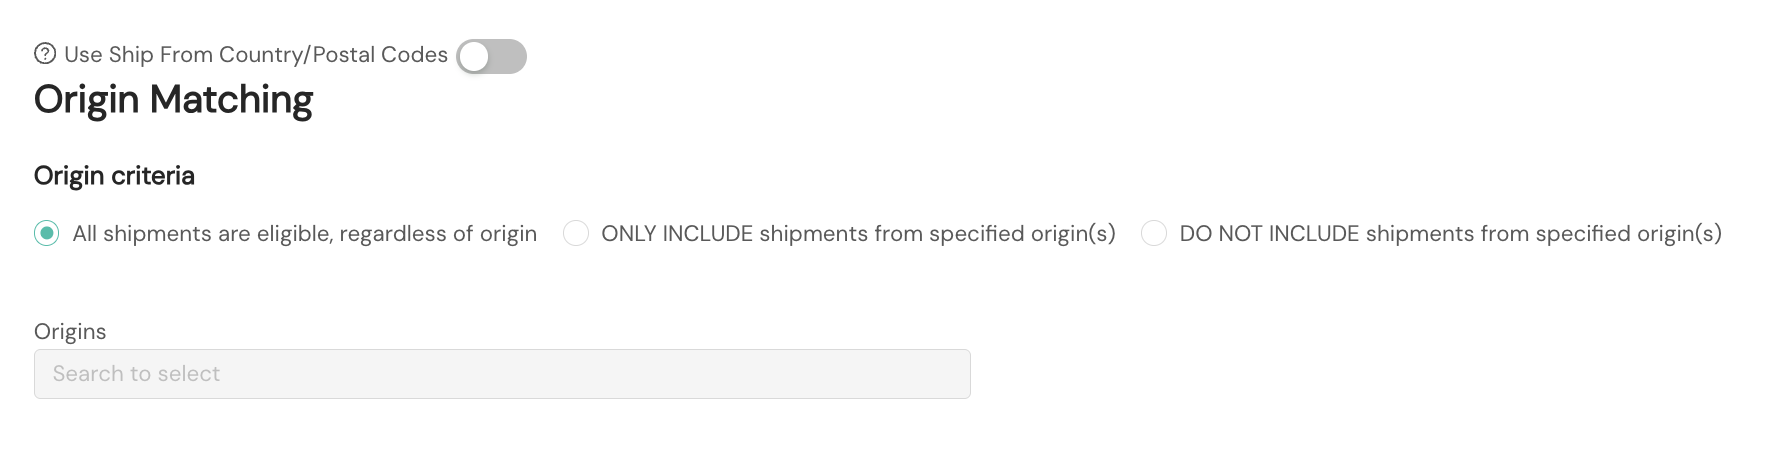
For Origin Matching, you can choose to have the rule apply to all shipments, regardless of origin, by selecting All shipments are eligible, regardless of origin. You also can differentiate rules application by origin, either by including shipments from specific origins or excluding shipments from specified origins.
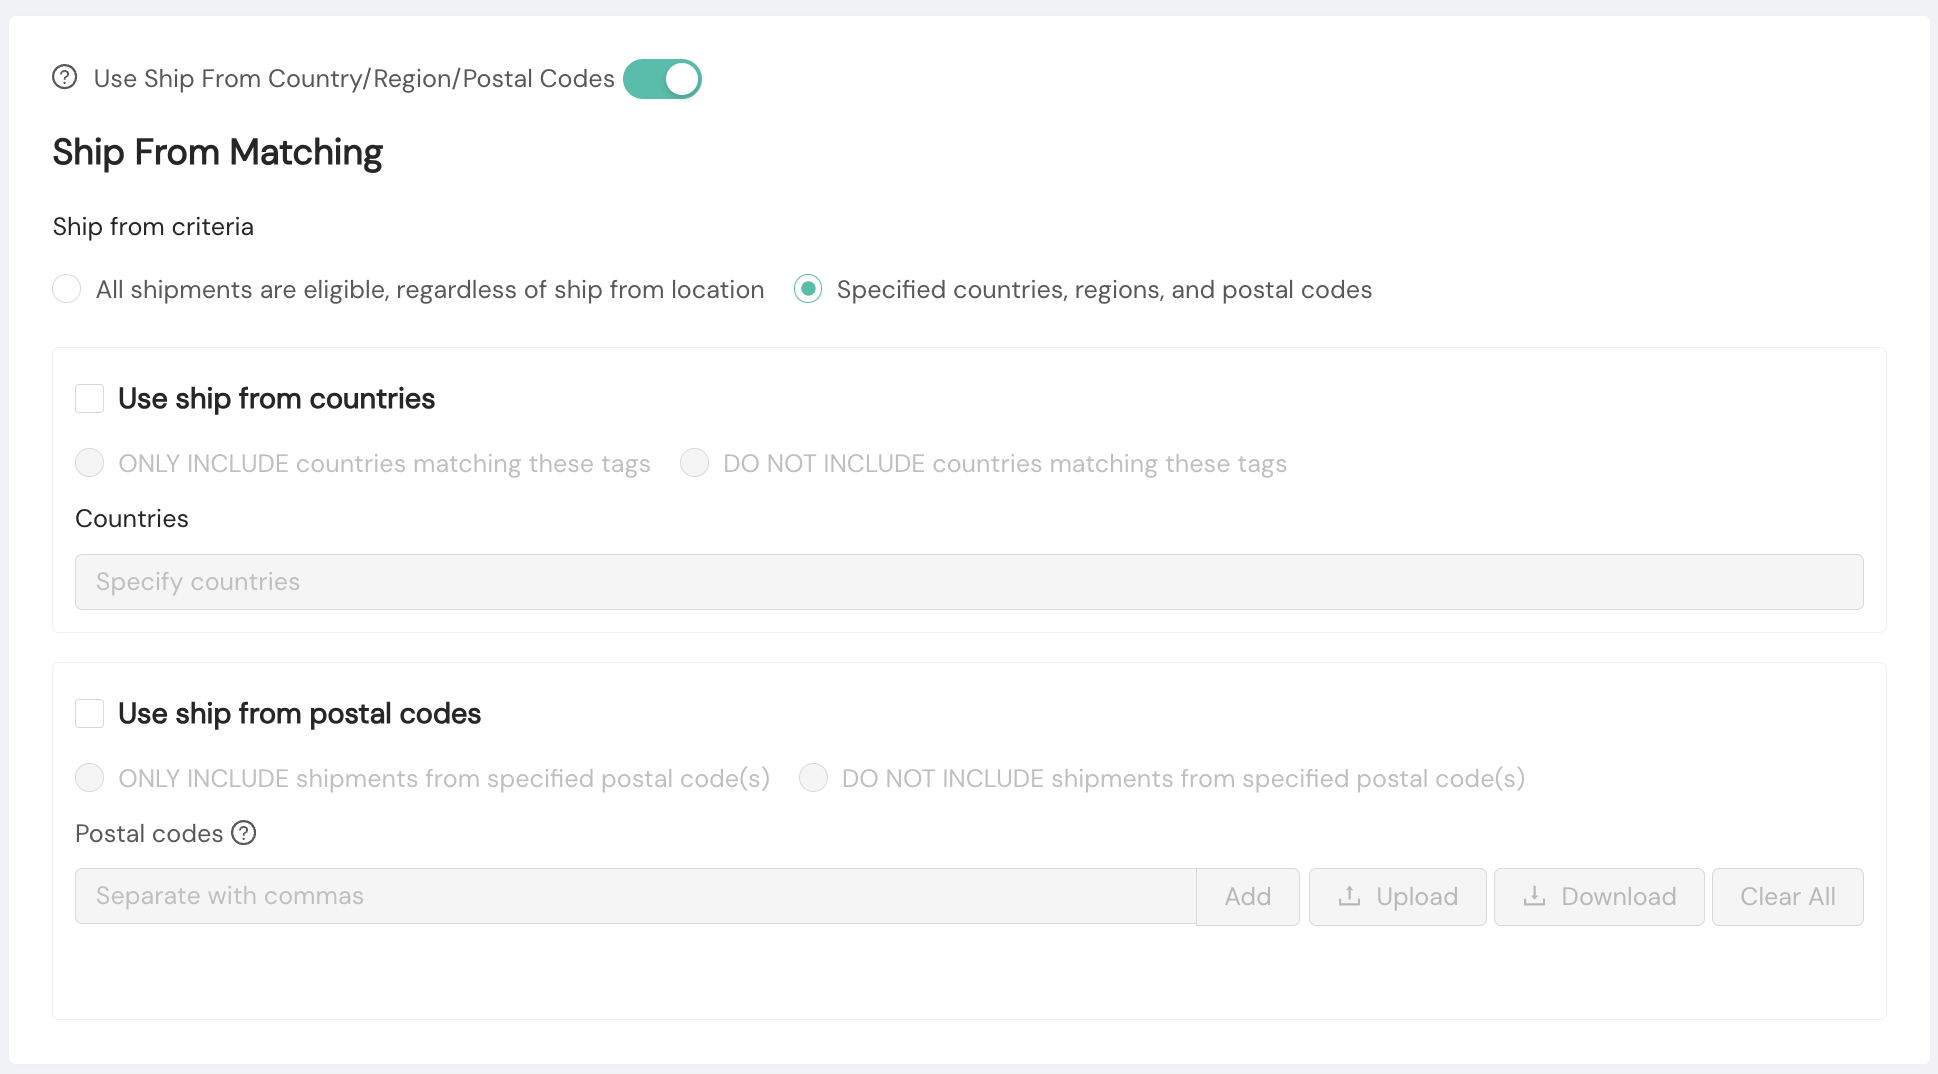
Another option within Origin Matching for at large shipping locations without a specific origin is to use countries and/or postal codes of ship-from addresses in your fulfillment network. To exercise this option, you'll enable the Use Ship From Country/Region/Postal Codes toggle and then select Specified countries, regions, and postal codes. To use countries, you'll need to select the box next to Use ship from countries, and to use postal codes, you'll select the box next to Use ship from postal codes. You will provide all countries and/or postal codes for which you wish the rule to apply. Alternatively, for postal codes, you can download a postal code CSV template and then upload a file of applicable postal codes.
For Destination Matching, you'll provide your Destination Criteria, whether applicable to all of your network destinations or to specified countries, regions, and postal codes. To apply the rule to specific countries, regions, and/or postal codes, you'll need to select Specified countries, regions, and postal codes. If you opt to specify countries, you'll need to select the checkbox next to Use destination countries. You have the option to include or not include countries matching the country(ies) you select from the dropdown menu. Similarly, if you opt to specify postal codes, you'll need to select the checkbox next to Use destination postal codes. You have the option to include or not include the postal code(s) matching the postal code(s) you enter.
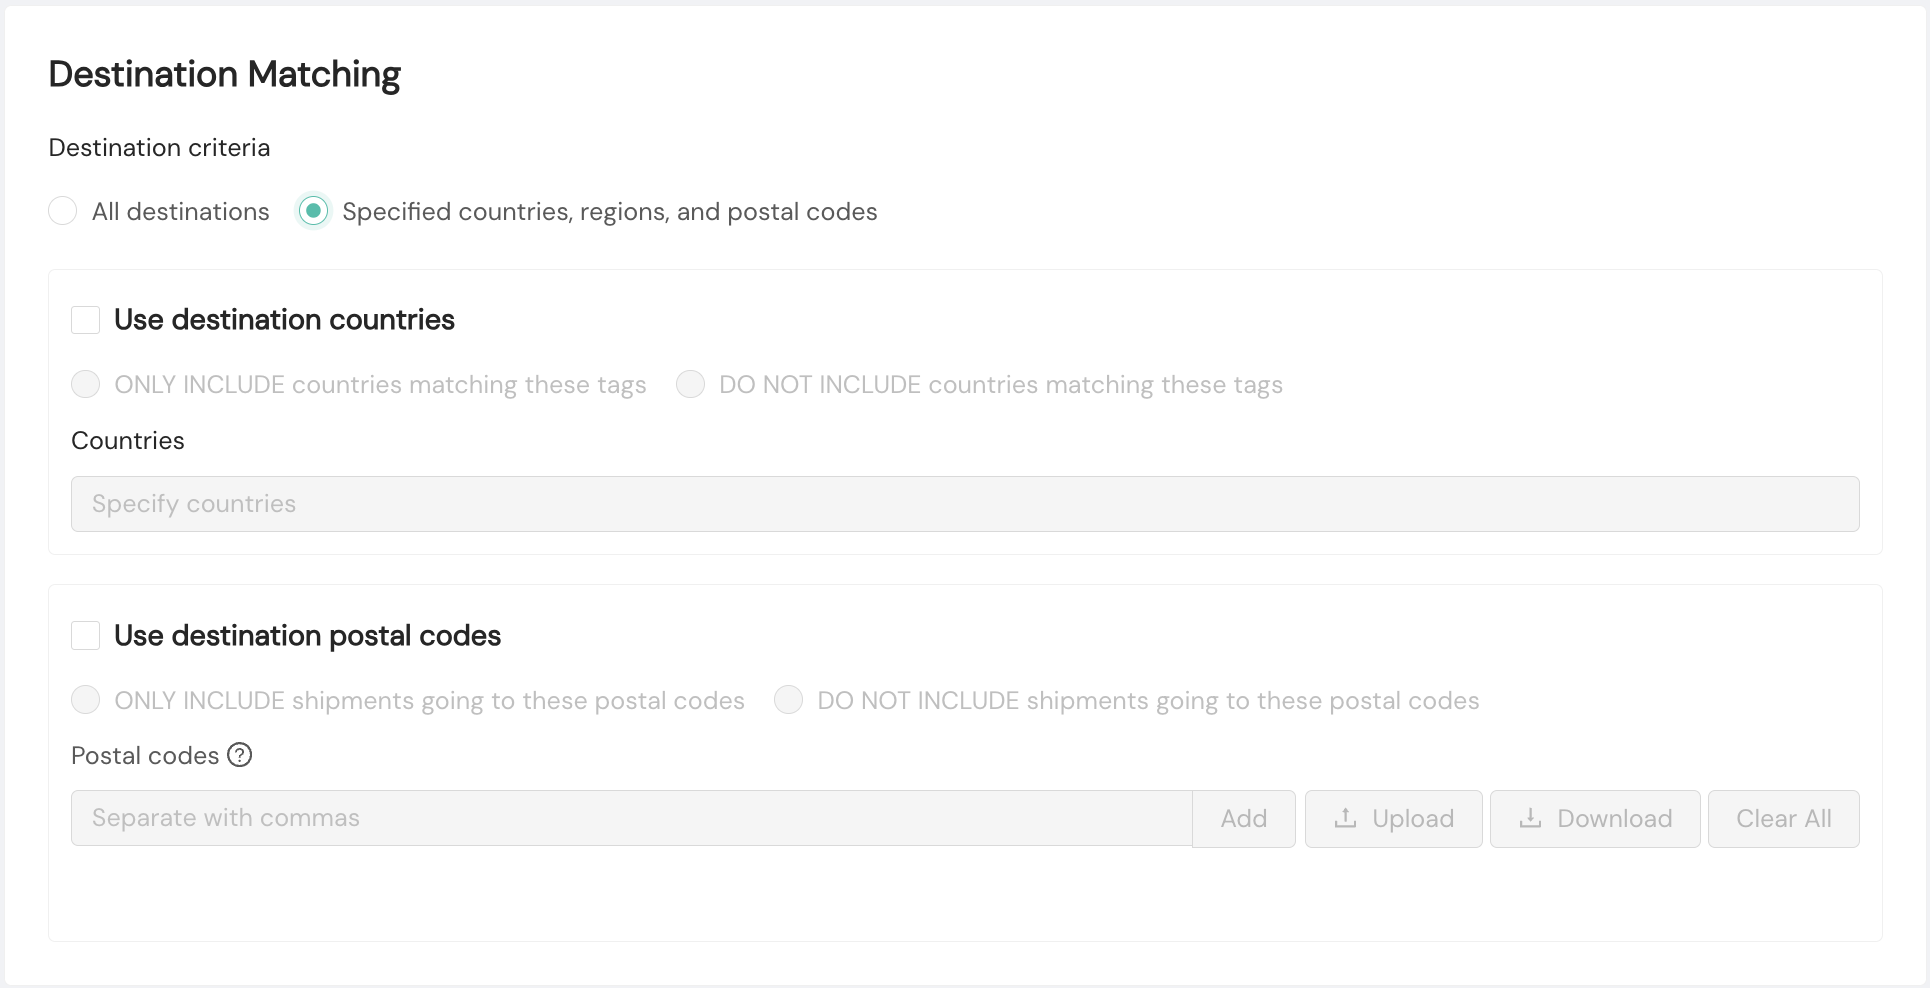
Alternatively to populating the postal codes field with individual postal codes, you can download a CSV file to complete with your applicable postal codes and upload into the console.

For Package Matching, you'll select your Package Criteria for your Carrier Selection rule. You may choose All packages are eligible, regardless of size and weight or Specify required package criteria. If you select Specify required package criteria, you'll need to provide a weight in ounces, pounds, grams, or kilograms as well as a qualifier for how the rule should treat your package weight (e.g., Greater Than or Equal To, Equals). The package weight is defined by the actual physical weight of the package.

For PO Box Matching, you'll select the desired PO Box Criteria for your Carrier Selection rule. You can choose All shipments are eligible, regardless if the shipment is for a PO Box to keep the default setting of not considering PO boxes. You also have the option to only include or not include shipments destined for a PO box. In addition, if you'd like the rule to match Highway Contract (HC) and Rural Route (RR) boxes, you can select the box next to Include HC (Highway Contract) and RR (Rural Route) Boxes.

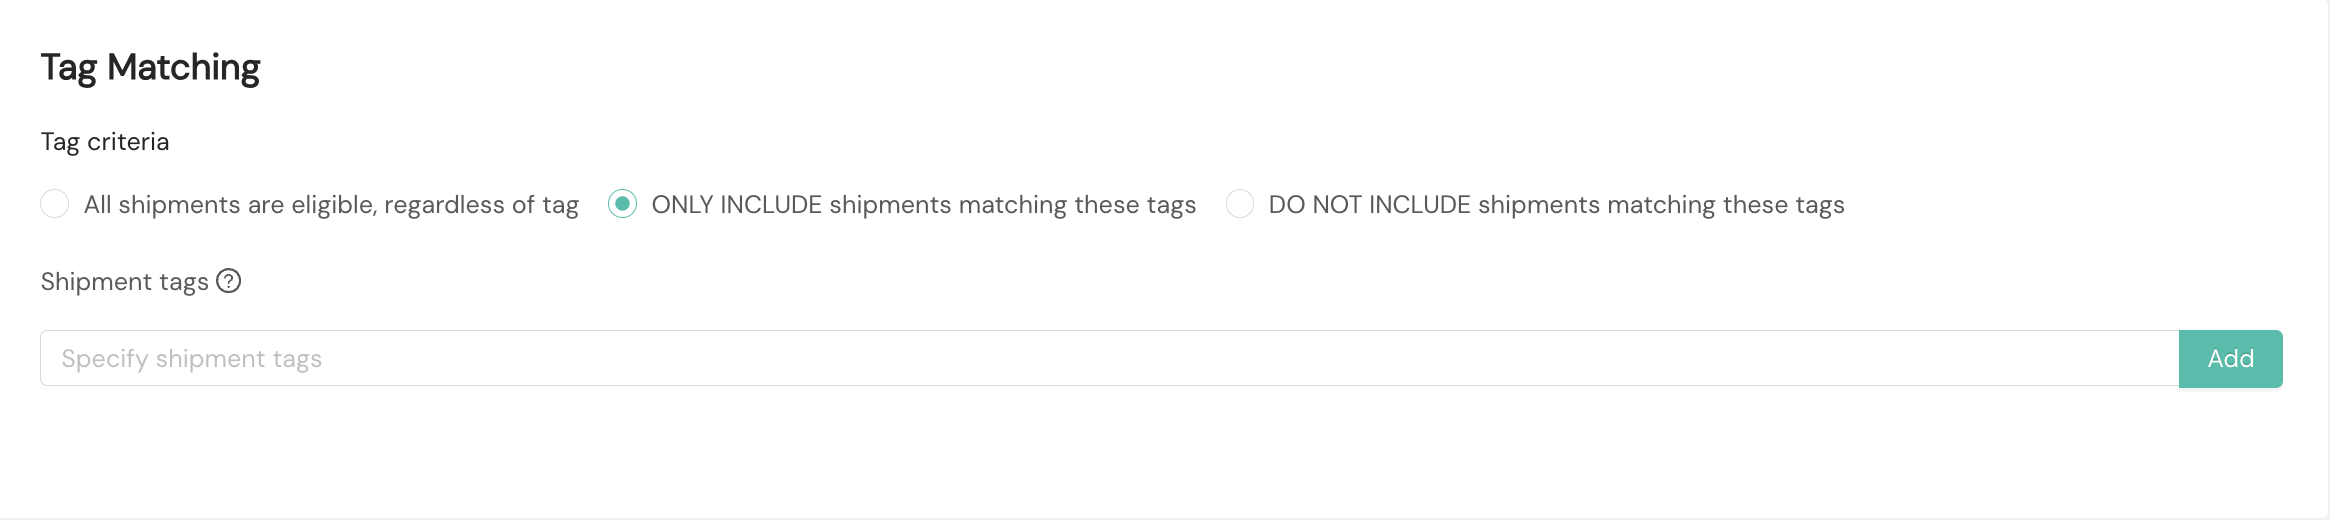
For Tag Matching, you'll select your Tag Criteria for your Carrier Selection rule. You have three choices: to not use tags and include all shipments, to only include shipments matching the tag(s) you specify, and to not include shipments matching the tag(s) you specify. In the Shipium platform, shipment tags are decorated on shipments at request time. They are string keys that allow your organization to categorize types of shipments.
If you choose to apply tags, you'll need to add the tag(s) in the field, as shown in the following screenshot.
For Exact Delivery Date Matching, you have three options: to not consider exact delivery date for your shipments; to only include shipments with an exact delivery date, or to exclude shipments with an exact delivery date.

Another selection criterion is Ship Option Matching, which allows you to include or exclude shipments by selected ship option. You may multi-select your own configured ship options or Shipium's standard ship options.

Also within the selection criteria is the option to set a rule for Hazardous Materials Matching. You can include or exclude shipments matching hazardous material (hazmat) criteria for Limited Quantity Hazmat, Full Hazmat, or Full Hazmat or Limited Quantity Hazmat.

Within Carrier Criteria, you'll provide your Carrier Selection Criteria. For Eligible Carriers & Methods, you'll select which carriers and methods to apply to your rule from the dropdown menu. The menu provides the option of selecting a carrier and all its associated delivery methods or selecting specific methods by carrier. You can select as many carriers and methods as are eligible within your network.
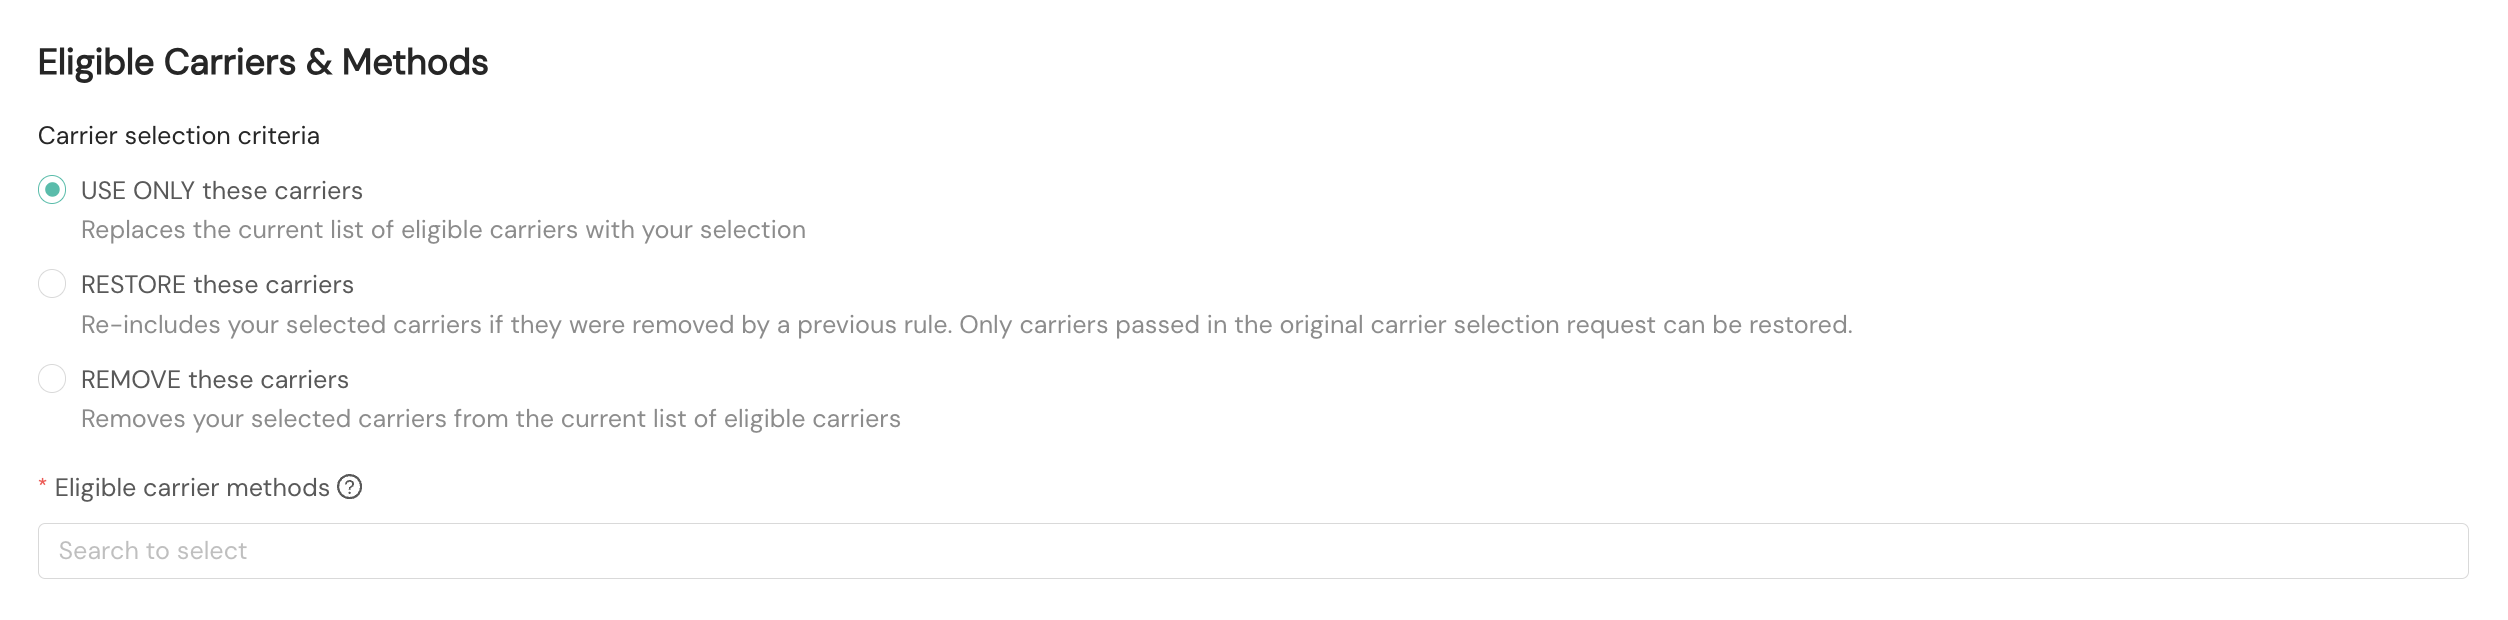
The Carrier selection criteria option you choose determines how your selected carriers interact with the eligible carrier list as it's built up across matching rules:
- USE ONLY these carriers. Replaces the current list of eligible carriers with your selection. Any carriers and methods that were previously in the list (from higher-priority rules or the original carrier selection request) will be removed, and only the carriers and methods defined in this rule will be considered.
- RESTORE these carriers. Re-includes your selected carriers if they were excluded by a previous rule (whether REMOVEd or replaced by USE ONLY). Only carriers that were eligible at the start of rule processing can be restored, meaning carriers from the original carrier selection request that also passed pre-rule filtering.
- REMOVE these carriers. Removes your selected carriers and methods from the current list of eligible carriers. This is useful for filtering out specific carriers or services that should not be used for shipments matching the rule's criteria.
How the options work together with multiple rules:
Carrier selection rules are processed in priority order. When a shipment matches multiple "continuing" rules, the carrier criteria are applied sequentially to build up the eligible carrier list. For example, suppose the original carrier selection request includes carriers A, B, C, and D, and all four pass pre-rule filtering:
- The eligible list starts as [A, B, C, D].
- A high-priority rule with REMOVE for Carrier A is matched. The eligible list is now [B, C, D].
- A lower-priority rule with USE ONLY for Carrier B is matched. USE ONLY replaces the entire list, so the eligible list is now [B].
- An even lower-priority rule with RESTORE for Carriers C and D is matched. Because both were in the original eligible list, they're re-included. The eligible list is now [B, C, D].
- Finally, a rule with REMOVE for Carrier B is matched. The eligible list is now [C, D].
RESTORE only works for carriers in the original requestIf a rule attempts to RESTORE a carrier that wasn't part of the original carrier selection request, the carrier won't be added to the eligible list. RESTORE is for re-including carriers that were removed by another rule, not for introducing new ones.
Complete configuration of a new rule
Once you've created your Carrier Selection rule, it will appear as the last rule in priority order on your Carrier Selection Rules screen. The rule's status automatically will be set to not enabled. To enable your new rule, you'll need to toggle the Enabled button from Off to On.
Priority order of rules
Adding a new rule could negate existing rules if the new rule is in higher priority order and modifies the eligible carrier list in a way that conflicts with what your other rules are doing. We recommend reviewing all your configured rules after creating a new one to ensure the new rule doesn't create a conflict with an existing rule.
For example, suppose you have an existing rule that REMOVEs Carrier X for shipments destined to PO boxes; its purpose is to keep Carrier X out of consideration for those shipments. You then create a new, higher-priority rule that uses USE ONLY for Carrier Y across all shipments. Because USE ONLY replaces the entire list of eligible carriers with only the carriers in that rule, the lower-priority PO box rule's REMOVE action has nothing left to act on by the time it's evaluated. The PO box rule is effectively negated.
Conflicts like this are most likely when a higher-priority rule uses USE ONLY, since it discards everything the lower-priority rules might have been managing.
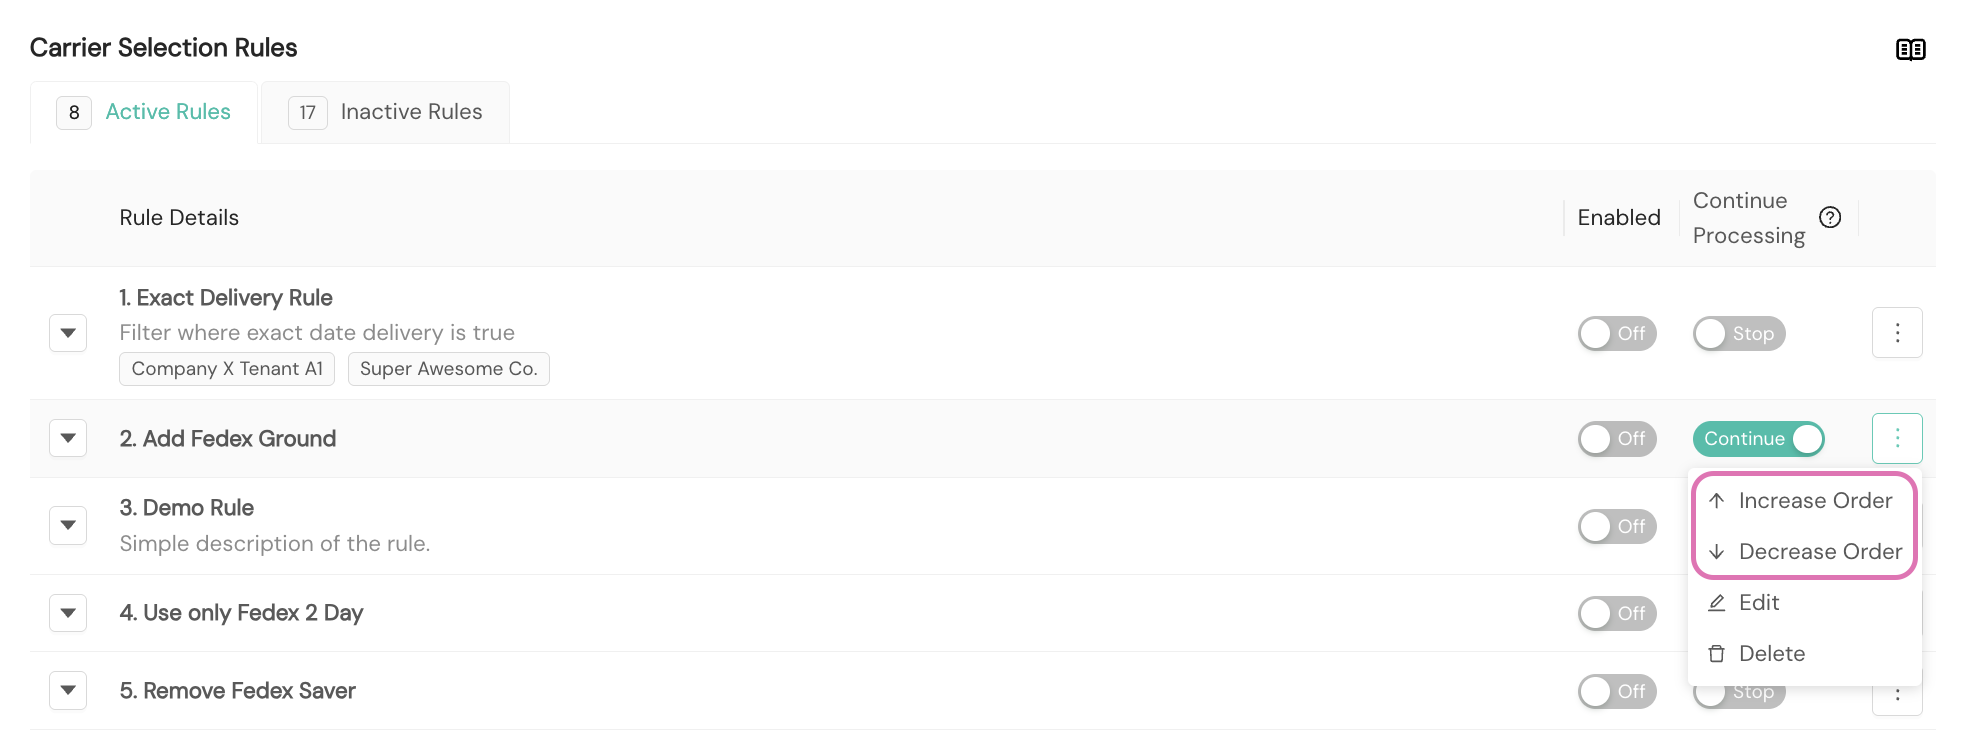
To change the priority order of your rule, you'll use the kebab menu to the right of the rule once enabled, opting to Increase Order or Decrease Order. The priority order determines the order in which the rules will be followed.
Continuous and terminal status for rules
On the Carrier Selection Rules homepage, you will establish the status for each rule, setting the Continue Processing toggle to either Continue or Stop. When you select Continue for a rule, even if the rule's conditions are met, the next rule will still be evaluated. When you select Stop for a rule, no additional rules will be processed.
An example scenario for which an organization might wish to use continuous rather than terminal rules is if a rule is needed to guarantee that certain shipments such as PO boxes only include certain carrier service methods and another rule is also needed for certain postal codes or states (some of which include PO box postal codes) to include only a subset of those carrier service methods. In this case, one continuous rule would be set for PO Box Matching criteria, to only include shipments destined for a PO box. Another rule, which could be either terminal or continuous depending on other rules' desired outcomes, could be set for Destination Matching and Eligible Carriers & Methods such that certain carrier service methods are removed from consideration for a set of postal codes.
Manage carrier selection rules
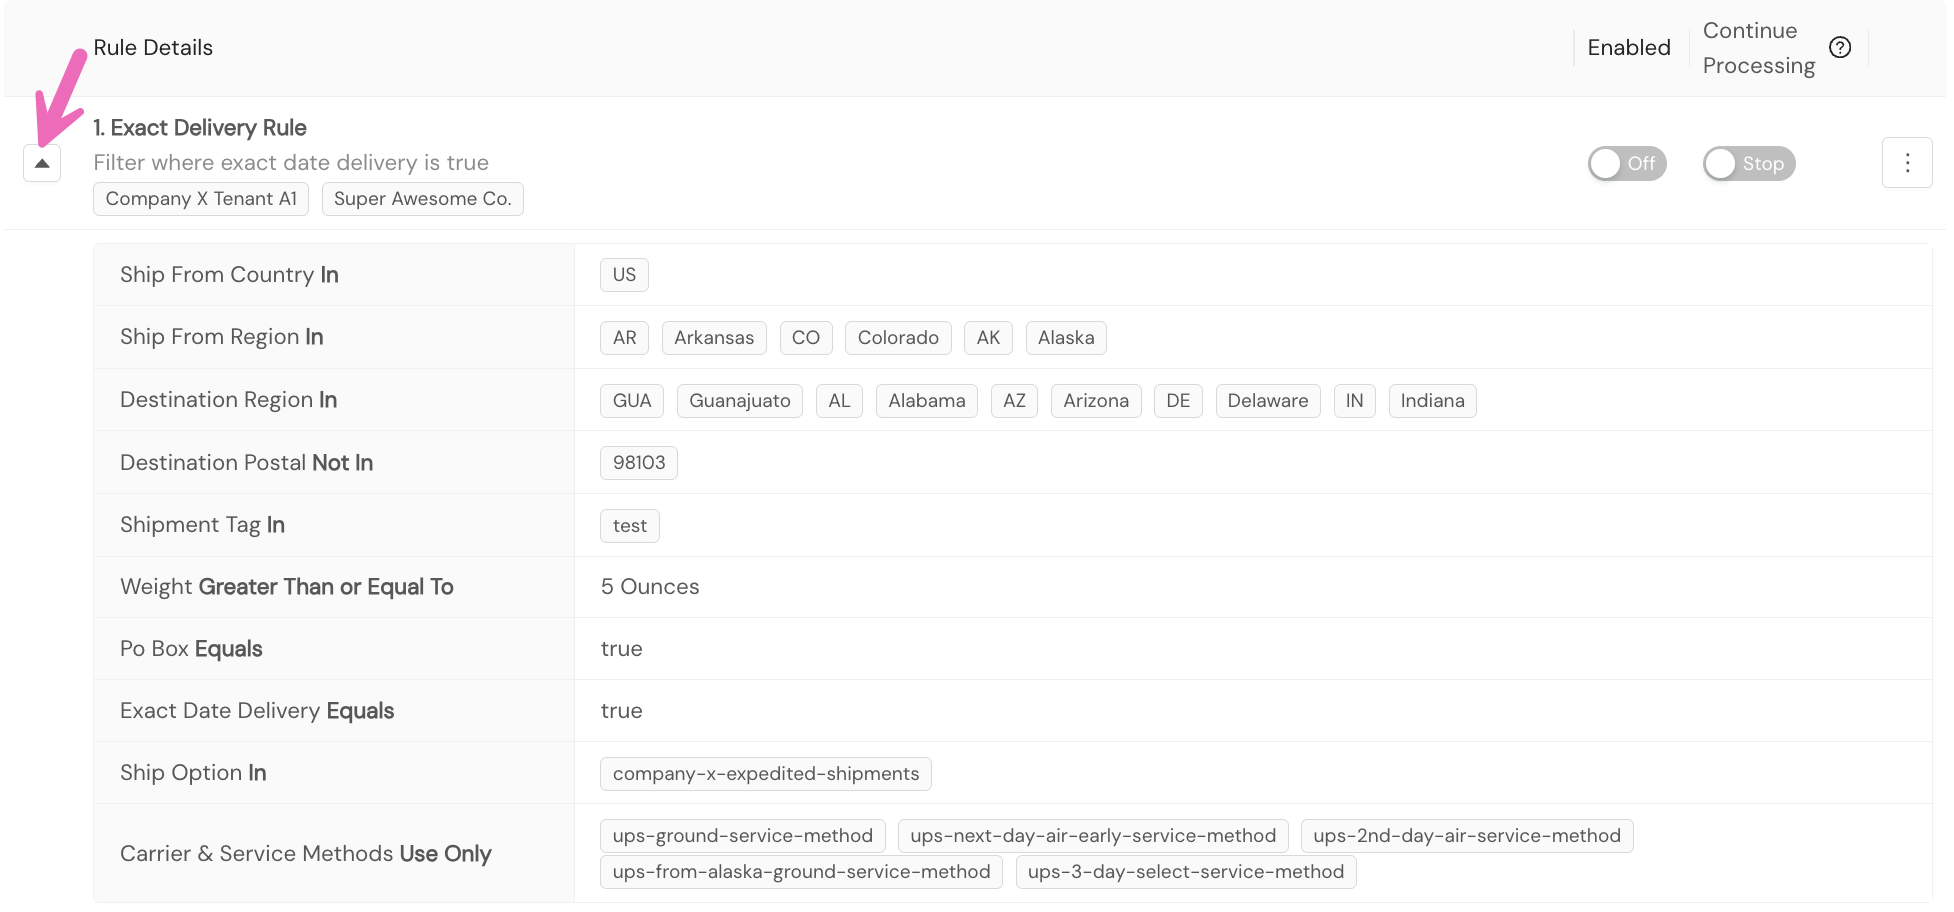
Within the Carrier Selection Rules page, you can access details about any rule by clicking on the caret icon to the left of the rule name. Each criterion that can be configured for a rule is listed in the details with information pertaining to that particular rule.
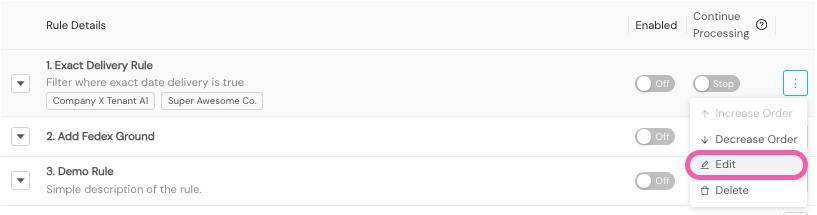
To edit a Carrier Selection rule, you'll select the Edit option within the kebab menu for the rule, next to the Continue Processing toggle. Selecting Edit takes you to the Carrier Selection Rule Details screen for that particular rule.
To change a rule's status from active to inactive, you'll select the Delete option within the kebab menu for the active rule.
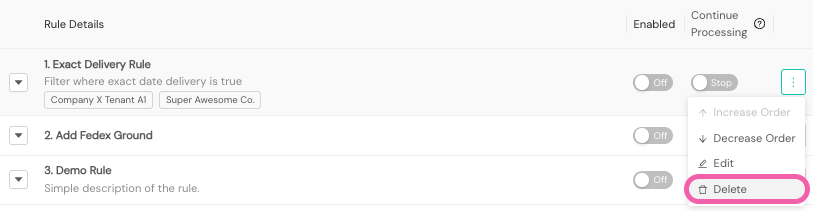
Selecting Delete prompts a popup message asking if you're sure you want to make the rule inactive, as shown in the following screenshot.

Once you select the OK button, your rule will appear in the Inactive Rules tab. Within Inactive Rules, you can edit the rule by selecting Edit or change its status back to Active by selecting Restore.

Selecting Restore causes a popup message asking if you're sure you want to make the rule active, as shown in the following screenshot.
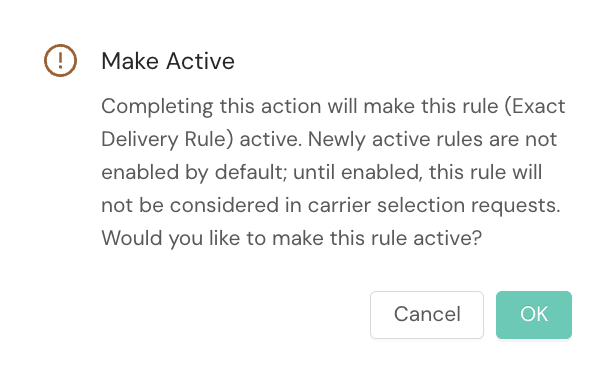
Once you select the OK button, your rule will appear in the Active Rules tab. Just as when you first created the rule, its default status in the Active Rules tab will be not enabled and in the lowest priority order.
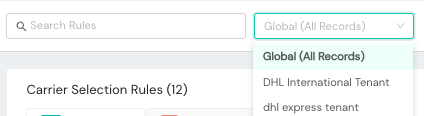
To search your organization's Carrier Selection Rules, you can use the search tool at the top of the Carrier Selection Rules screen. You can opt to search all your network records (a global search) or you can limit the search by tenant - if your organization uses tenants in your network.
Resources
Your Shipium team member is available to help along the way. However, you might find these resources helpful: