Carrier Contracts
Set up and maintain your fulfillment network carrier contracts.
About carrier contracts
Contracts establish shipping settings and rates for carriers within your organization's fulfillment network. To begin using a fulfillment context, you must have at least one carrier contract associated with it. Carrier contracts can be shared by multiple fulfillment contexts.
A carrier contract is requiredA valid fulfillment context requires a carrier contract to be associated with it. Your organization won't be able to use the fulfillment context until you link carrier contract to it.
Fulfillment contexts
In order to use Shipium’s APIs, your organization needs to establish your fulfillment network configurations within the Shipium platform. We refer to these configurations as Fulfillment Contexts. A fulfillment context allows you to configure the characteristics for your network origins, carrier contracts, label augmentations, third party billing, injection shipping, and tenants, in addition to other feature settings. To use a fulfillment context, you must establish a carrier contract for it.
Configure carrier contracts
In order to configure carrier contracts, you'll need to access Fulfillment Contexts in the Configure section of the lefthand navigation menu within the Shipium Console. These instructions assume you've already established a fulfillment context in the Shipium platform. If you haven't yet set up a fulfillment context, you can find guidance for how to do so in the fulfillment contexts documentation.
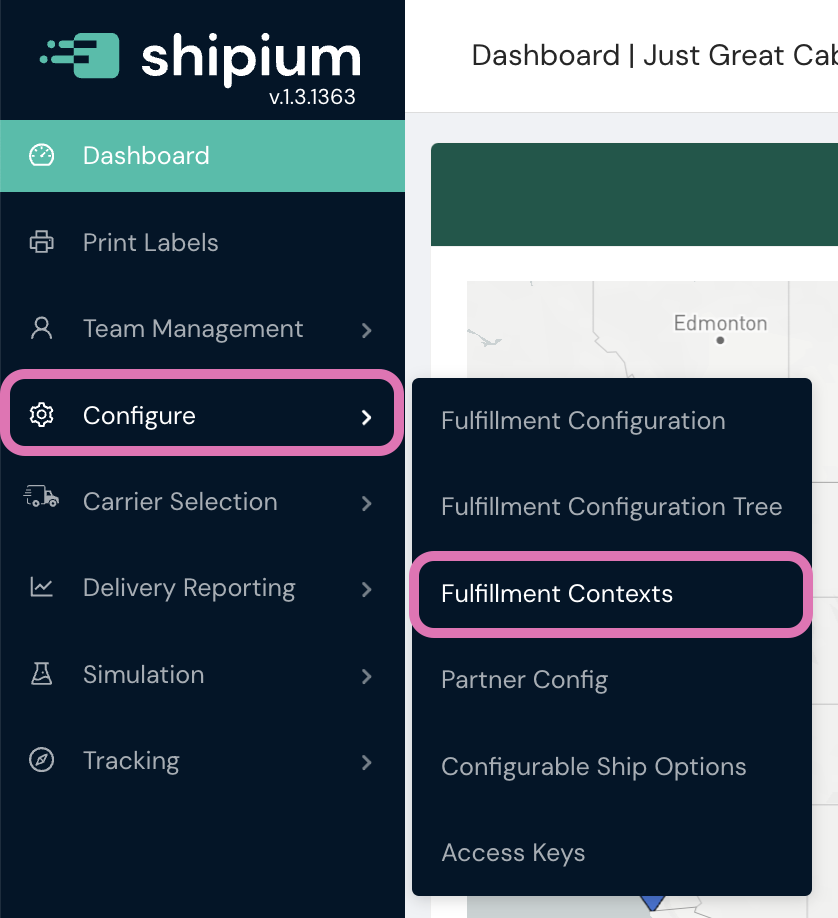
To locate the fulfillment context for which you wish to configure a carrier contract, you can use the search bar at the top of the Fulfillment Contexts homepage or simply scroll through a list of the available contexts. Once you've located the desired context, you can access it by clicking on its name.

Within the Carrier Contracts tab of the context, you can add a new carrier contract by selecting the Add Contract button within the warning message that there is no carrier contract associated with the fulfillment context or by selecting Add a Carrier Contract from the dropdown menu at the right of the screen.


You can create a new contract or select an existing one.
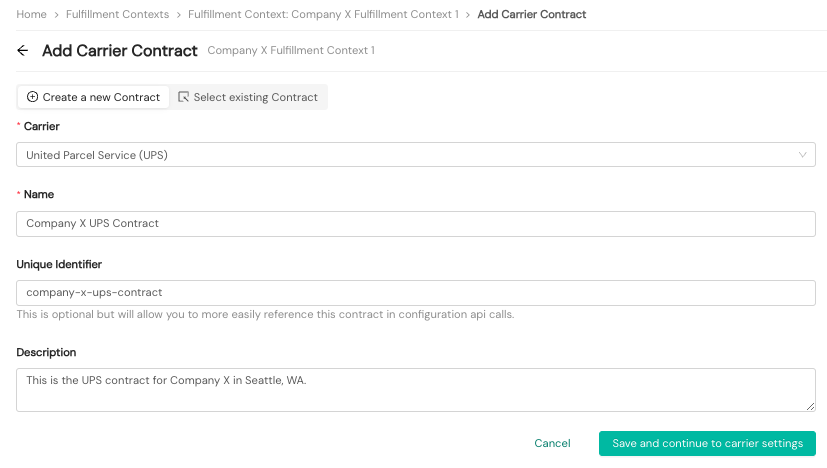
To create a carrier contract, you'll provide details to be associated with it, as shown in the following screenshot and detailed in the sections that follow.
Contract details
For Contract Details, you'll provide a Carrier, Name, optional Unique Identifier, and optional Description. You'll select the Carrier to be associated with the carrier contract from a dropdown menu. The Contract Name should be one that your organization can use to differentiate among your different network carrier contracts. The Unique Identifier is an optional field that can help you more easily reference the fulfillment context in calls to Shipium's APIs. This unique ID is case sensitive. The optional Description can help you organize your carrier contracts.

Carrier settings
Within the Carrier Contracts tab in the fulfillment context, you can edit Carrier Settings by selecting the Edit button.

You can create new carrier settings or select existing ones.
To create a new Carrier Settings configuration, you'll provide details to be associated with it, as shown in the following screenshot and detailed below.
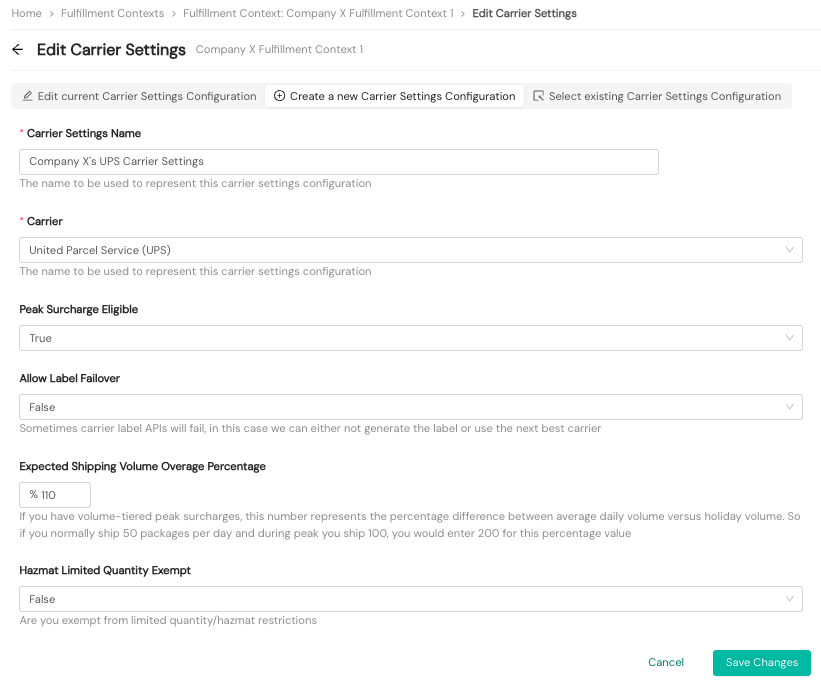
- Carrier Settings Name. Required. A human-readable name your organization will use to refer to the carrier settings configuration
- Carrier. Required. You'll select the desired carrier from a list of available carriers in a dropdown menu.
- Peak Surcharge Eligible. Required. You'll select a value of either True or False from a dropdown menu, depending on the eligibility of the carrier settings configuration for peak surcharges.
- Allow Label Failover. Required. You’ll select True to allow failover or False to not allow failover from the dropdown menu. In the case of a carrier label API failure, Shipium can either not generate the label or use the next best carrier. This means that if the carrier was selected and can't be reached, the next-best carrier and ship method will be used. You can find more information about failover in the Carrier Failover document.
- Expected Shipping Volume Overage Percentage. Optional. If your organization has volume-tiered peak surcharges, this number represents the percentage difference between average daily volume versus holiday volume. For example, if you normally ship 50 packages per day and during peak you ship 100, you would enter 200 for this percentage value. A value under 100 indicates that you have less volume during peak.
- Hazmat Limited Quantity Exempt. Required. You'll select a value of either True or False from a dropdown menu, depending on the hazmat limited quantity exemption eligibility of the carrier settings configuration.
Carrier account
Within the Carrier Contracts tab in the fulfillment context, you can edit a Carrier Account by selecting the Edit button.

You can create a new carrier account or select an existing one.
To create a new Carrier Account, you'll provide details to be associated with it, as shown in the following screenshot and detailed below. The information requested for a carrier account is dependent upon the carrier. For this example, United Parcel Service (UPS) appears as the carrier. Fields beyond the Cost Center field for other carriers differ. In addition, some optional fields are dependent upon the carrier account being used for international shipping.
Your Implementation team member is available to assist you in completing any of this information.
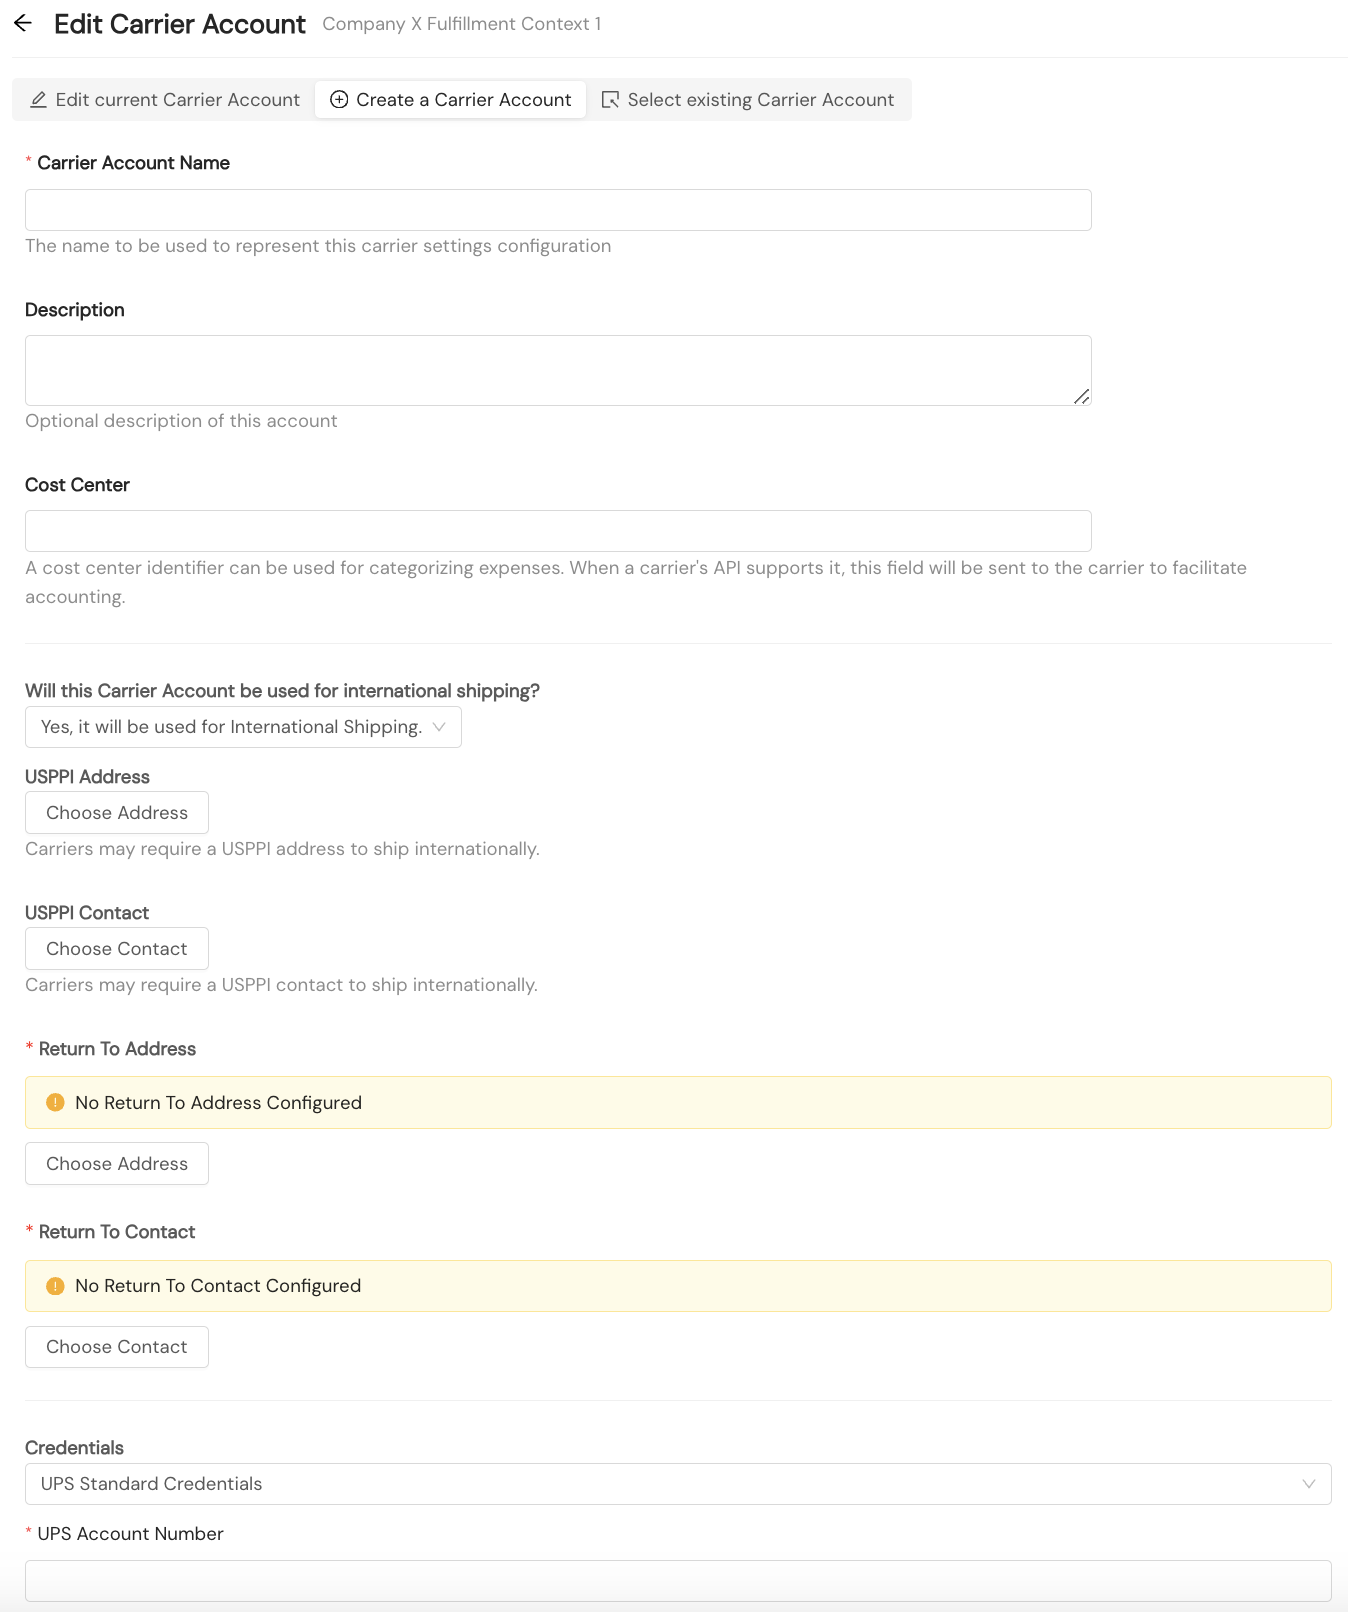
- Carrier Account Name. Required. A human-readable name your organization will use to refer to the carrier account
- Description. Optional. An optional description your organization can use to help you organize your carrier accounts
- Cost Center. Optional. A cost center identifier can be used for categorizing expenses. When a carrier's API supports it, this field will be sent to the carrier to facilitate accounting.
- Will this Carrier Account be used for international shipping? Required. The default value is No. To designate the carrier account to be used for international shipping, you'll select Yes from the dropdown menu.
- USPPI Address. Optional. Some carriers require the U.S. Principal Party in Interest (USPPI) address for international shipments. This address can also be set for an individual tenant, as described in the Fulfillment Contexts documentation.
- USPPI Contact. Optional. Some carriers require the USPPI contact for international shipments. This contact can also be set for an individual tenant, as described in the Fulfillment Contexts documentation.
- Return To Address. Optional. A returns address is the address where a package will be returned, if it is undeliverable for any reason. You can select an existing return address or create a new one.
- Return To Contact. Optional. A return contact is the person within your organization who serves as the point of contact regarding shipment returns. You can select an existing return contact or create a new one.
- Credentials. Required. You'll select the desired carrier credentials from the list of available carrier credentials in a dropdown menu.
- The remaining fields in this example are specific to the carrier UPS.
Amazon account verification
Amazon shipping methods require verification of account registration. For guidance on verifying your account, you can refer to the Amazon documentation.
FedEx Ground Economy (SmartPost) shipping hub ID requirement
FedEx Ground Economy, formerly referred to as FedEx SmartPost, is a shipping method that requires you to provide an identification (ID) number for the FedEx processing hub located closest to your fulfillment center, or origin.
In order to ship packages via the FedEx Ground Economy service method through Shipium, whether generating labels or using the Carrier Selection service, you'll need to provide a FedEx hub ID when setting up your FedEx carrier account. To indicate your organization's FedEx account will include the Ground Economy service method for a particular fulfillment context (and origin), you'll first toggle the button for FedEx SmartPost to Yes within carrier credentials. Then you'll select your hub ID from the dropdown menu.
UPS account upgrade
UPS made changes to its system and is requiring its customers to upgrade their accounts to integrate with the new UPS system. To complete the transition for you and your customers, all UPS accounts will need to be registered through Shipium’s system. To begin the process, within the UPS carrier account's Credentials section, you'll select Verify Account and Generate Token.

You'll be directed to log in to your UPS account and verify registration. You’ll need to check the box indicating that you agree to the UPS Technology Agreement and you authorize Shipping Connection Service to access your UPS account before logging in to your account.
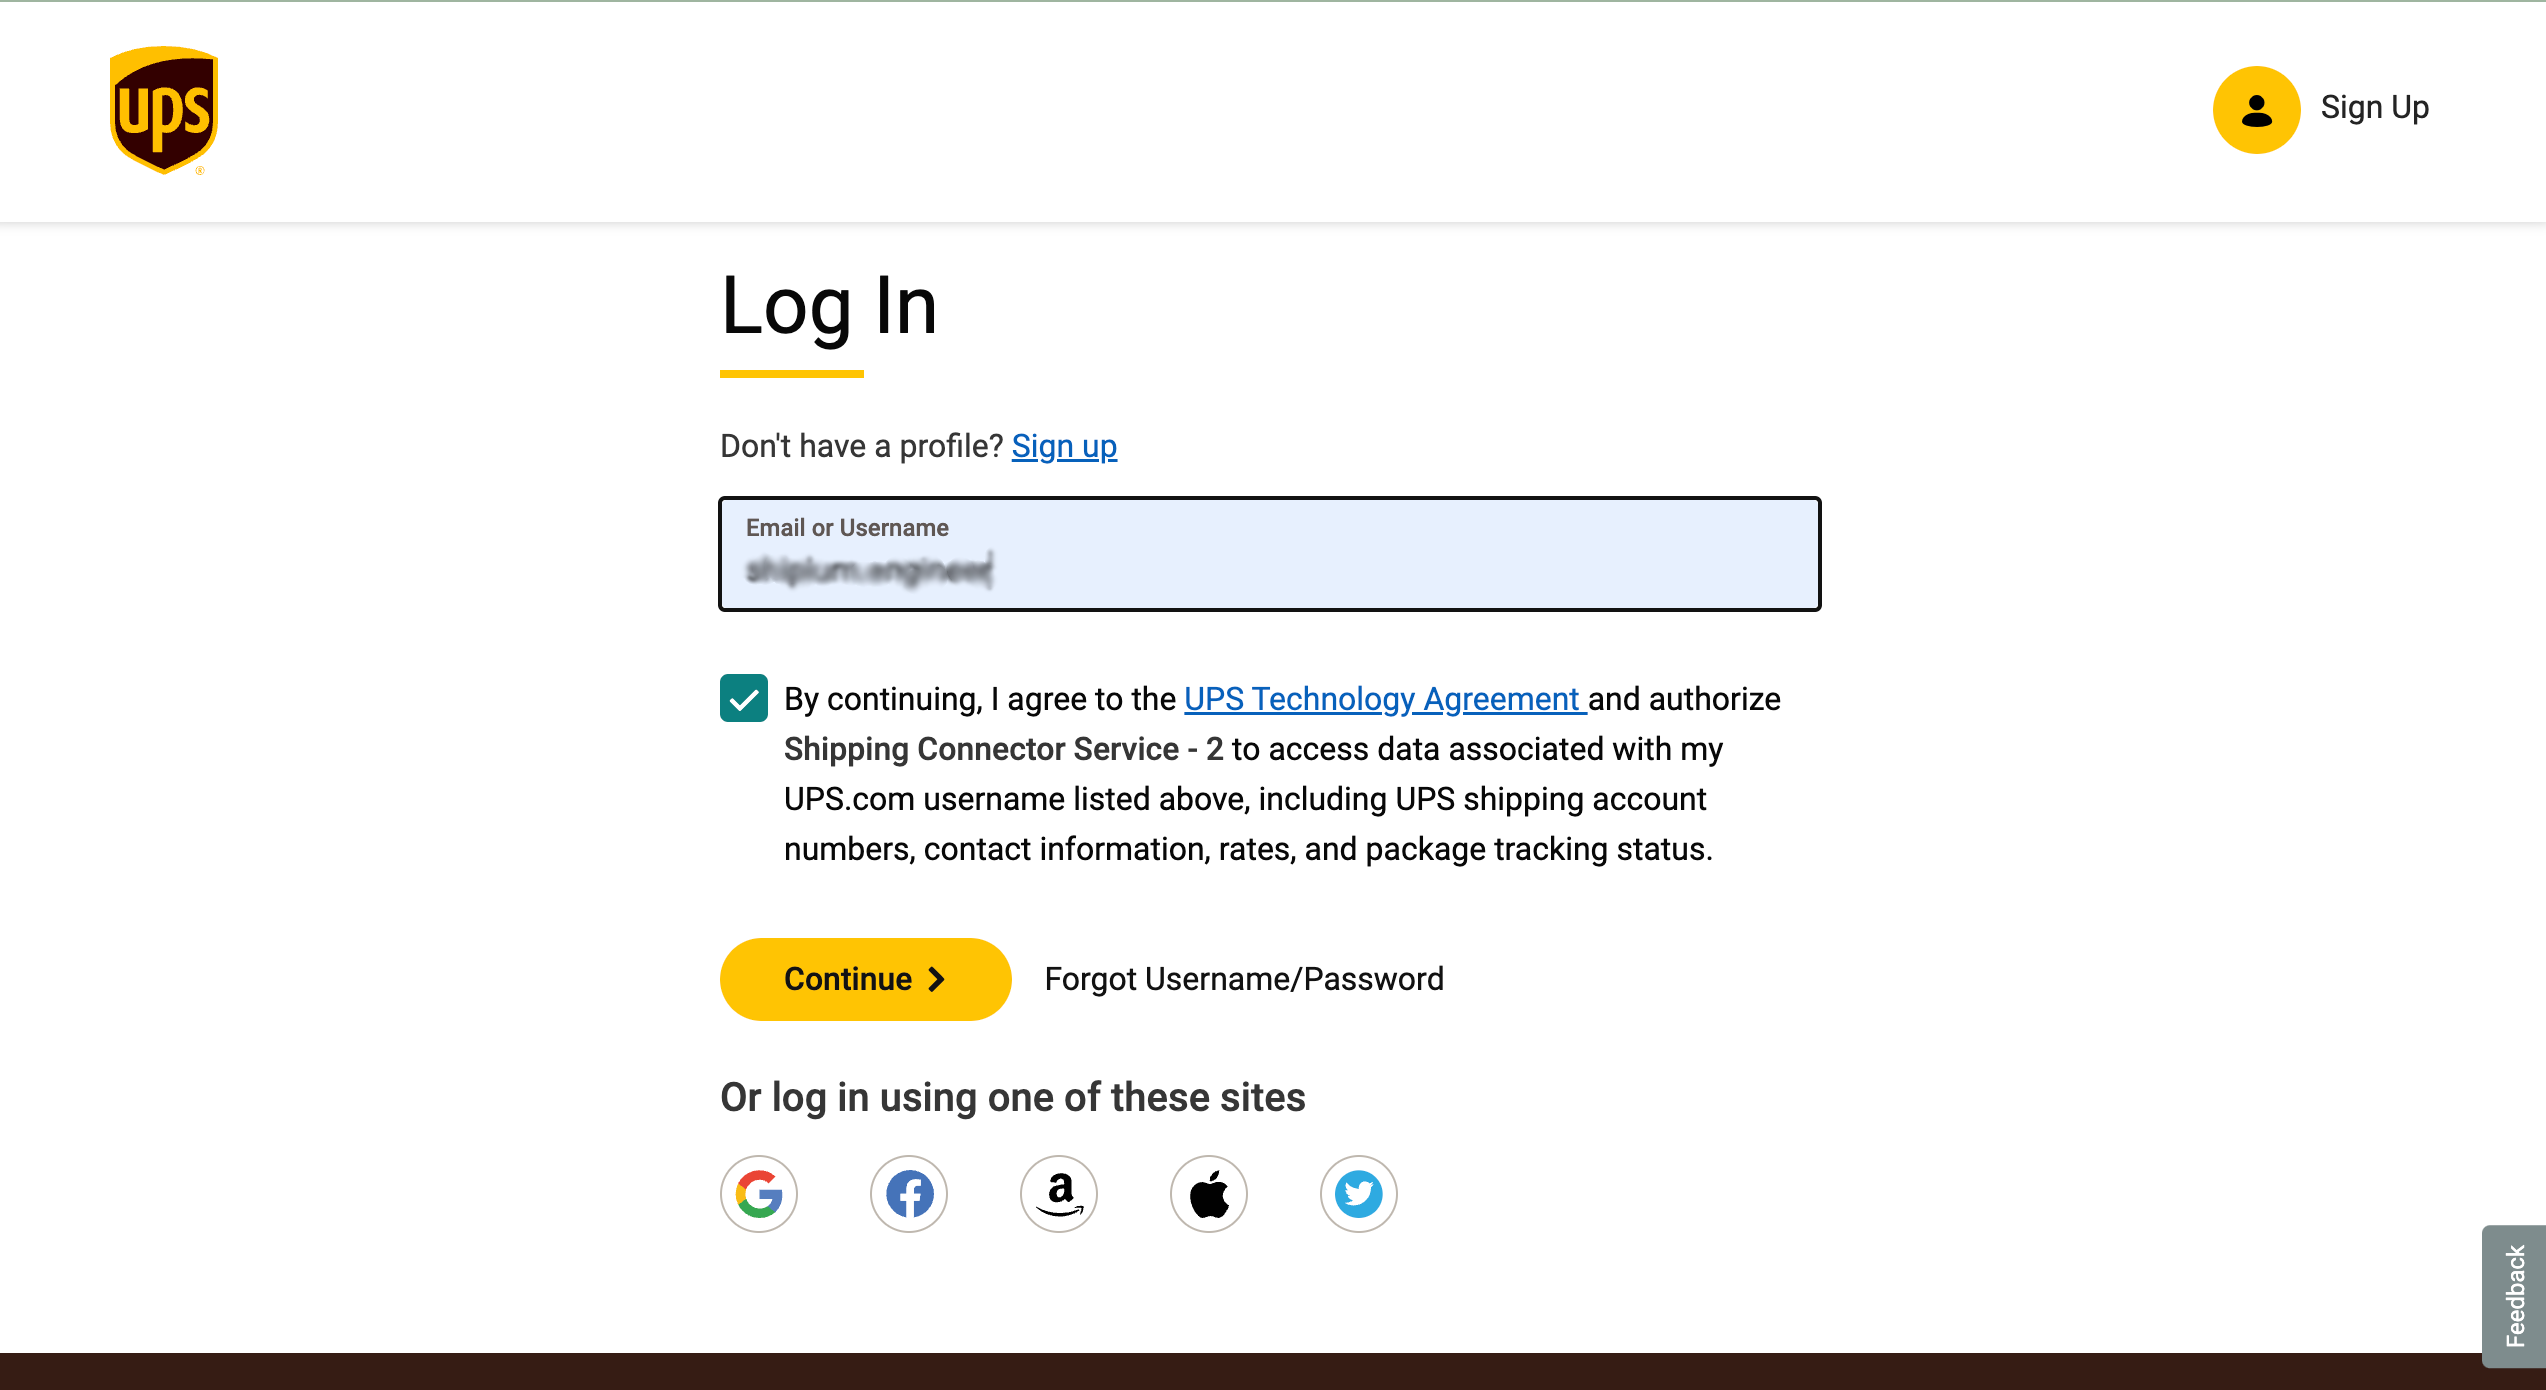
Once registration is done, you’ll receive a message notifying you that your UPS registration was successful.

You'll close that tab and return to the Shipium Console to complete setup.
Important: Password changes affect linked accountsIf your UPS.com account password is changed or reset, all UPS accounts linked in the Shipium platform using that UPS.com login will be invalidated. To restore functionality, you'll need to re-link the affected UPS accounts by repeating the registration process described above.
USPS Direct
For information about USPS Direct required credentials, you can refer to the USPS Direct documentation.
Carrier rates
You can establish rates and surcharges your organization has for the carrier contract for a fulfillment context. The interface allows you to export a rate and surcharges table to complete and upload into the Shipium Console for the selected carrier service method. However, you must have your carrier account configured before you're allowed to enter carrier rates.
Carrier account required to establish ratesYou must have a carrier account configured before you can configure carrier rates for the carrier contract.
You can add a new carrier rate configuration or select an existing one. If you want to select one or more already configured rates, you'll click the Select Existing Carrier Rate tab and choose the desired rate(s). You can filter the list of available rates down to only those that are valid configurations for the fulfillment context you're attempting to add them to, based on currency unit; you can also filter the view to include only the rates that you have selected.
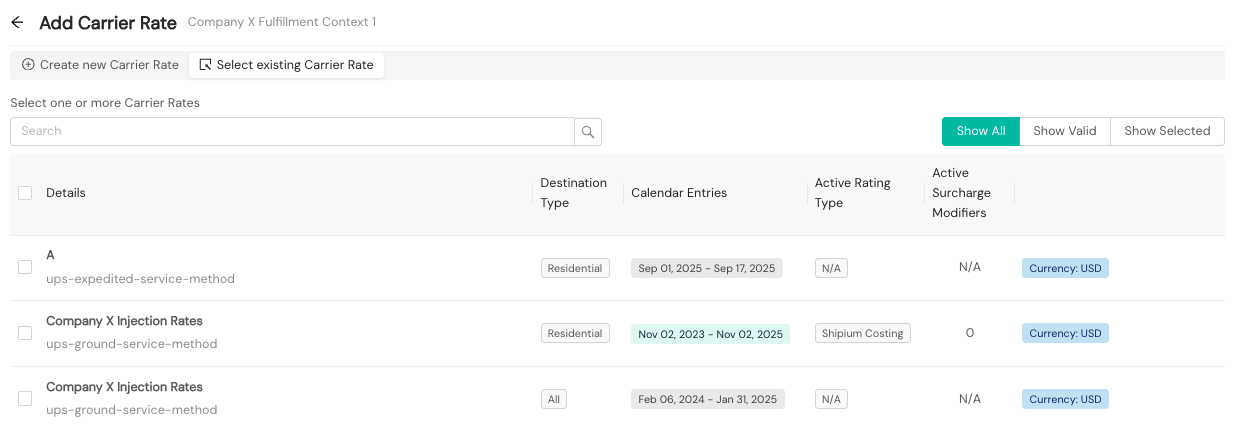
To create a new carrier rate, you'll provide details to be associated with it, as shown in the following screenshot and detailed below. You must have a rate configured for each of the applicable service methods for your carrier account that will be used in this fulfillment context. The only case in which you would not be required to provide specific carrier rates is if you designate a carrier rate as uncosted, meaning that Shipium will not attempt to cost the method during Carrier Selection. Any changes made to a carrier rate apply across contracts. For example, if you create a rate for Contract A and then add that same rate to a new contract, Contract B, and make changes to the rate within Contract B, the rate also will be changed within Contract A.
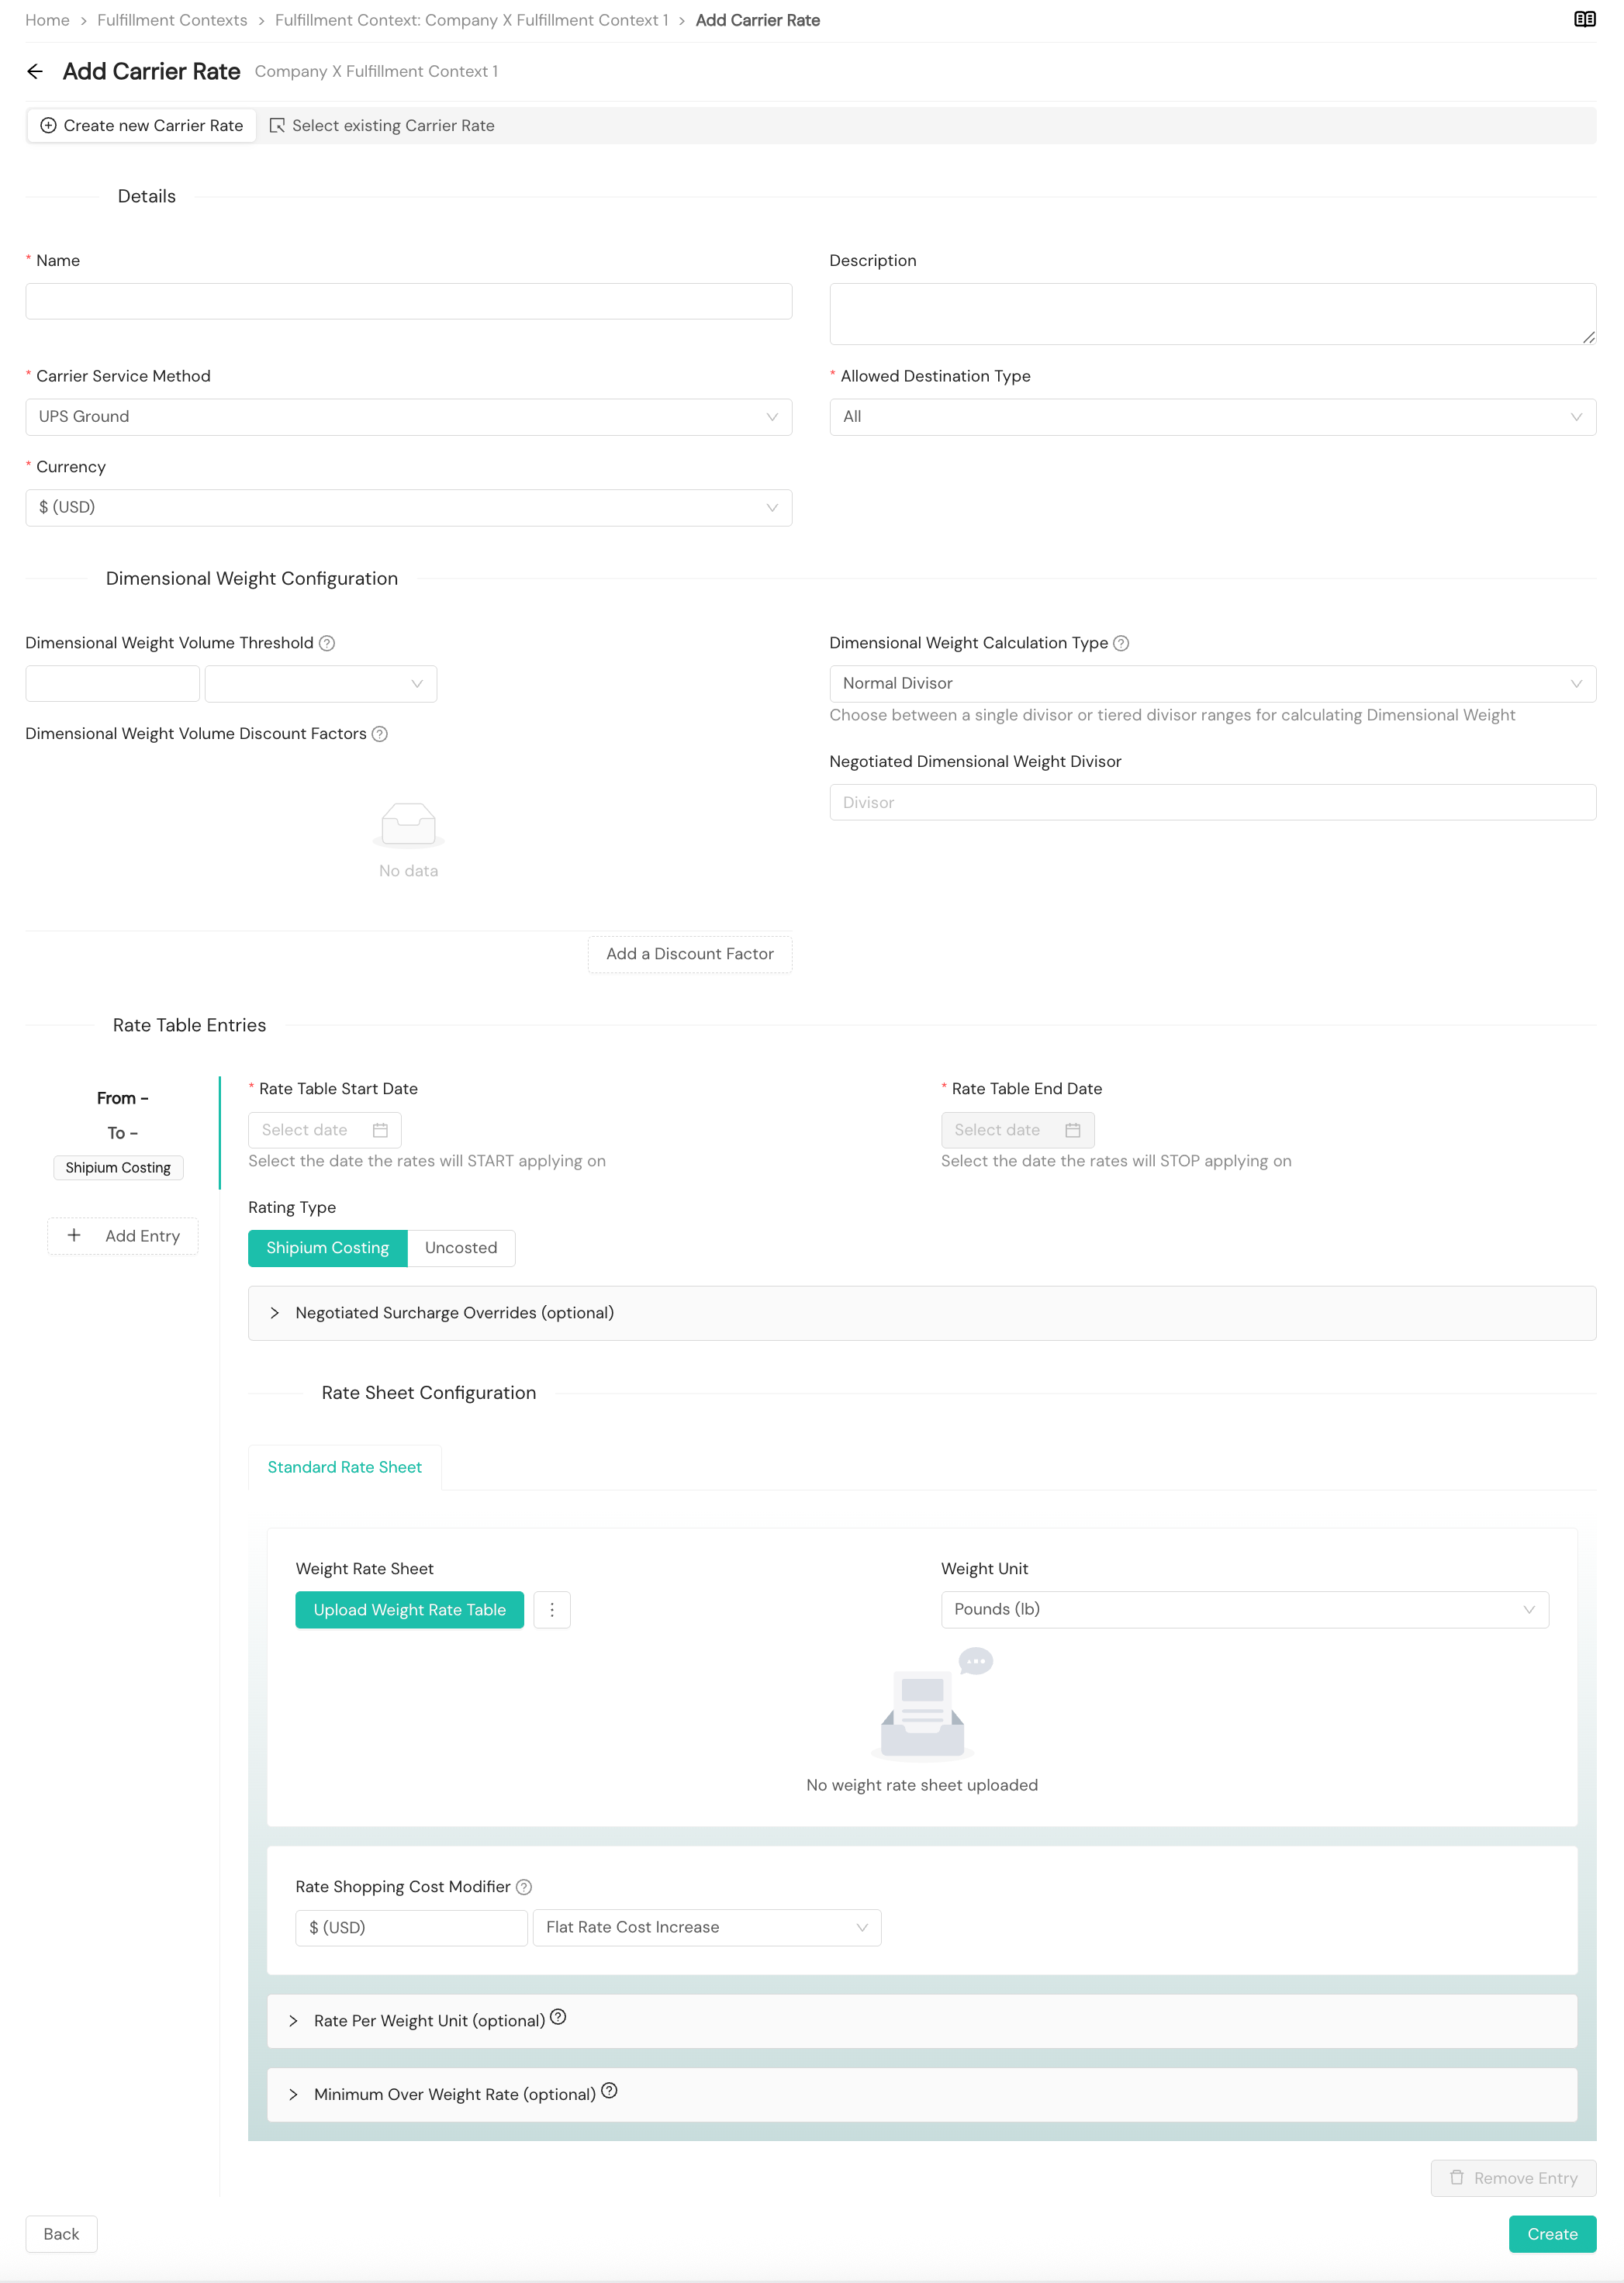
Details
- Name. Required. A human-readable name your organization will use to refer to the carrier rate
- Description. Optional. An optional description to help you organize your carrier rates
- Carrier Service Method. Required. You'll select the desired service method for the applicable carrier from a dropdown menu. You must establish a rate for each carrier service method for your context.
- Allowed Destination Type. Required. You'll select All, Commercial, or Residential as the type of destination address allowed from a dropdown menu. The default value is All.
- Currency. Required. You'll select your desired currency from the dropdown menu. Currency cannot be changed when multiple carrier rates are in a contract.
Dimensional weight configuration
Dimensional weight configuration scenarios are included at the end of this section.
-
Dimensional Weight Volume Threshold. Optional. You may have a custom dimensional weight volume threshold for the applicable carrier service method. This value represents the minimum volume required for any package for any dimensional weight divisor to be applied, whether it's a single or tiered divisor. If you provide this value, any packages with a volume below this threshold will not have a dimensional weight divisor applied. If you do not provide a value for this field, dimensional weight will always be calculated, regardless of package volume. You'll also need to select the appropriate volume unit for the dimensional weight volume from a dropdown menu (feet, meters, inches, centimeters). You most likely will select inches or centimeters.
-
Dimensional Weight Volume Discount Factors. Optional. You can add volume discount factors according to packaging material, to be applied against the package volume before the dimensional weight is applied. The discount factor value must be a decimal number less than 1. This optional discount factor must be pre-negotiated with UPSMI or USPS.
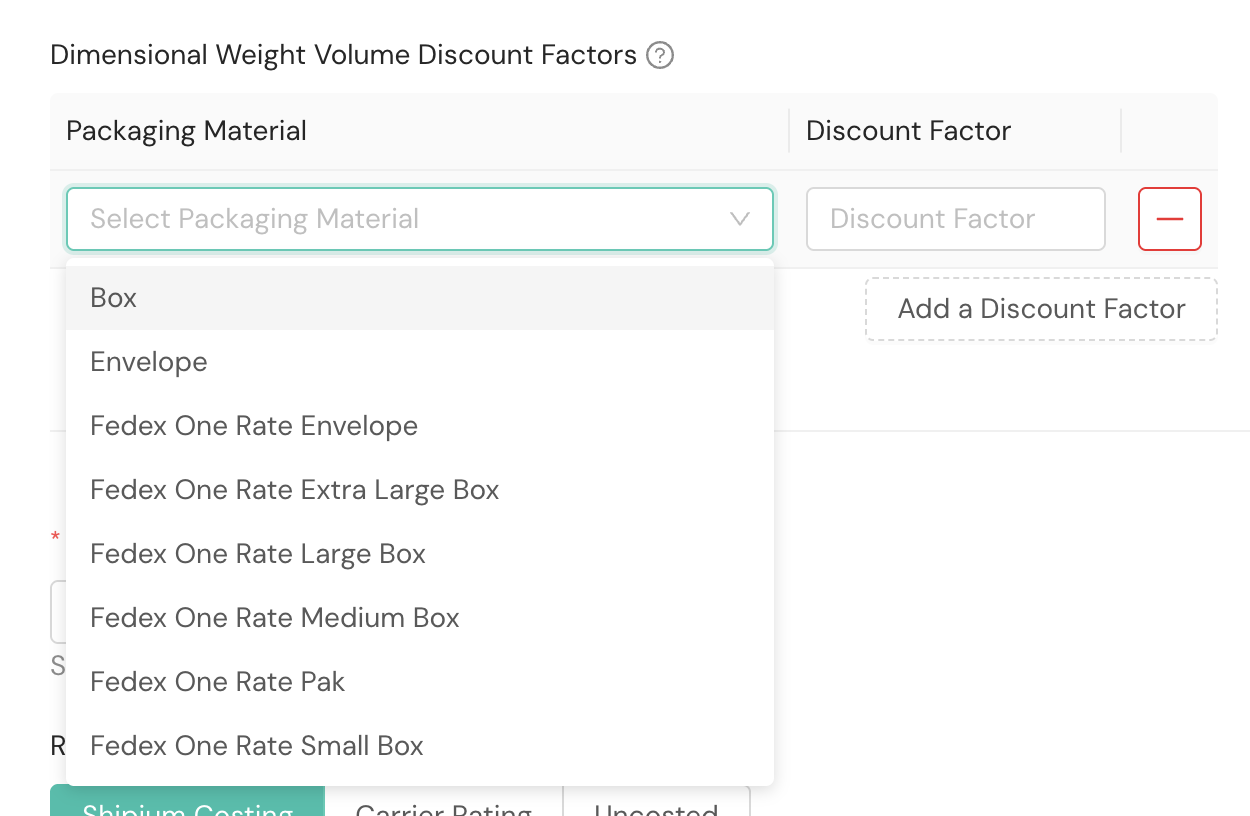
-
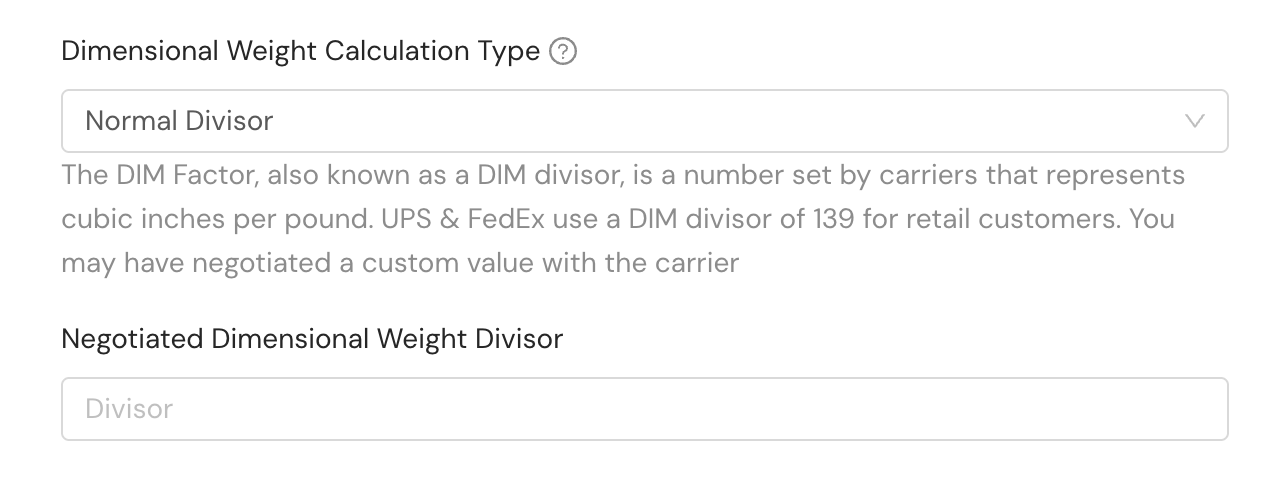
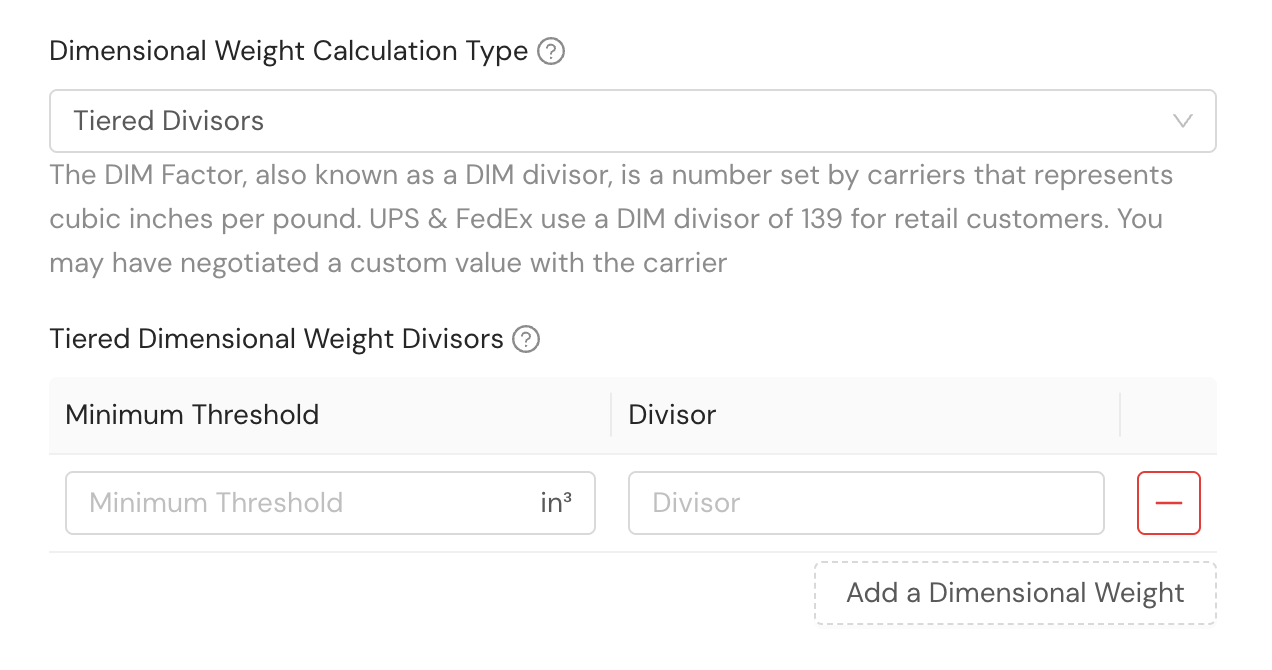
Dimensional Weight Calculation Type. Optional, but required if configuring a dimensional weight volume threshold. You can choose between normal (single) and tiered divisors for calculating the dimensional weight.
-
Normal (single). For this calculation type, you'll provide a single value for the negotiated dimensional weight divisor that is applied once the dimensional weight volume threshold is met. Any packages with a volume above your defined dimensional weight volume threshold will have the negotiated dimensional weight divisor applied to their calculation. If you did not specify a dimensional weight volume threshold, this divisor will be applied to all packages.
-
Tiered. For this calculation type, you can define multiple thresholds for which specific dimensional weight divisors apply. Any packages with a volume above one defined threshold but not above the next (if more than one is defined) will have that dimensional weight divisor applied. The system selects the dimensional weight divisor with the largest threshold that the package exceeds without going over. Each threshold value must be an integer.
-
-
Negotiated Dimensional Weight Divisor. Optional, for normal dimensional weight calculation type only. You may have a negotiated dimensional weight divisor for the applicable carrier service method. This value is a number set by the carrier that represents cubic inches per pound.
-
Tiered Dimensional Weight Divisors. Optional. You can add multiple ranges for which a divisor should apply.
Sample dimensional weight configuration scenarios
Scenario 1. 'Normal' dimensional weight divisor with a minimum threshold value
- Dimensional weight volume threshold =
300 cubic inches - Dimensional weight configuration type =
normal - Negotiated dimensional weight divisor =
50 cubic inches per pound
The following table illustrates example package volume and application of the dimensional weight divisor for scenario 1, in which the divisor would be applied to any packages exceeding the dimensional weight volume threshold of 300 cubic inches.
| Package volume (in cubic inches) | Dimensional weight divisor applied (in cubic inches per pound) |
|---|---|
| 150 | No divisor applied |
| 500 | 50 |
| 1720 | 50 |
| 2000 | 50 |
| 999999 | 50 |
Scenario 2. 'Tiered' dimensional weight divisors with a minimum threshold value
- Dimensional weight volume threshold =
200 cubic inches - Dimensional weight configuration type =
tiered - Tiered dimensional weight divisors included in the following table and the image from the workflow in the Shipium Console
| Minimum threshold (in cubic inches) | Dimensional weight divisor (in cubic inches per pound) |
|---|---|
| 0 (zero) or empty value | 20 |
| 1728 | 40 |
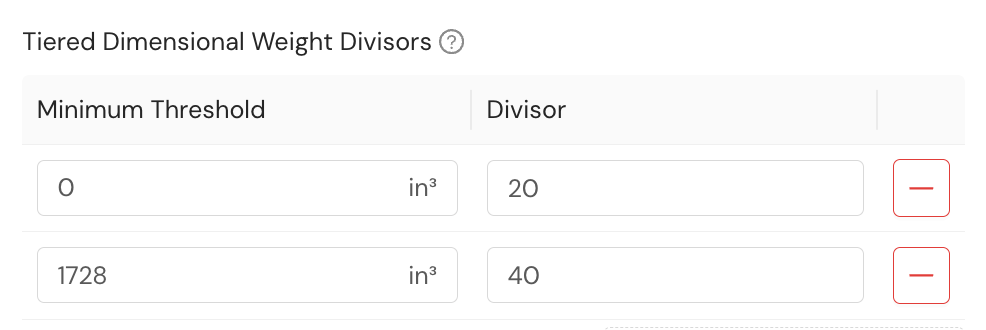
The following table illustrates example package volume and application of the tiered dimensional weight divisors for scenario 2.
| Package volume (in cubic inches) | Dimensional weight divisor applied (in cubic inches per pound) |
|---|---|
| 150 | No divisor applied (because the dimensional weight volume threshold is defined as 200, which supersedes the minimal thresholds defined for the tiered divisors) |
| 500 | 20 |
| 1720 | 20 |
| 2000 | 40 |
| 999999 | 40 |
Scenario 3. Multi-tiered dimensional weight divisors without a minimum threshold value
- Dimensional weight volume threshold =
nullor0 - Dimensional weight configuration type =
tiered - Tiered dimensional weight divisors included in the following table and the image from the workflow in the Shipium Console
| Minimum threshold (in cubic inches) | Dimensional weight divisor (in cubic inches per pound) |
|---|---|
| 0 (zero) or empty value | 10 |
| 300 | 20 |
| 750 | 30 |
| 1500 | 40 |
| 2500 | 50 |
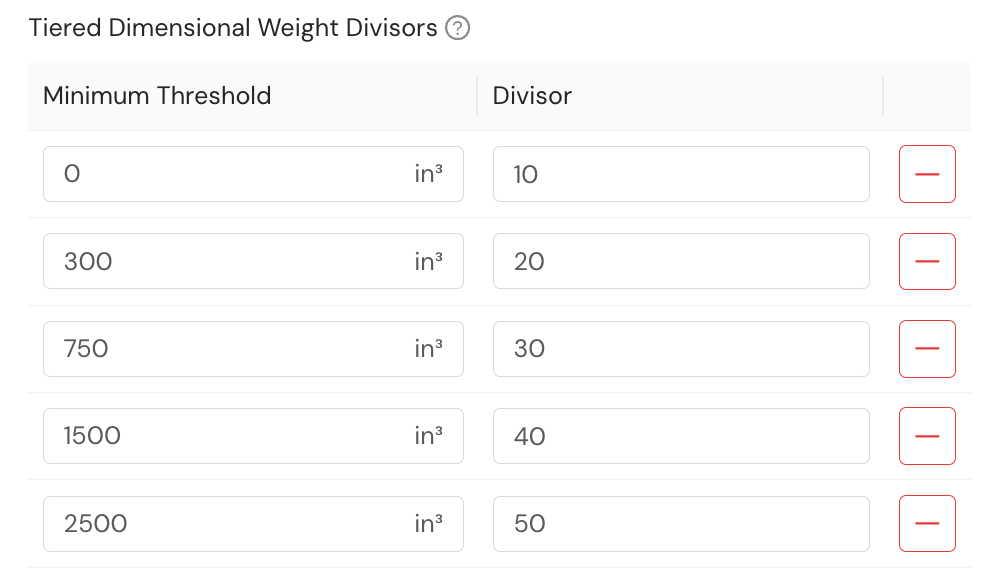
The following table illustrates example package volume and application of the multi-tiered dimensional weight divisors for scenario 3.
| Package volume (in cubic inches) | Dimensional weight divisor applied (in cubic inches per pound) |
|---|---|
| 150 | 10 |
| 500 | 20 |
| 1720 | 40 |
| 2000 | 40 |
| 999999 | 50 |
Rate table entries
Once you have rate table entries configured, you'll see a listing of them in the lefthand column in the Rate Table Entries section.
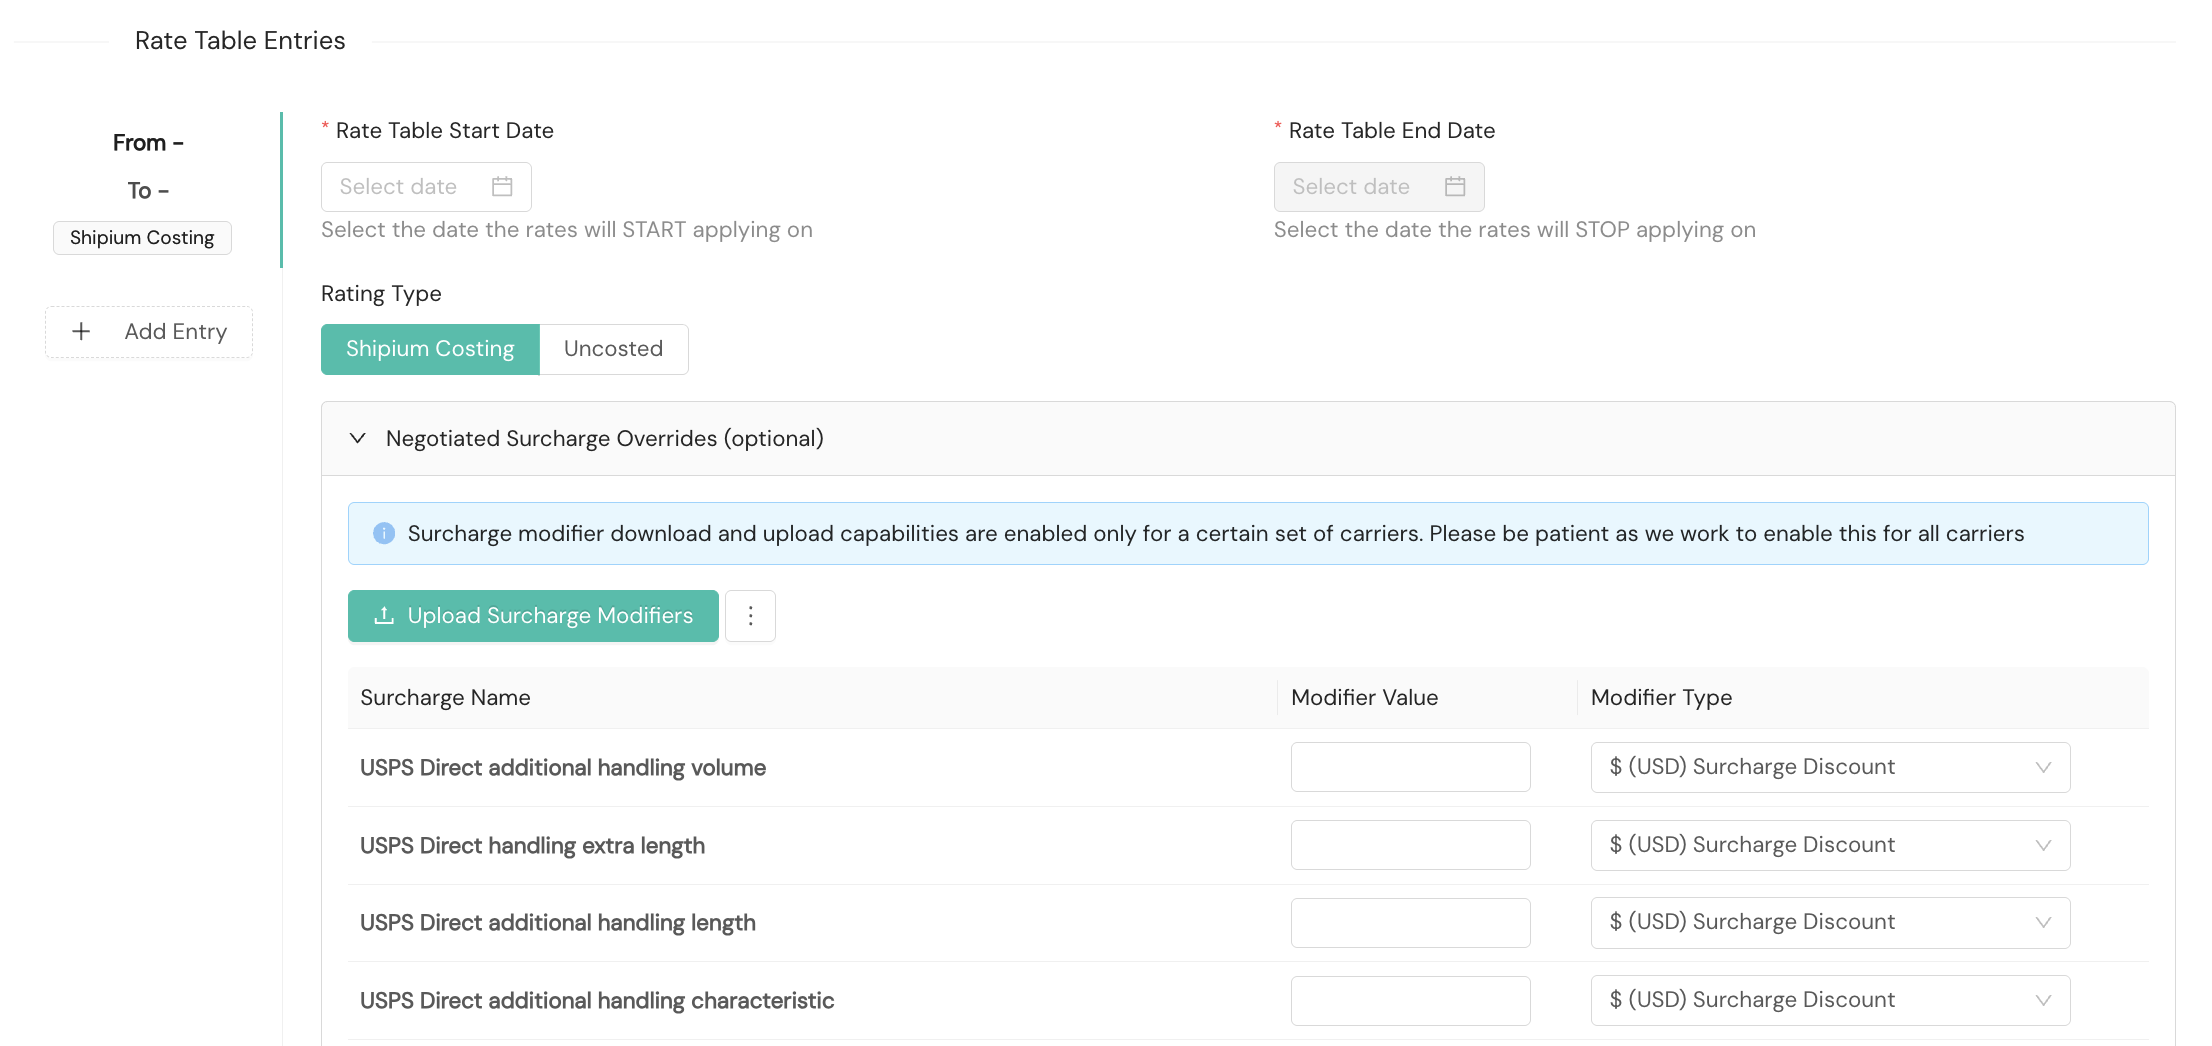
- Rate Table Start Date. Required. You'll select the date on which you wish the carrier rate to start applying.
- Rate Table End Date. Required. You'll select the date on which you wish the carrier rate to stop applying.
Rate card timing and expirationStart timing: New rate cards become effective at 8:00 AM UTC on the configured start date.
End timing: Rate cards expire at midnight UTC (00:00) on the configured end date. For example, a rate card with an end date of October 24 will expire at the start of October 24 (midnight between October 23 and October 24).
Expiration behavior: If a rate card's end date passes without a replacement rate card configured, the system will continue to use the expired rate card for rating. This prevents service disruption but may result in outdated rates being applied. To ensure accurate pricing, configure a new rate card to begin on or before the previous card's end date.
- Rating Type. Choices for the type of rating are determined by the carrier service method you selected in the previous step. Options include:
- Shipium Costing. Estimates are based on Shipium’s costing engine, using the rate cards and surcharges you configure.
- Carrier Rating. Shipium provides an estimate directly from the carrier. You do not need to configure rate cards or surcharges but do need to supply a carrier schedule. For LTL shipments, you must select this rating type.
- Uncosted. Shipium will not attempt to cost the method and will only select it during Carrier Selection if no costed methods are available. You do not need to configure rate cards or surcharges but do need to supply a carrier schedule.
- Negotiated Surcharge Overrides. Optional. When creating a rate, you may also elect to enter any surcharge overrides your organization has negotiated with the carrier applicable to the service method for which you're creating the rate. Surcharges vary by carrier. You can refer to Peak and Other Carrier Surcharges for more information on carrier surcharges. For each surcharge override you wish to configure, you'll provide the modifier value and its type. There are three main types of surcharge discounts that can be configured for carrier rates:
- % Surcharge Discount. This applies a percentage-based discount to a surcharge. For example, if a surcharge is $10 and you configure a 20% surcharge discount, the final surcharge amount will be $8.
- $ Surcharge Discount. This applies a fixed currency amount discount to a surcharge. For example, if a surcharge is $10 and you configure a $2 USD surcharge discount, the final surcharge amount will be $8. The currency for this discount is determined by the currency configured for the fulfillment context.
- Fixed % Surcharge Discount. This sets the surcharge to a fixed percentage of its original amount. This is different from the % Surcharge Discount because it's a discount to a specific percentage, not by a specific percentage. For example, if a surcharge is $10 and you configure a fixed % surcharge discount of 30%, the final surcharge amount will be $3.
There are two types of replacement surcharge modifiers: - Fixed % Surcharge. This modifier replaces the original surcharge with a new value calculated as a percentage of the total shipping cost. For example, if the total shipping cost is $50 and you configure a Fixed 5% Surcharge, the new surcharge will be $2.50, regardless of the original surcharge amount.
- Fixed $ Surcharge. This modifier replaces the original surcharge with a fixed currency amount. For instance, if the original surcharge is $10, and you configure a Fixed $5 Surcharge, the new surcharge will be $5. The currency of this fixed amount is determined by the currency configured for the fulfillment context.
In essence, these "replacement" modifiers ignore the original surcharge value and substitute it with a new value, either a percentage of the total shipping cost or a fixed amount.
Rate sheet configuration
Three types of rate sheets can be configured. Standard rate sheets may be uploaded for any supported carrier. Remote rate sheets may be added for specific service methods, including USPS Ground Advantage, USPS Priority Mail, and other USPS service methods via USPS (not via third-party USPS software partners). Multiparcel rate sheets may be added for carrier Nationex.
In addition, cubic rate cards may be uploaded for carriers shipping with USPS for part of the delivery transport, including DHL, eHub, OSM, UPSMI, and USPS directly or via EasyPost, Endicia, or Pitney Bowes.
Cubic vs. weight based rating API response differencesWhen cubic rating is used, the API response will contain a
billableCubicVolumeobject instead ofbillableWeight. When a shipment is rated by volume (i.e., cubic rating), thebillableWeightfield in thecarrierSelectionandcarrierLabelobjects will be null. When a shipment is rated by weight (i.e., billable weight), thebillableCubicVolumefield in the response will be null.
If you have both a weight and a cubic rate sheet, you'll see them both in this section of rate configuration. To have the option to upload rate cards, you will need to select Shipium Costing as your rating type during the Rate Table Entries step.
Standard rate sheet
The standard rate sheet is the default option, unless you've selected a USPS service method that qualifies for remote rates. The optional remote rate is described below. For a standard rate sheet, you'll upload the applicable rate sheet, whether a weight rate table or a cubic rate table.
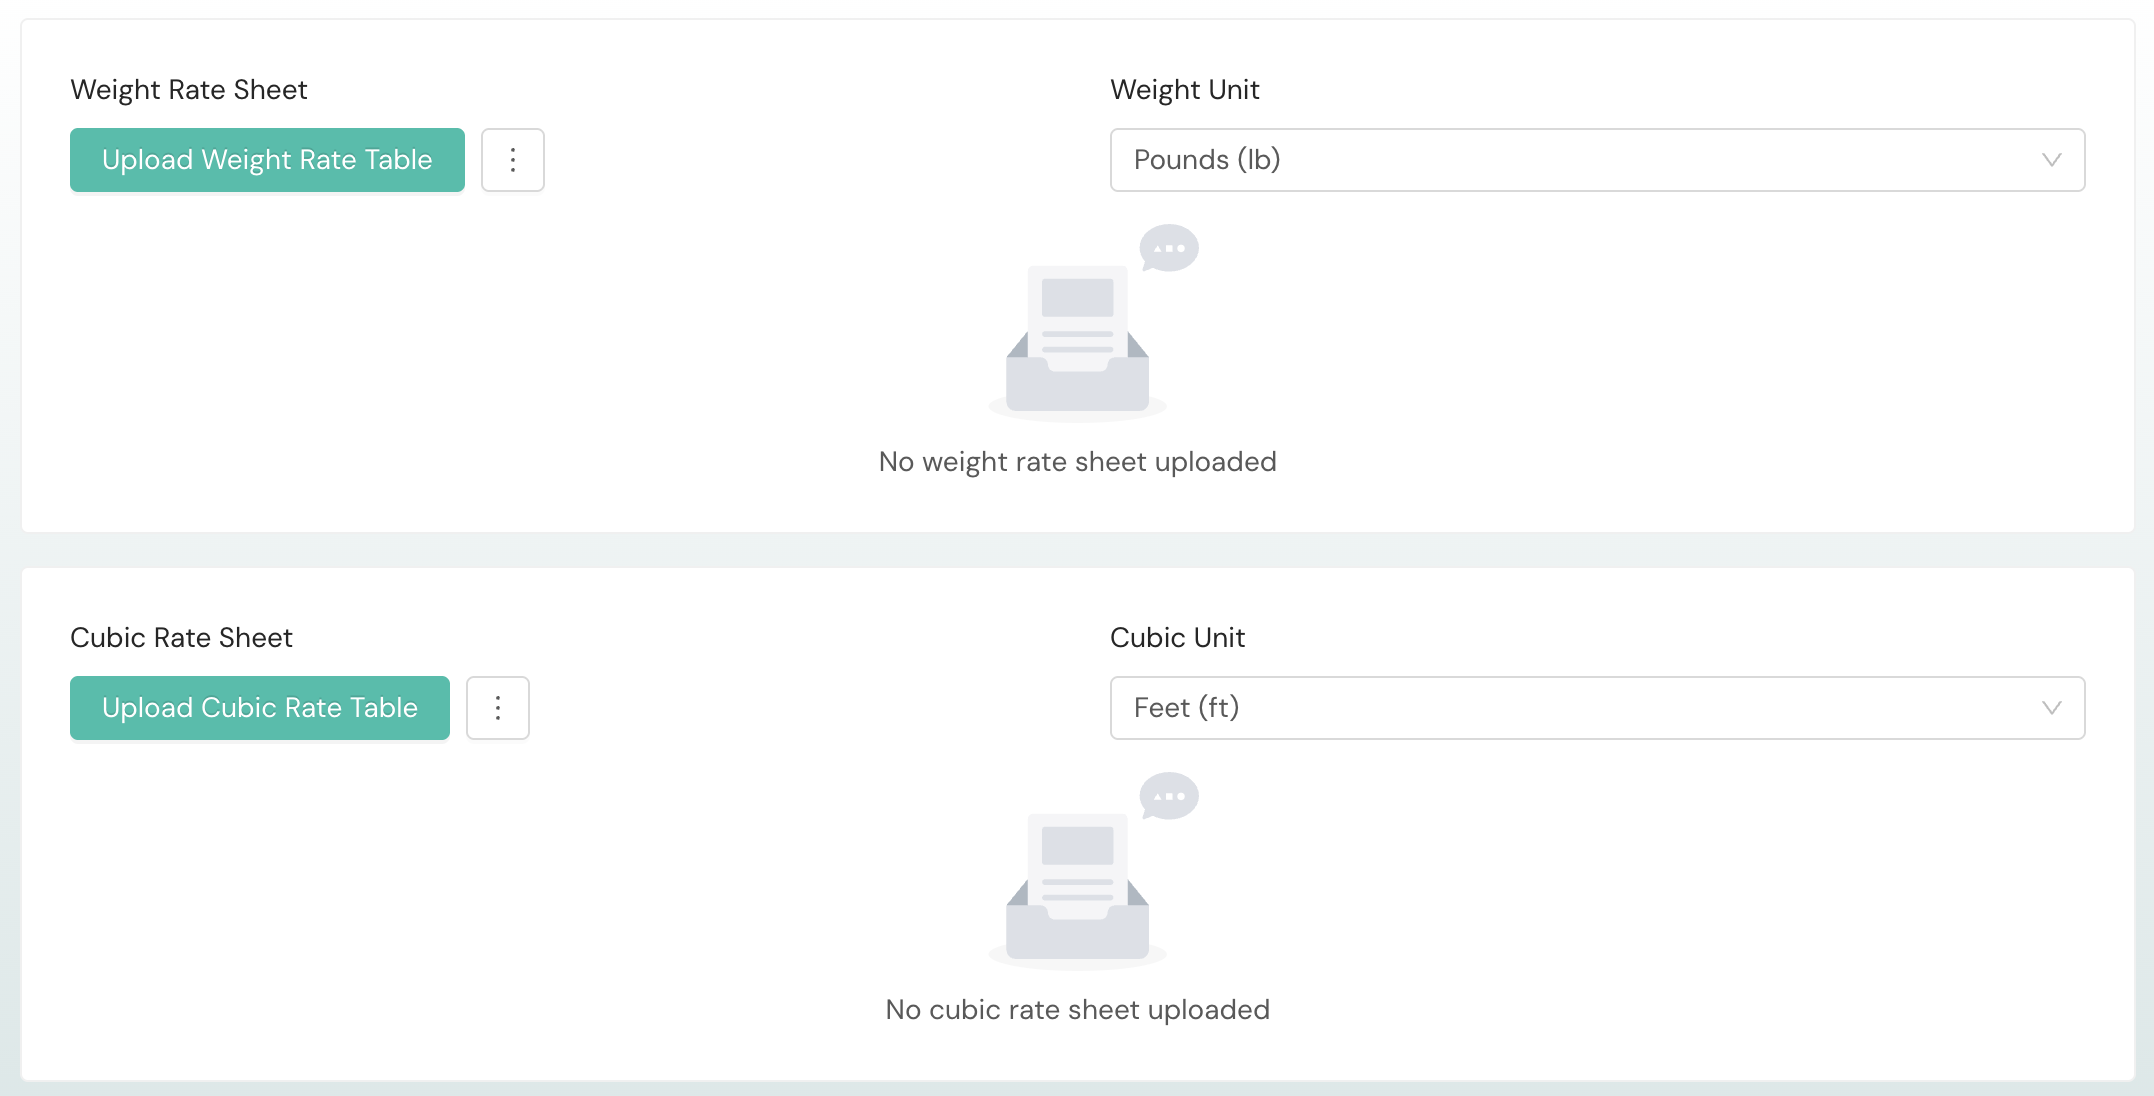
-
Weight Rate Sheet. Optional. You may download a CSV file to complete with the carrier service method rates and upload the CSV file back to the console.
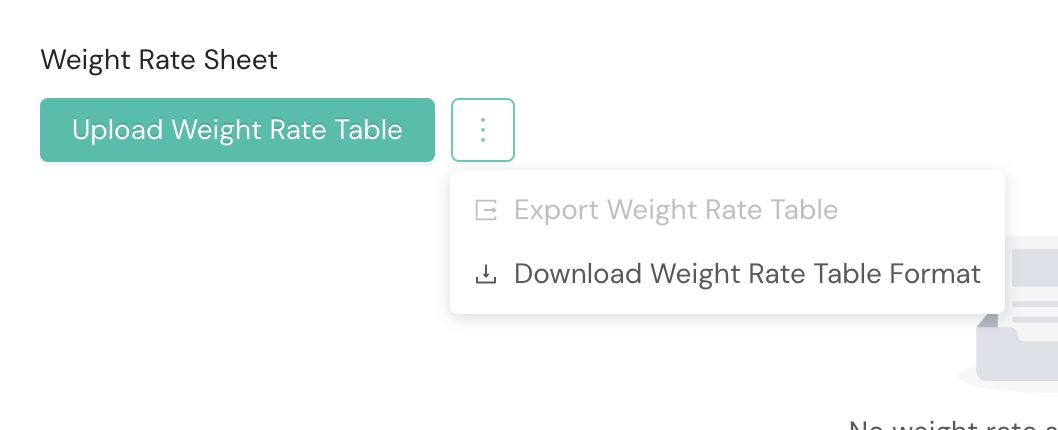
-
Cubic Rate Sheet. Optional. You also can download a CSV file to complete with the carrier service method rates to upload for your cubic rates. For packages under the max cubic price tiers of 1.00 cubic foot, a weight-based and cubic rate card may both be applied when rate shopping. When both are applicable, Shipium will calculate both estimated label costs for the package and return the lowest cost rate match between the two.
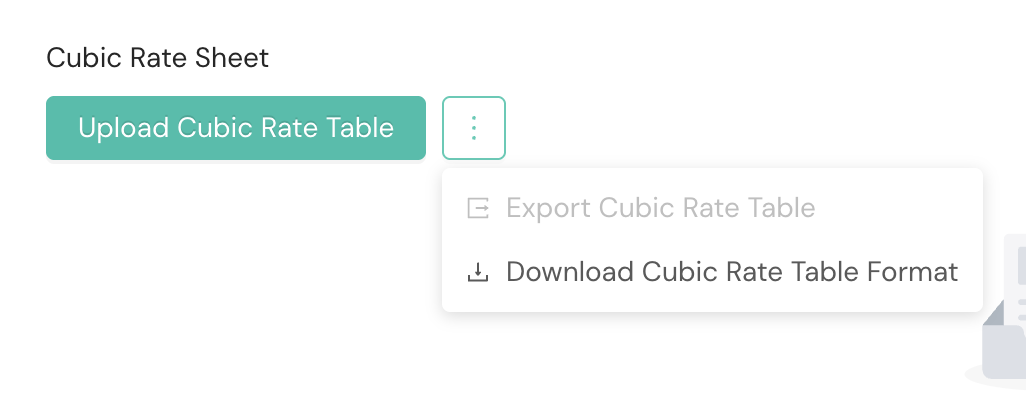
-
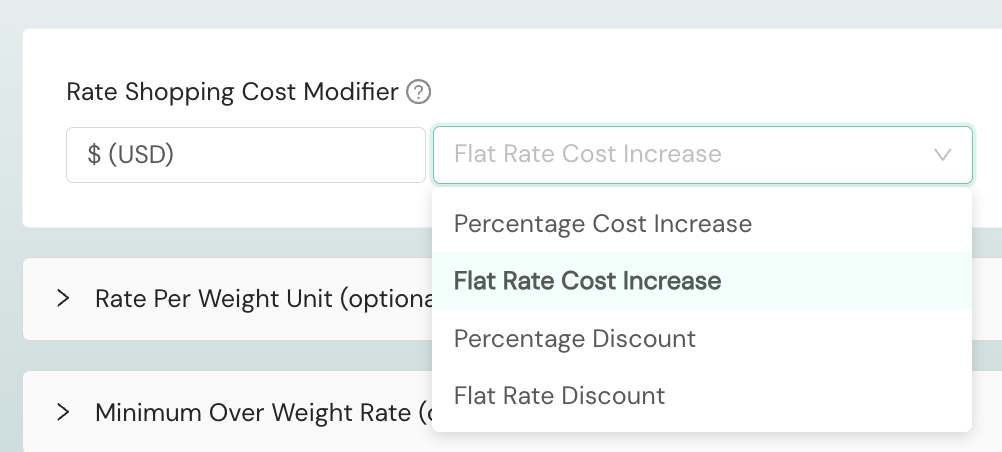
Rate Shopping Cost Modifier. Optional. You may have a cost modifier for this carrier rate. When specified, Shipium will add the amount to the rate calculated for the carrier service method during rate shopping. This value can be a flat rate cost increase or flat rate discount expressed in dollars, or it can be a percentage cost increase or percentage discount expressed as a percentage.
Remote rate sheet
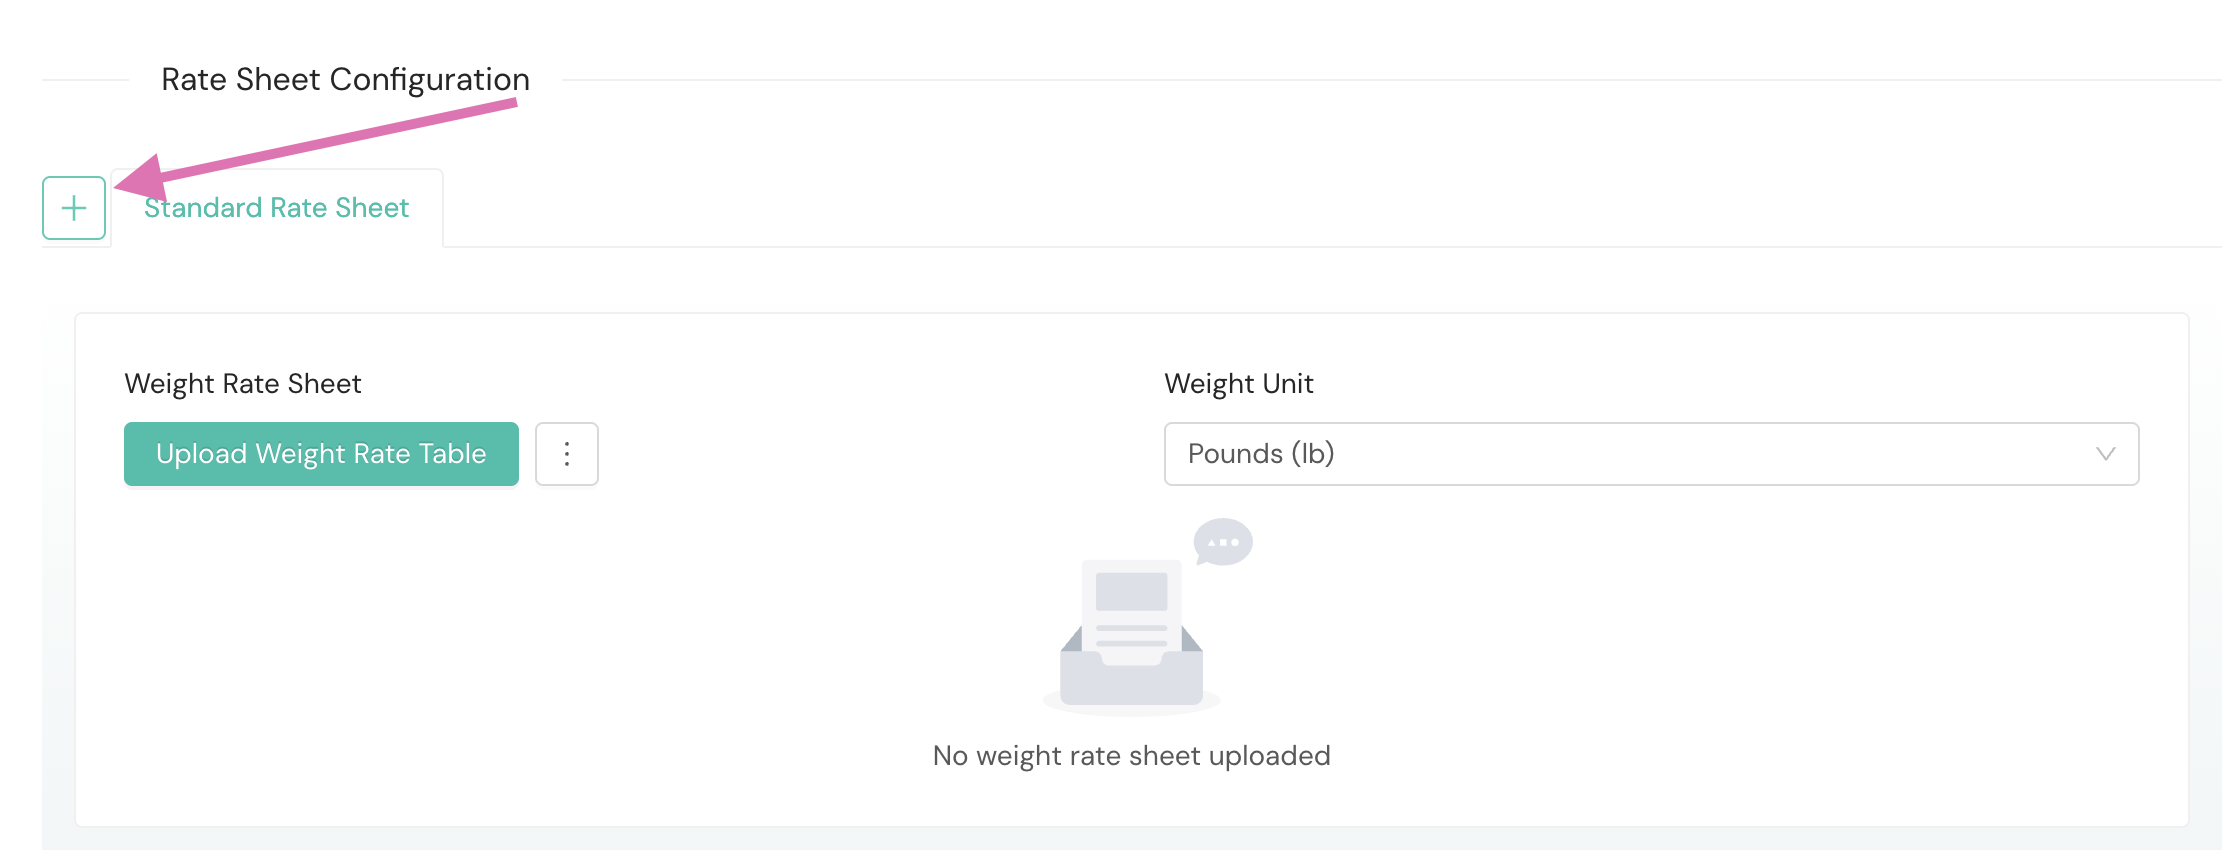
For certain USPS service methods, you can add a remote rate sheet. You'll select the + button to the left of the Standard Rate Sheet tab. The additional tab will not be visible if remote rates do not apply to your selected service method.
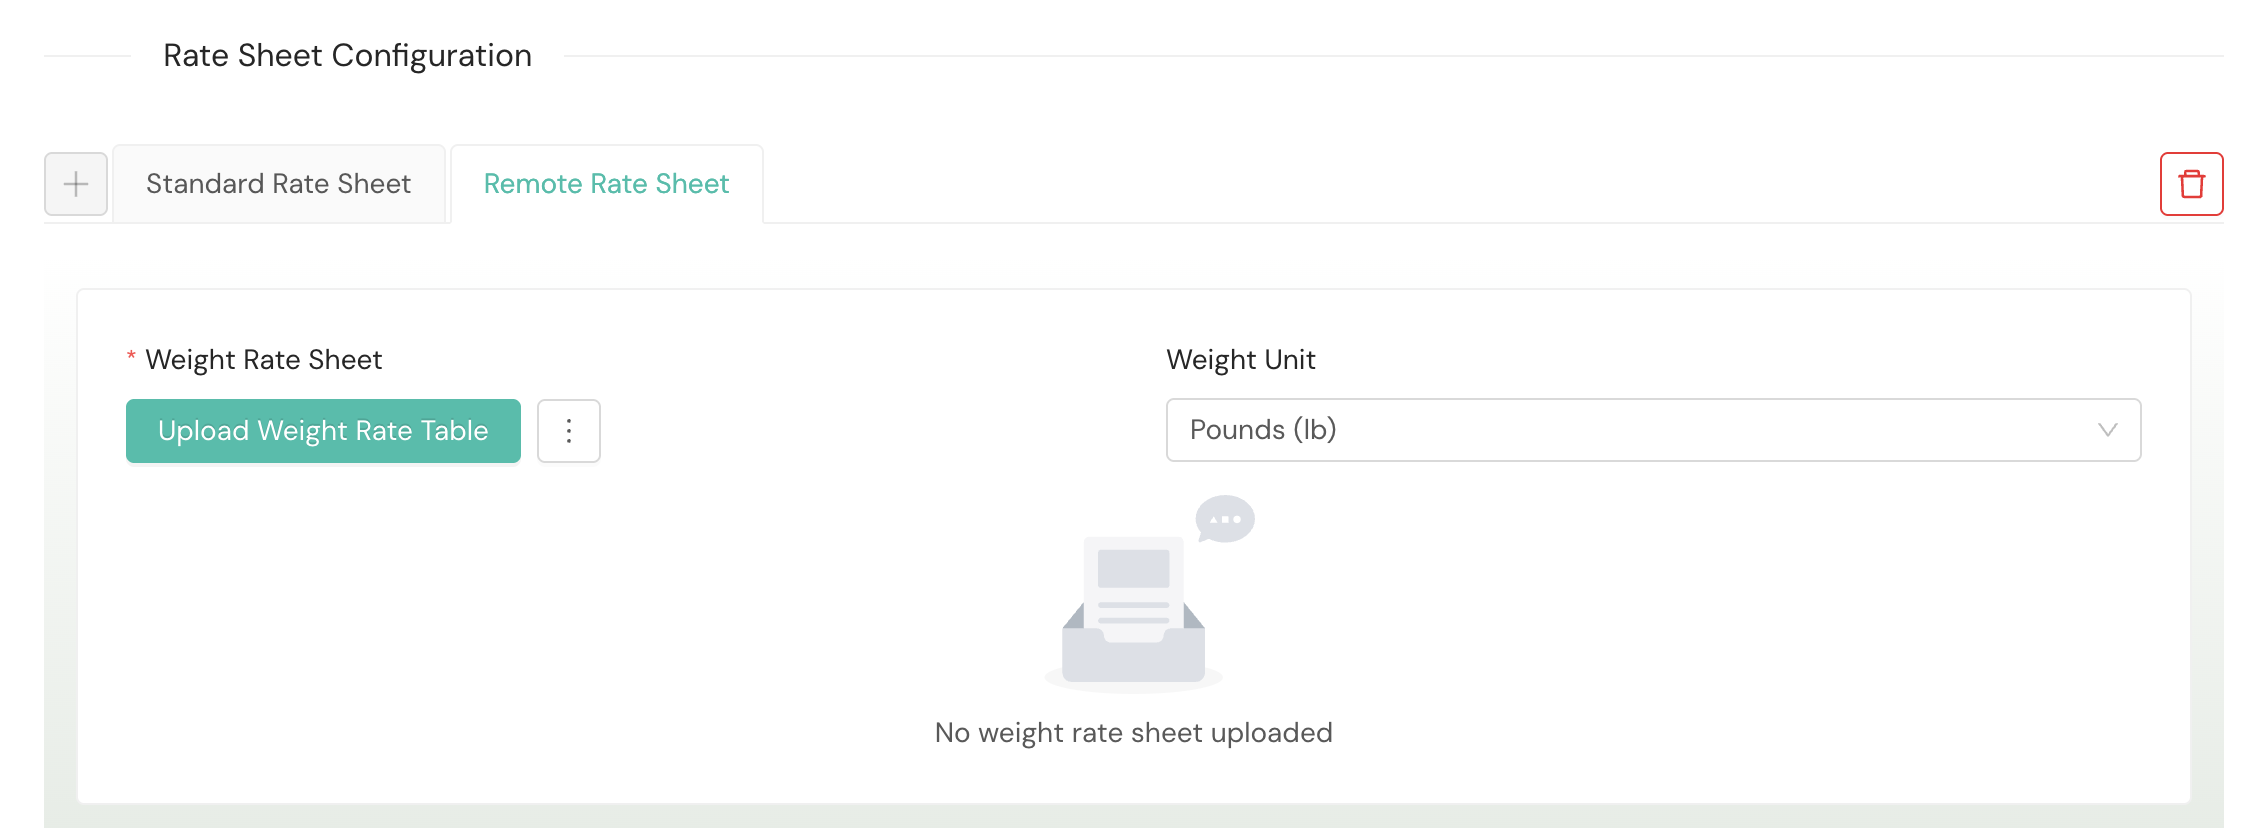
The Remote Rate Sheet tab will appear for your configuration once you select the + button.
Multiparcel rate sheet
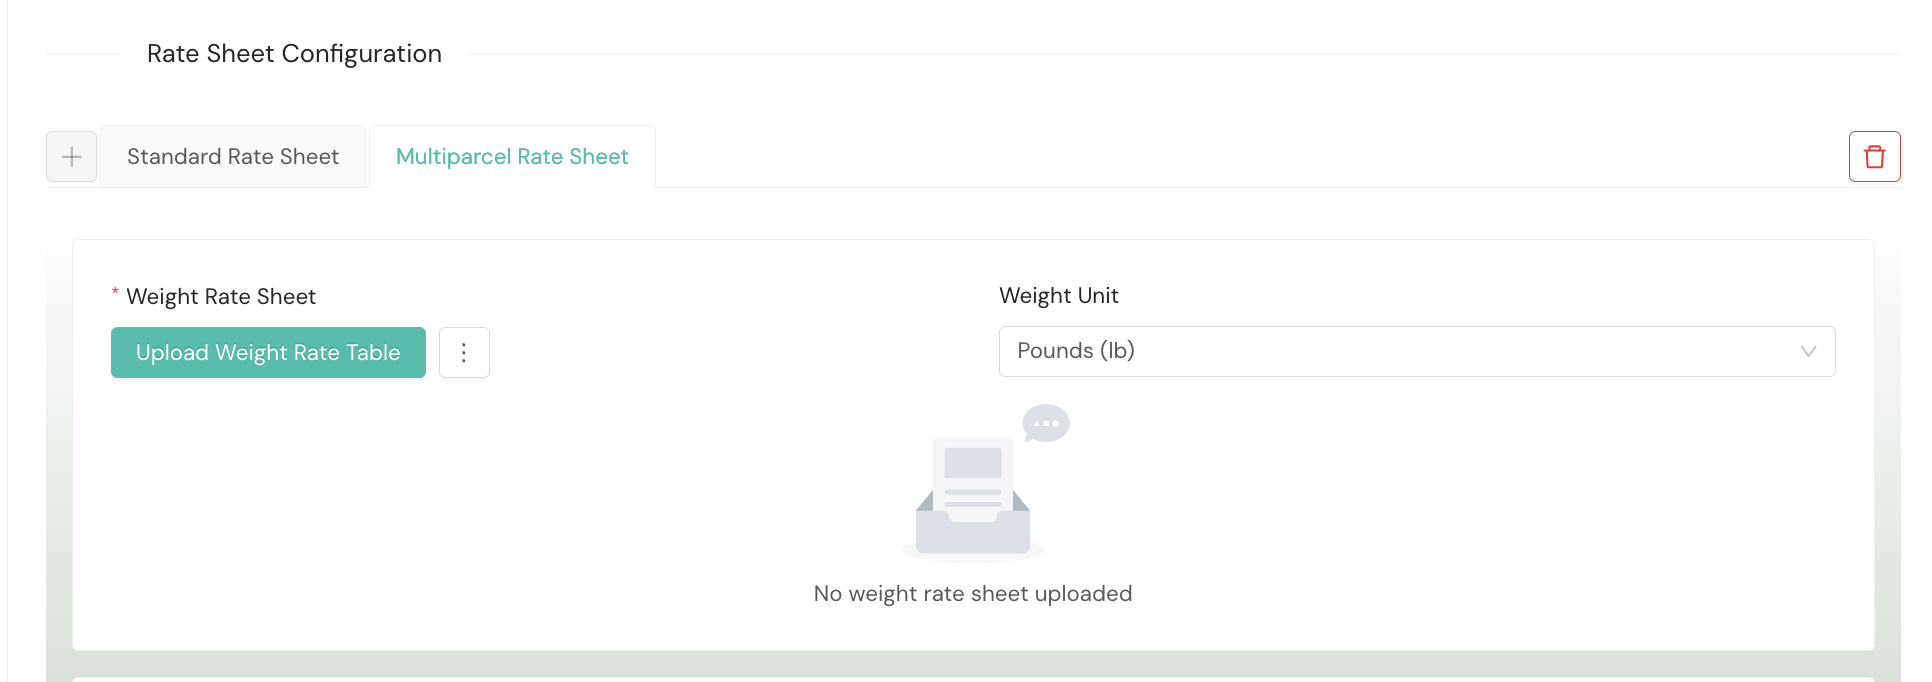
Nationex uses a dual rate sheet system to rate multiparcel shipments. If you're using this carrier, you'll need to upload a multiparcel rate sheet in addition to the standard rate sheet. The first package in the shipment will be rated according to the standard rate sheet, and all subsequent packages in the shipment will be rated using the multiparcel rate sheet.
You'll select the + button to the left of the Standard Rate Sheet tab.
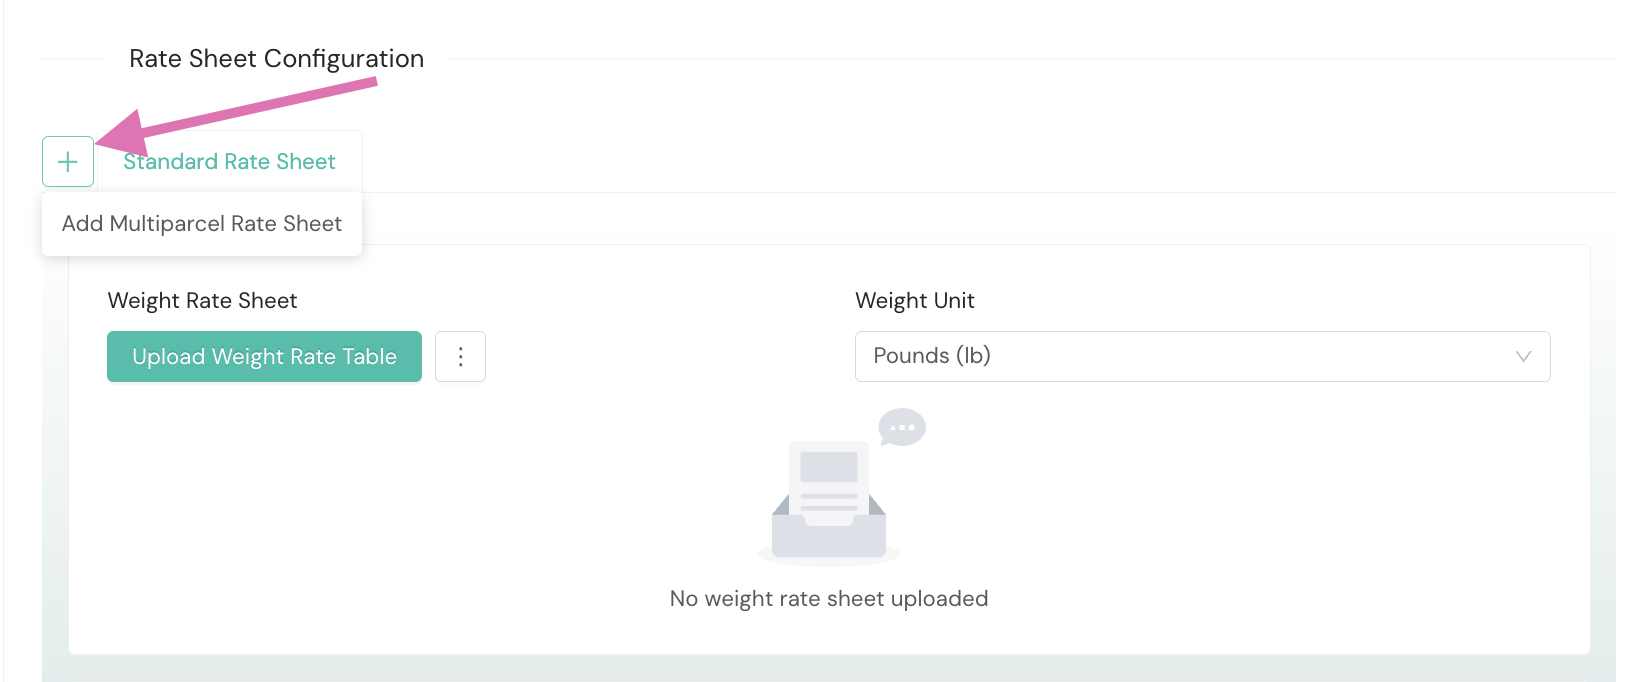
The Multiparcel Rate Sheet tab will appear for your configuration once you select the + button.
Other optional rate sheet configurations
The carrier service method for which you're creating a rate may have shipment weight and size thresholds. You can configure a Rate Per Weight Unit by delivery zone for packages that exceed the weight threshold for the rate table to enable rate shopping for the shipment. Similarly, you can enter Minimum Over Weight Rate by zone for packages that exceed the size threshold to ensure the shipment will be rate shopped. If you have both Rate Per Weight Unit and Oversize Rates configured for a carrier service method, the oversize rate takes priority.
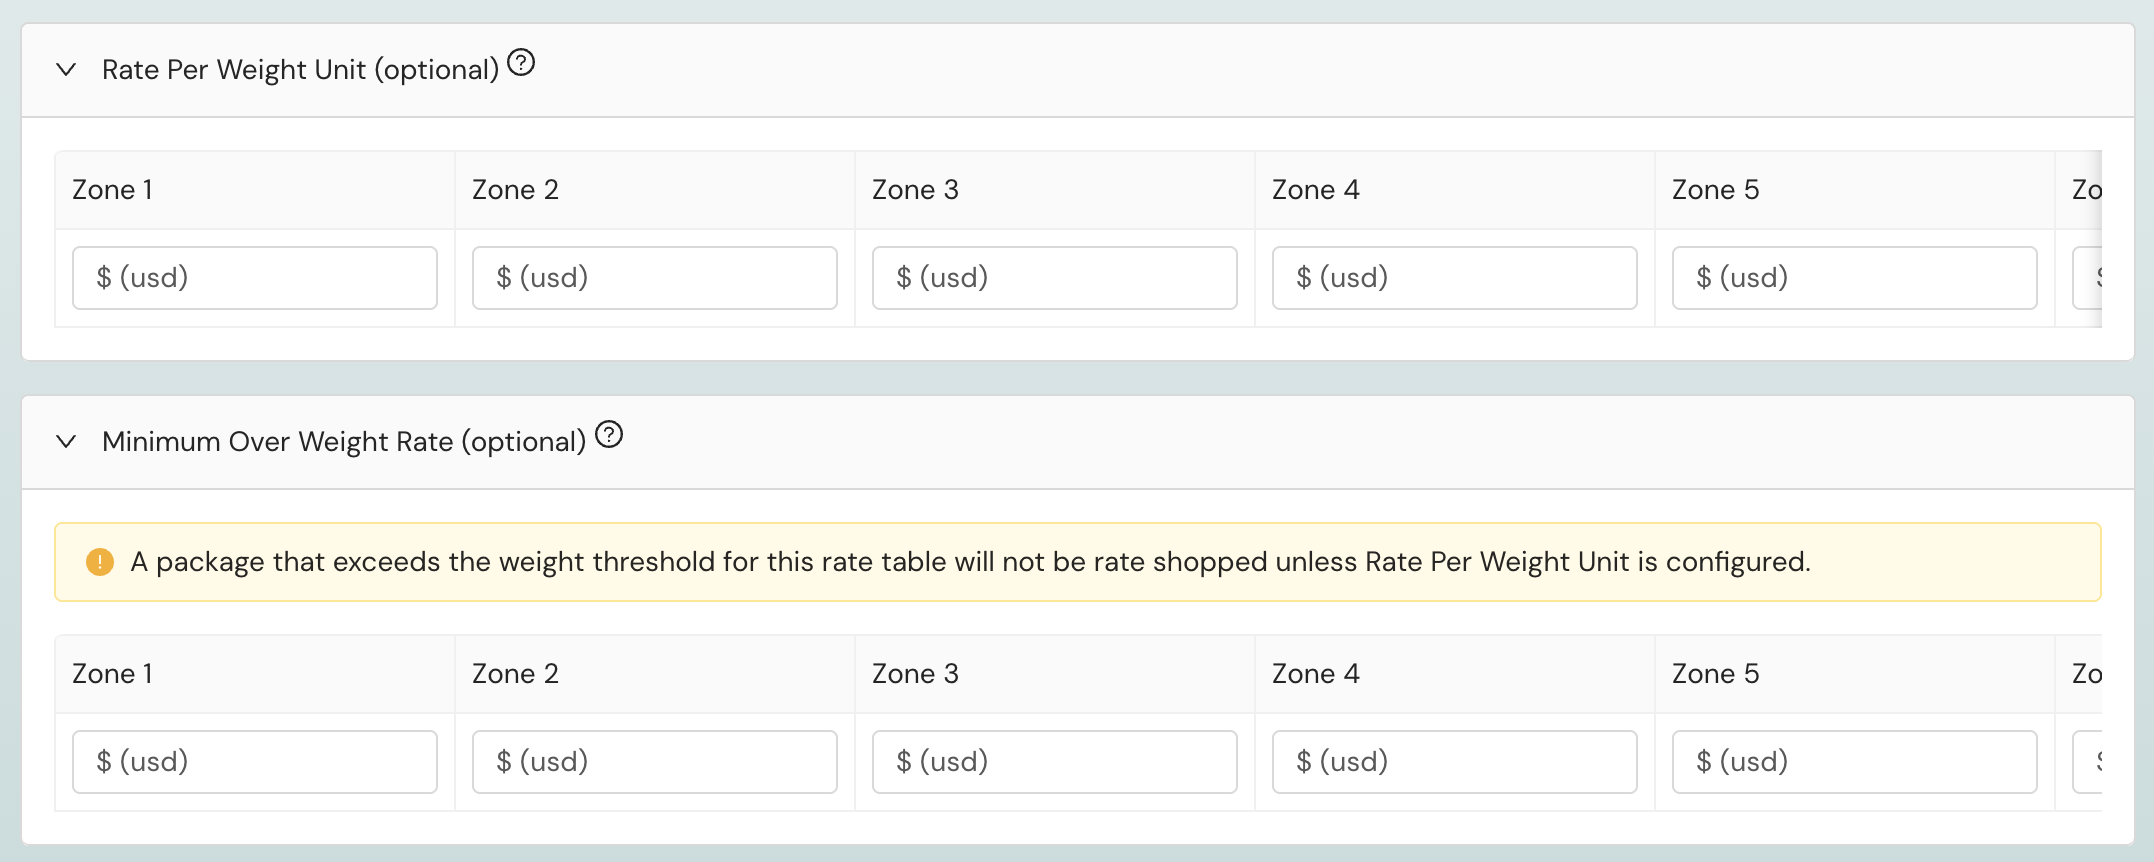
- Rate Per Weight Unit. Optional. These values should be provided instead of normal rates when a package exceeds all weights in the rate table. This value will be multiplied by the weight unit to calculate the rate. A package that exceeds the weight threshold for this rate table will not be rate shopped unless rate per weight unit is configured.
- Minimum Over Weight Rate. Optional. These values should be provided instead of normal rates when a package exceeds all weights in the rate table. The minimum over weight rate value is the minimum rate for packages exceeding the maximum weight in the rate table.
Test contract configuration
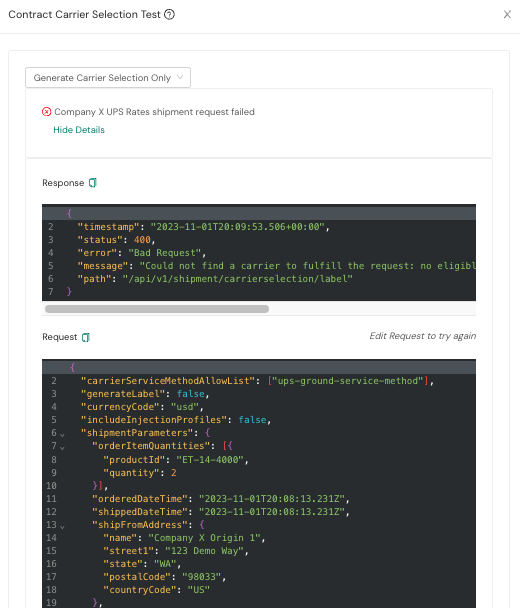
Once you've configured a carrier contract, you can test the configuration using the Test Contract Configuration button on the homepage for the Carrier Contracts tab. The testing tool generates a generic Carrier Selection or Label Service request per the configured service method. If you have a more specific use case to test, you should ask your Implementation team member about using the Rate Calculation Test Tool.

The test will return the API call request body and JavaScript Object Notation (JSON) response. You may edit the request body to retest the contract configuration.
View your carrier contract configuration
Once you've configured carrier contracts for your fulfillment contexts, you can view and verify your active configurations directly within the Shipium Console. This section provides guidance for viewing your active carrier rates, reviewing configured surcharge modifiers, and managing carrier availability.
View active carrier rates
You can view the carrier rates currently associated with a carrier contract to verify rate table entries, check effective dates, and confirm rate sheet configurations.
- Log in to the Shipium Console.
- In the lefthand navigation menu, select Configure and then Fulfillment Contexts.
- Locate the fulfillment context containing the carrier contract you wish to review. You can use the search bar at the top of the page or scroll through the list of available contexts.
- Select the fulfillment context name to open it.
- Select the Carrier Contracts tab.
- Locate the carrier contract you wish to review in the righthand section and select it.
- Scroll to the Carrier Rates section, select the desired rate table configuration, and click View Details.
- In the lefthand column under Rate Table Entries, you'll see a list of configured rate table entries with their associated start and end dates (or a single entry if only one is configured). Select a rate table entry to view its details, including rating type, rate sheets, and any configured rate per weight unit or minimum over weight rate values.
Rate table entry date displayRate table entries display their configured start and end dates. New rate table entries become effective at 8:00 AM UTC on the start date, and rate table entries expire at midnight UTC (00:00) on the end date.
View active surcharge modifiers
Surcharge modifiers, also referred to as negotiated surcharge overrides, are configured as part of your carrier rate settings. You can review these modifiers to verify your negotiated discounts and replacement surcharges are correctly configured.
- Log in to the Shipium Console.
- In the lefthand navigation menu, select Configure and then Fulfillment Contexts.
- Locate and select the fulfillment context containing the carrier contract you wish to review.
- Select the Carrier Contracts tab.
- Locate the carrier contract you wish to review in the righthand section and select it.
- Scroll to the Carrier Rates section, select the desired rate table configuration, and click View Details.
- Select the applicable rate table entry from the list in the lefthand column; you may have only one configured.
- Scroll to the Negotiated Surcharge Overrides section to view any configured surcharge modifiers. Each configured override displays the surcharge type, modifier value, and modifier type (such as % Surcharge Discount, $ Surcharge Discount, Fixed % Surcharge Discount, Fixed % Surcharge, or Fixed $ Surcharge).
Turn carriers on and off
You can temporarily pause or resume carriers and service methods using Carrier Selection Overrides. This feature allows you to control which carriers are available for selection without removing carrier contracts from your fulfillment contexts.
Pause a carrier or service method
When you pause a carrier account or service method, it will not be considered when the system is rate shopping for a label.
- Log in to the Shipium Console.
- In the lefthand navigation menu, select Configure and then Fulfillment Configuration.
- Scroll to the Carrier Selection Configuration section and select the Carrier Selection Overrides card.
- Select Add Carrier Selection Override.
- Configure the override with the following details:
- Override Type. Select Pause from the dropdown menu.
- Override Scope. Select Carrier Account or Carrier Service Method from the dropdown menu. Then select the desired account or service method. You can only set up a single service method per override.
- Apply to All Origins. Select Yes to apply the override to all origins or No to apply to a specific origin. If you select No, you'll be prompted to select an origin.
- All Tenants. Select Yes to apply the override to all tenants or No to apply to a specific tenant. If you select No, you'll be prompted to select a tenant.
- Name. Enter a human-readable name for the override.
- Description. Optionally, enter a description for the override.
- Save the override.
Test Mode optionIn addition to pausing a carrier, you can set a carrier account or service method to Test Mode. A carrier in test mode will not generate production labels; instead, test labels will be generated. This is useful when you're initially testing a new carrier and want to validate that everything is working correctly in and out of the fulfillment center.
Resume a carrier or service method
To resume a paused carrier or service method, you can disable or delete the Carrier Selection Override.
- Log in to the Shipium Console.
- In the lefthand navigation menu, select Configure and then Fulfillment Configuration.
- Scroll to the Carrier Selection Configuration section and select the Carrier Selection Overrides card.
- Locate the override for the carrier or service method you wish to resume.
- Disable or delete the override to resume carrier selection for that carrier or service method.
Alternative: Remove a carrier contract from a fulfillment context
For more permanent changes to carrier availability, you can remove a carrier contract from a fulfillment context entirely. This prevents the carrier from being selected for any shipments using that fulfillment context.
- Log in to the Shipium Console.
- In the lefthand navigation menu, select Configure and then Fulfillment Contexts.
- Locate and select the fulfillment context for which you wish to remove a carrier.
- Select the Carrier Contracts tab.
- Locate the carrier contract you wish to remove in the righthand section and select it.
- Select Delete under Contract Details.

Carrier contract remains availableRemoving a carrier contract from a fulfillment context does not delete the contract itself. The contract remains available and can be re-added to the same or different fulfillment contexts as needed.
To add a carrier back to a fulfillment context, select Add a Carrier Contract from the dropdown menu, then select the Select Existing Contract tab and choose the carrier contract you wish to enable.
Maintain and make changes to a carrier contract
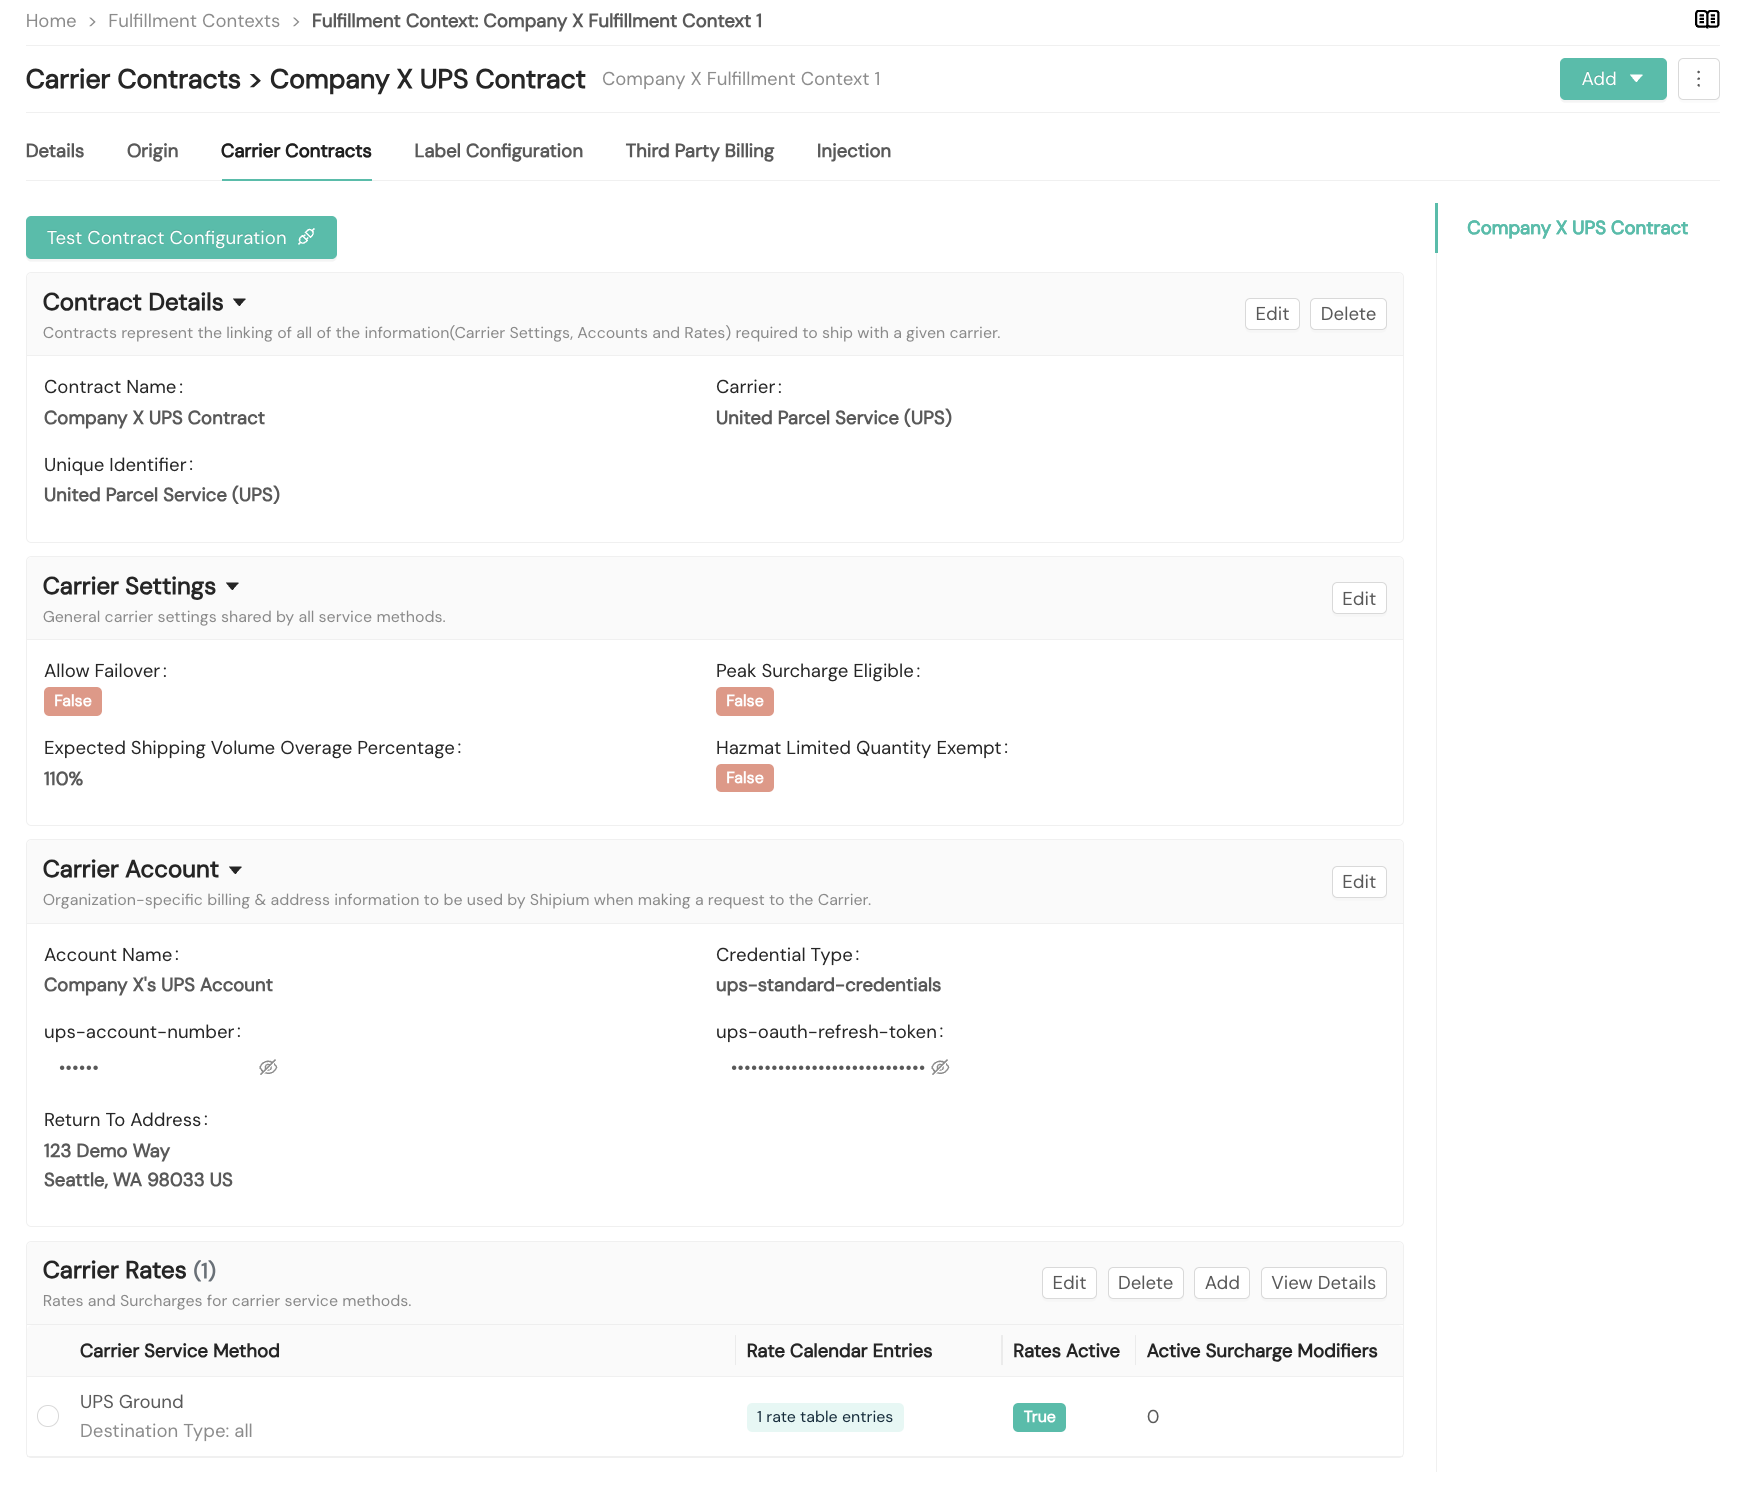
You can access the fulfillment context's carrier contract details, settings, account, and rates via the Carrier Contracts tab within the fulfillment context. Each section includes an Edit button that enables editing of the context component.
Resources
Your Shipium team member is available to help along the way. However, you might find these resources helpful:
Updated 11 days ago
