
Simulation
Configure your account to use Shipium's Simulation service.
About Simulation
Simulation helps your organization optimize current fulfillment network operations and plan for the future. You can read more about Simulation on our website.
This guide provides Shipium’s recommended steps for using Simulation to generate a carrier selection cost analysis or a breakdown of carrier and service method configurations and their impact.
Set up Simulation for your organization
To start using Simulation, you’ll need to complete the following steps. Your dedicated Shipium team member is available to assist you with each one.
- Set up your Shipium account.
You’ll set up your organization’s account within the Shipium platform. - Configure your fulfillment context.
A fulfillment context, including the origin and network properties critical to the outcomes of a simulation, is required to run a simulation. You can use an existing fulfillment context or create a new one in the Shipium Console. - Set up simulation environment.
To access the simulation environment, you’ll need to log in to the Shipium Console and follow the directions in the section below.
Run a new simulation
You'll access Simulation from the lefthand navigation menu in the Shipium Console.
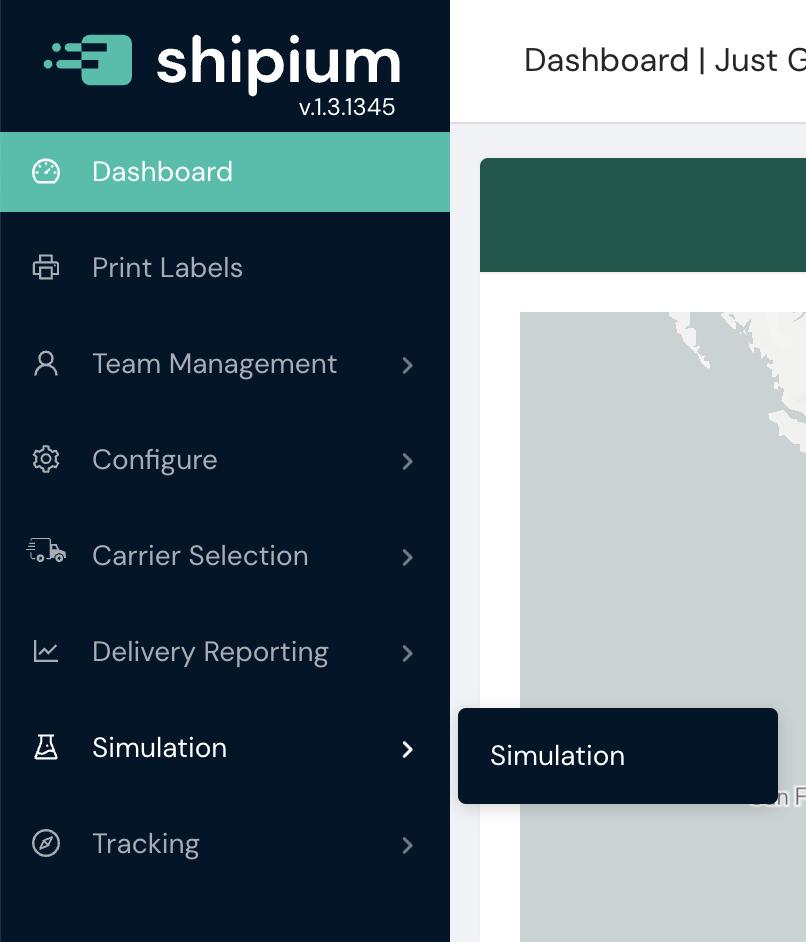
To create a new simulation, you’ll select the + Create a New Simulation button in the upper righthand part of the page.

Next, you’ll select the type of simulation you wish to create.
Types of simulations
Regardless of type, the starting steps to run a simulation are generally the same and are included in the next section, Common Steps to Run Each Type of Simulation. This section provides a description for each simulation type as well as a link to steps later in this document that are specific to that type of simulation.
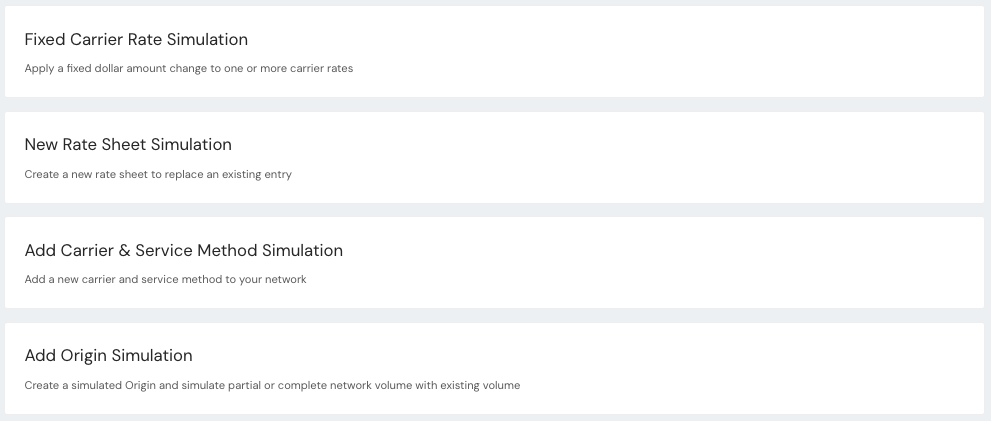
- Fixed Carrier Rate Simulation. Apply a fixed dollar amount change to one or more carrier rates.
- New Rate Sheet Simulation. Create a new rate sheet to replace an existing entry.
- Add Carrier & Service Method Simulation. Add a new carrier and service method to your network.
- Add Origin Simulation. Create a simulated origin and simulate partial or complete network volume with existing volume.
- Sell Rate Margin. Select a set of sell rate sheets to simulate alongside your carrier rates, and compare your shipping costs to your expected sell prices and predict your customer's savings. An option for this type of simulation is pre-configuration of your sell rate sheets prior to setting up and running a simulation. Instructions are included in the section specific to this type of simulation later in this document.
Common steps to run each type of simulation
There are five primary steps for each type of simulation, as outlined in the following subsections: (1) configure details, (2) time in transit overrides, (3) upload historical shipments, (4) simulation mapping, and (5) review and approve settings. Other steps unique to each type of simulation are included in the next section.
Step 1. Configure details
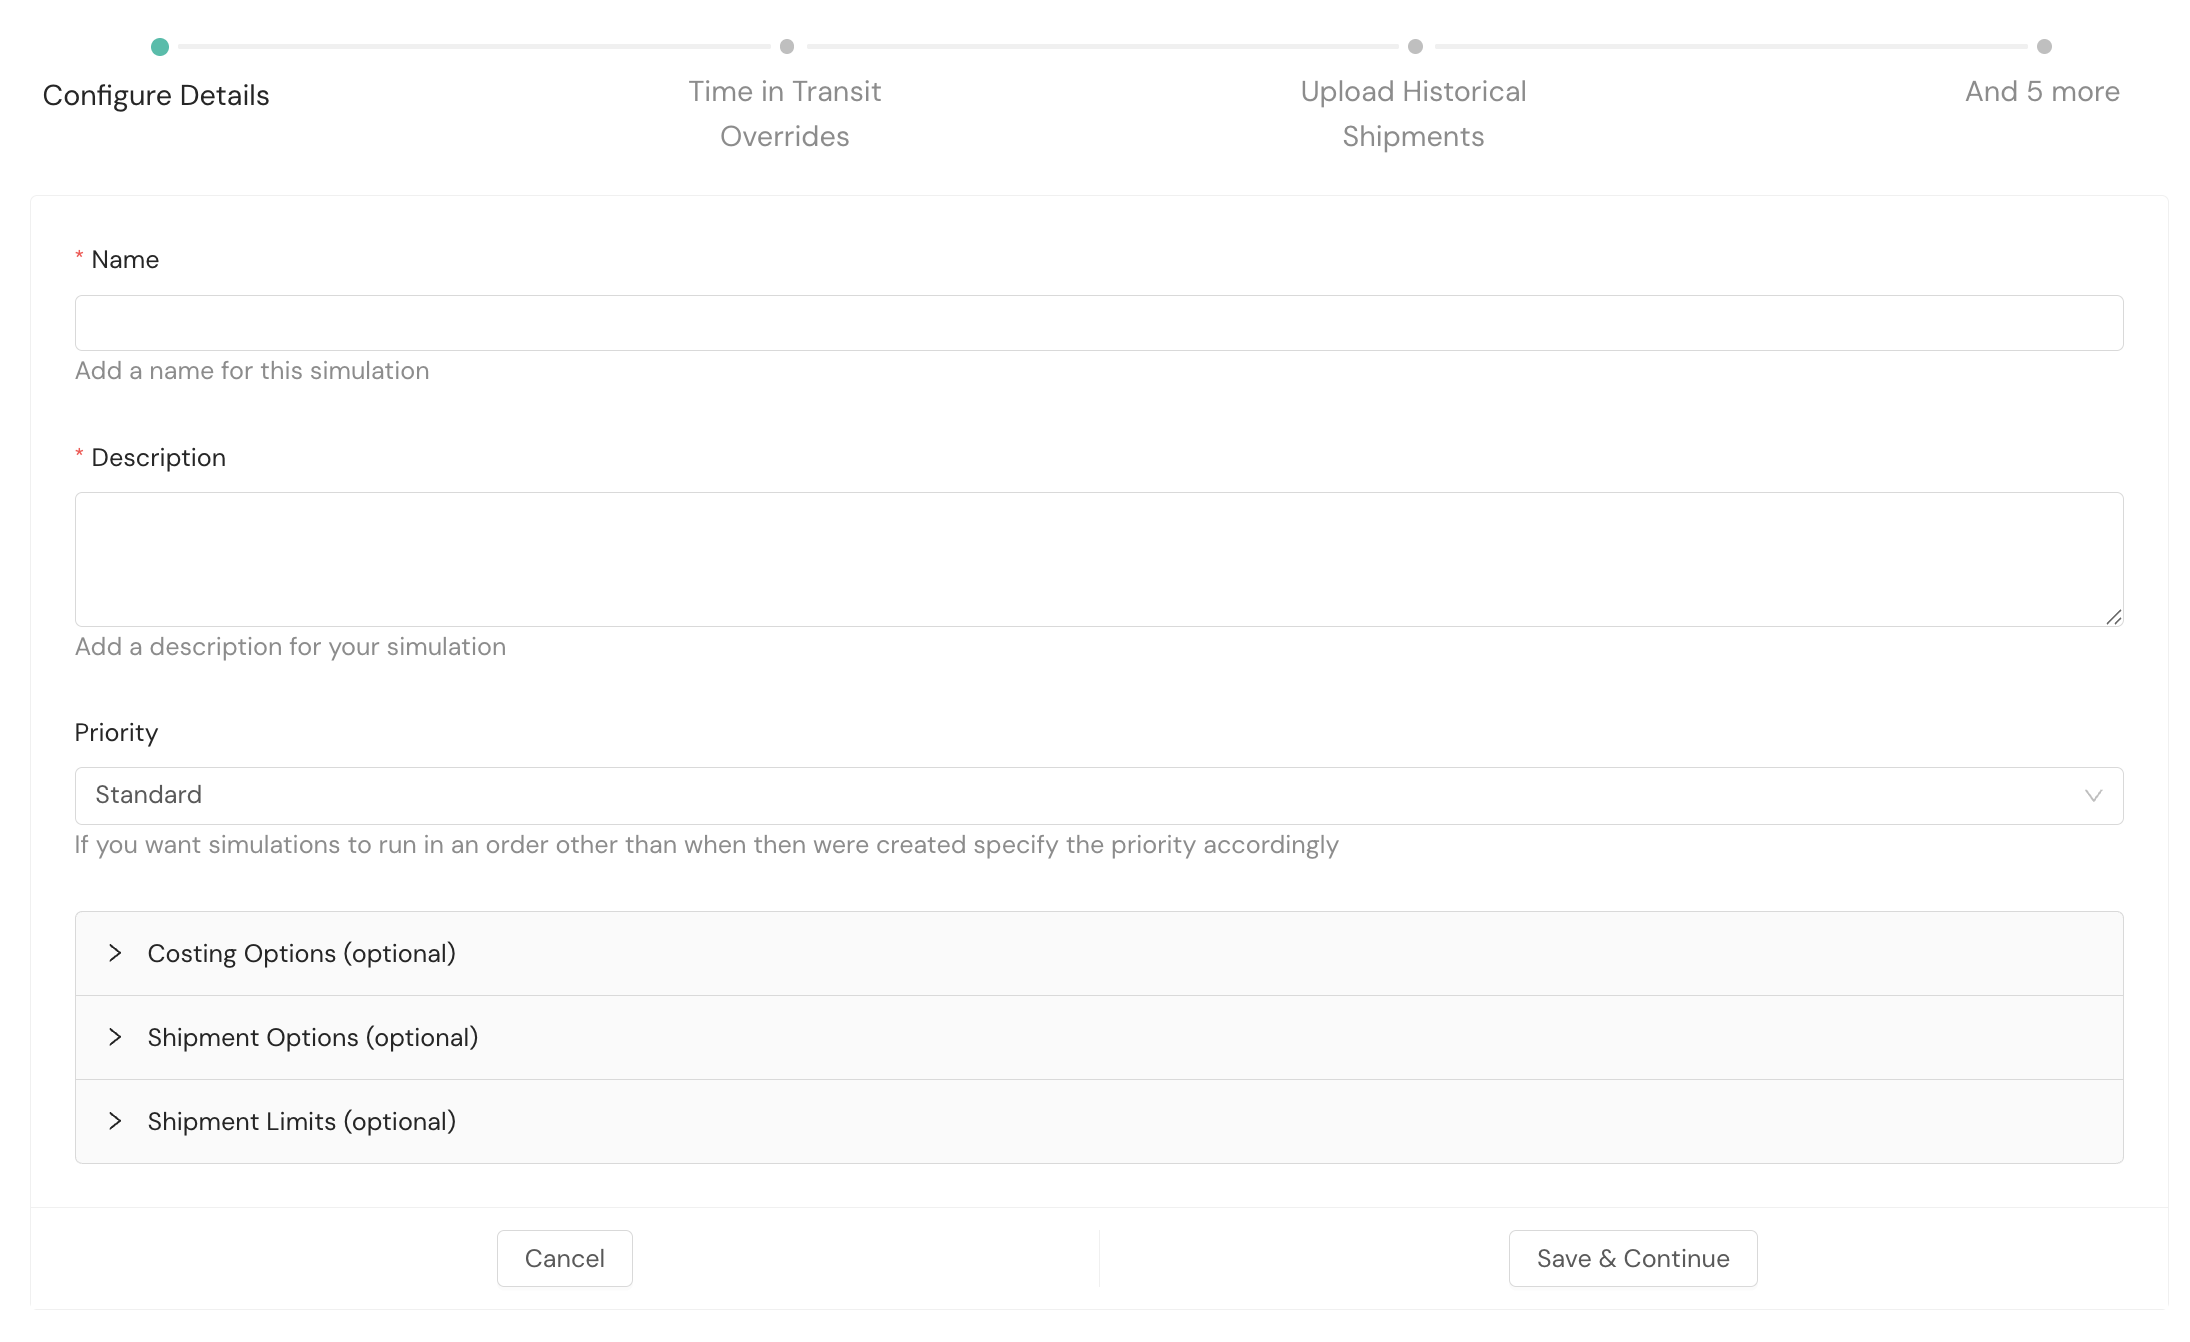
- Name. Required. A human-readable name you’ll use to refer to the simulation
- Description. Optional. An optional description you can use to help you organize your simulations
- Priority. Optional. An optional priority order you can assign to the simulation, especially useful if you are running multiple simulations. Priority values are Low, Standard, and High.
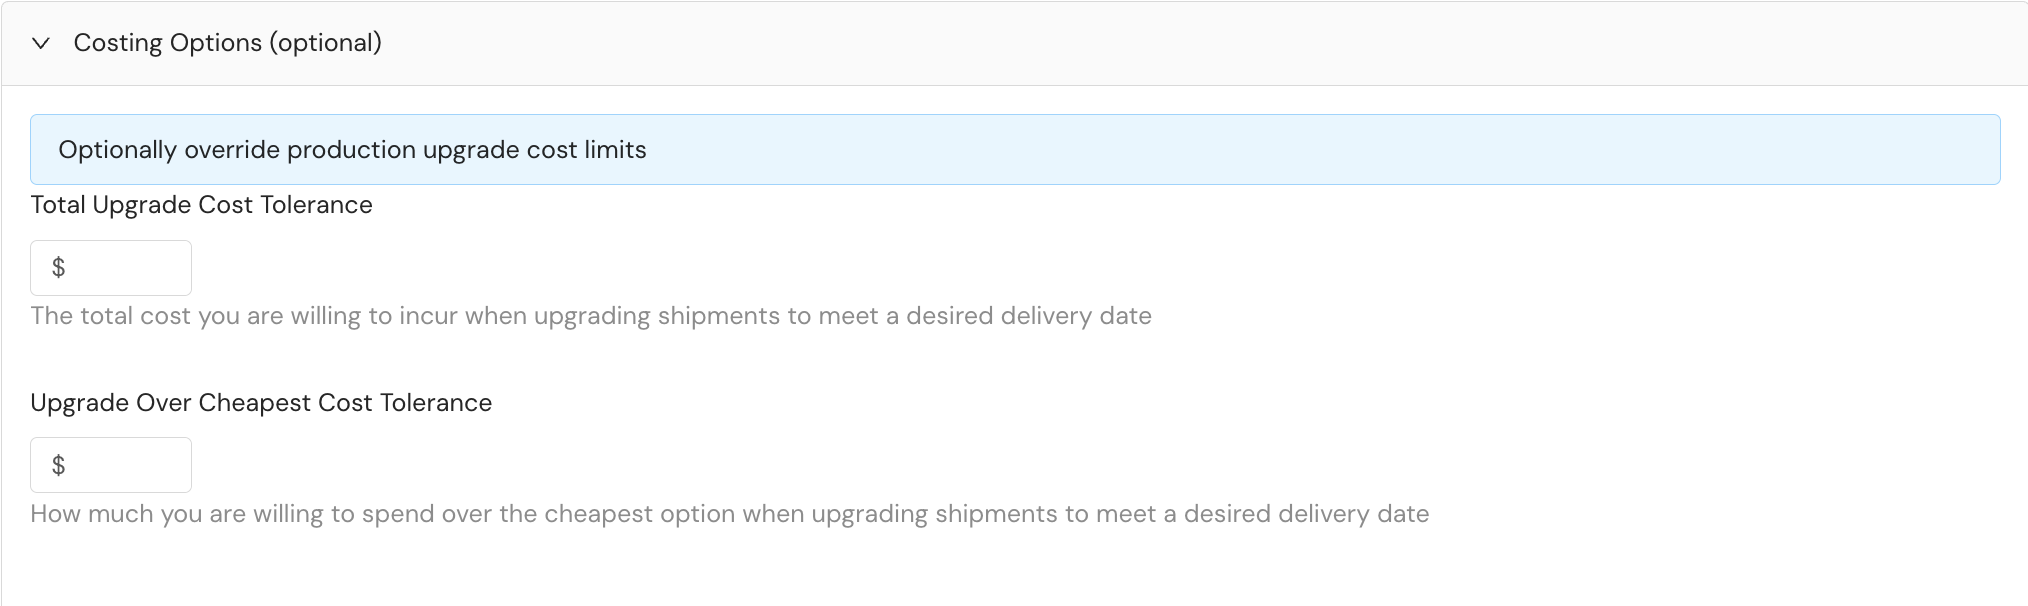
- Costing Options. Optional. Optionally override production upgrade cost limits. Any costing options associated with an existing fulfillment context will pre-populate these fields.
- Total Upgrade Cost Tolerance. The total cost in whole dollars that you’re willing to incur when upgrading shipments to meet a desired delivery date
- Upgrade Over Cheapest Cost Tolerance. The total amount in whole dollars that you’re willing to spend over the cheapest delivery option when upgrading shipments to meet a desired delivery date
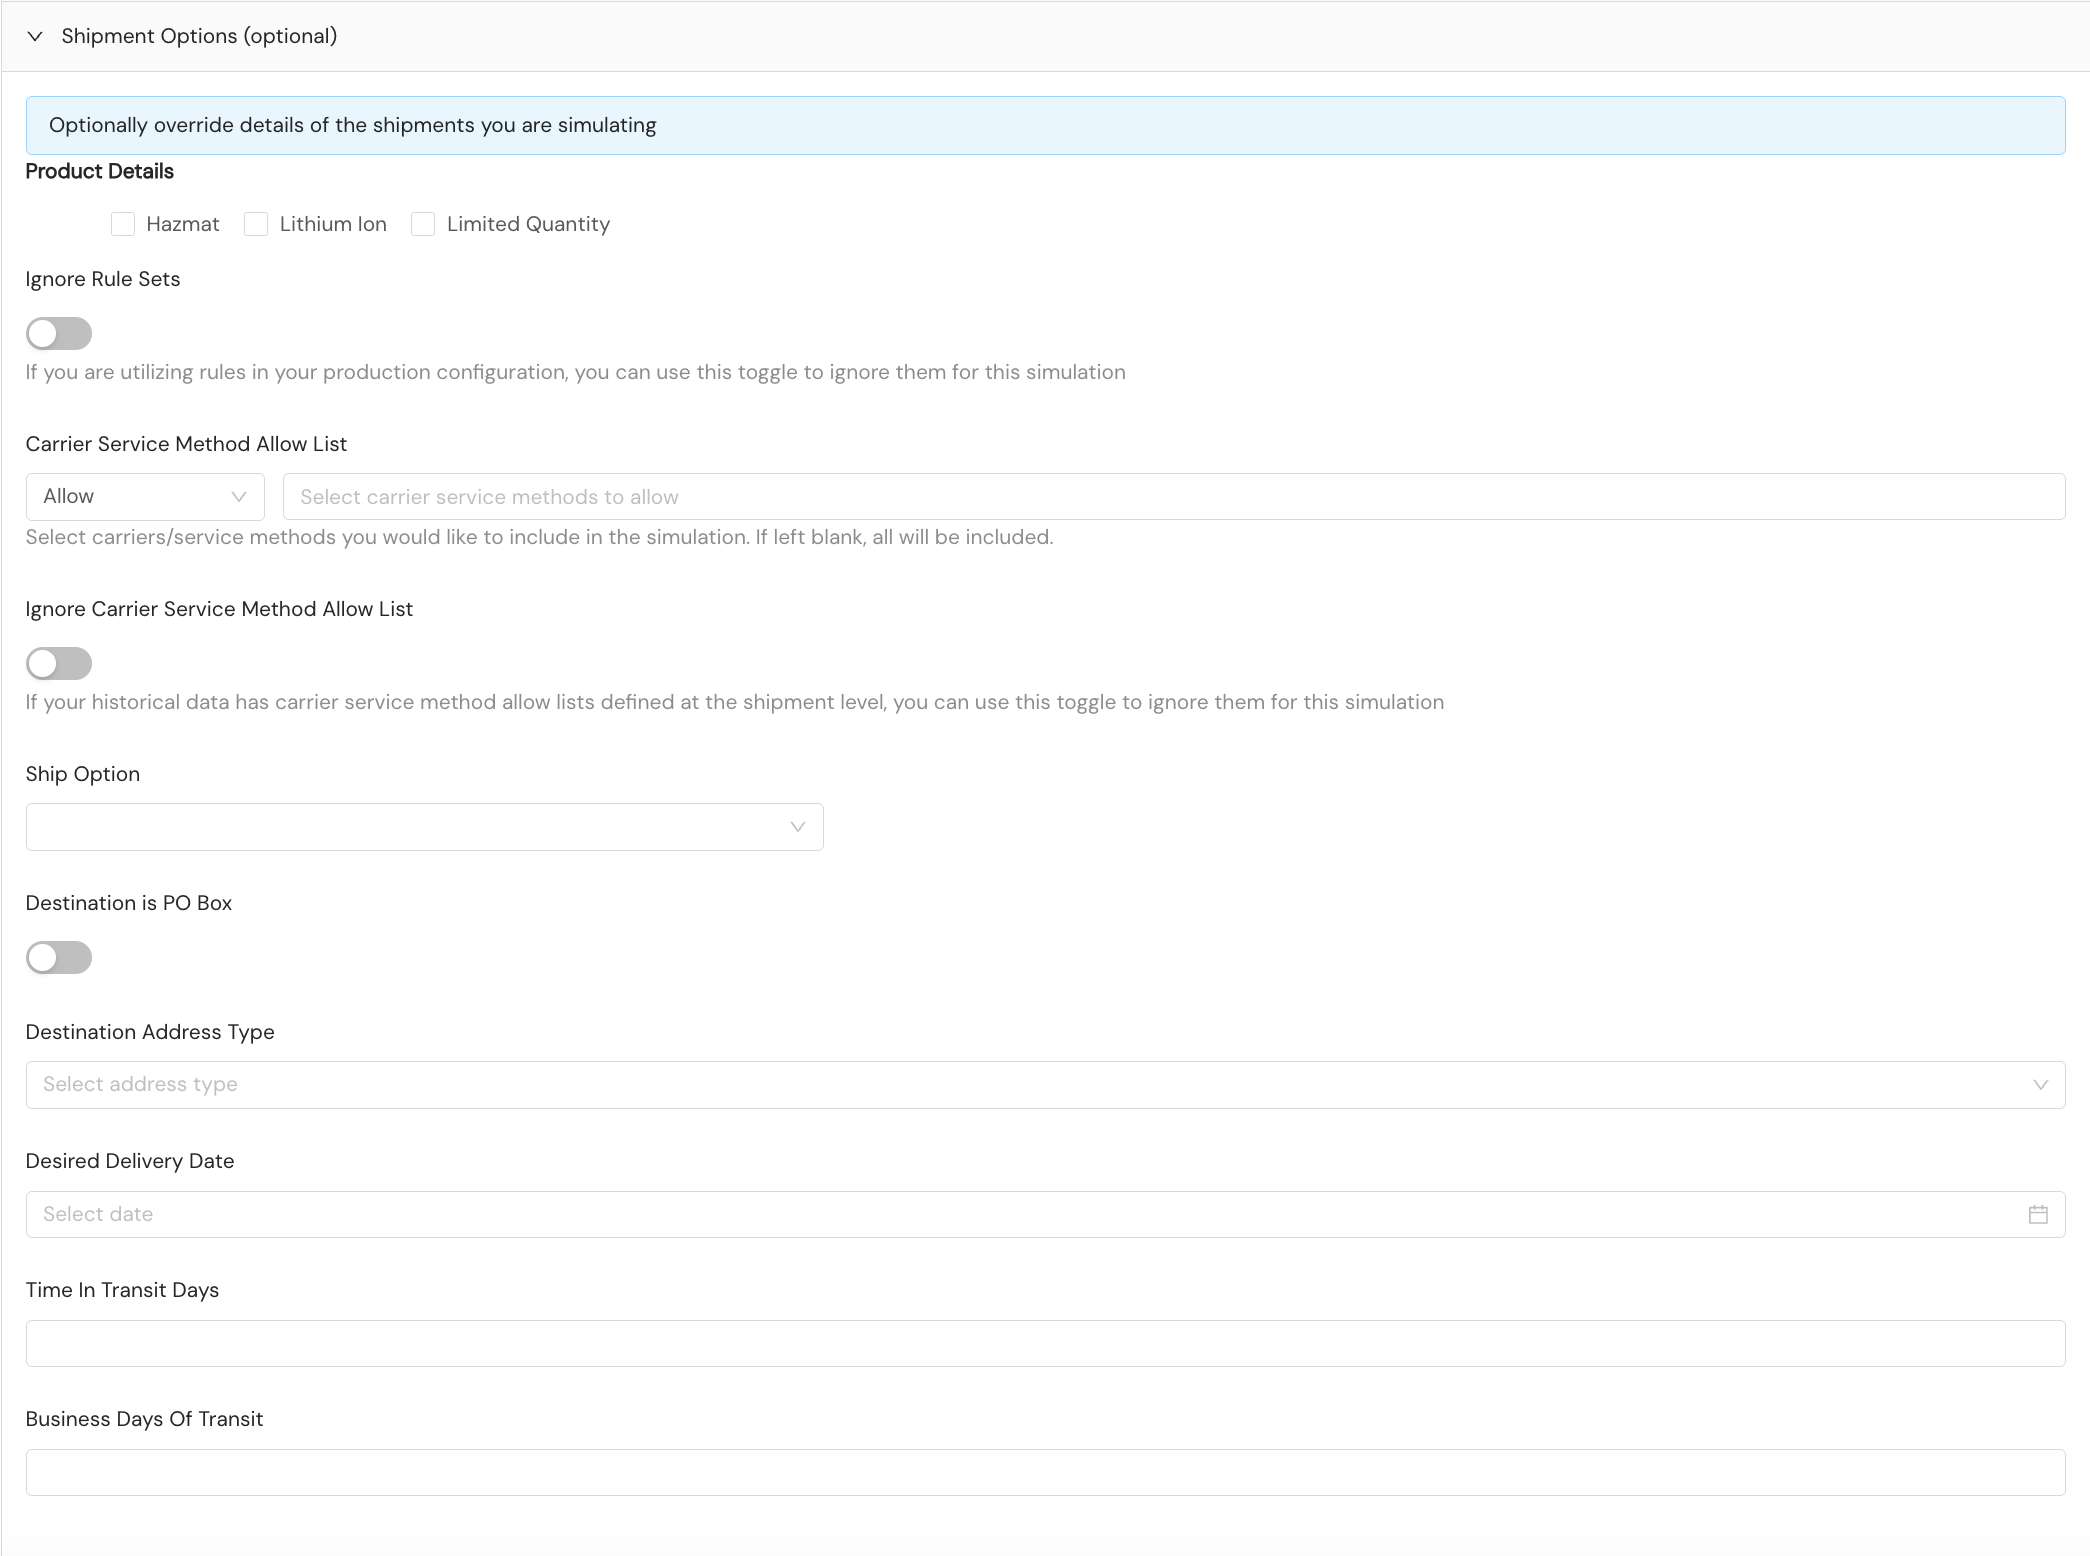
- Shipment Options. Optional. Optionally override details of the shipments you are simulating.
- Product Details. You can specify the product as ORM-D, Lithium Ion, or Limited Quantity. More information about these classifications is in our Hazardous Materials documentation.
- Ignore Rule Sets. This setting should be toggled on (to “Ignore”) if you're utilizing rules in your production configuration and you wish to ignore them for this simulation.
- Carrier Service Method Allow List / Carrier Service Method Exclusion List. You can select carriers and/or service methods from the dropdown menu to limit the simulation to only specific carriers/service methods or to exclude certain carriers/service methods from the simulation. You'll use the dropdown menu to toggle between Allow and Exclude functionality. These selections will override the allow list defined in the historical shipment data. If nothing is selected to allow or exclude, all carriers/service methods will be included in the simulation.
- Ignore Carrier Service Method Allow List. If your historical data has carrier service method allow lists defined at the shipment level, you can use this toggle to ignore them for this simulation.
- Ship Option. You can select a Shipium default ship option or desired delivery date (DDD) from the dropdown menu if you wish to apply one for the simulation.
- Destination Is PO Box. This setting should be toggled on if the destination address is a P.O. box.
- Destination Address Type. You can select Commercial or Residential as the address type from the dropdown menu.
- Desired Delivery Date. You can use the calendar to select a desired delivery date if you wish to include one for this simulation.
- Time in Transit Days. You can override the number of TNT days expected for all shipments in the simulation.
- Business Days of Transit. You can override the number of business days of transit expected for all shipments in the simulation.
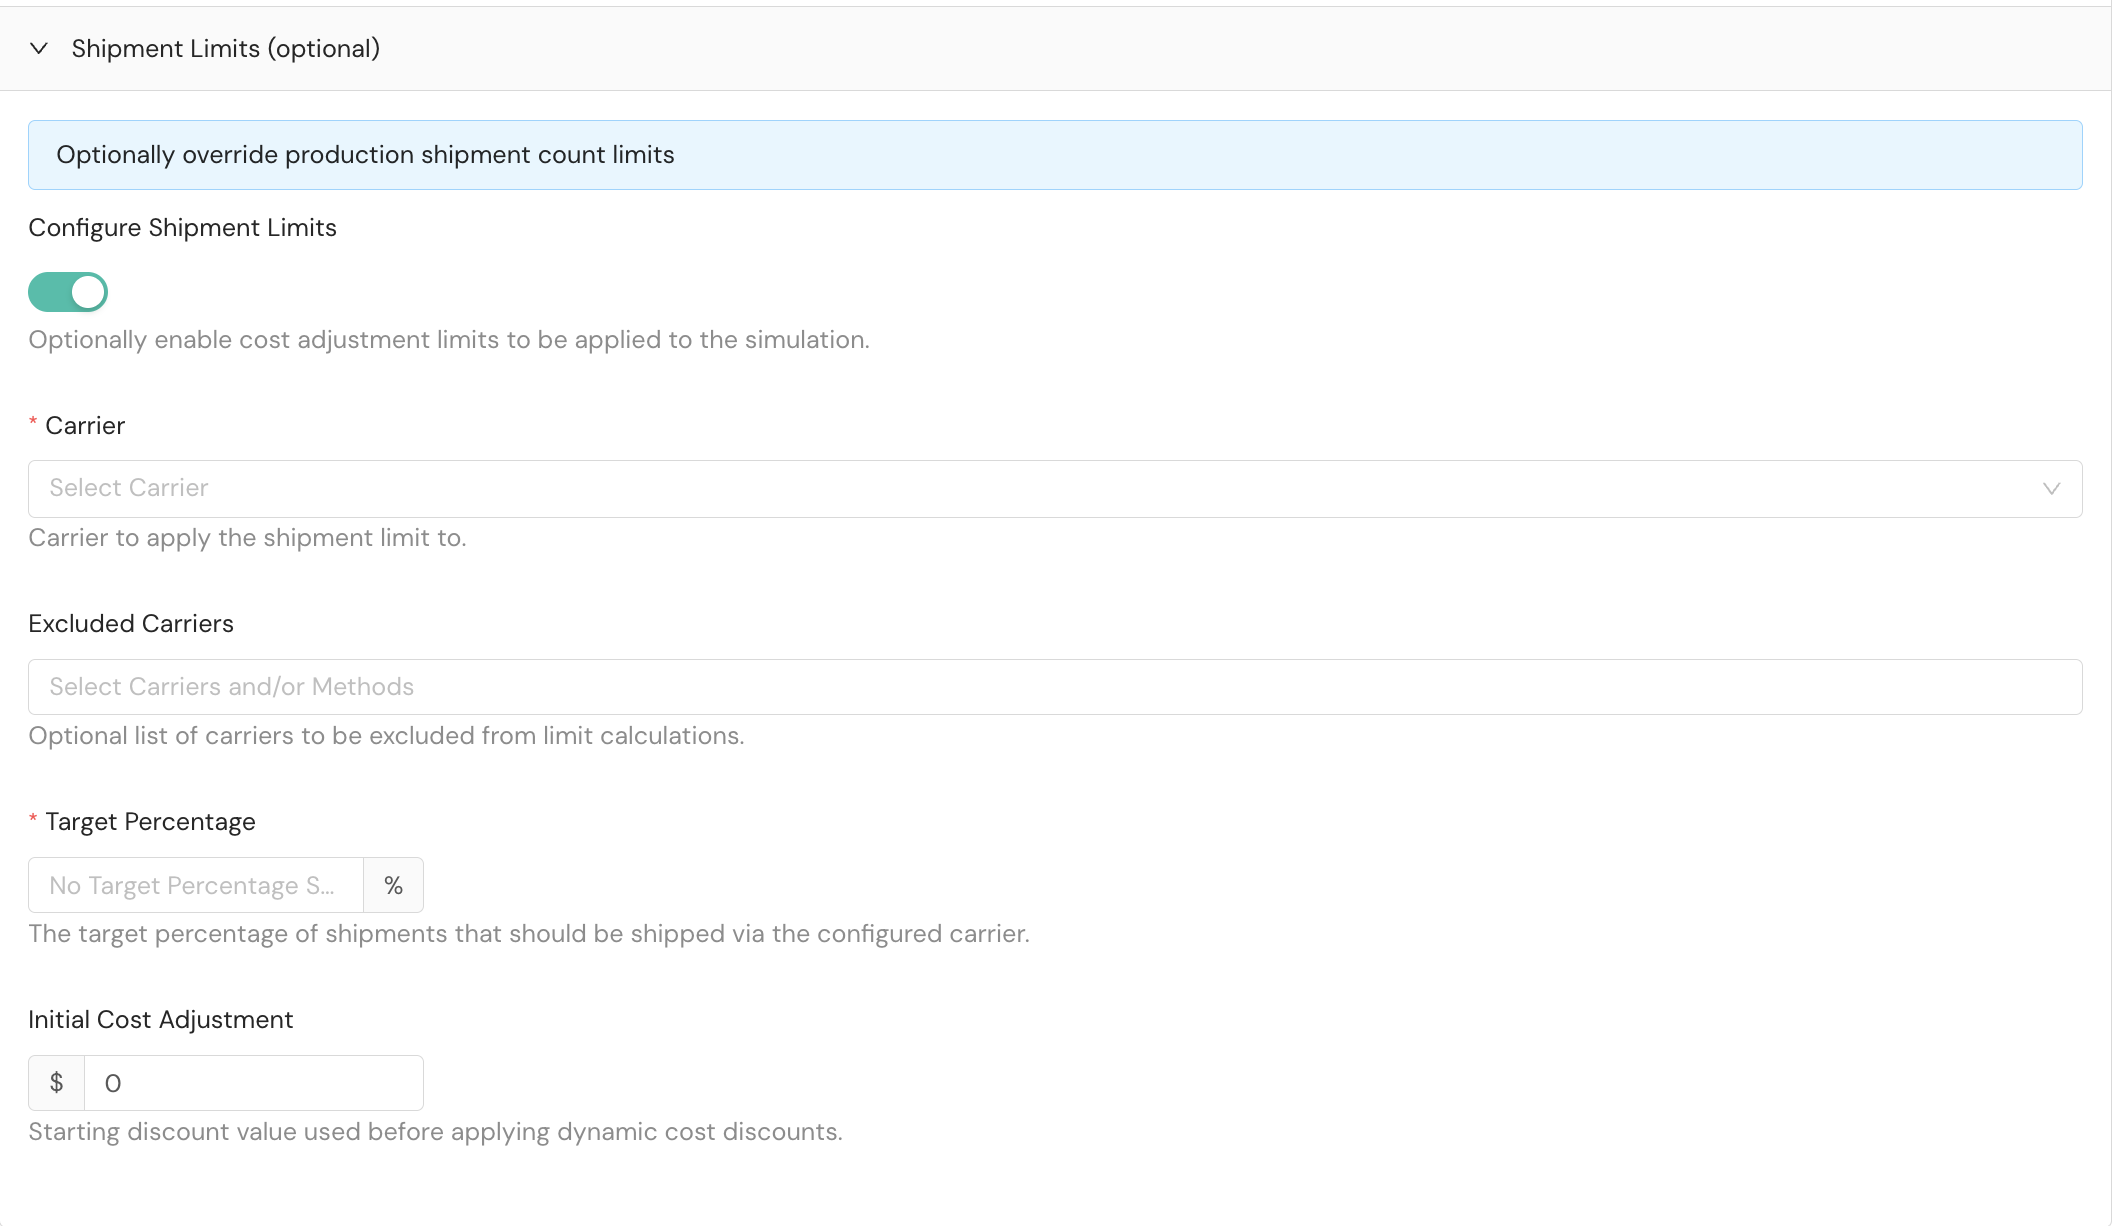
- Shipment Limits. Optional. Optionally override production shipment count limits.
- Configure Shipment Limits. You'll need to switch the toggle to enable cost adjustment limits to be applied to this simulation.
- Carrier. The carrier to which the shipment limit should be applied
- Excluded Carriers. You can optionally select carriers that you wish to be excluded from the shipment limit calculation
- Target Percentage. The target percentage of shipments that should be shipped via the configured carrier
- Initial Cost Adjustment. The starting discount value used before applying dynamic cost discounts
Step 2. Time in transit overrides
You can optionally override production TNT values, which default to carrier provided values.
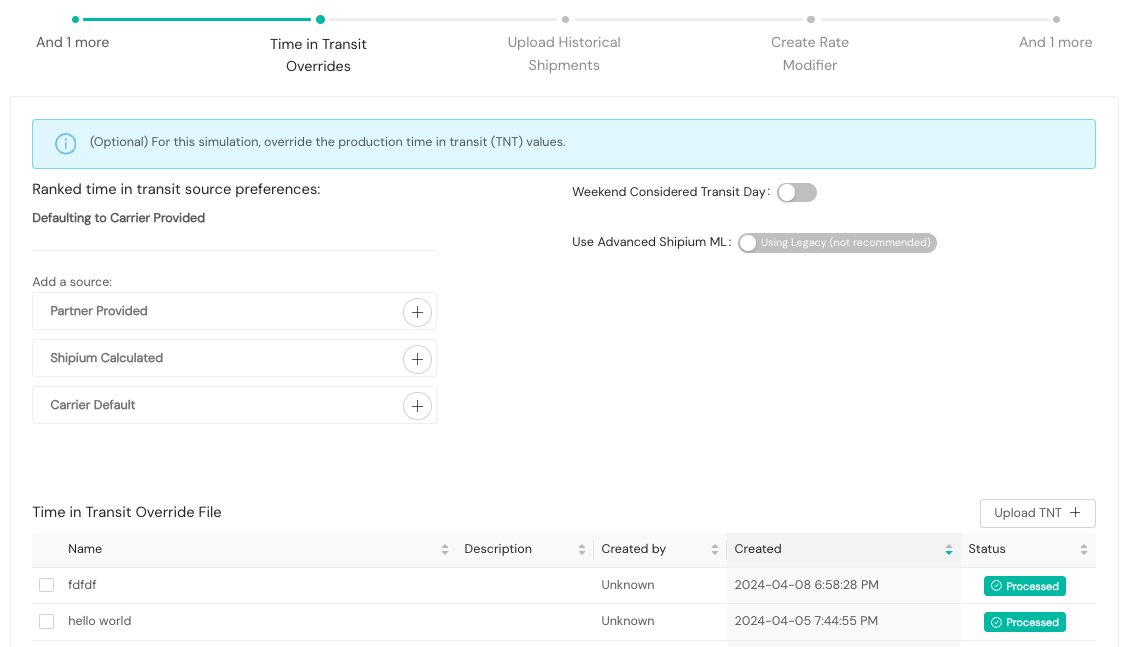
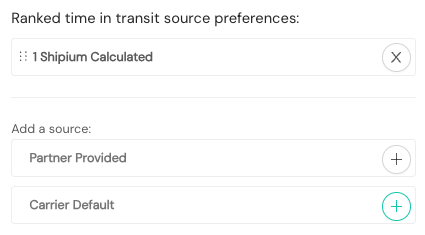
When you select the + add button next to a TNT source, the source will be placed in the ranked time in transit source preferences. You can re-order your preferred TNT sources, and you can remove any source from the list by selecting the X delete button next to it.
In addition, you can use the toggle to consider weekend days as days of transit, and you can opt to use Shipium's advanced machine learning model for the simulation, rather than the legacy model.

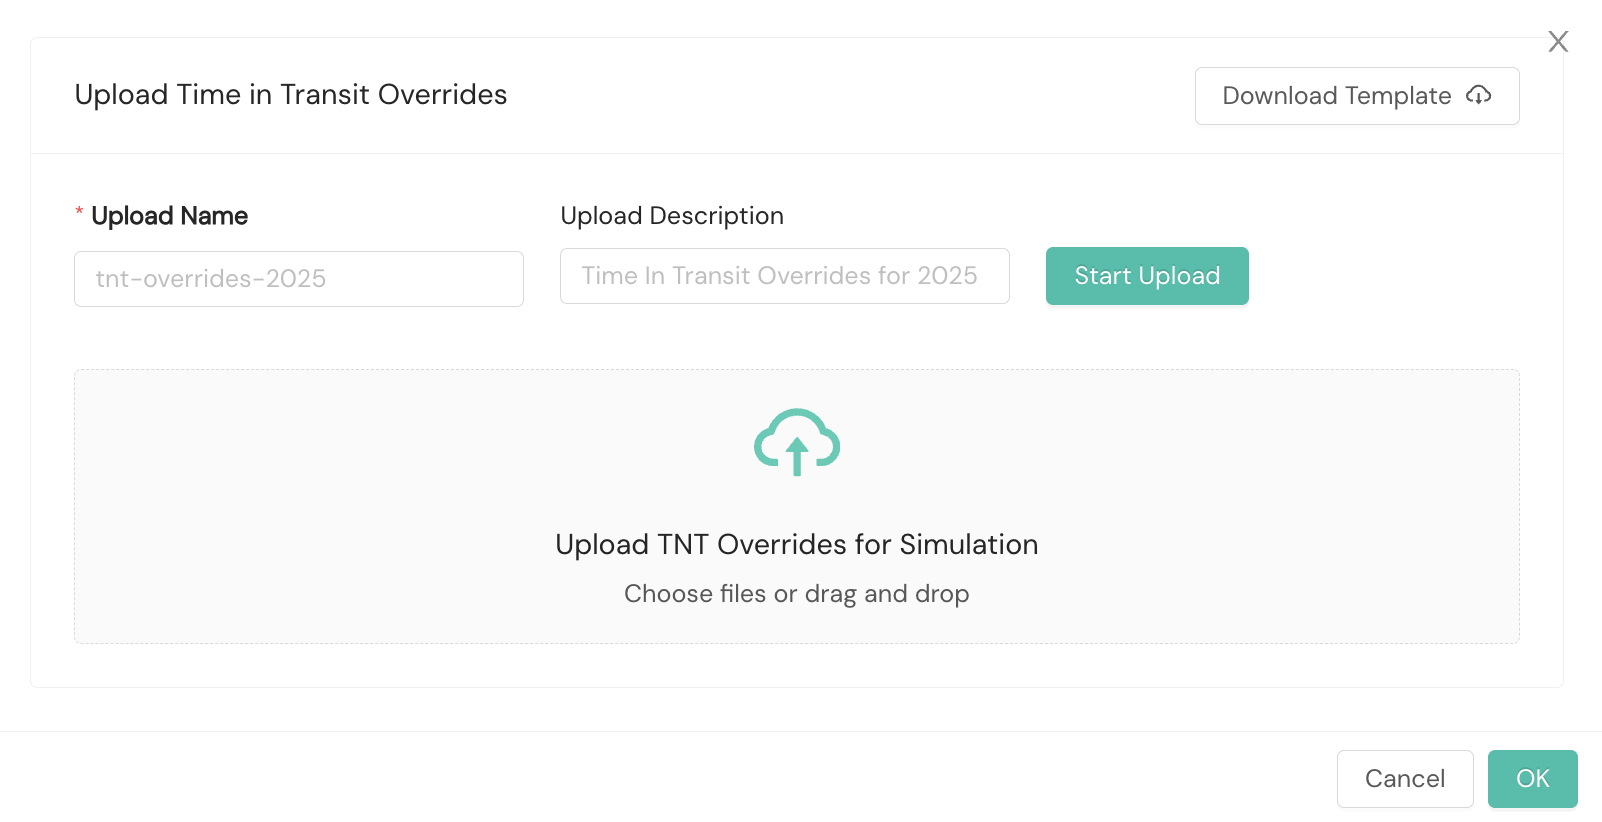
Alternatively, you can override production TNT values with an existing uploaded file of your organization's TNT values or by uploading a new file. To use an existing file, you'll select the box next to the file you wish to use for the override. To upload a new file, you’ll click the Upload TNT + button and provide the required information in the popup modal.
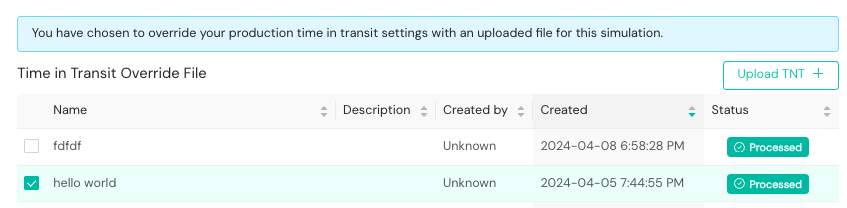
You can download a template to populate within this modal as well.
Step 3. Upload historical shipments
You have three choices for historical shipment data: (1) use a historical Shipium dataset, (2) upload your own data file, or (3) use a previous simulation dataset. The data fields you'll encounter in a file upload are described at the end of this step.

"At Large" fulfillment contextsYou can include shipments from unconfigured origins by providing the
fulfillmentContextIdof an At Large fulfillment context directly in the historical shipment data file.
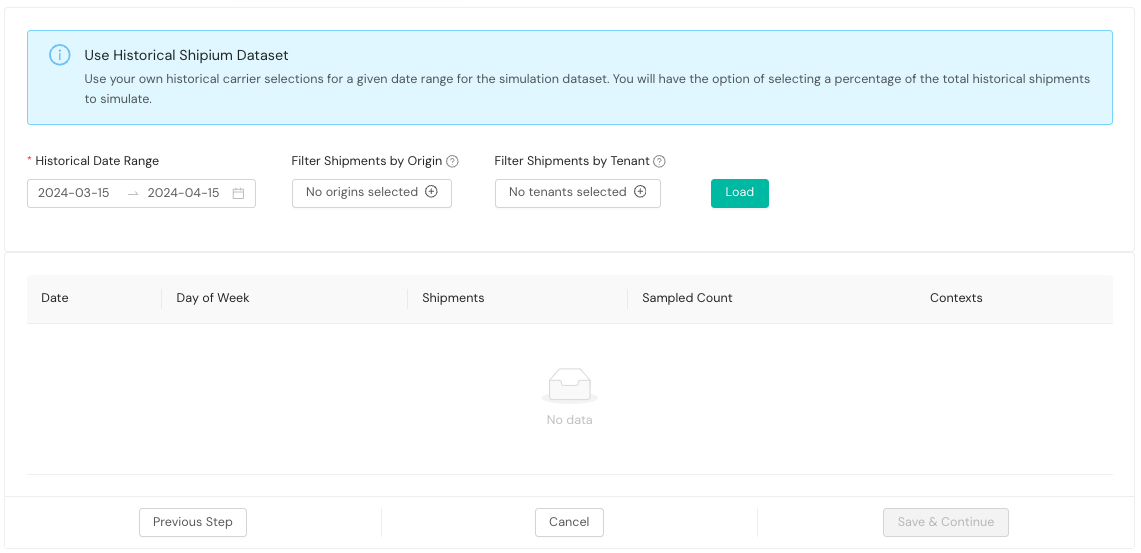
Use a historical Shipium dataset
You can use your own historical carrier selections for a given date range for the dataset. You will have the option of selecting a percentage of the total historical shipments to simulate. You'll need to provide a date range for the dataset, and you can optionally filter the dataset by origin and/or tenant.
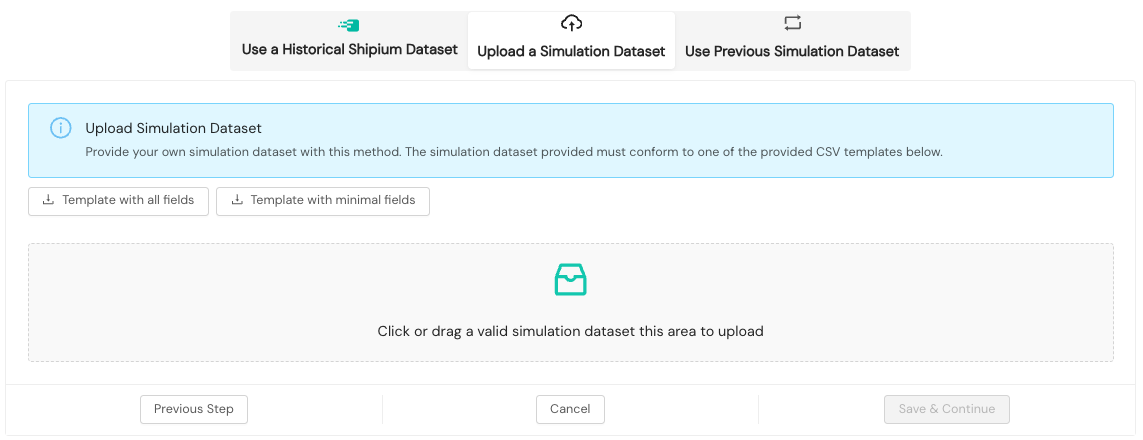
Upload a simulation dataset
You can provide your own simulation dataset with this method. The simulation dataset provided must conform to one of the provided CSV templates. You can download a template with minimal data fields needed for the simulation or a full template with all data fields. If you have run previous simulations, the Simulation Historical File Output CSV file generated can be used to run a new simulation using historical data from a prior simulation.
Package dimensions in the Simulation Historical File Output CSVThe
simulation-historical-file-output.csvpreserves the original package dimension values from your initial simulation input — not the rounded values used internally by the carrier selection engine for costing.When running a simulation, Shipium rounds package dimensions up to the next whole number for rate shopping. For example, a package length of 6.25 is costed as 7. The output file retains the original value (6.25) so that when you use it as input for a follow-up simulation, the engine applies its own rounding logic fresh and produces accurate costing results. If rounding were applied in the output file itself, errors could compound across chained simulations.
The output file also includes additional result columns beyond the upload template fields — such as
carrier_service_method_id,label_cost, anddelivered_at_date— which represent the results of the simulation. These columns are treated as optional fields and do not affect re-upload compatibility.If you manually edit the output file before re-uploading, use the original float values from your source data rather than rounding them yourself.
You'll download the file from the Export tab and use it as the upload file in the Upload Historical Shipments step for the simulation. You'll choose to upload a simulation dataset and upload the Simulation Historical File Output CSV file.
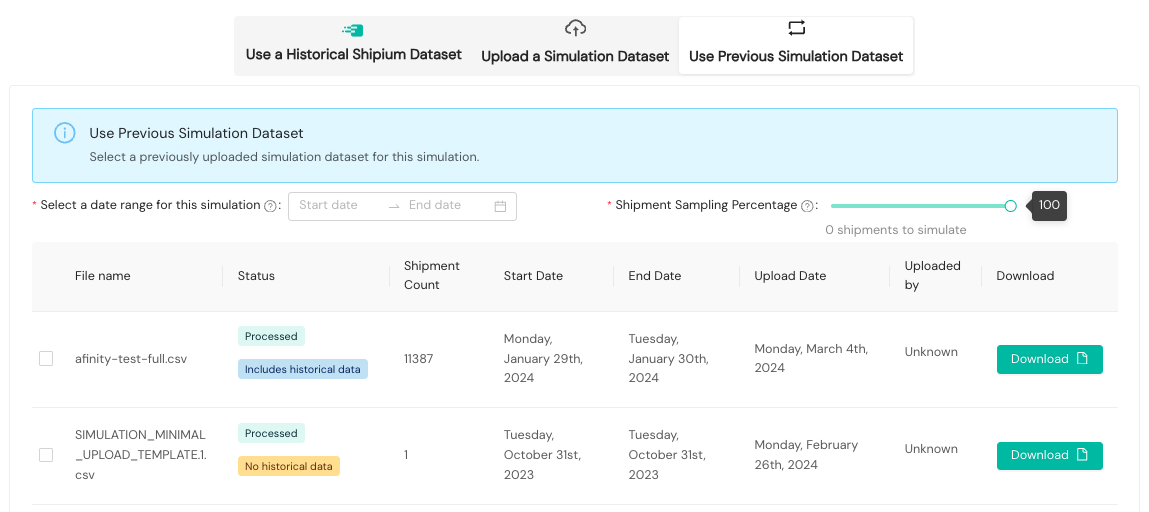
Use previous simulation dataset
You also can select a previously uploaded simulation dataset for this simulation. Once you make your selection, you can select a date range you wish to apply to the dataset as well as set the shipment sampling percentage. Reducing the sampling percentage decreases the amount of time the simulation needs to run.
You'll click the Save & Continue button to proceed. You also may download the file to make any changes you wish, if applicable.
Data fields for simulation dataset uploads
The following tables describe the fields available when uploading your own historical shipment data file. Required fields must be included for the simulation to process successfully.
Required fields
| Request field | Details |
|---|---|
origin_postal_code | Type: String Example: 87121Description: Valid postal code for the origin country code and region; must be a minimum of 5 digits. An optional fulfillment_context_id can replace this value. |
origin_state_region | Type: String Example: NMDescription: The 2-letter abbreviation of the origin's state or region; an optional fulfillment_context_id can replace this value. |
origin_country_code | Type: String Example: USDescription: The 2-character ISO 3166-1 country code of the origin |
shipped_date_time | Type: String Example: 2024-01-03 01:00:00Description: The ISO date string representing the ship date for the simulation shipment; the date must fall within the simulation date range. Shipments with a shipped_date_time outside of the simulation date range will be ignored. |
shipment_id | Type: String Description: A unique identifier representing the historical shipment; duplicate shipments will be removed. |
destination_state_region | Type: String Example: NMDescription: The 2-letter abbreviation of the destination's state or region |
destination_postal_code | Type: String Example: 87121Description: Valid postal code for the destination country code and region; must be a minimum of 5 digits |
destination_country_code | Type: String Example: USDescription: The 2-character ISO 3166-1 country code of the destination |
package_material | Type: String (enumeration) Values: box, envelope, flat_pack, mailing_tube, parcel_palletDescription: The type of material for the packaging |
package_length | Type: Number (float) Example: 12.0Description: The longest linear dimension (i.e., the longest side of a box or envelope) |
package_width | Type: Number (float) Example: 8.0Description: The second longest linear dimension (i.e., the second longest side of a box or envelope) |
package_height | Type: Number (float) Example: 8.0Description: The least long linear dimension (i.e., the shortest side of a box or envelope) Note on envelopes: This height should represent the highest product you would reasonably put in this envelope before losing more than 10% of the length of the envelope in other dimensions. |
package_linear_unit | Type: String (enumeration) Values: cm (centimeter), in (inch)Description: The unit in which linear dimensions are provided |
package_weight | Type: Number (float) Example: 50Description: The value of the weight |
package_weight_unit | Type: String (enumeration) Values: g (gram), kg (kilogram), lb (pound), oz (ounce)Description: The unit in which weight values are provided |
currency_code | Type: String Example: USD Description: The ISO 4217 currency code for the shipment |
Optional fields
| Request field | Details |
|---|---|
fulfillment_context_id | Type: String Description: This value may be provided in place of the origin state and postal code. |
tenant_id | Type: String Description: Either the Shipium Tenant ID or your organization's Tenant ID. When present, this is used to indicate the tenant associated with the shipment. |
reference_identifier | Type: String Description: An identifier value to be included in the request and response data |
limited_quantity | Type: Boolean Values: true or falseDescription: A value of true indicates the shipment includes limited quantity (LQ) products, such as small cosmetics. |
lithium_ion | Type: Boolean Values: true or falseDescription: A value of true indicates the shipment includes lithium-ion products, such as electronics. |
hazmat | Type: Boolean Values: true or falseDescription: If true, this indicates that the item is hazardous material (hazmat). The default value is false. |
ormd | Type: Boolean Values: true or false Description: A value of true indicates the shipment includes ORM-D (Other Regulated Materials—Domestic) products. See the Hazardous Materials documentation for more information. |
desired_delivery_date | Type: String Example: 2019-10-31T20:00:00ZDescription: The ISO date representing the desired delivery date, which is the date or date-time the package is intended to arrive to the customer, for the historical shipment |
business_days_of_transit | Type: Integer (int32) Example: 3Description: Indicates the number of business days from the ship time by when the shipment needs to be delivered; the number of business days to be used when calculating a desired_delivery_date. |
ship_option | Type: String Example: StandardDescription: The type of ship option; Shipium supports default and configurable ship options. |
destination_is_po_box | Type: Boolean Values: true or falseDescription: If true, this indicates that the destination address is a P.O. Box. |
destination_address_type | Type: String (enumeration) Values: commercial, residentialDescription: The type of location for the destination address |
label_cost | Type: Number Description: The label cost of the historical shipment |
carrier_service_method_id | Type: String Description: The selected carrier service method ID of the historical shipment; a list of carrier service method IDs for Shipium is in Supported Carriers. |
delivered_at_date | Type: String Description: The ISO date representing the delivery date of the historical shipment |
time_in_transit_days | Type: Integer (int32) Description: The TNT value (number of days the package is expected to take in transit) for the historical shipment |
time_in_transit_data_type | Type: String (enumeration) Values: partner_provided, ml_model, carrier_default, shipium_calculatedDescription: The TNT data type for the historical shipment |
ignore_upgrade_spend_limits | Type: Boolean Values: true or false Description: A value of true indicates the shipment can ignore all of your organization's configured upgrade spend limits for the potential upgrade required to deliver the shipment by the desired delivery date. |
saturday_delivery_requested | Type: Boolean Values: true or false Description: A value of true indicates the historical shipment requested Saturday delivery. |
carrier_service_method_allow_list | Type: String Example: upsmi-parcel-select-service-method Description: A carrier service method ID that limits carrier selection to a specific service method for the simulation shipment. A list of carrier service method IDs is in Supported Carriers. Note that allow list and exclusion list settings configured at the simulation level will override this value. |
Step 4. Select simulation mapping
Three simulation mapping options are available, depending on the selections made in the previous step for your dataset:
- Link to an origin postal code. Available regardless of the dataset selected
- Use the historical fulfillment context. Available if you used a Shipium historical dataset, a previous simulation dataset, or uploaded a shipment dataset that included a
fulfillment_context_id - Link to an origin fulfillment context. Available if you used a Shipium historical dataset, a previous simulation dataset, or uploaded a shipment dataset that included a
fulfillment_context_id
The following sections describe each option in detail.
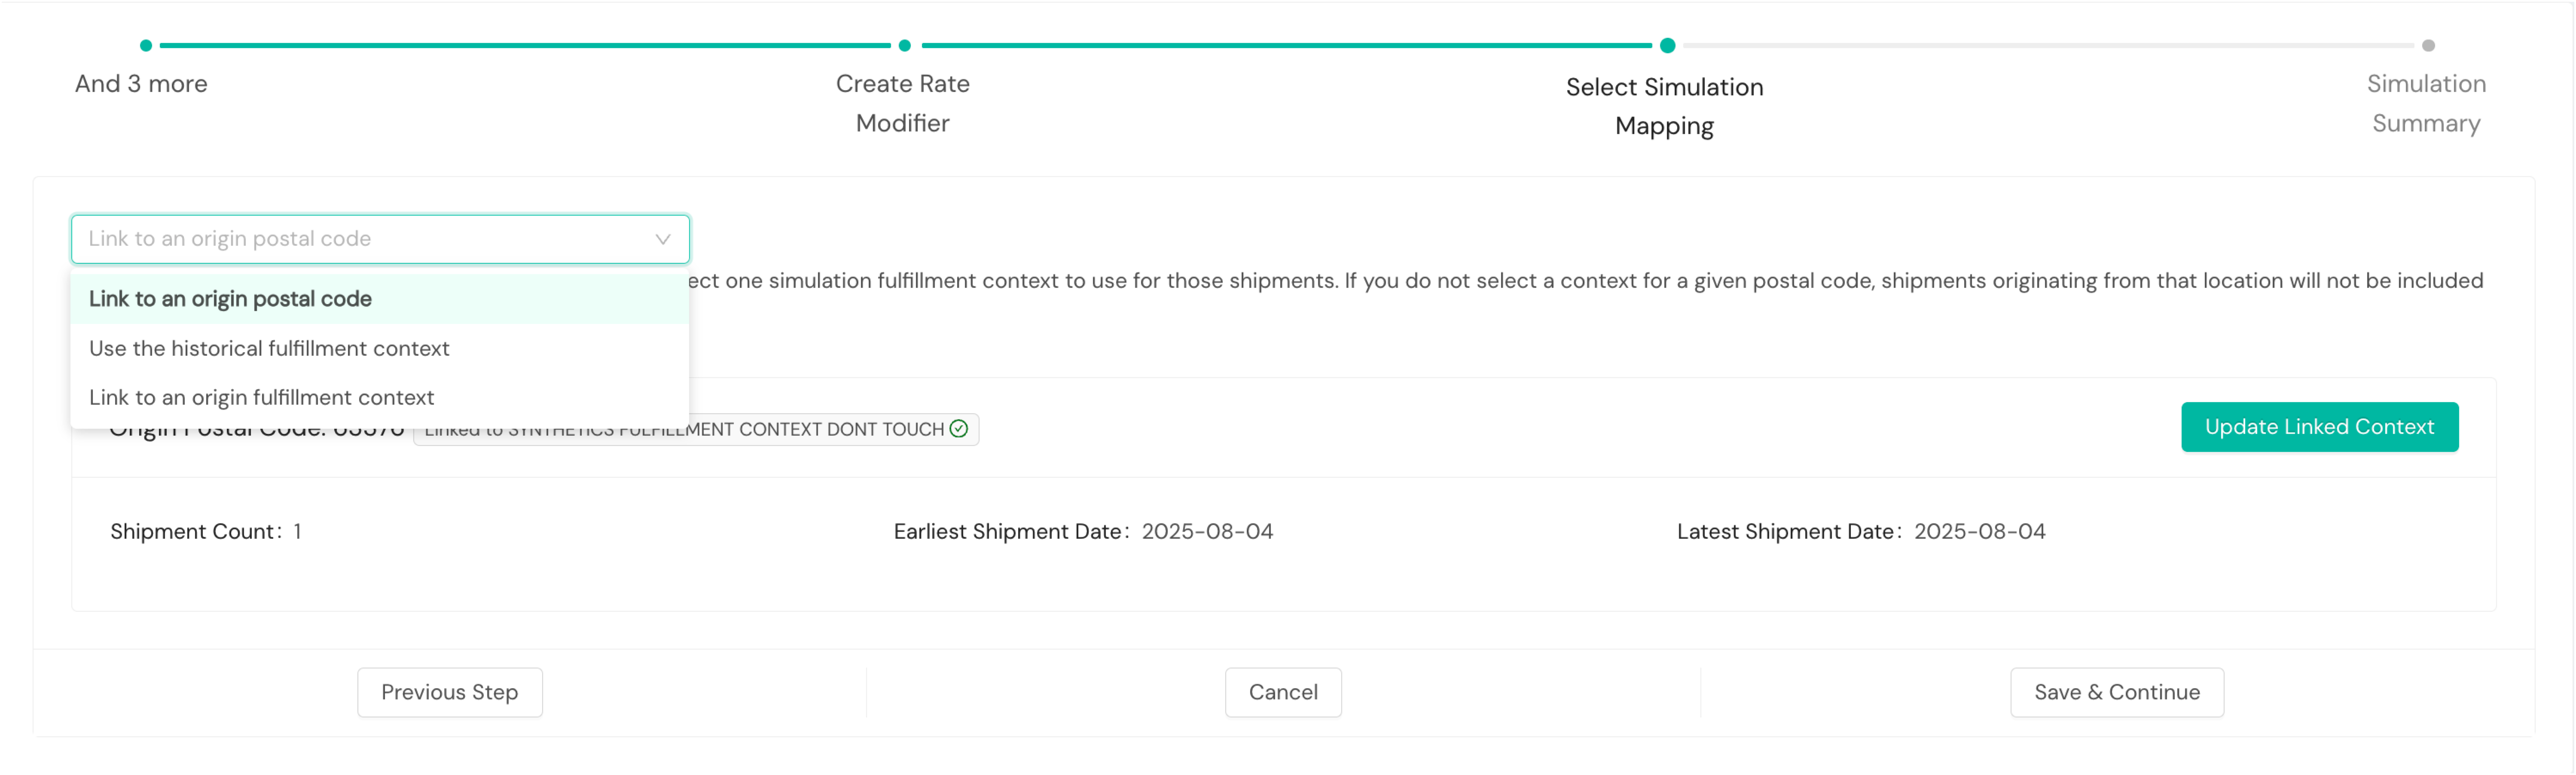
Link to an origin postal code
One choice, linking to an origin postal code, is available regardless of the dataset you selected.
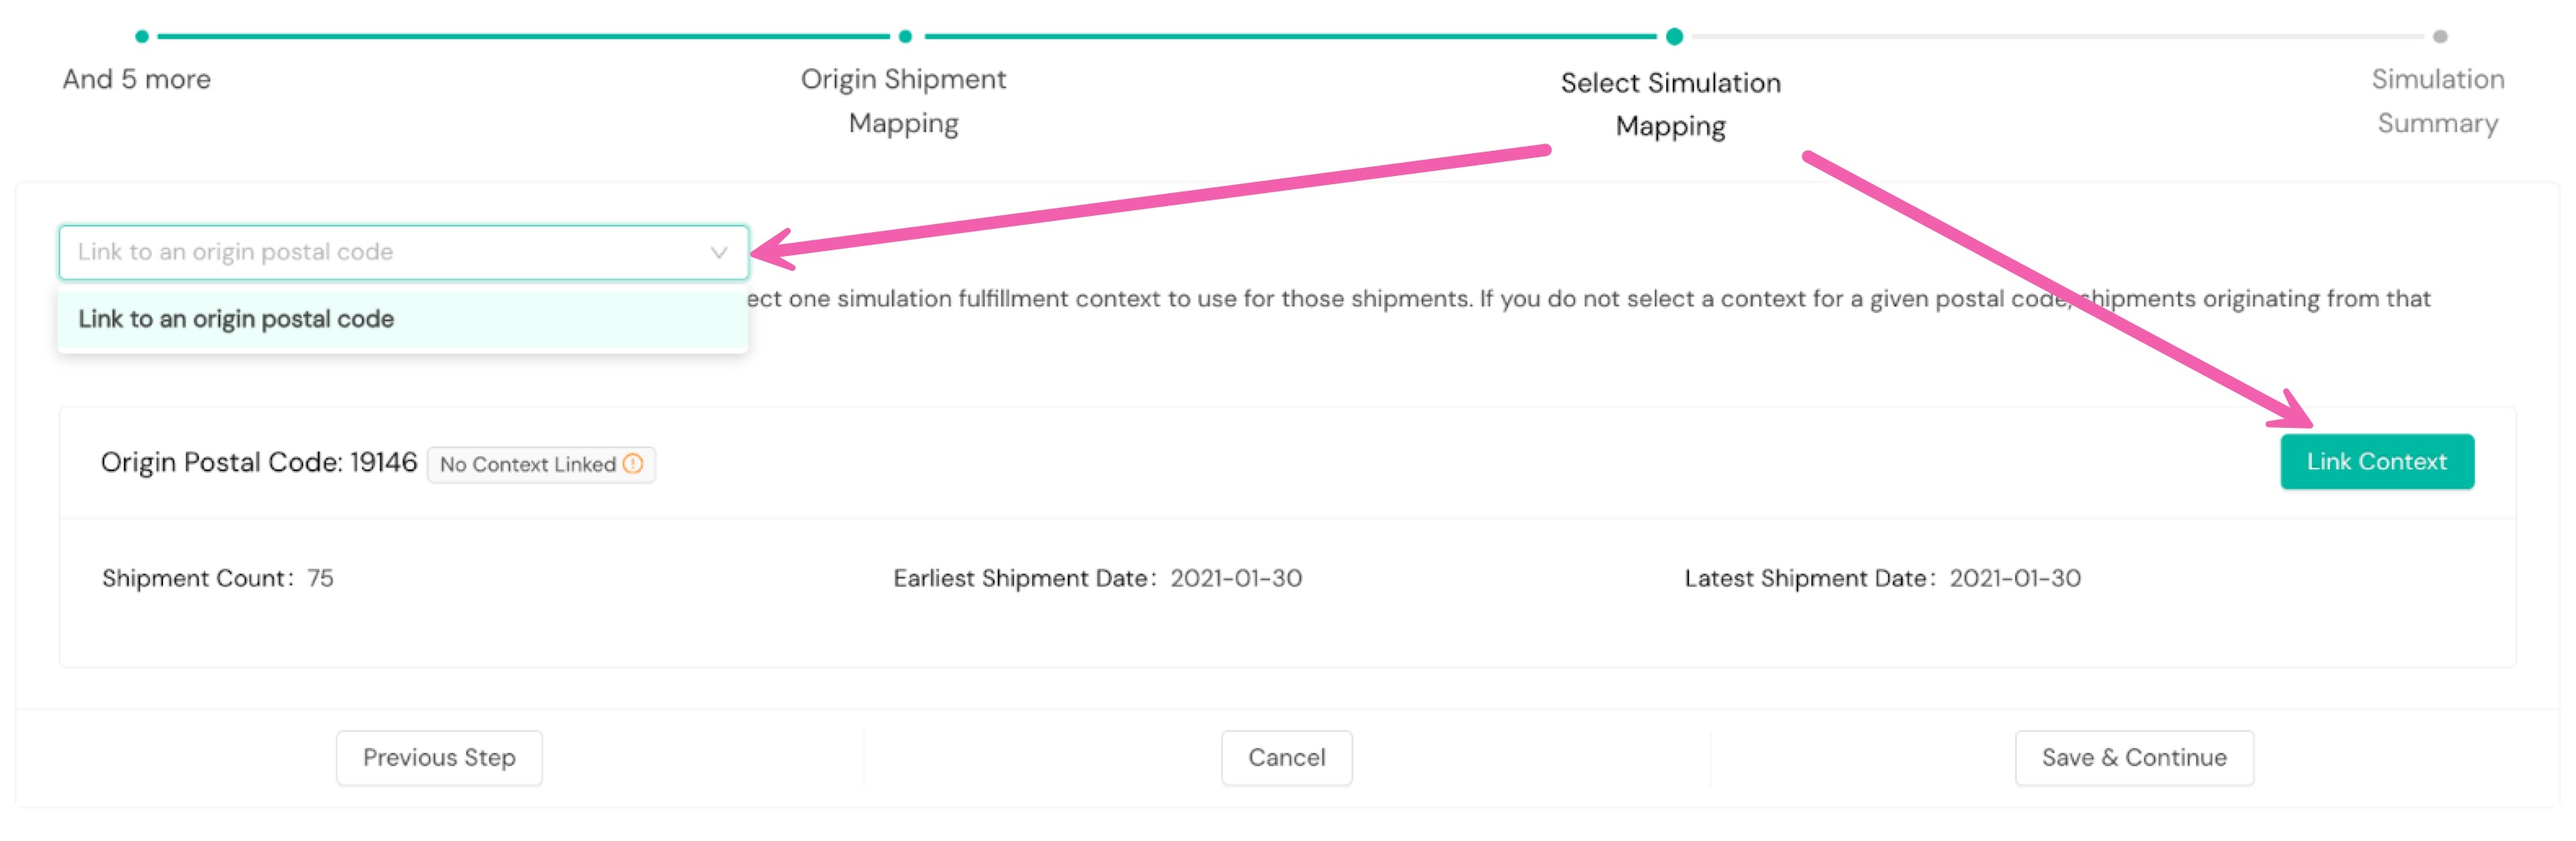
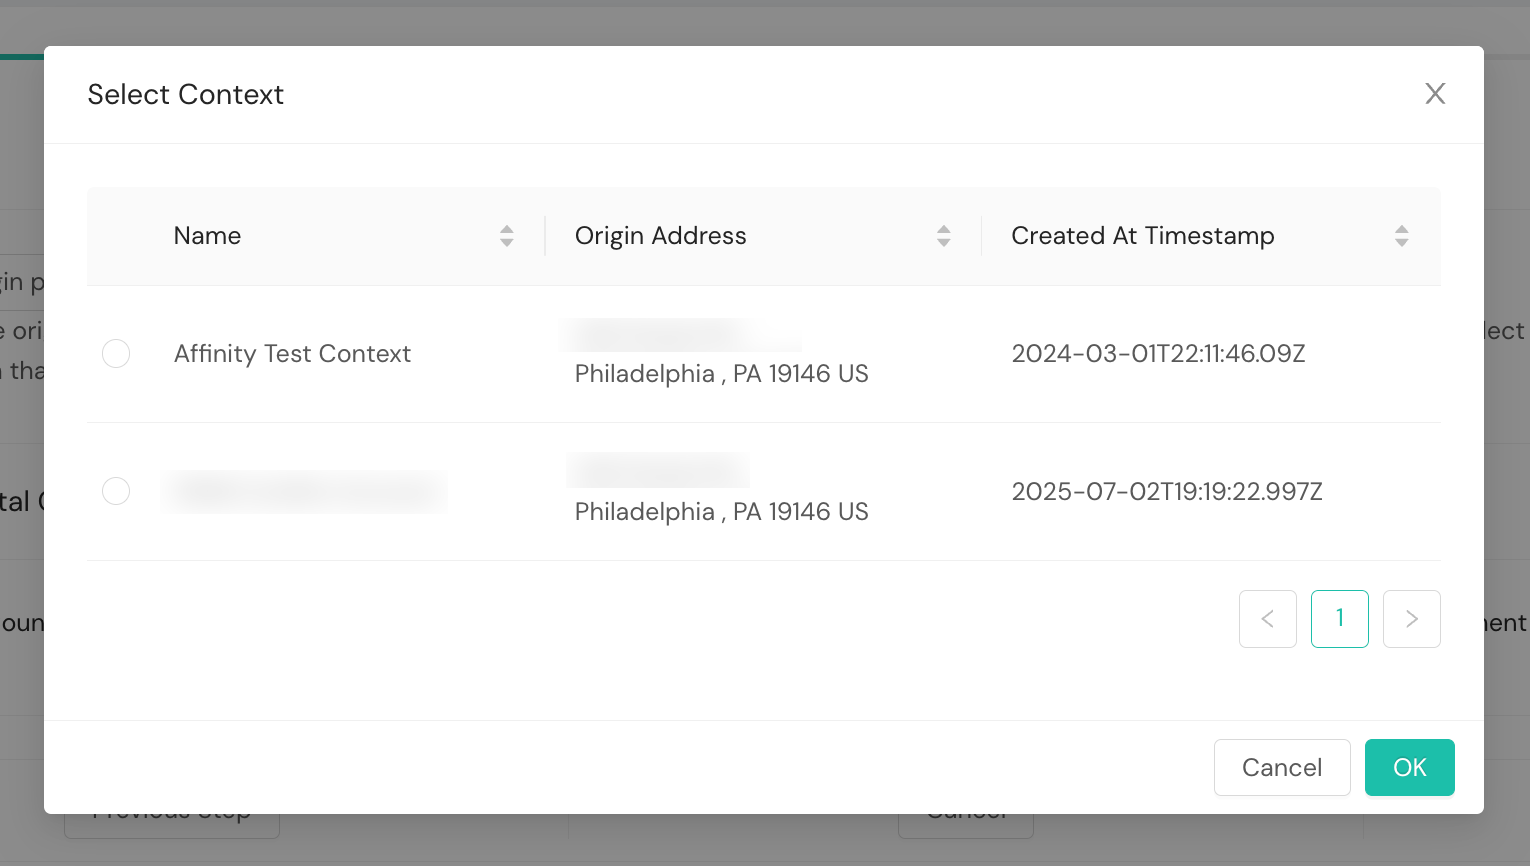
For each unique origin postal code that the system detects, you'll link a fulfillment context by selecting the Link to an origin postal code dropdown and then selecting the Link Context button. A new modal will appear enabling you to select the desired fulfillment context.
If you do not select a context for a given postal code, shipments originating from that location will not be included in the simulation.
Use the historical fulfillment context
You can link to a historical fulfillment context if you opted to use a Shipium historical dataset or a previous simulation dataset. You also have this option available if you chose to upload a shipment dataset and you included a fulfillment_context_id in the file upload.

For each shipment, the Shipium system will use that same fulfillment context as it did for the original shipment but with the overridden simulation settings passed in.
Link to an origin fulfillment context
You can link to an origin fulfillment context if you opted to use a Shipium historical dataset or a previous simulation dataset. You also have this option available if you chose to upload a shipment dataset and you included a fulfillment_context_id in the file upload.
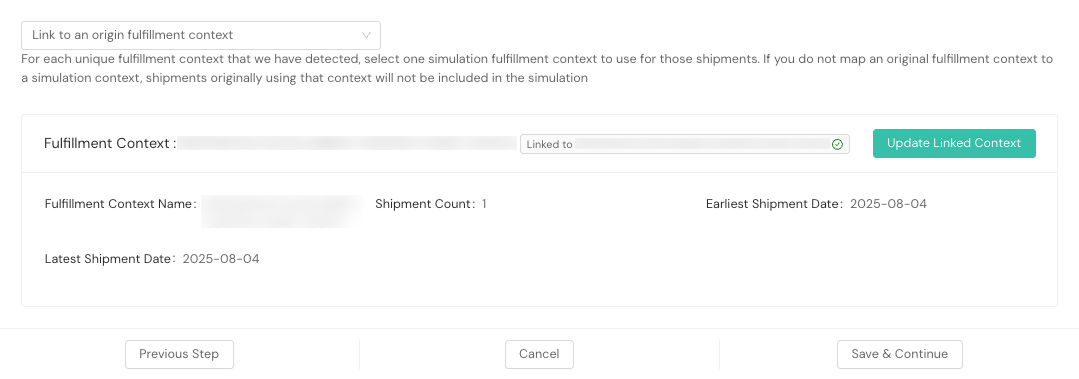
For each unique fulfillment context that the Shipium system detected, you'll select one simulation fulfillment context to use for those shipments. If you do not map an original fulfillment context to a simulation context, shipments originally using that context will not be included in the simulation.
Step 5. Review and approve settings
Once you review your settings and you wish to proceed, you can select the Start Simulation button.
Steps specific to simulation type
Fixed carrier rate simulation
Steps unique to the Fixed Carrier Rate type of simulation are included here:
Create rate modifier
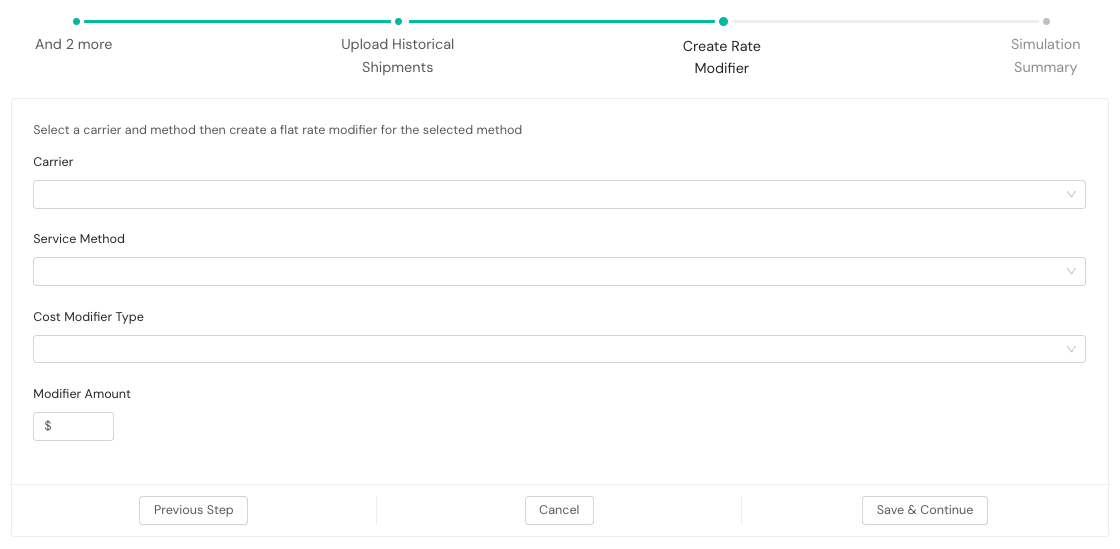
You'll select the Carrier, Service Method, and Cost Modifier Type from dropdown menus and provide the Modifier Amount.
New rate sheet simulation
Steps unique to the New Rate Sheet type of simulation are included here:
Add rate sheet
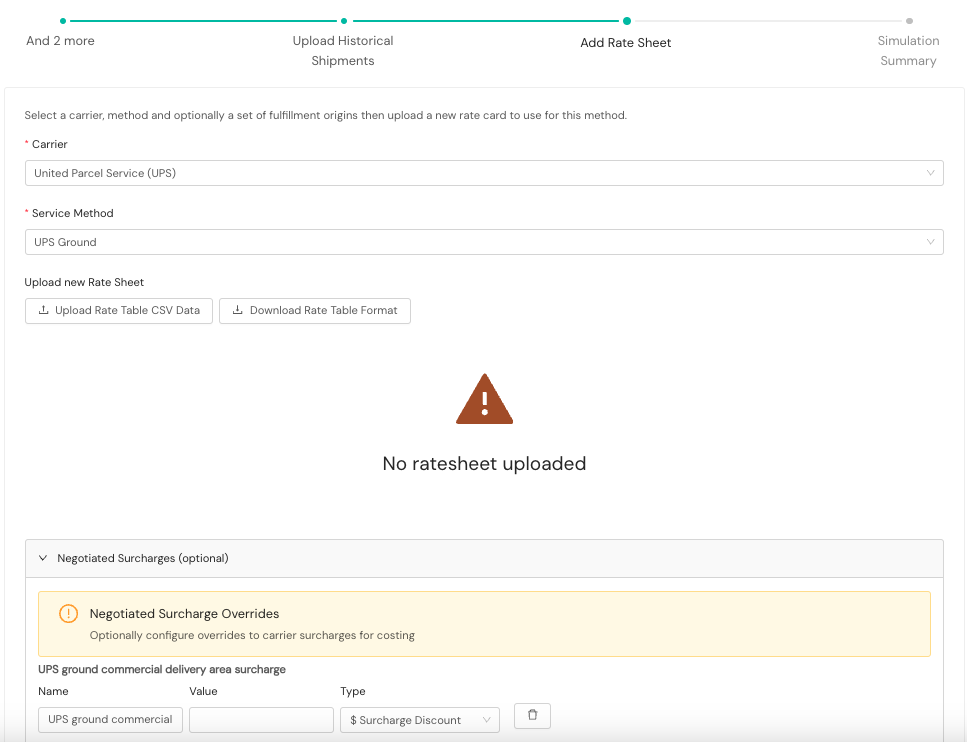
You'll select the carrier and service method from dropdown menus. Next, you will need to upload a new ratesheet to apply to the selected carrier and service method. You also may enter any negotiated surcharge overrides for the carrier service method.
Add carrier & service method simulation
Steps unique to the Add Carrier & Service Method type of simulation are included here:
Select carrier and service method
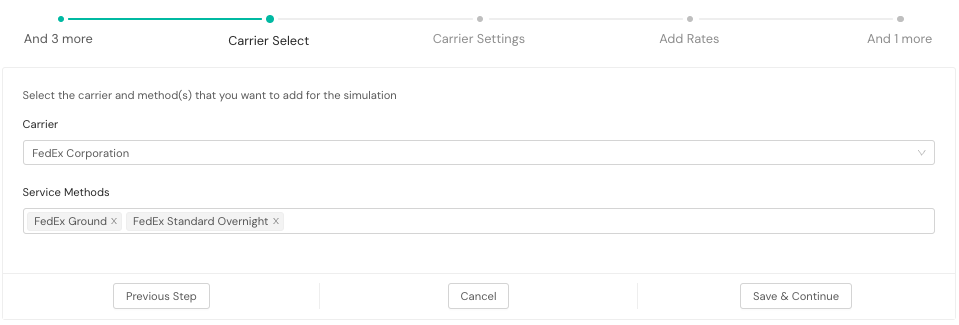
You'll choose the desired carrier and service method(s) from dropdown menus.
Create carrier settings
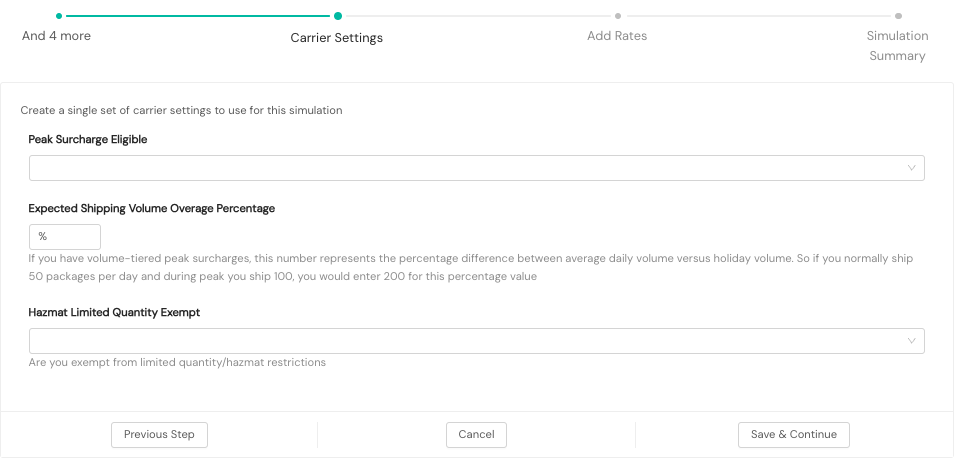
From dropdown menus, you'll select "true" or "false" for eligibility for peak surcharges and for exemption from hazmat and limited quantity restrictions. You will also enter any expected shipping volume overage percentage. If you have volume-tiered peak surcharges, this number represents the percentage difference between average daily volume versus holiday volume.
Add rates
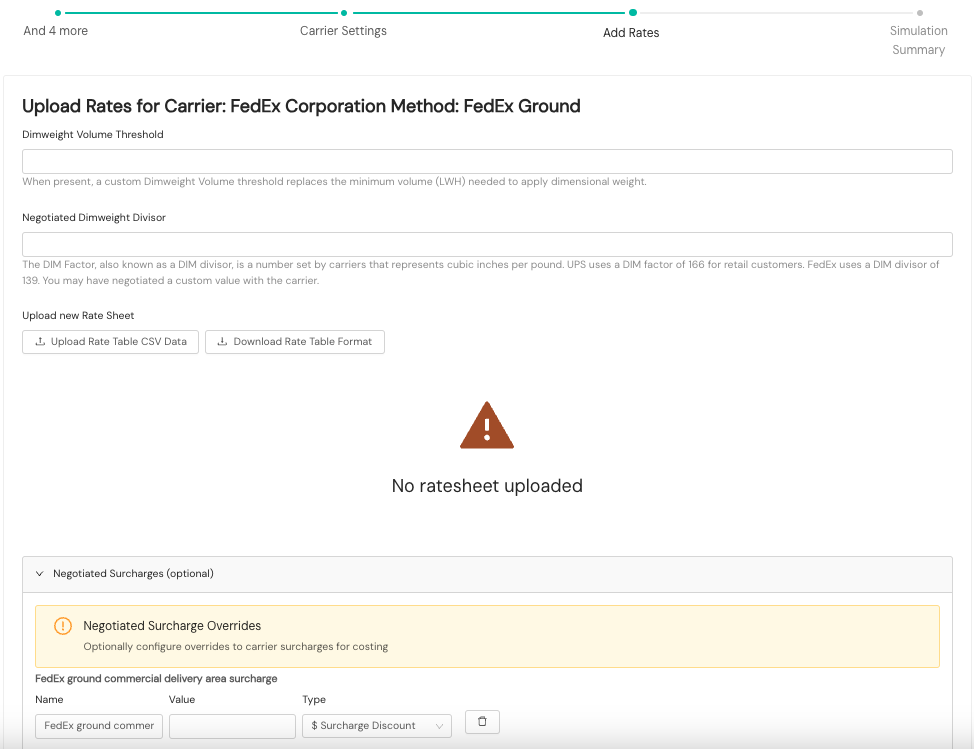
You'll enter any applicable dimweight volume threshold and negotiated dimweight divisor values for the carrier service methods you selected on the previous screen. Depending on the carrier, you also might select the allowed destination type (commercial or residential) from a dropdown menu. Next, you will need to upload a new ratesheet to apply to the selected carrier and service method. You also may enter any negotiated surcharge overrides for the carrier service method.
Add origin simulation
Steps unique to the Add Origin type of simulation are included here:
Create origin
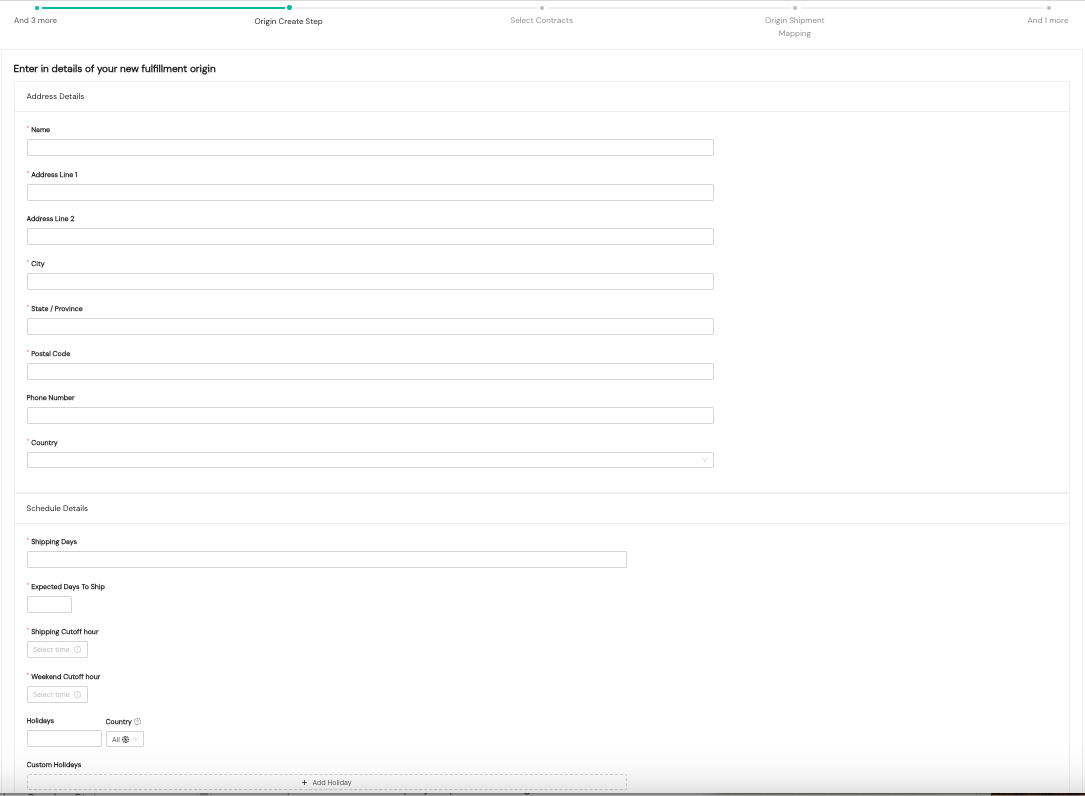
To create an origin, you'll provide address and schedule details, as noted in the screenshot above. The schedule will include shipping days of the week, the shipping cutoff hour for weekdays, and the weekend shipping cutoff hour. You'll also configure your organization's expected number of days to ship once an order has been received at your origin. For example, if shipments typically leave your origin on the same day that the order was received, you'll select 0 for the expected days to ship. You also can enter holidays for the origin schedule, including custom holidays.
Select contracts
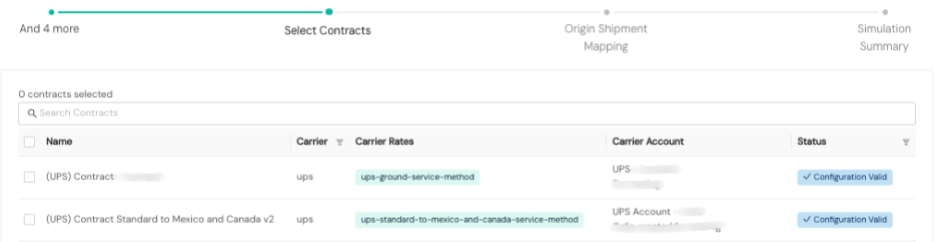
Applicable carrier contracts will populate on the page, and you'll select the desired one.
Map origin shipment
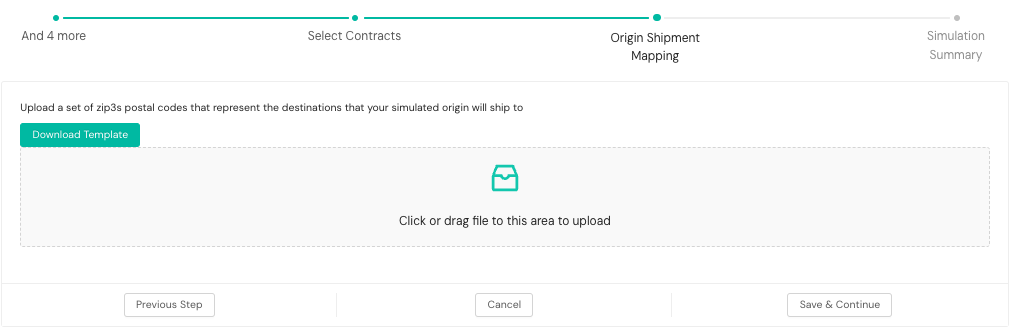
For this step, you will provide a set of ZIP3 postal codes (a format including the first three digits of the postal code) and matching country codes. You can download the CSV template, populate it, and upload it.
Sell rate margin simulation
Steps unique to the Sell Rate Margin type of simulation are included here:
Carrier surcharge modifier
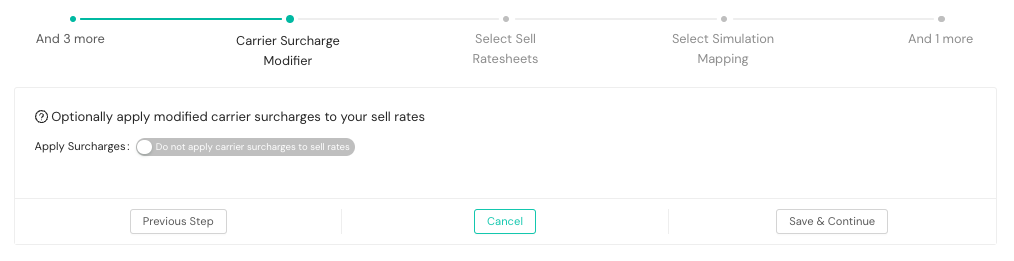
You can opt to apply modified carrier surcharges to your sell rates using the toggle in this step. The default is set to not apply surcharges to sell rates.
Select sell rate sheets
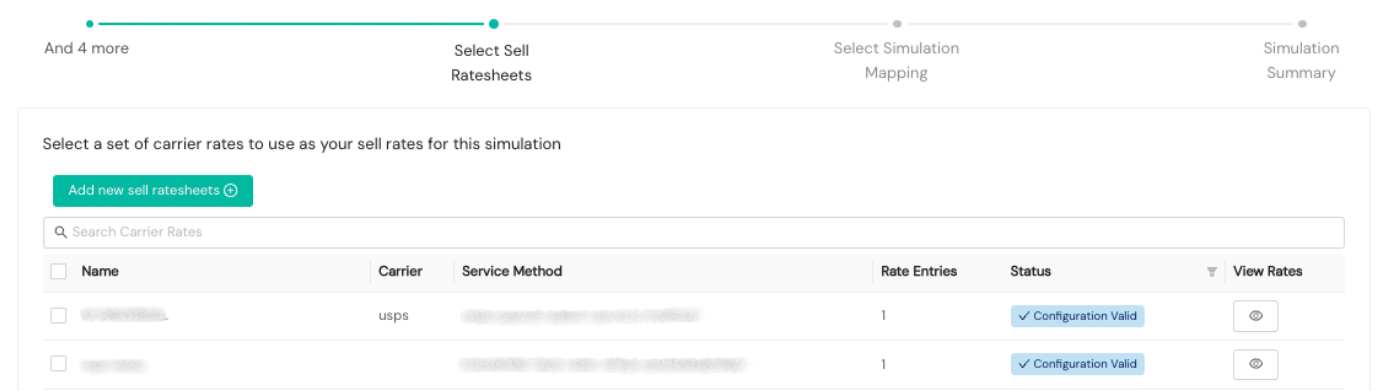
This step involves selecting existing sell rates or adding a new sell rate sheet for the simulation. If you're adding a new sell rate sheet, you'll select the Add New Sell Rate Sheets + button. As this process is the same as adding sell rate sheets outside the actual simulation workflow, you'll follow the alternative guidance below.
Alternative workflow to add sell rate sheets
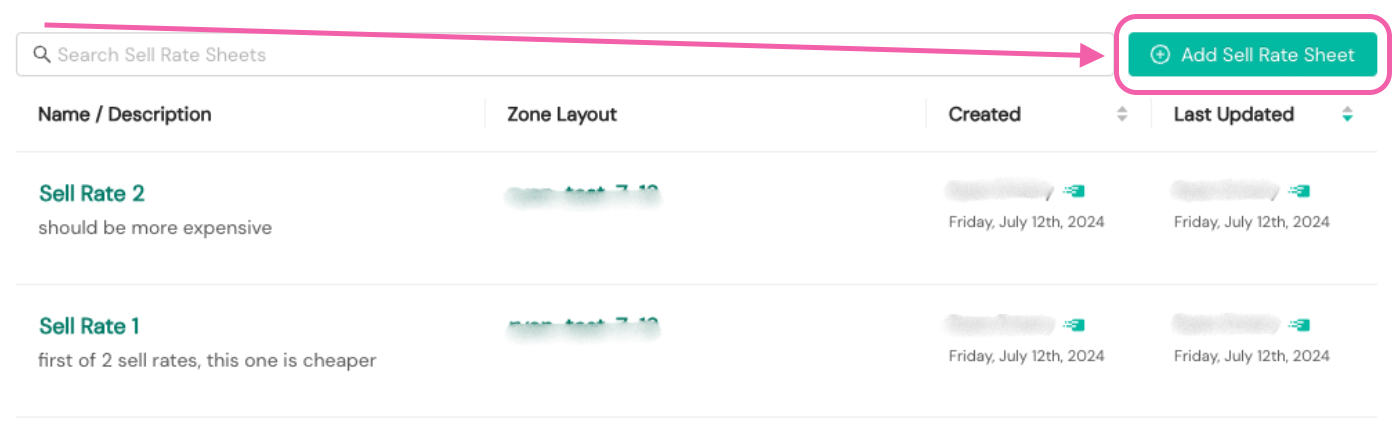
Alternatively, you can add sell rate sheets before running a simulation. You can access this optional feature via Simulation and then Sell Rate Sheets in the lefthand navigation menu of the Shipium Console.
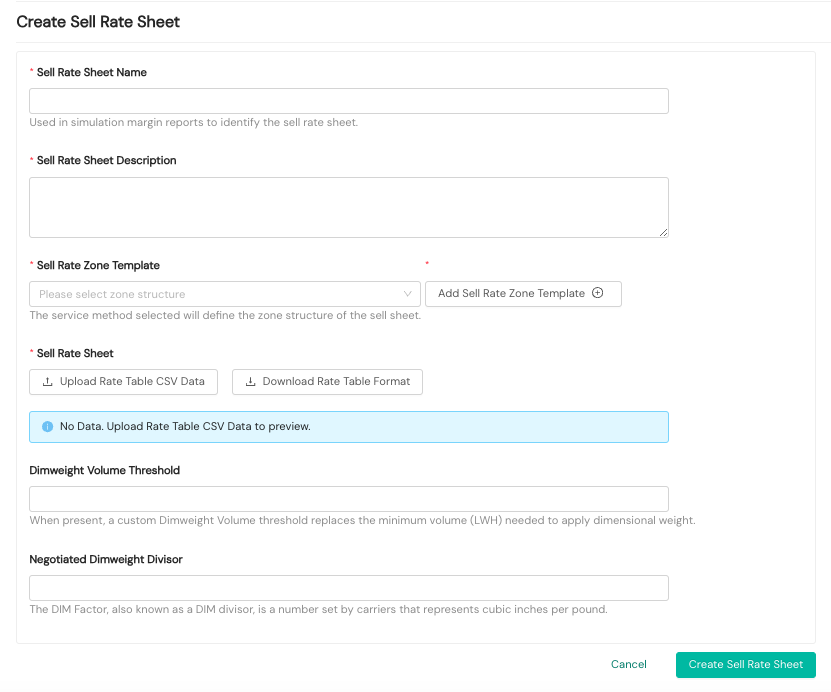
Existing sell rate sheets will display after you select Sell Rate Sheets. To add a new sell rate sheet, you'l select the + Add Sell Rate Sheet button at the top right of the screen.
You will need to provide the requested information to create a sell rate sheet.
-
Sell Rate Sheet Name. Required. A human readable name by which your organization wishes to refer to the sell rate sheet
-
Sell Rate Sheet Description. Required. A description that your organization would like to use for the sell rate sheet
-
Sell Rate Zone Template. You'll either select the desired service method zone template applicable for your sell rate zone from a dropdown menu of national carrier zones (USPS currently supported) and, if applicable, custom zones or you'll add your own custom sell rate zone template using the Add Sell Rate Zone Template + button. If you choose the former, you can download the rate table template in the next step, add your rates, and upload the file.
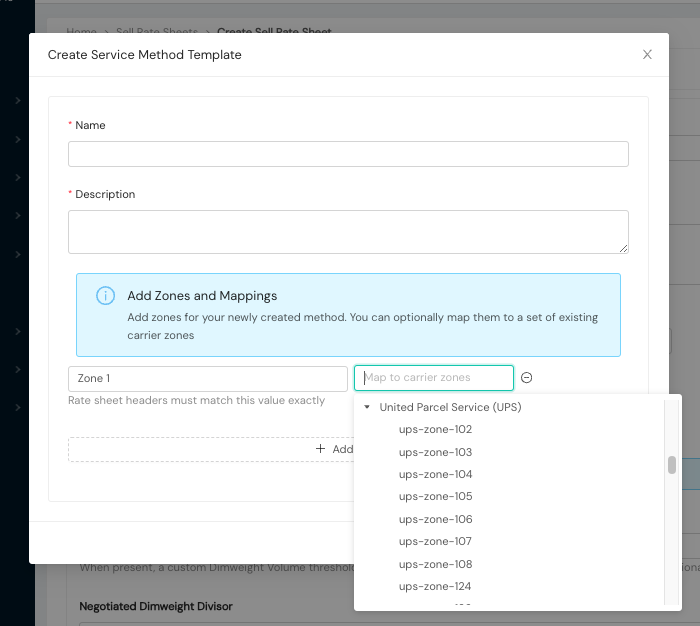
If you choose the latter, a popup dialog window will appear requesting you to provide a Name and Description for the service method template. You can add zones for your newly created method and map them to a set of existing carrier zones. You'll provide a Zone ID for each newly added zone and select at least one carrier zone to map your added zone to from the dropdown menu (you can add multiple carrier zones to match your own Zone ID). Each Zone ID must match the column header in your rate sheet file exactly. Once you're done, you'll select the OK button and return to the background screen. You'll need to select the template you just created by its name under Custom Zones in the Sell Rate Zone Template dropdown menu before proceeding to the next step.
-
Sell Rate Sheet. If you selected an established sell rate zone template in the previous step, you can download it here, populate it with your zone rates, and upload the file back to the console. If you opted to add your own custom zone rate template, you'll want to make sure you selected it from the Sell Rate Zone Template dropdown menu before choosing to download the rate table.
-
Dimweight Volume Threshold. If provided, this custom value will replace the minimum volume (LxWxH) needed to apply dimensional weight.
-
Negotiated Dimweight Divisor. Also known as the DIM factor, the DIM divisor is a number set by carriers that represents cubic inches per pound.
Access simulation results
Existing simulations will be displayed on the primary Simulation landing page within the Shipium Console. You’ll be able to see each simulation’s name, description, type, simulation status, and execution status. In addition, you’ll be able to execute certain actions for each simulation, depending on its status. For example, for simulations in a Pending Execution status, you may choose to cancel or archive them.

To access the details for any existing simulation, you can click on its name in the Details column or on its type in the Type column. The details landing page includes Simulation Details, Simulation Overrides, Simulation Limits, and Simulation Events as well as individual tabs for Shipments, Export, Shipment Limits Report, Sell Rate Margin Report, Carrier Selection Report, Time in Transit Report, Choropleth Report, and Mappings. Report tabs are viewable based on the type of simulation.

Simulation result reports
The following eight report tabs are available for simulation results, with availability depending on the type of simulation you ran:
- Shipments. A snapshot of total shipments in the sample, shipments executed in the simulation run, shipments not included due to undefined fulfillment contexts, and shipments that failed; includes simulation shipment batch details
- Export. Download your simulation results as a CSV file, including the Simulation Historical File Output CSV that can be used to seed a follow-on simulation.
- Shipment Limits Report. Details of the shipment limits configuration applied to the simulation, including target carrier percentage, target carrier shipments, and target carrier adjustment amount
- Sell Rate Margin Report. Available for sell rate margin simulations; compare a sell rate against historical and simulated label costs by origin, tenant, carrier, TNT source, and day of week, with margin details.
- Carrier Selection Report. Shipment counts for carrier selection plus total and average label cost by carrier service method, filterable by origin, tenant, carrier, TNT source, and day of week; available as a PDF download
- Time in Transit Report. Shipment counts by time in transit source type, filterable by origin, tenant, carrier, TNT source, and day of week
- Choropleth Report. An interactive map of the simulation's delivery zone showing shipment totals, average times in transit, total cost, and average cost by carrier and by state; available as a PDF download
- Mappings. The configuration used when running simulation shipments
The following sections describe each report in detail.
Shipments
The Shipments tab provides a snapshot of the total number of shipments in the sample file provided for the simulation, the number of shipments executed as part of the simulation run, the number of shipments for which a fulfillment context was not defined for the simulation, and the number of shipments for which simulation was attempted but failed due to invalid request parameters or a service error.
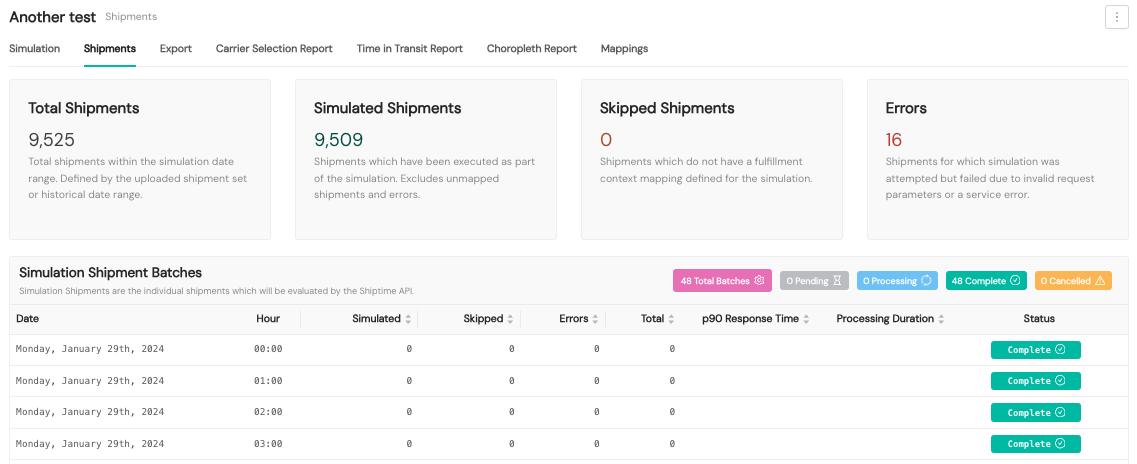
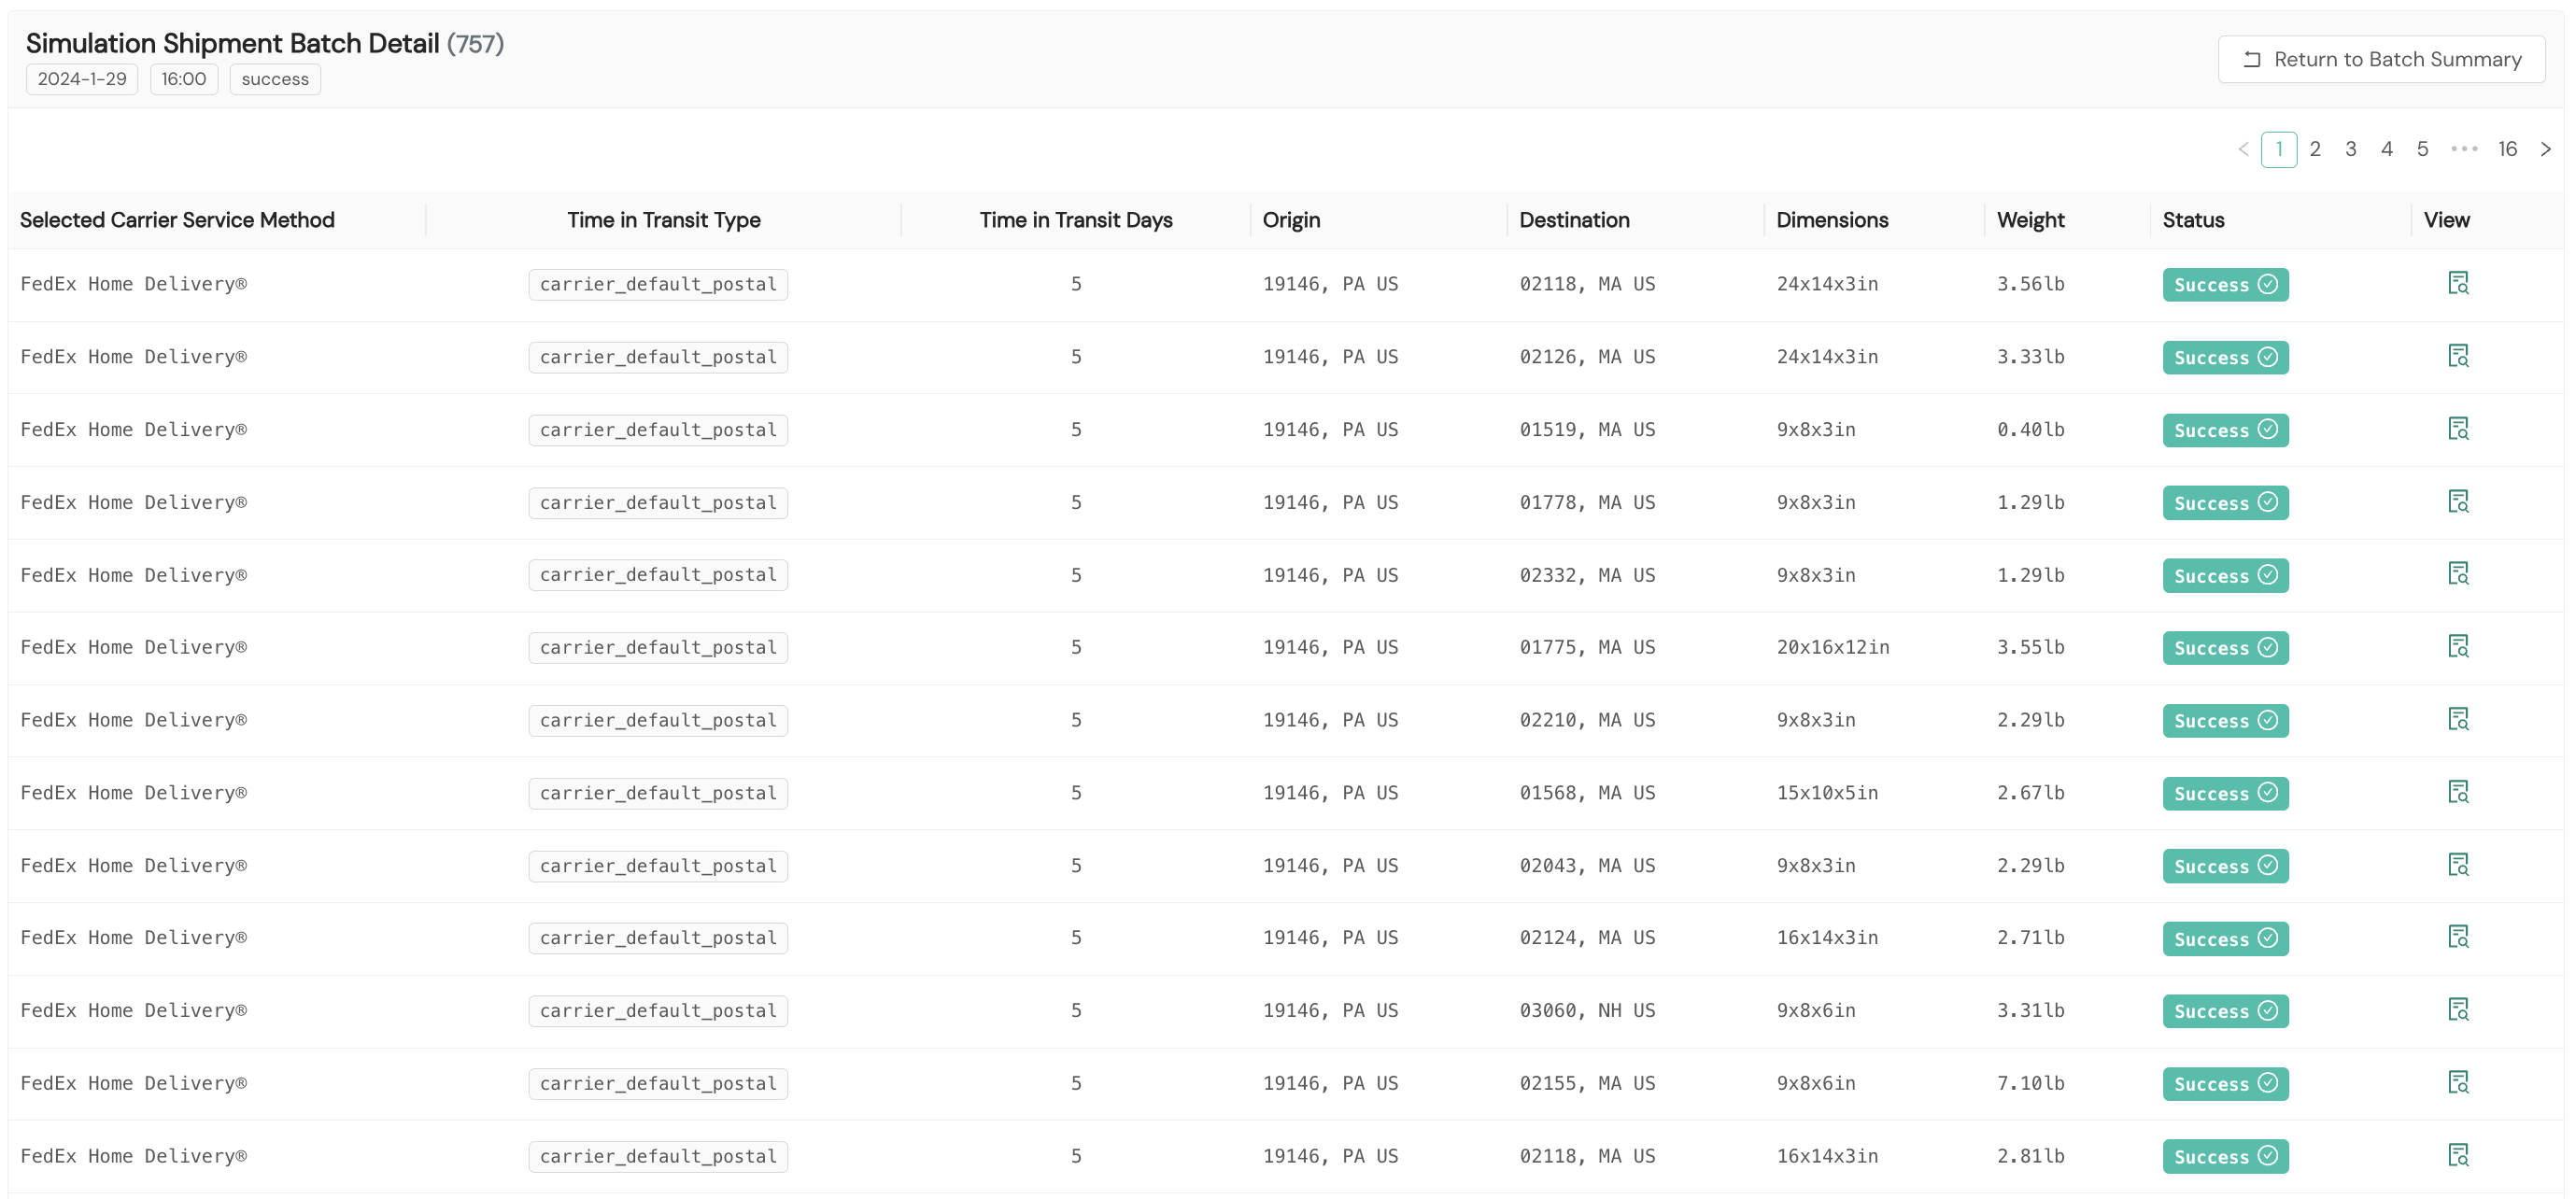
This page also provides details for the simulation shipment batches. To access the Simulation Shipment Batch Detail, you'll need to select the numeric value in the Simulated column of the batch for which you want more details.
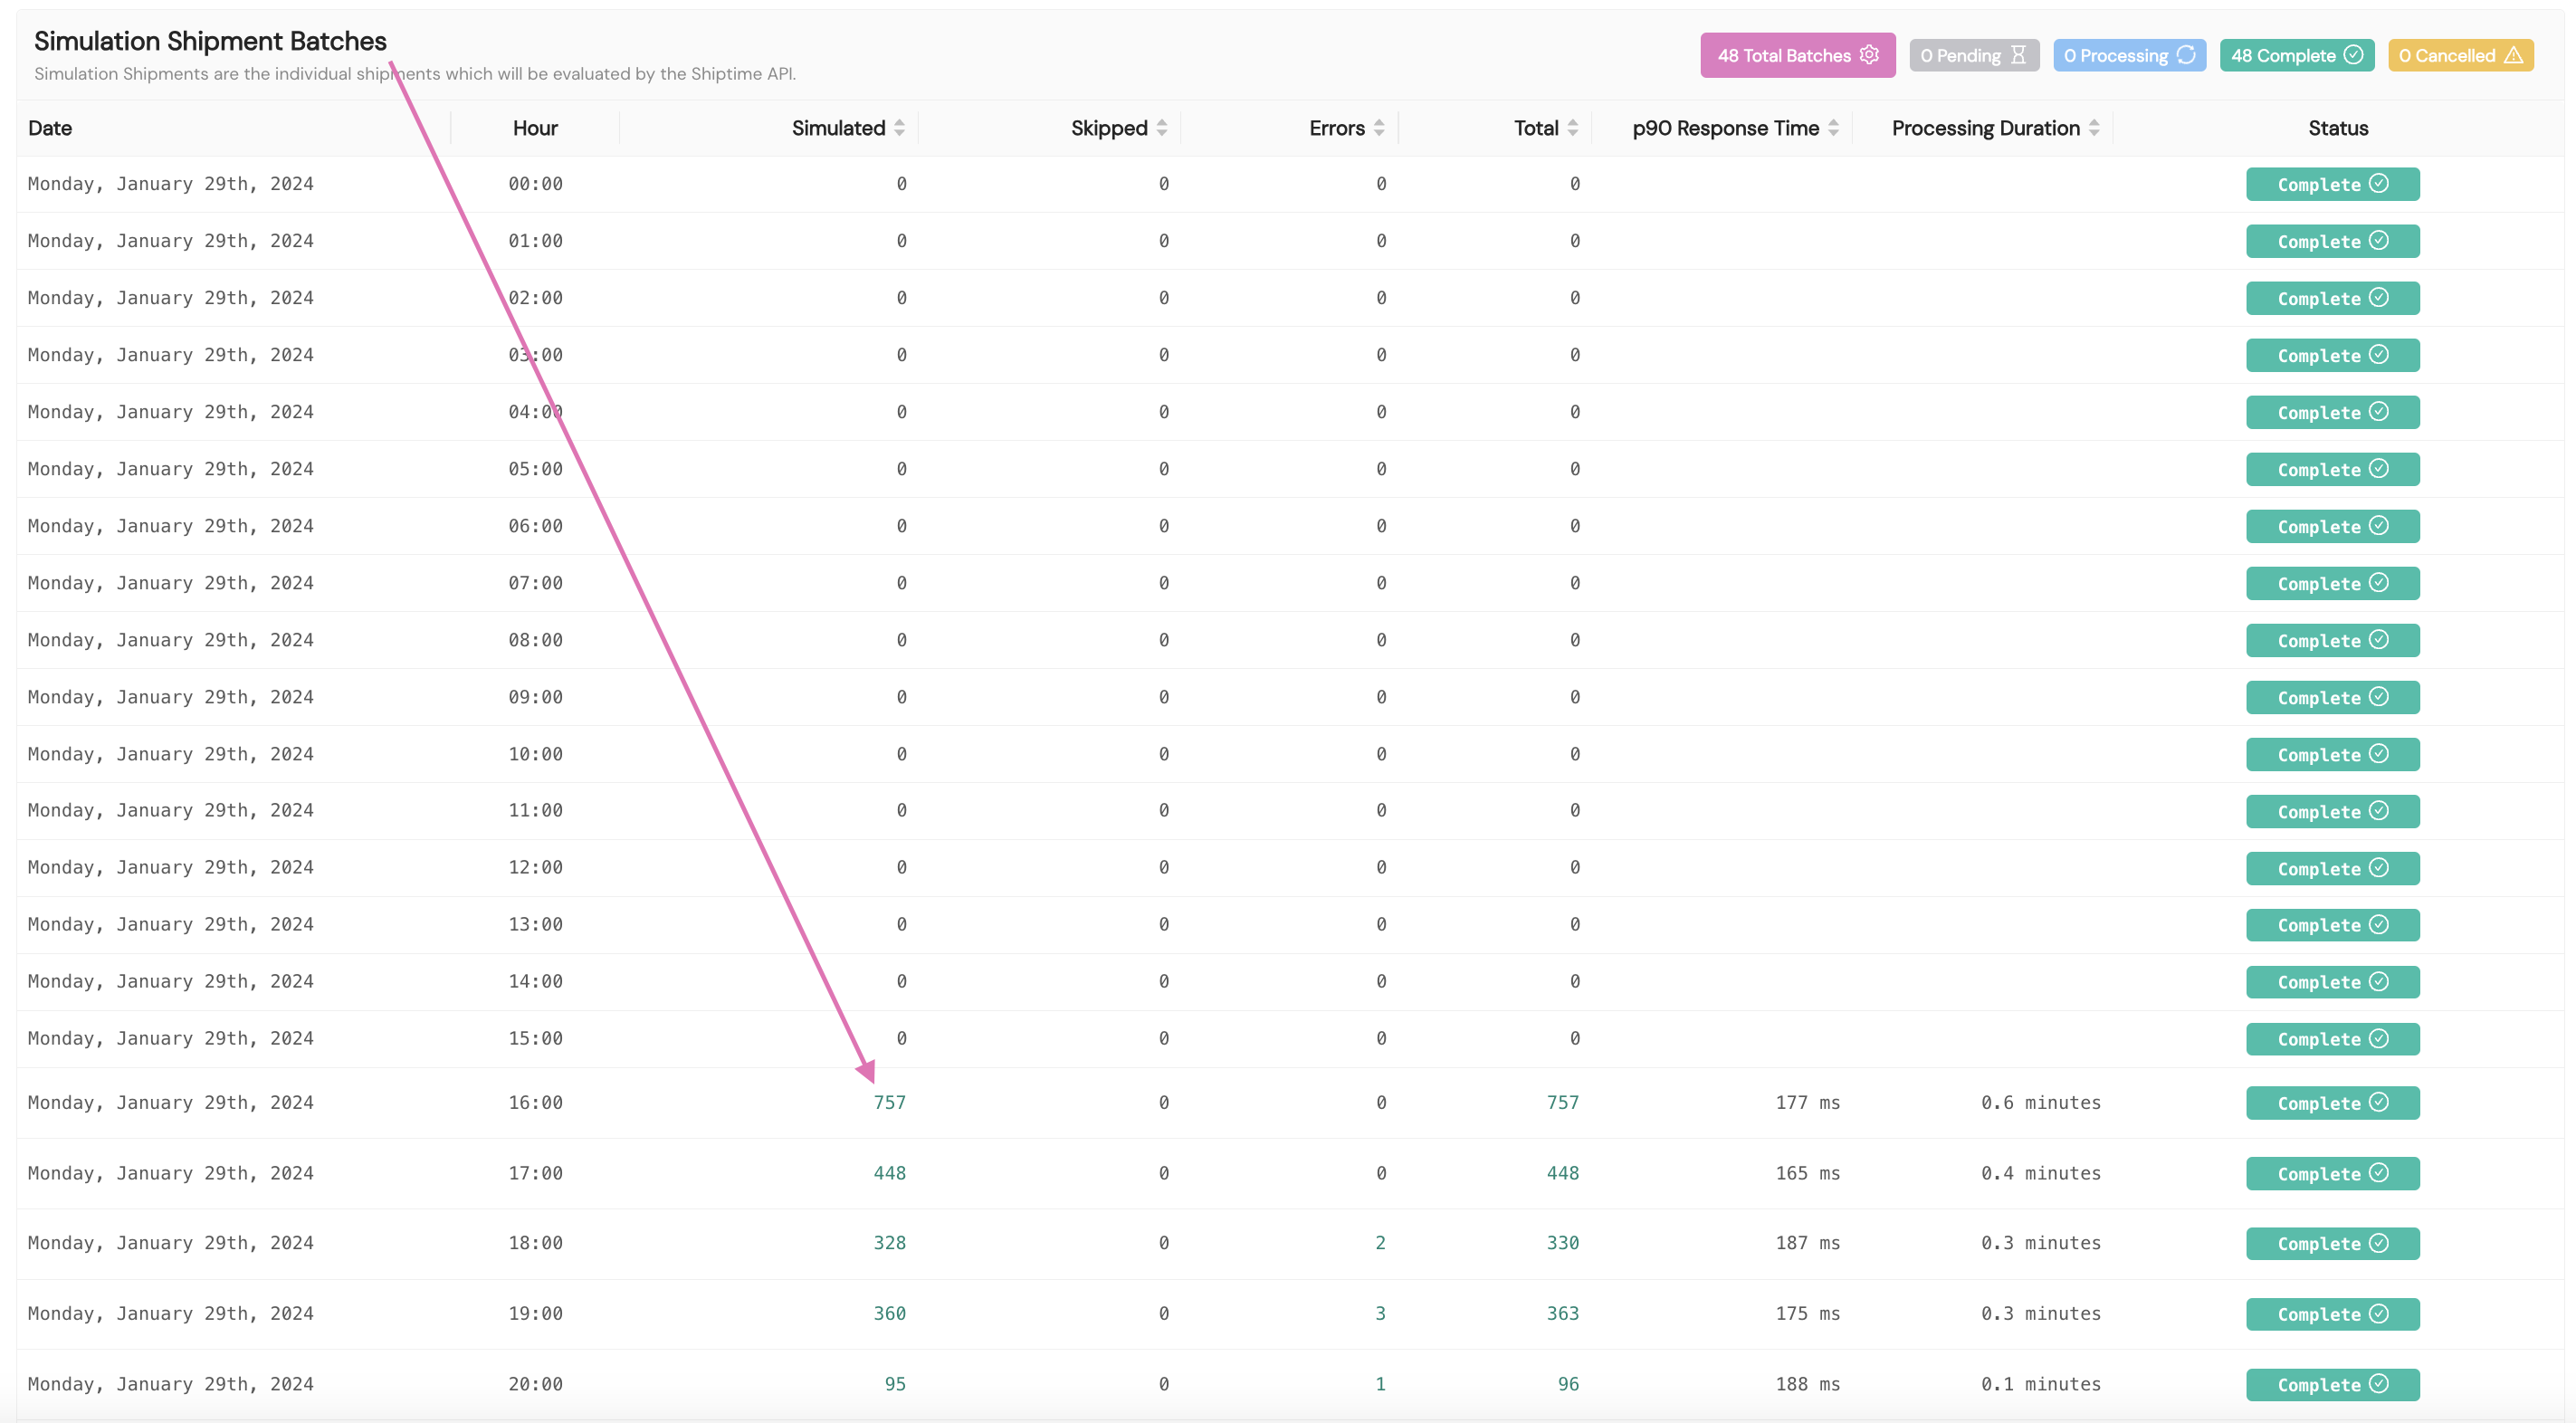
Shipment batch details include the selected carrier service method; time in transit type and days; origin ZIP code, state, and country; destination ZIP code, state, and country; dimensions; weight; and status.
Export
The Export tab gives you the option to download your simulation results in a CSV file.
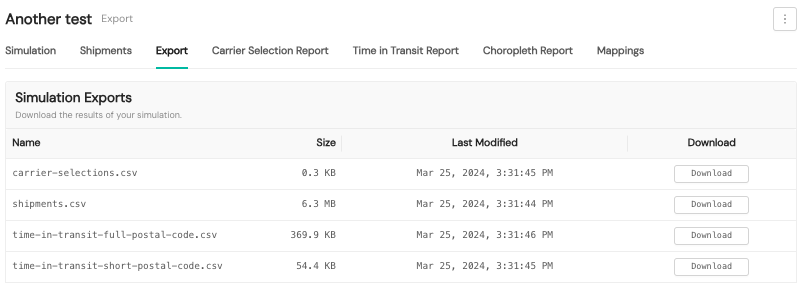
The Simulation Historical File Output CSV file can be used to run a simulation using historical data from another simulation. You'll download it from the Export tab and use it as the upload file in the Upload Historical Shipments step for the simulation. You'll choose to upload a simulation dataset and upload the Simulation Historical File Output CSV file.
Shipment limits report
The Shipment Limits Report tab displays details for your shipment limits configuration within the simulation, including target carrier percentage, target carrier shipments, and target carrier adjustment amount.

Sell rate margin report
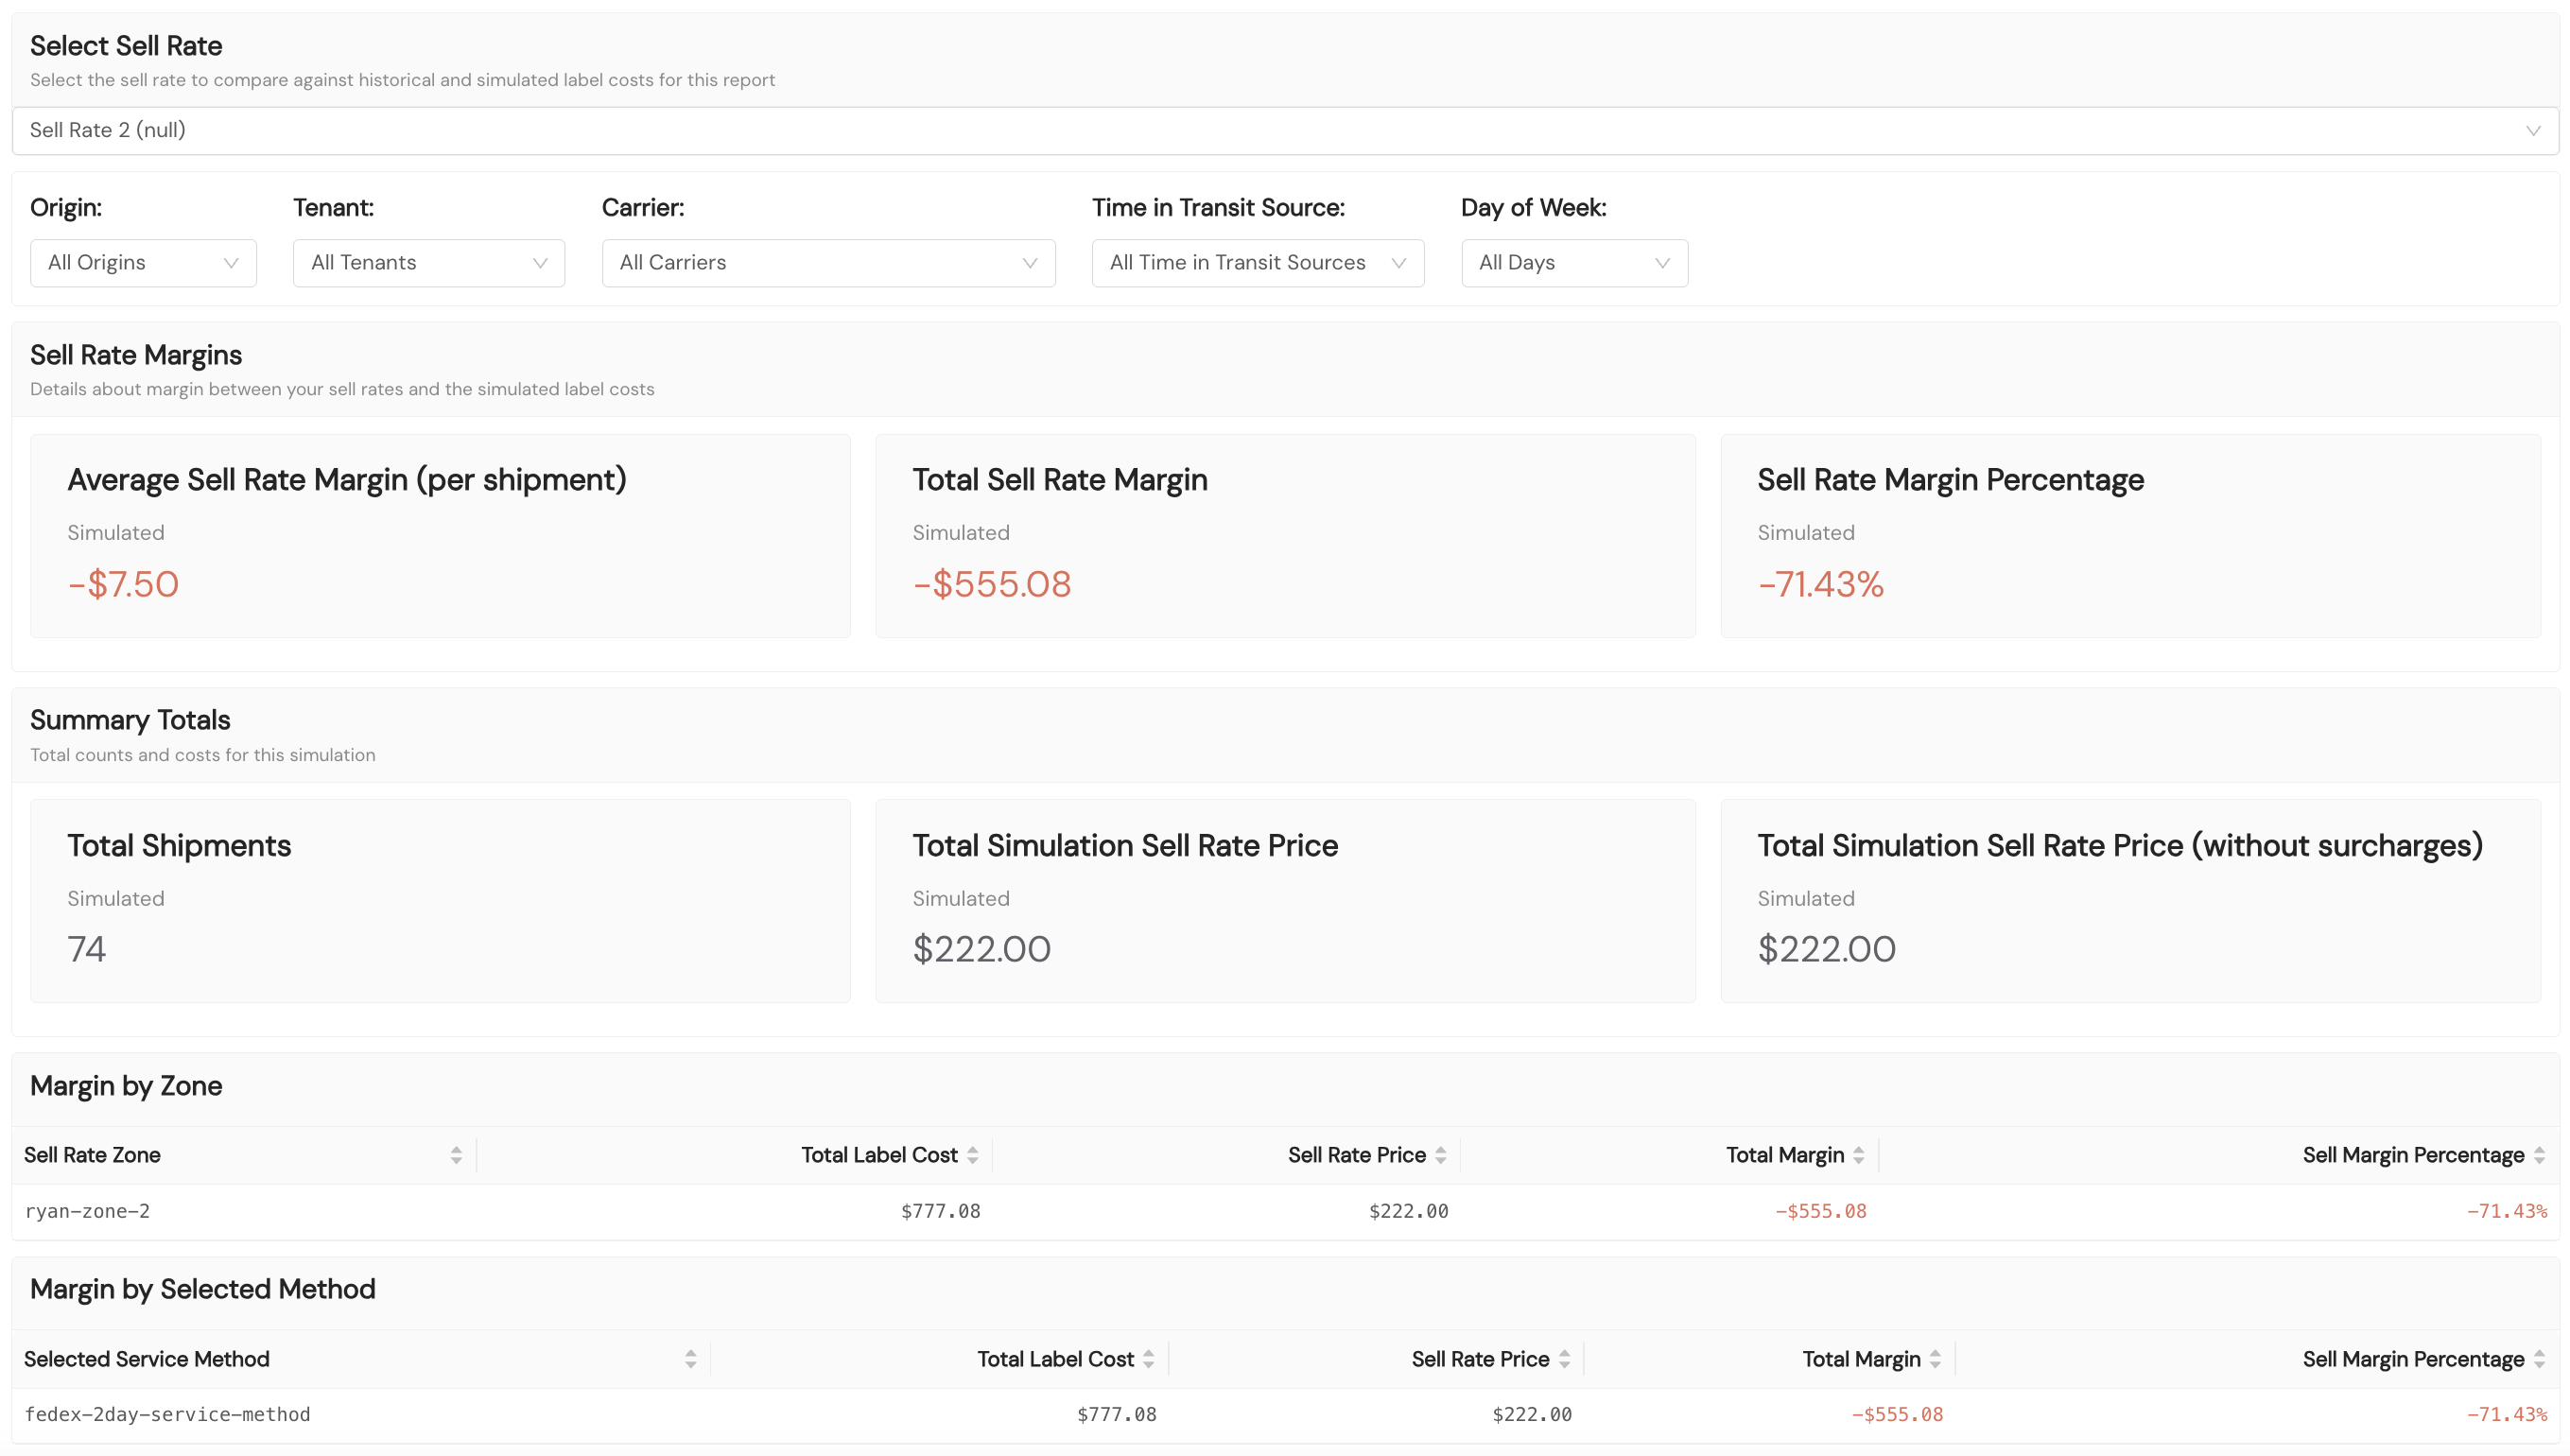
If you ran a sell rate margin simulation, you'll have access to the Sell Rate Margin Report via its tab. Within this report, you can select a sell rate to compare against historical and simulated labels costs, by origin, tenant, carrier, TNT source, and day of week. This report also provides details about the margin between your sell rate and simulated label costs.
Carrier selection report
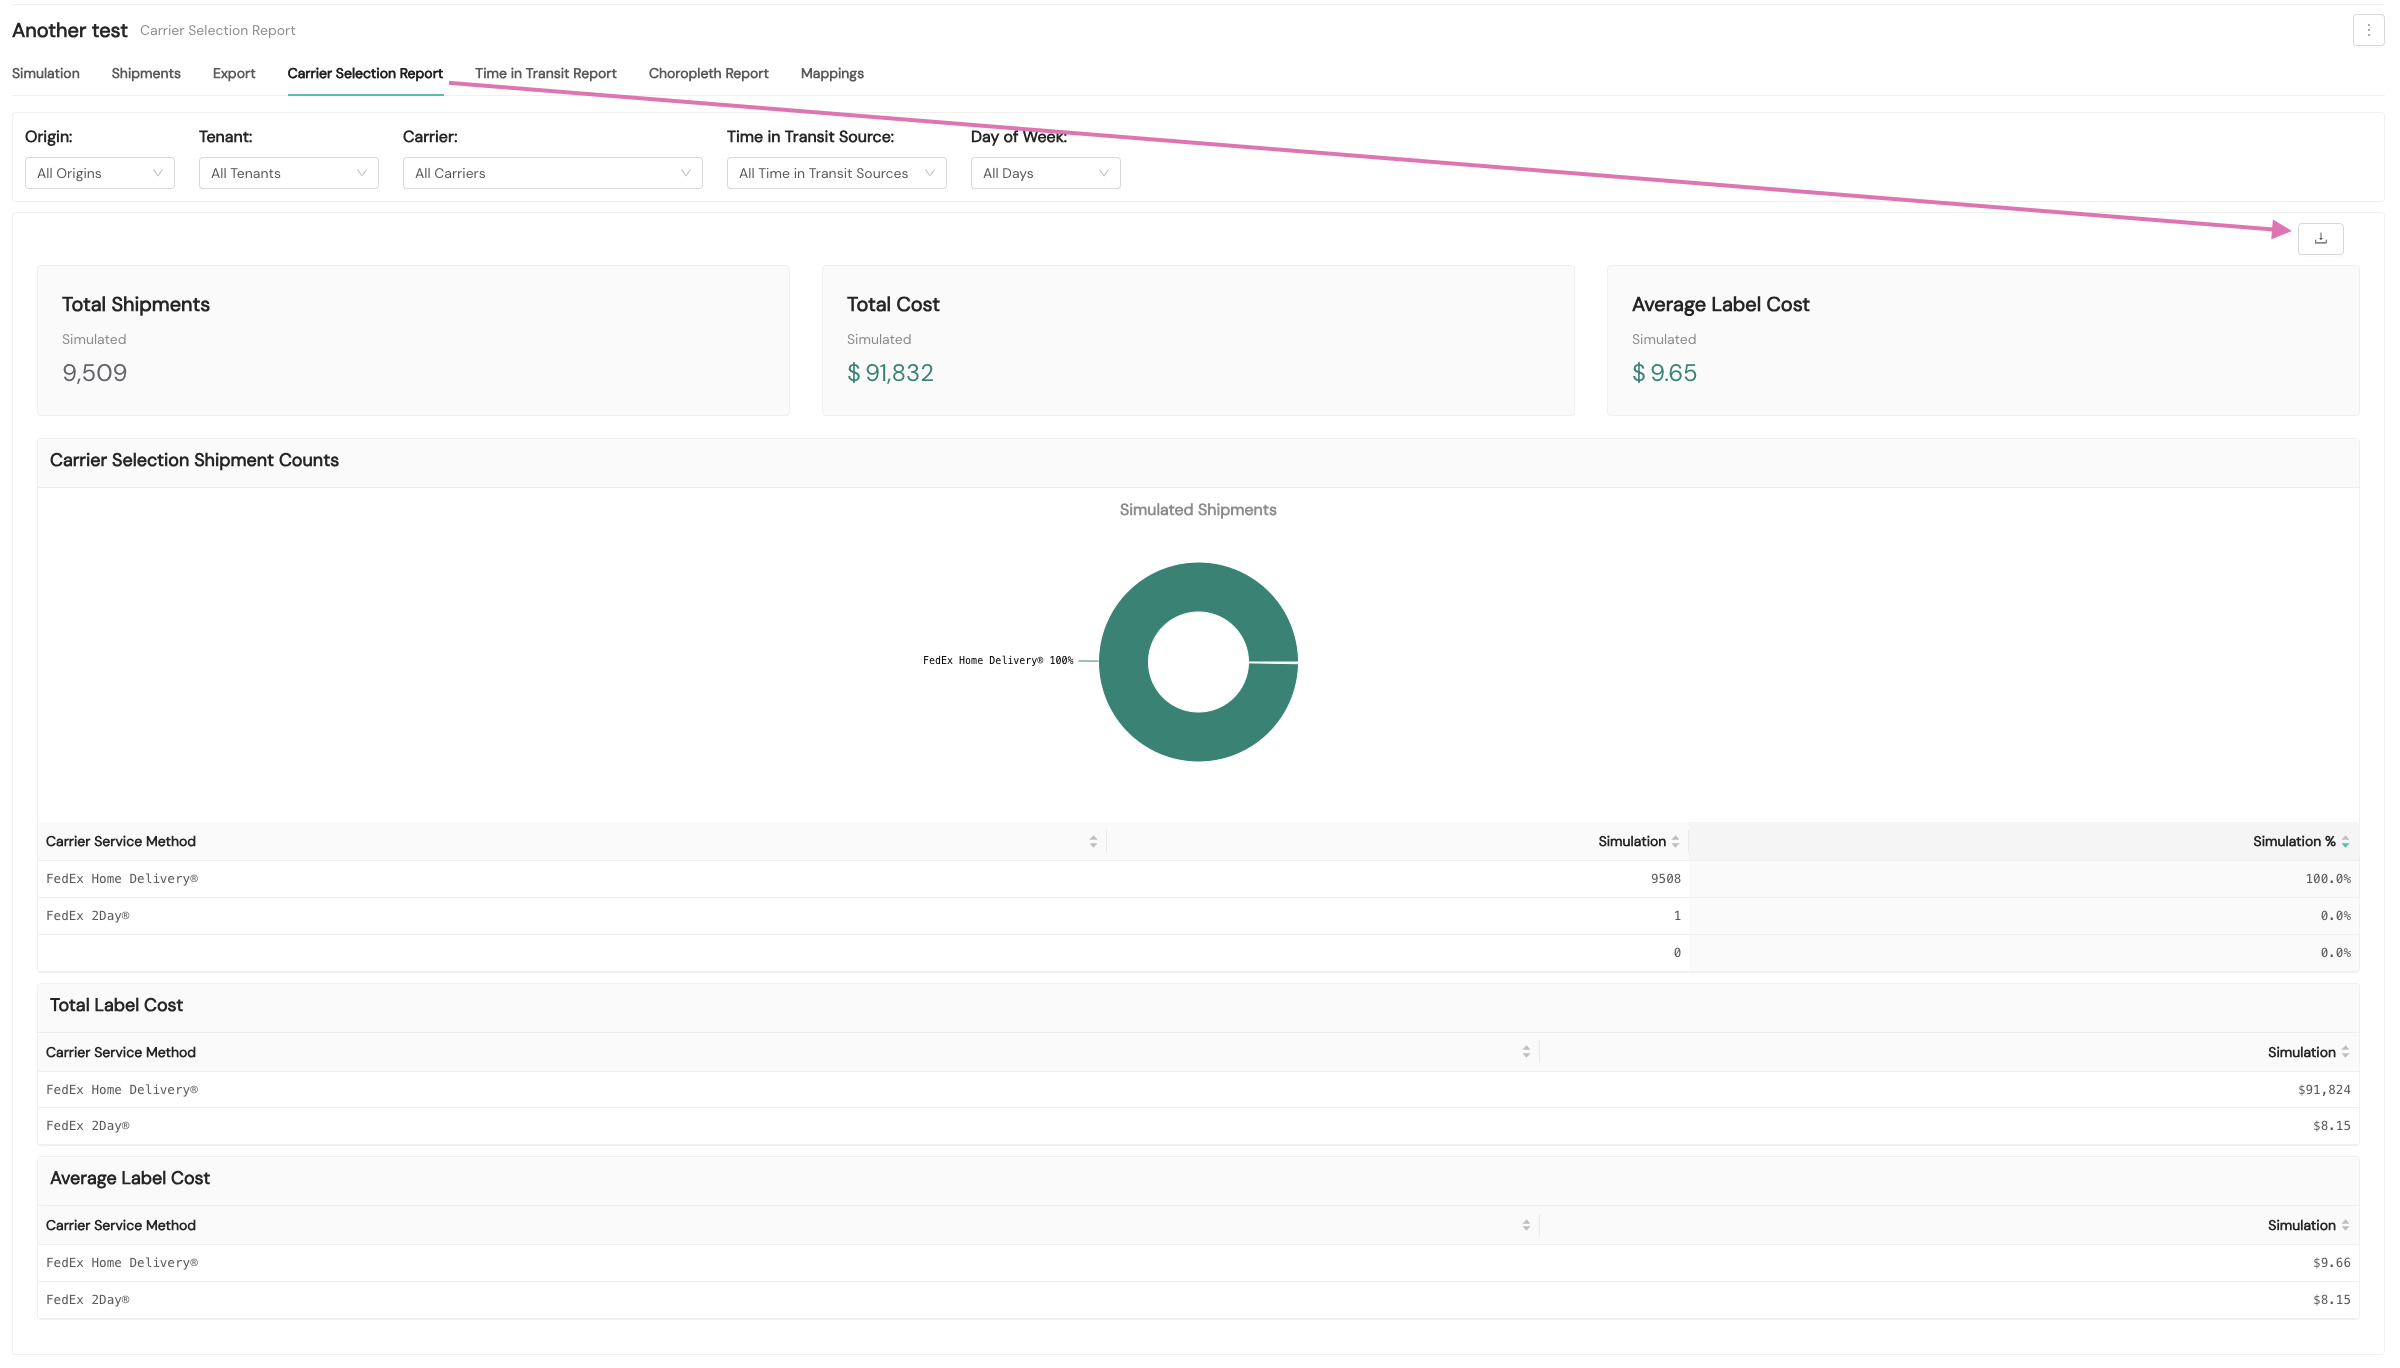
The Carrier Selection Report tab provides shipment counts for carrier selection as well as total label cost and average label cost by carrier service method. You can narrow results using the dropdown menus for Origin, Tenant, Carrier, Time in Transit Source, and Day of Week selections. You also can download the report in a PDF file, as shown in the following screenshot.
Time in transit report
The Time in Transit Report tab provides shipment counts by time in transit source type. You can narrow results using the dropdown menus for Origin, Tenant, Carrier, Time in Transit Source, and Day of Week selections.

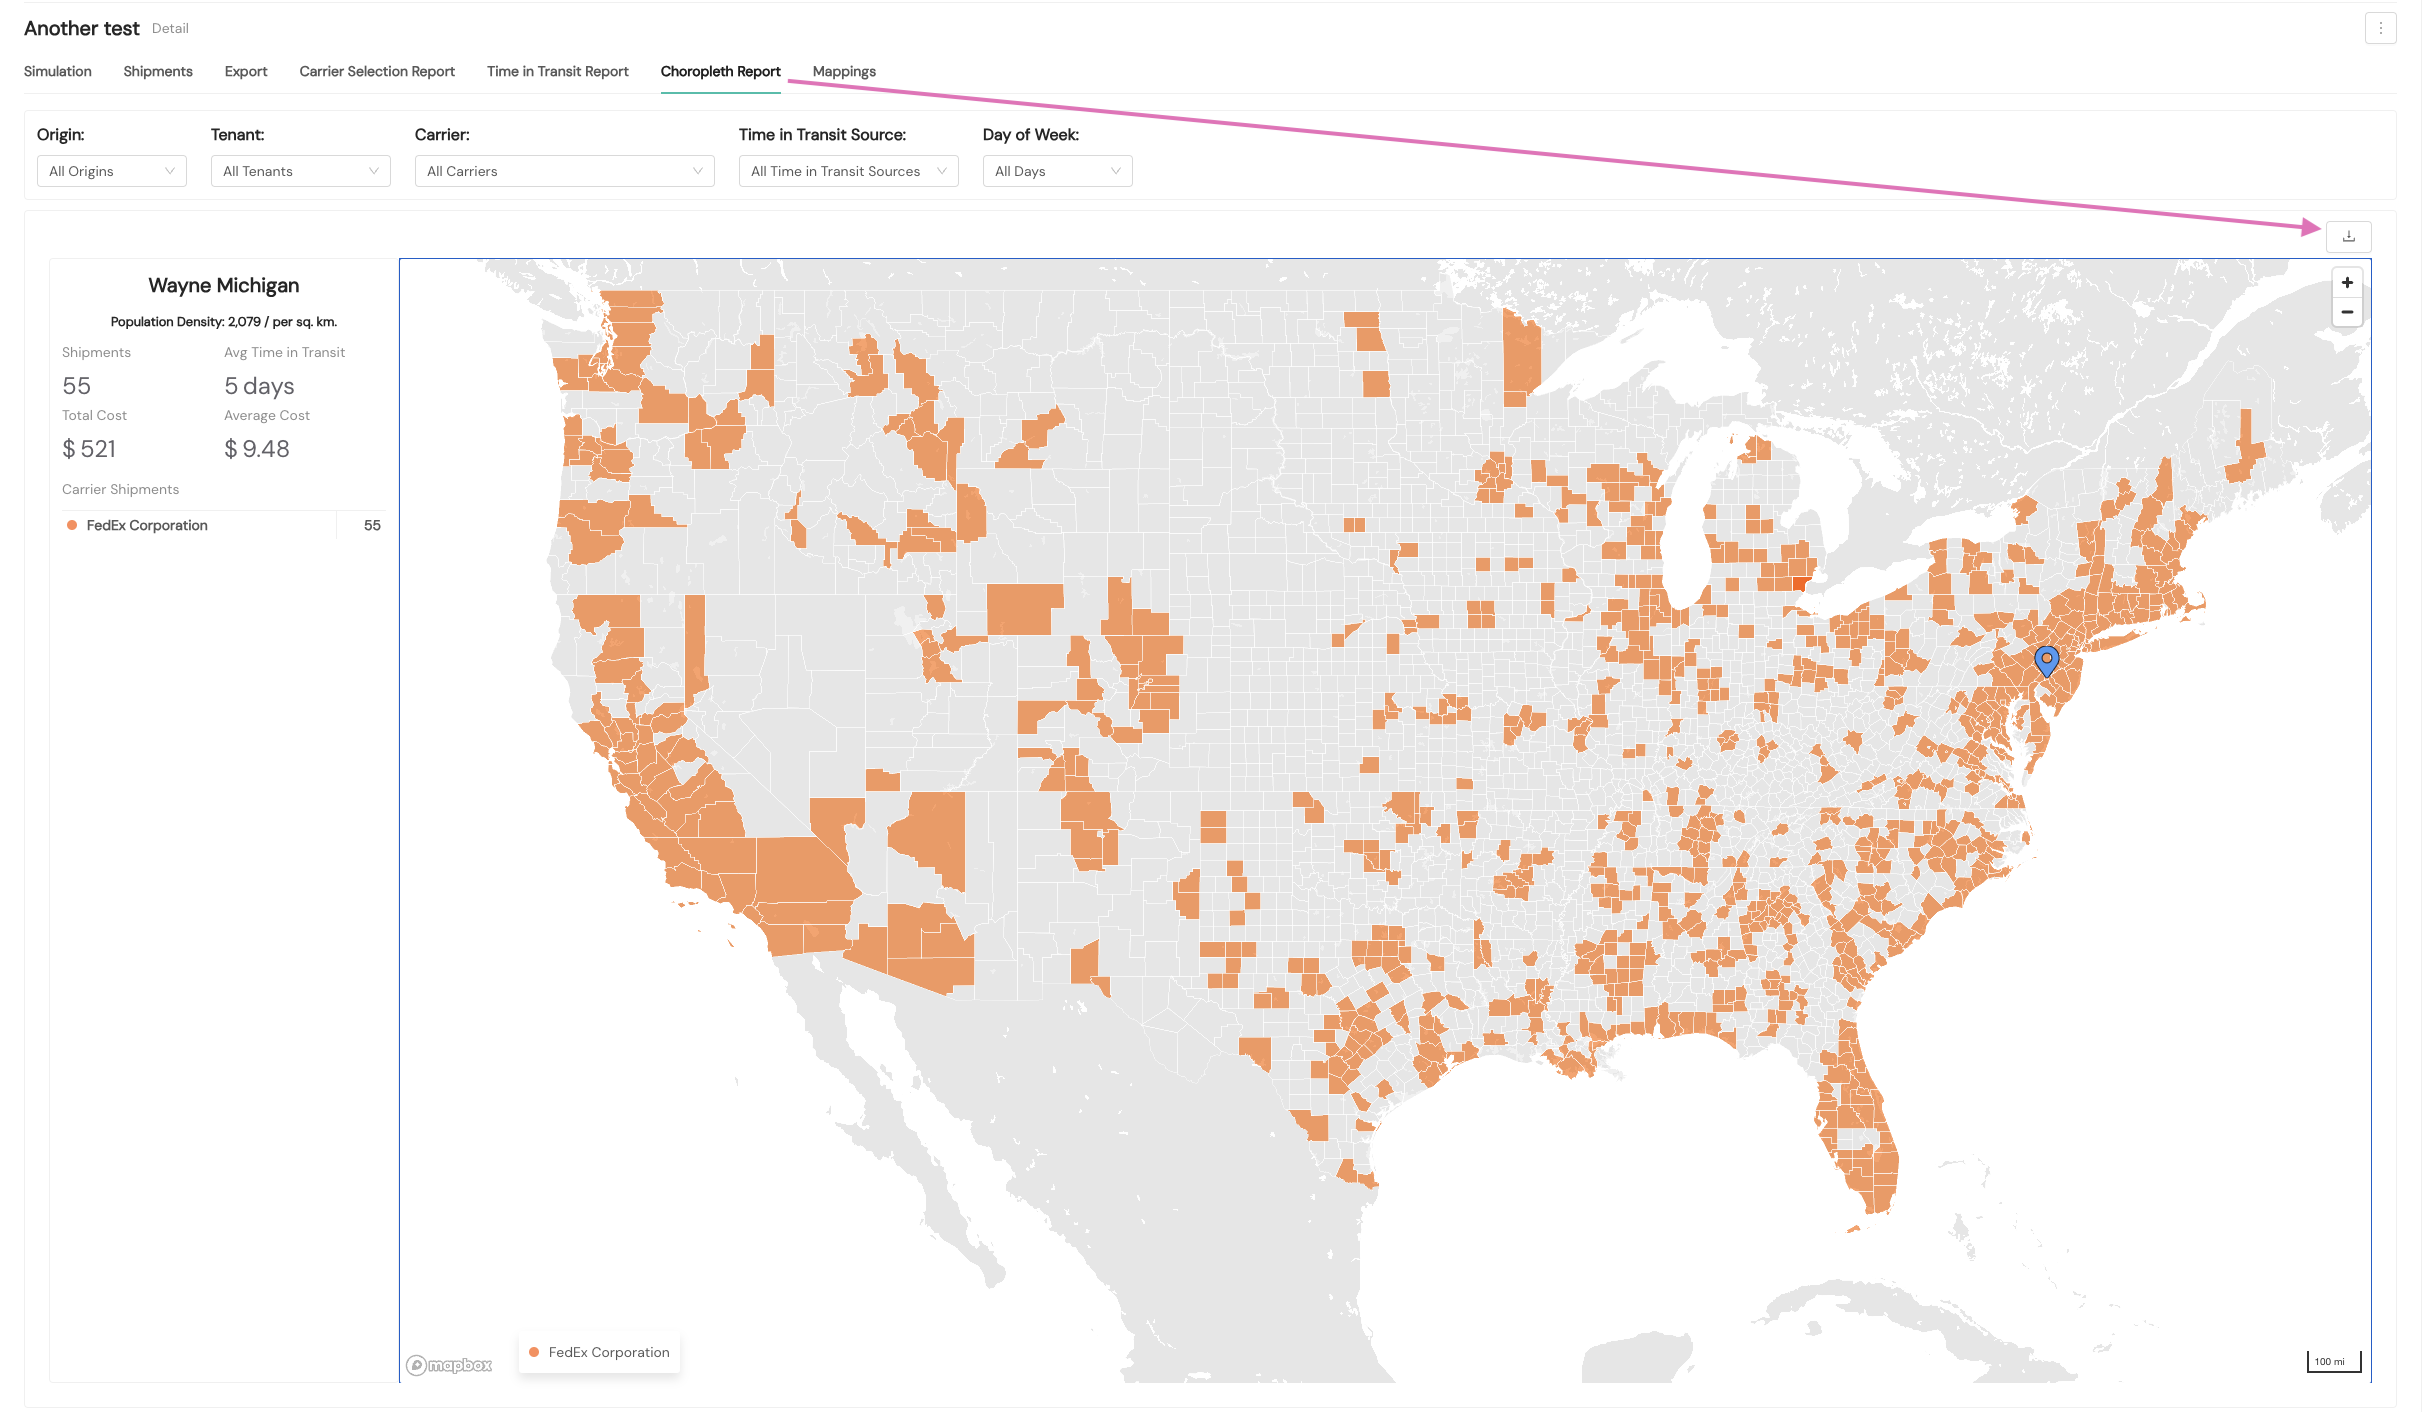
Choropleth report
The Choropleth Report tab provides an interactive map of the delivery zone for the simulation. You can gain insights about shipment totals, average times in transit, total cost, and average cost by carrier and by state. You can narrow results using the dropdown menus for Origin, Tenant, Carrier, Time in Transit Source, and Day of Week selections. You also can download the report in a PDF file, as shown in the following screenshot.
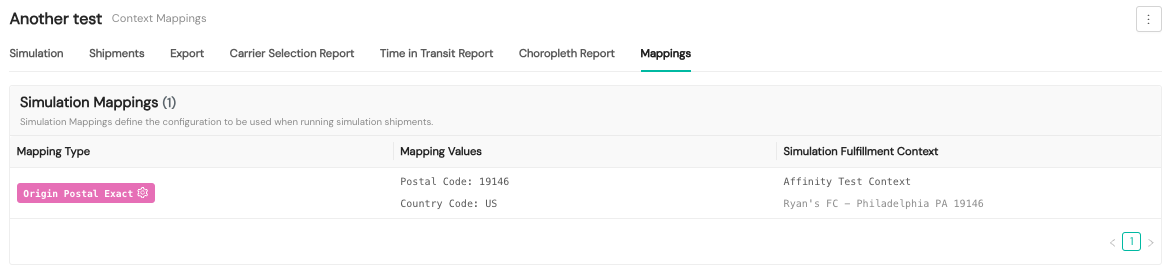
Mappings
The Mappings tab demonstrates the configuration used when running simulation shipments.
Resources
Your Shipium team member is available to help along the way. However, you might find these resources helpful:
Updated about 1 month ago