
Print Labels
Print shipping and return labels directly from the Shipium Console.
About printing labels from the console
If you are in a fulfillment center situation where you need to print labels directly from the console, there are options to do so that will automatically push labels to a local Zebra printer.
There are two common cases for printing labels from the Shipium Console:
- Re-print labels that were previously printed on fulfillment center equipment
- Print labels that were created by the Print Labels tool in the console
For either of these cases, there are two basic options for printing. The first option is to download the ZPL, PNG, or PDF files locally and then print them from the computer on which they were downloaded. The second option is to use Shipium's built-in support for QZ Tray, which is an application that sits on your local computer and allows direct printing from the Shipium Console to an attached printer.
Another use for printing from the console is creating ad-hoc return labels for your customers. You can do this using the Print Return Labels tool, which is described in this document.
Print from the console
You'll need to complete a few steps to print labels from the console, depending on your use case. This section includes guidance for installing QZ Tray, configuring a printer, re-printing a label, and printing from the Print Labels tool.
Install QZ Tray
On the computer on which you would like to install QZ Tray (and on which a Zebra-compatible printer is installed), go to QZ's application page and download the correct application for that computer. Configuration and testing information for QZ tray can also be found here.
Corporate managed computersIf you're trying to print labels from a company-managed computer, you may need to work with your company's IT team to get the QZ Tray software installed and configured on your fulfillment center's workstations.
Configure the printer
The first time that you configure a workstation and click on print from a shipment or the Print Labels tool, you'll be prompted to configure a printer for use from the workstation. Select the appropriate ZPL printer associated with this workstation, and you should be ready to go. The default ZPL printer dialogue is shown in the following screenshot.

Re-print a label
When viewing a particular label, you can print it again by using the toolbar that is next to the label and clicking the Print button. This will feed the ZPL for the label directly to your printer, and you should get a label.

If for some reason there has been a problem configuring the printer or you don't want to configure it, you can also always download the ZPL and print it directly from the computer's desktop.
Print from the Print Labels tool
You'll access Print Labels from the left navigation menu within the Shipium Console.
The Print Labels tool uses a multi-step wizard to guide you through entering shipment information. A progress indicator at the top of the page shows your current step, and a Shipment Summary sidebar on the right displays a real-time summary of the information you've entered as you move through the steps. Each section in the sidebar includes an edit button so you can jump back to a previous step at any time.
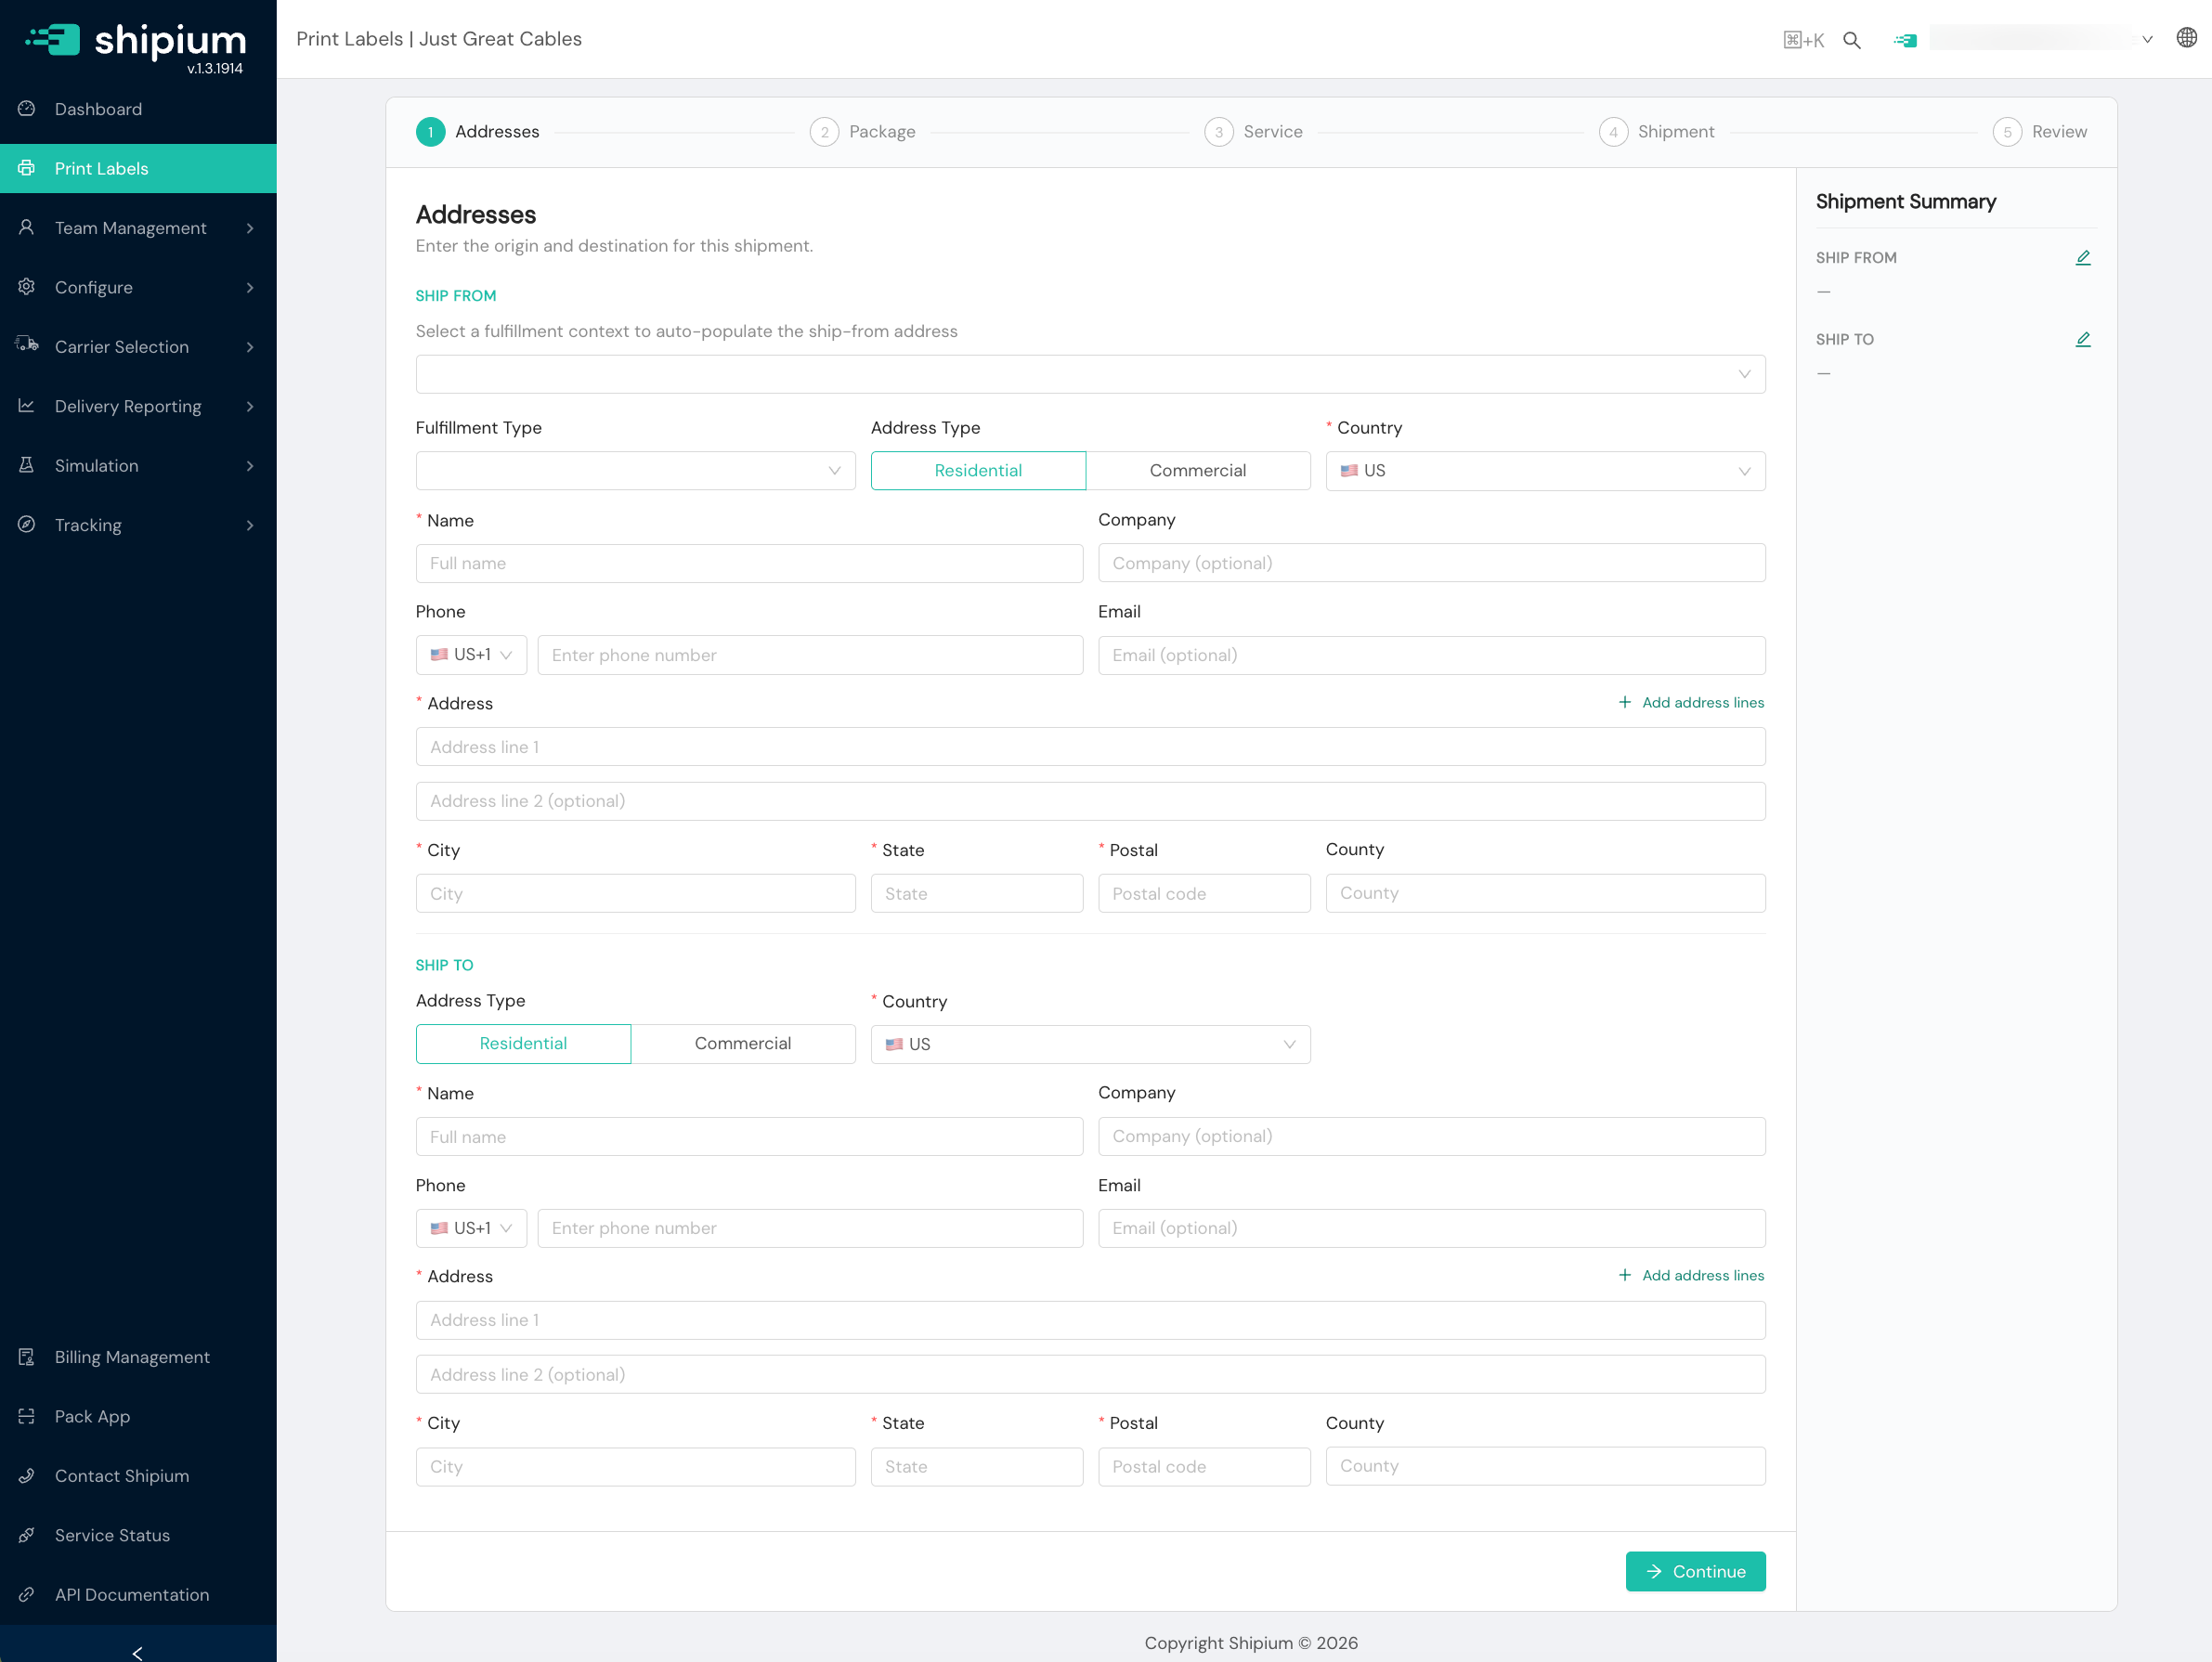
Step 1. Addresses
The Addresses step is where you'll enter the origin and destination for your shipment. It includes two sections: Ship From and Ship To.
Ship From. Select a fulfillment context to auto-populate the ship-from address. If you have fulfillment contexts configured for your network in the Shipium platform, you can select from a list of fulfillment contexts. The fulfillment context name and type (Customer, Returns, Ship from Anywhere) and any associated tenants will be displayed. You also can select the Fulfillment Type and Address Type (required). If you selected a fulfillment context, the remaining fields will be populated with data for that fulfillment context. Alternatively, you can enter details about the fulfillment center address from which the package is shipping. Information requirements vary by carrier; Shipium recommends completing as many data fields as possible.
Ship To. Select the Address Type and enter details about the destination address to which the package is shipping. Information requirements vary by carrier; Shipium recommends completing as many data fields as possible.
For non-U.S. addresses, different address components may be required. For example, if you select Mexico as the origin or destination country, additional data fields will appear for you to complete.
Click Continue to proceed to the next step.
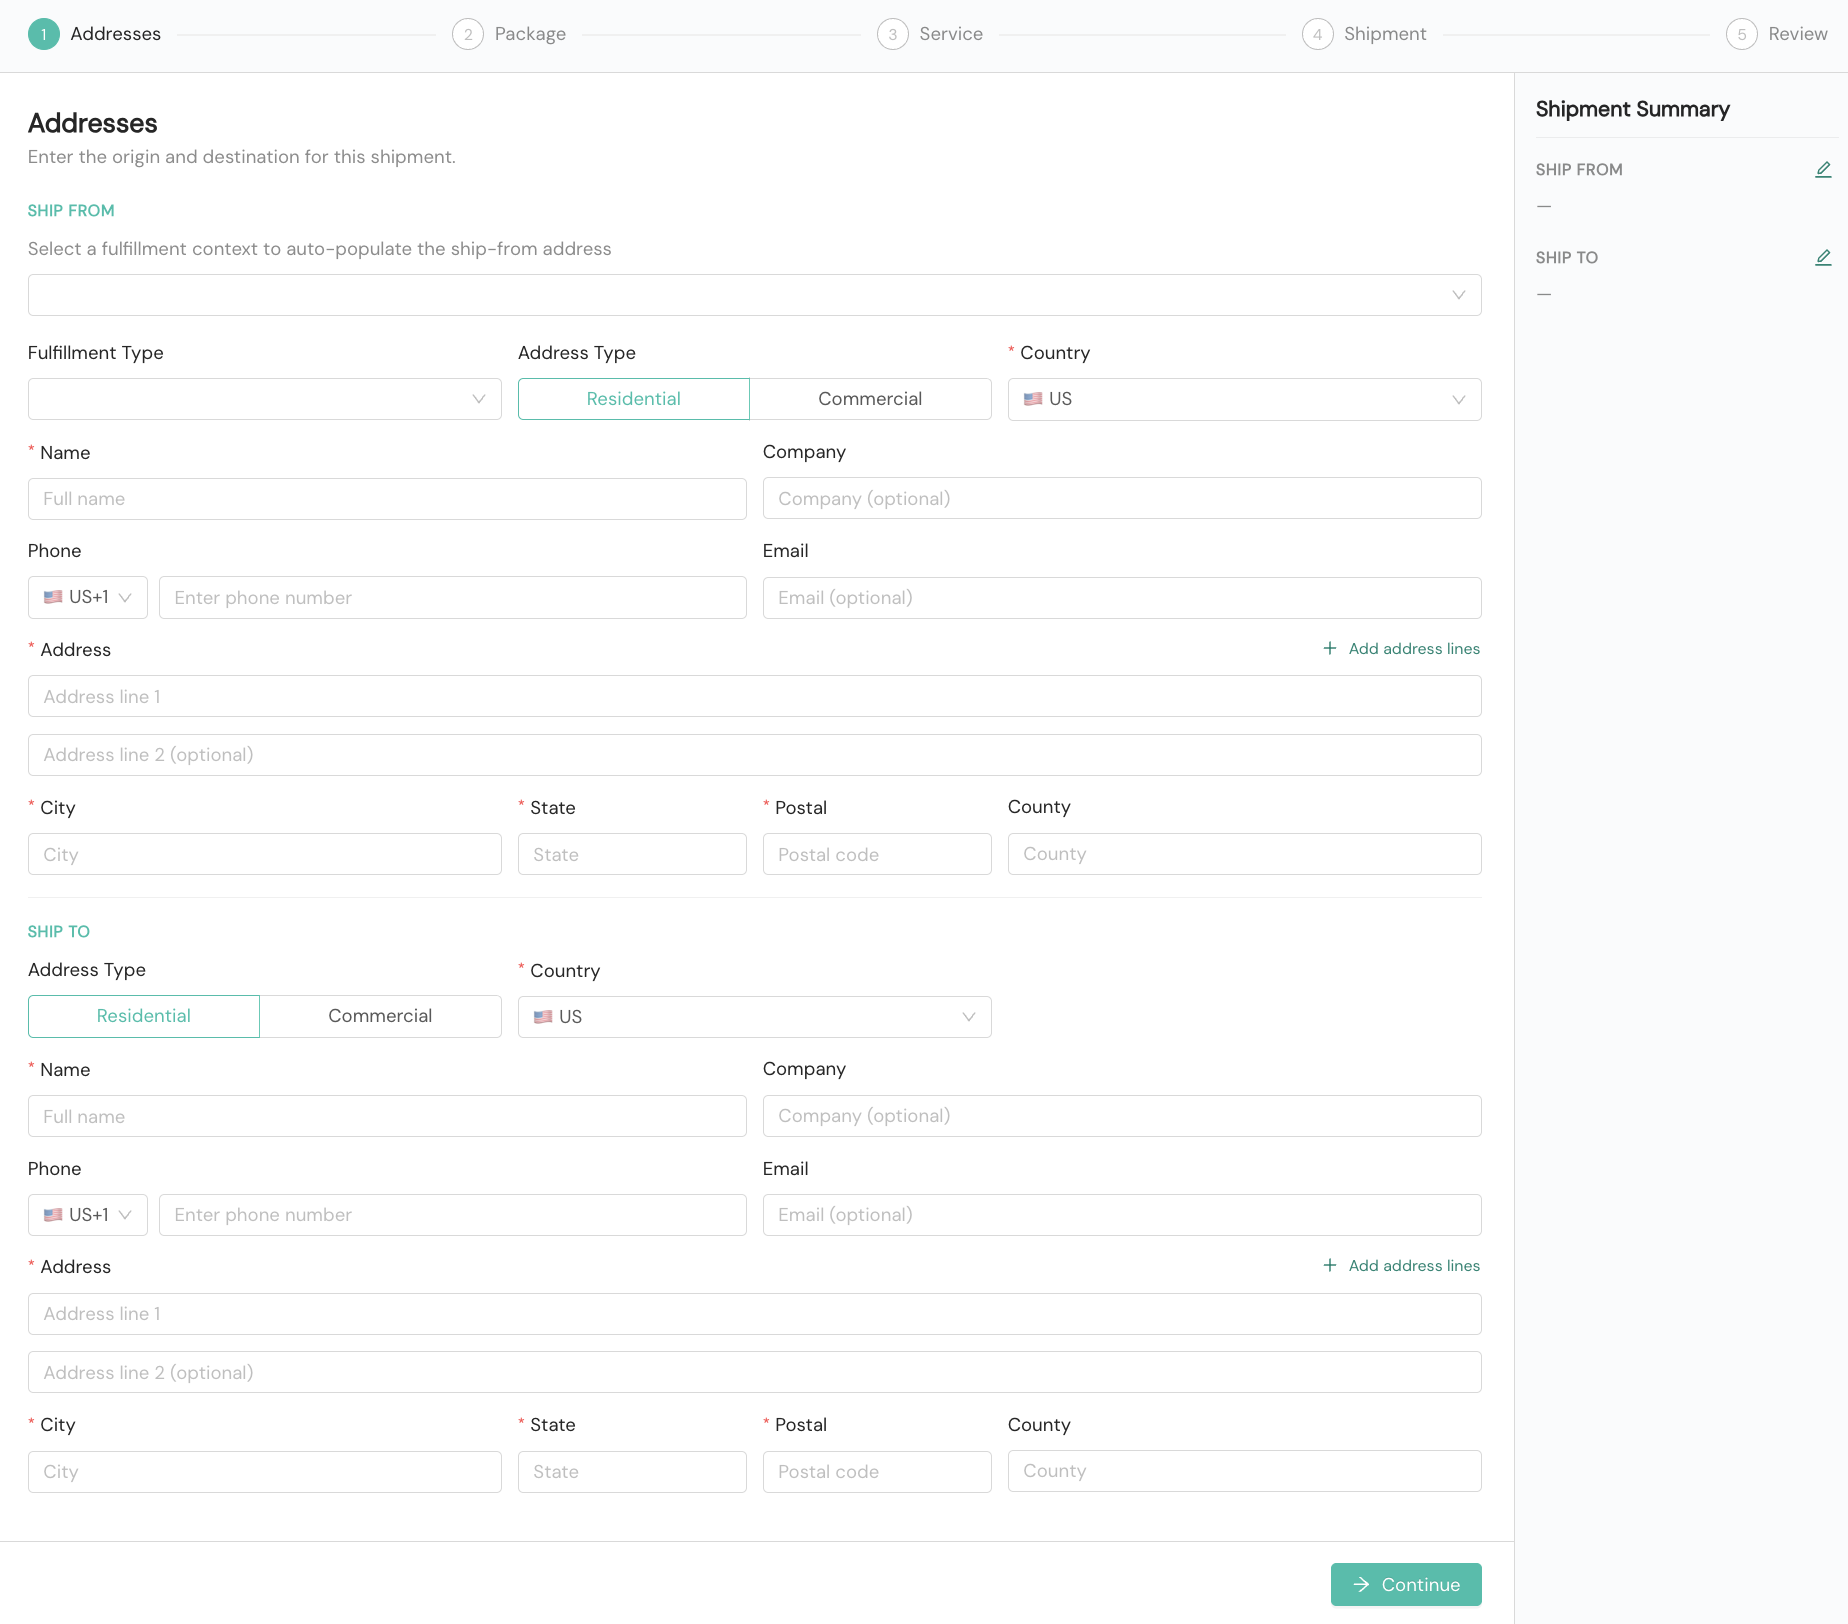
Step 2. Package
The Package step is where you'll describe the package size, weight, and material. Enter the following information:
- Packaging Type. Select the packaging material from the dropdown menu.
- Total Weight. Enter the total weight of the package, including packaging, and select the applicable unit (lb or kg).
- Dimensions. Enter the length, width, and height of the package, and select the applicable unit (in or cm).
Click Continue to proceed to the next step.
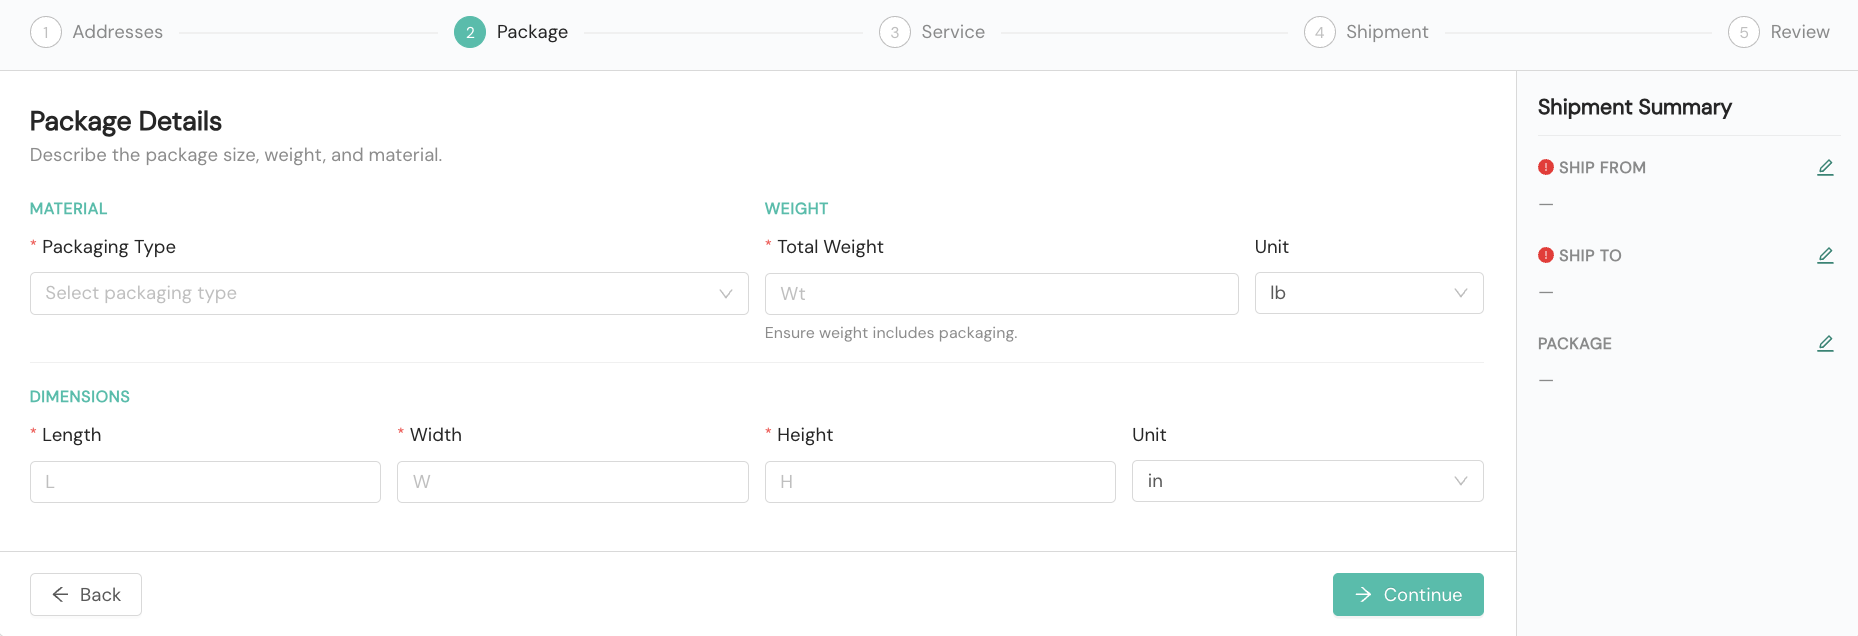
Step 3. Service & Delivery
The Service & Delivery step is optional. It allows you to configure carrier selection preferences and delivery constraints.
Under Carrier Selection, you can specify the following:
- Allowed Carrier Service Methods. Select one or more carrier service methods from the dropdown menu. Only the selected methods will be considered in the carrier selection call. Leave this field empty to allow all available service methods.
- Ship Option. Select from your organization's configured ship options or Shipium standard ship options (e.g., Standard, Express).
Under Delivery Preferences, you can specify the following:
- Delivery Constraint. Choose from three options using the tab selector: None (default), Delivery Date (to set a desired delivery date), or Days of Transit (to set a business days of transit value).
- Signature. Select a signature requirement from the dropdown menu.
- Saturday Delivery. Toggle on to request Saturday delivery.
Click Continue to proceed to the next step.
Step 4. Shipment Details
The Shipment Details step is where you'll configure product details, references, and label settings.
Under Product Details, check any applicable flags for the shipment contents:
- ORM-D. Other Regulated Materials – Domestic.
- Lithium Ion Battery. The shipment contains lithium ion batteries.
- Fragile. The shipment contains fragile items.
- Limited Quantity Hazmat. The shipment contains limited quantity hazardous material.
Under References, you can provide optional identifiers:
- Reference Identifier. An internal reference for the shipment.
- Purchase Order Identifier. A purchase order number associated with the shipment.
- Shipment Tags. Type and press Enter to add one or more tags to the shipment.
Under Label Settings, configure the following:
- Content Description. A brief description of the shipment contents, limited to 35 characters.
- Currency. Select the currency value for the shipment.
- Test Mode. Toggle on to generate a test label instead of a production label.
- Custom Label Entries. Click Add Entry to add optional custom key-value pairs to the label.
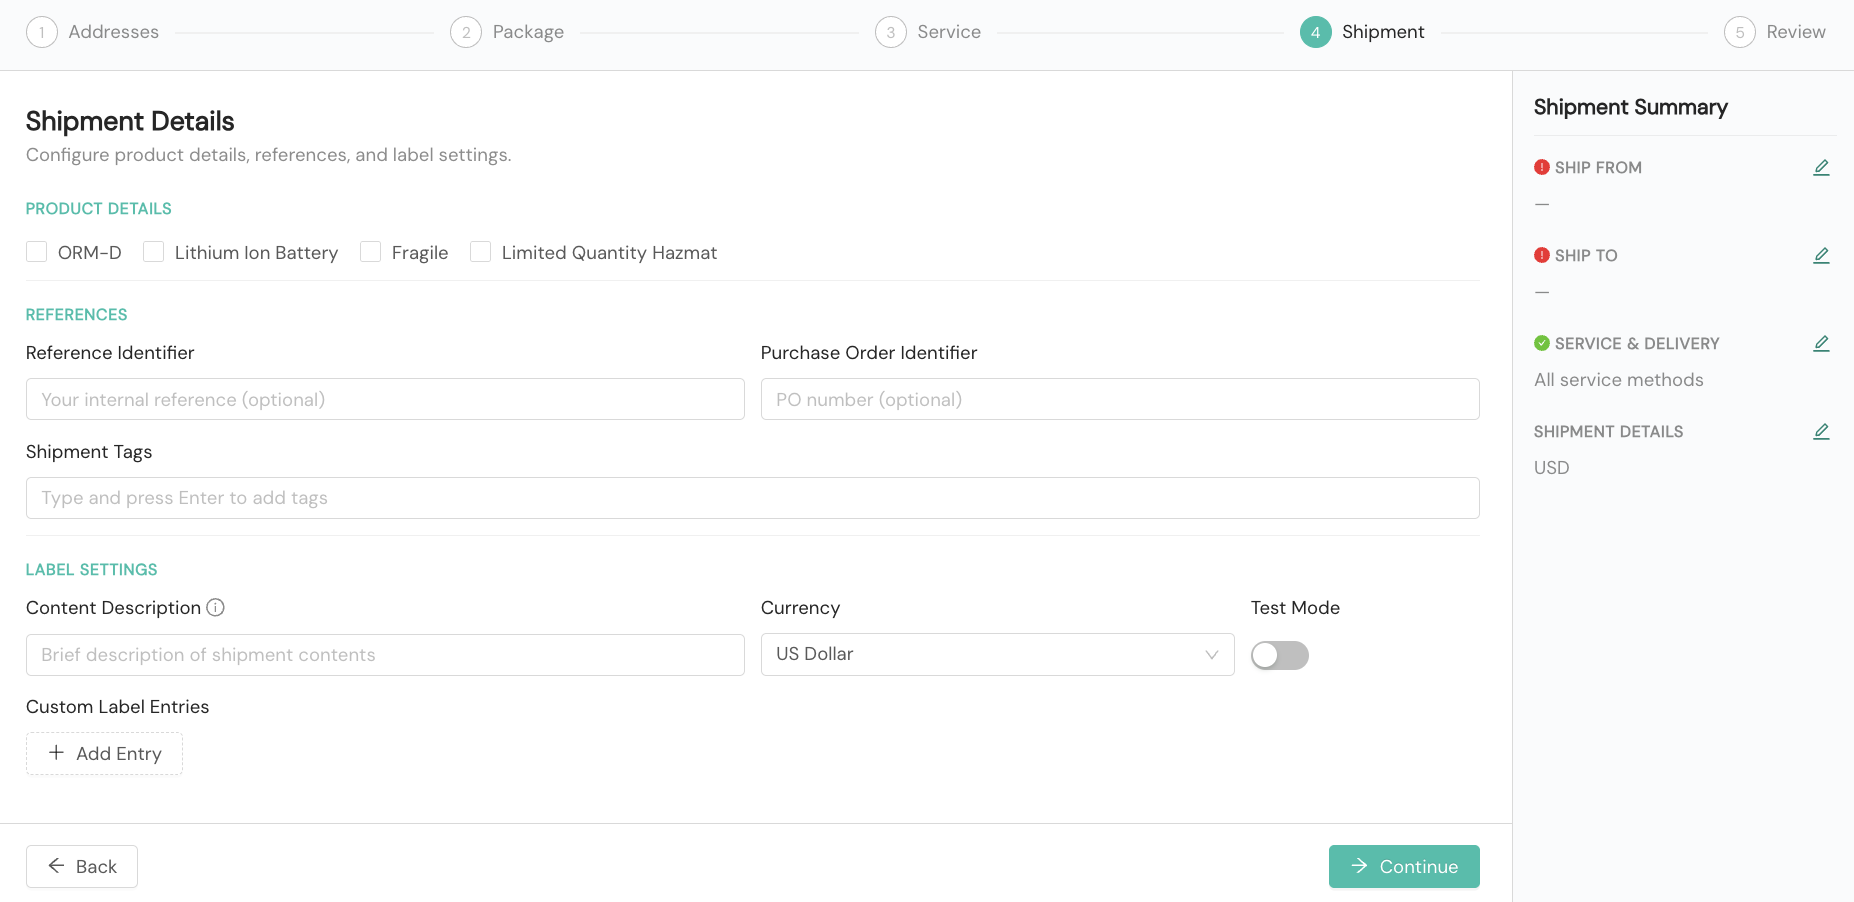
Click Continue to proceed to the review step.
Step 5. Review & Ship
The Review & Ship step displays a read-only summary of all the information you've entered across the previous steps, organized by section: Addresses, Package, Service & Delivery, and Shipment Details. Each section shows a summary of the values entered, and includes an Edit button if you need to go back and make changes.
Sections marked with a validation indicator require attention before you can generate a label. Review any flagged sections and complete any missing required information before proceeding.
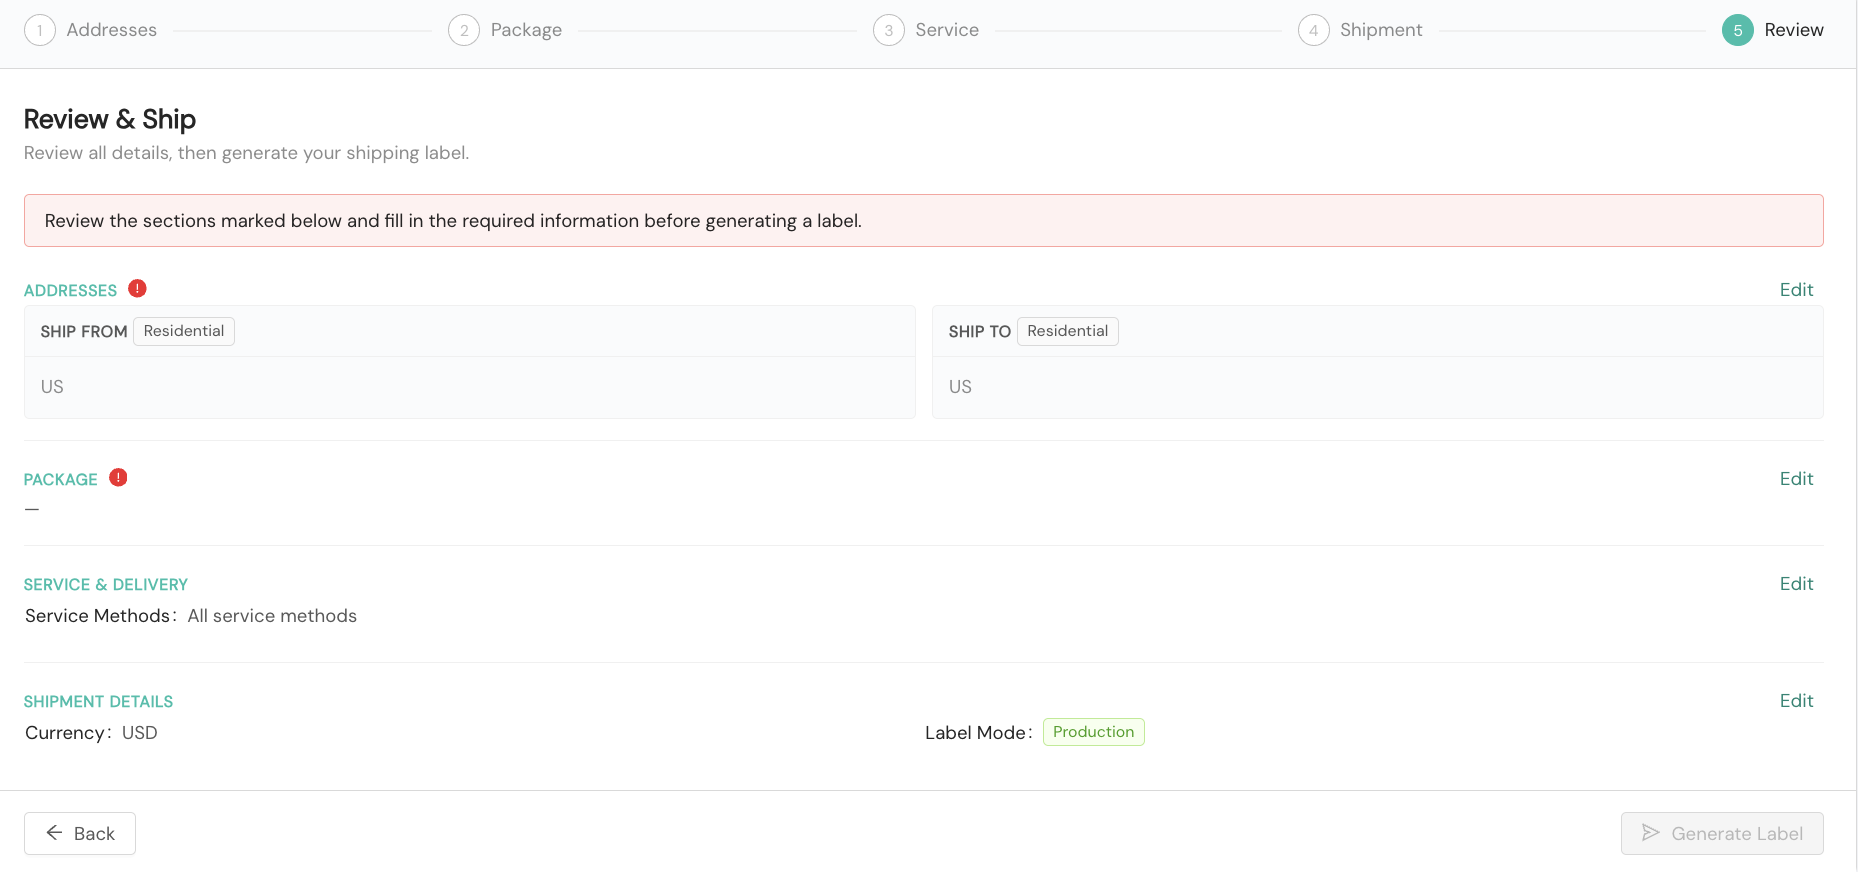
Once all required information is complete, click Generate Label to create the shipping label.
International shipmentsOrganizations with international shipping enabled may see an additional Customs step between Service & Delivery and Review. The Customs step is where you'll complete a customs declaration for the shipment, including line items, Harmonized System (HS) codes, and Incoterms. Contact your Shipium team member for more information about enabling international shipping for your organization.
Print the label
Once you have used the Print Labels tool to generate a label, you can immediately print by using the toolbar that is next to the label and clicking the Print button. This will feed the ZPL for the label directly to your printer, and you should get a label.

If for some reason there has been a problem configuring the printer or you don't want to configure it, you can also always download the ZPL and print it directly from the computer's desktop.
Print ad-hoc return labels from the Shipium Console
Your organization may have fulfillment center associates who need to create ad-hoc return labels for your customers. You can establish special account permissions (returns label only access) for associates to be able to complete this function without accessing the rest of your Shipium account information. Your Shipium team member can help you with setup for applicable associates.
To generate one-off return labels, you'll first need to access the Shipium Console. Upon logging into the console, an account user with the returns label only access will be directed to the Print Return Labels tool. To generate the ad-hoc return label, you'll provide information for the Destination Address and Customer Address.
- Destination. Required. You'll select a fulfillment center for your organization for the destination address to which you wish the customer to return the shipped item(s).
- Address Type. Required. You'll choose between Residential and Commercial as the destination address type.
- Company. Optional. You can include an optional company name if one is associated with the customer.
- Name. Required. The name of the customer returning the item(s)
- Address Line 1. Required. The first address line (e.g., 123 Main St.) for the customer returning the item(s)
- Address Line 2. Optional. The second address line (e.g., Suite 4) for the customer returning the item(s)
- City. Required. The name of the city for the customer address
- State. Required. The two-letter postal abbreviation of the state for the customer address
- Phone Number. Optional. The customer phone number
- Country. Required. You'll select the country for the customer address from a dropdown menu.
You'll also supply information about the contents of the shipment being returned.
- Products. You can add products that will be included in the shipment, specifying an ID and the quantity for each one. You also can designate each product as hazardous material.
- Label ID. You may provide an optional label ID for further identification.
- Description. You also may provide an optional description for the product.
Once you've completed the data fields for the Print Return Labels tool, you can click the Print Label button to create the return label.
You can find your return labels in the Shipment Search tool in the console.
Resources
Your Shipium team member is available to help along the way. However, you might find these resources helpful: