
Shipment Count Limits
Configure your account to establish shipment count limits.
About shipment count limits
Shipment count limits enable your organization to help manage shipment capacity by origin, carrier, and service method. If you employ tenants in your network, you also can establish limits at the tenant account level. The most common use cases for establishing limits typically are:
- meeting carrier contract minimum shipment requirements;
- enabling carrier-provided discounting for increased shipping volume; and
- managing carrier-imposed shipping maximum requirements, especially during peak shipping times.
Getting started with ShipiumIf your organization doesn't already have a Shipium account, you'll want to visit Get Started with Shipium to set up your account before you can configure limits for your organization.
Within the Shipium platform, you can determine limits for each of the following within your network:
- origin (fulfillment center or warehouse);
- tenant (individual account);
- carrier (package transporter); and
- service method (type of transport for shipping).
The Carrier Schedule documentation provides information about controlling which carrier is selected to pick up your package from your fulfillment center, when specifying a desired delivery date or business days of transit in your carrier selection and/or label generation.
How minimum shipment targets work
This sample scenario explains the behavior of a shipment count minimum limit with a percentage discount set at the carrier level. For this example, the carrier is FedEx.
If you set a shipment count minimum limit of 1,000 for FedEx with a 2% percentage discount and no maximum limit, the Shipium Carrier Selection system does not simply select FedEx for the first 1,000 shipments automatically, regardless of cost. Instead, the system's behavior is as follows:
- Rate shopping with a "finger on the scale". For the first 1,000 shipments that are eligible to go with FedEx (based on origin, destination, package characteristics, etc.), the Shipium Carrier Selection system will continue to rate shop against other carriers. However, it will apply a 2% cost discount to FedEx's calculated rate. This effectively makes FedEx appear cheaper to the rating engine, making it more likely to be selected than it would be without the discount.
- Not guaranteed selection. Even with the 2% discount, if another carrier is significantly cheaper (e.g., more than 2% cheaper than FedEx's discounted rate), the system will still choose the more economical carrier. The discount makes FedEx more competitive, but not necessarily guaranteed to be the cheapest or selected for every single one of the first 1,000 shipments.
- Discount expiration. Once the system determines that 1,000 shipments have been selected for FedEx (or the total count for the day reaches that target), the 2% cost discount will no longer be applied to subsequent FedEx shipments for that day. After this threshold, FedEx will be rated at its actual cost, competing without the "finger on the scale" against other carriers.
Set up your organization's shipment count limits
You can access your organization's profile and set your desired shipment count limits in the Shipium Console. You establish these limits by saving the values you input in the console. These values will be effective immediately and will remain in place until updated and saved with new values.
Count limits apply for the day of selectionOnce you establish your organization's shipment count limits in the Shipium platform, they're immediately applied for the day.
To set up your organization's shipment count limits, you first must access the Shipium Console. Then you'll complete the following steps.
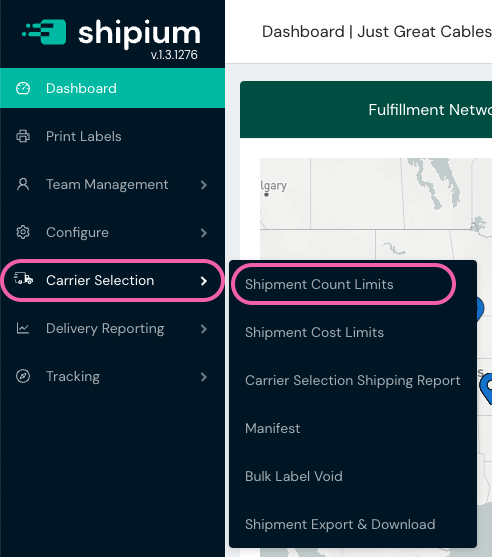
- Once logged into the Shipium platform, you'll select Carrier Selection and then Shipment Count Limits from the lefthand navigation menu.
- Within the Shipment Count Limits page, you'll select the + Add Limit button near the top right of the screen. Any existing limits for your organization will display on this page.

- To add a new limit, you'll need to provide your organization's information for all the required fields.

Limit Details. You'll complete the required fields as well as any applicable optional fields. You also can view any limits that relate to the new limit you're creating by toggling the dropdown arrow next to View Related Limits.
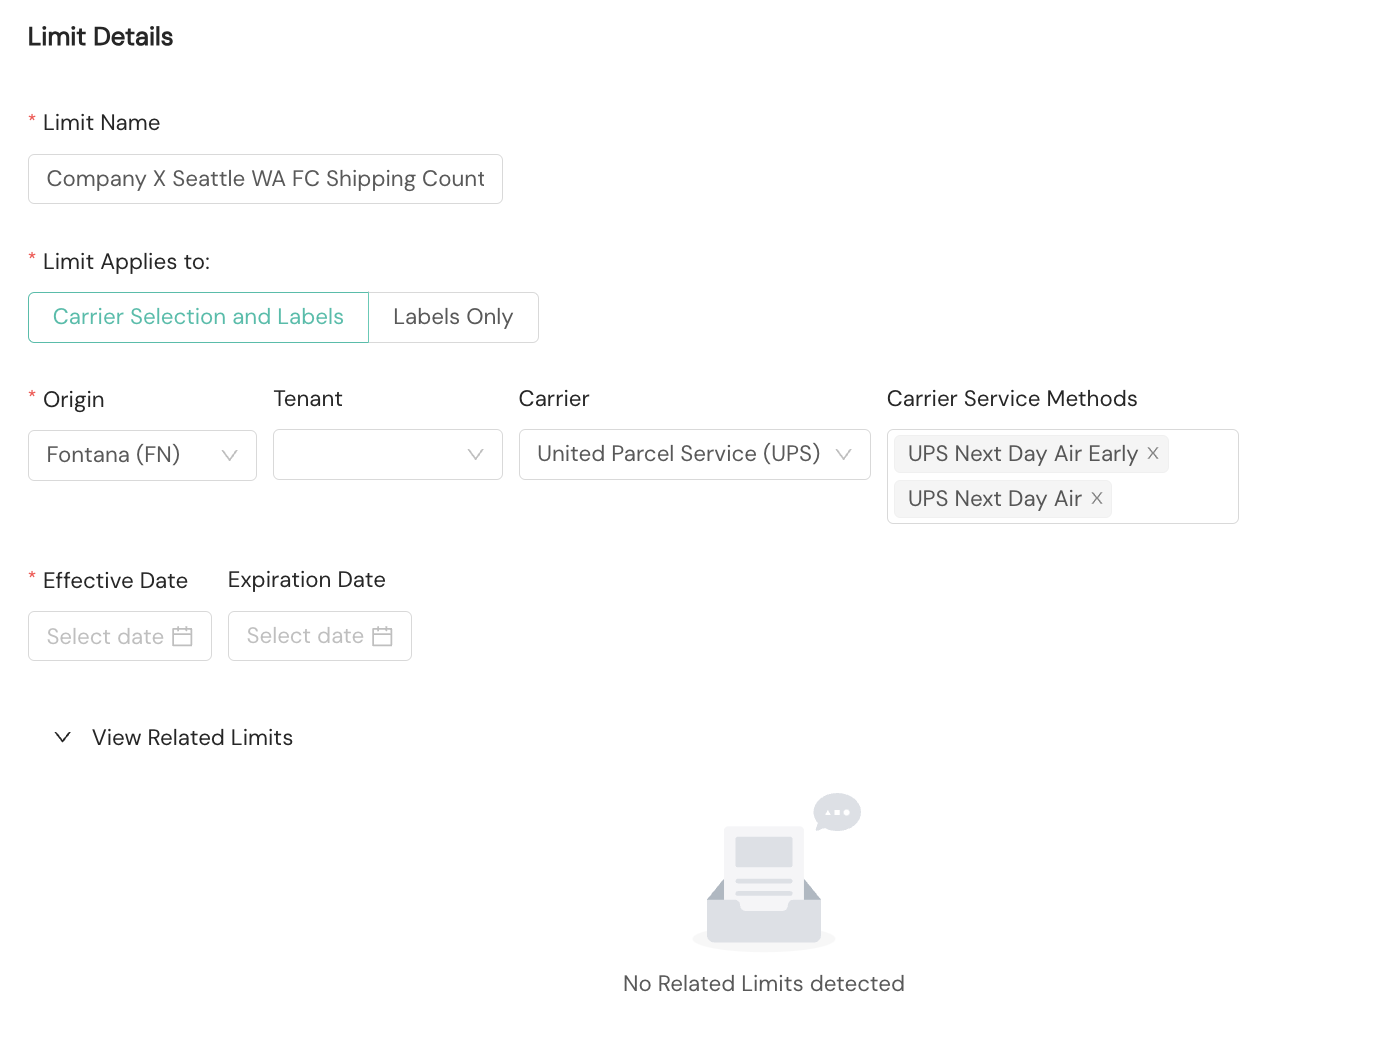
- Limit Name. This is the human readable name your organization wishes to assign this limit. There are no character limitations for the name.
- Limit Applies To. This allows you to apply the limit to both rate shopping and label generation counts or to label counts only. If you wish to cancel a carrier selection rate shop request in order to not have it count, you can cancel the shipment. More information is provided in the Cancel a Shipment document.
- Origin. This is the origin (typically a fulfillment center or warehouse) to which you want the limit to apply. You must select an origin to set a limit.
- Tenant. This is an optional selection for organizations employing tenants and wishing to configure limits at the individual tenant account level. You may choose a tenant from your fulfillment network from the dropdown menu.
- Carrier. This is an optional selection for organizations wanting to set shipment count limits at the carrier level. You'll choose the desired carrier from the dropdown menu.
- Carrier Service Methods. This is an optional selection for organizations wanting to set shipment count limits at the carrier service method (e.g., next day air) level. You'll choose the desired carrier service method from the dropdown menu. This category does not appear until a carrier is selected in the previous step.
- Effective Date. This is the date on which you want the new limit to start. It is a required field.
- Expiration Date. This is the date on which you want the new limit to end. It is an optional field.
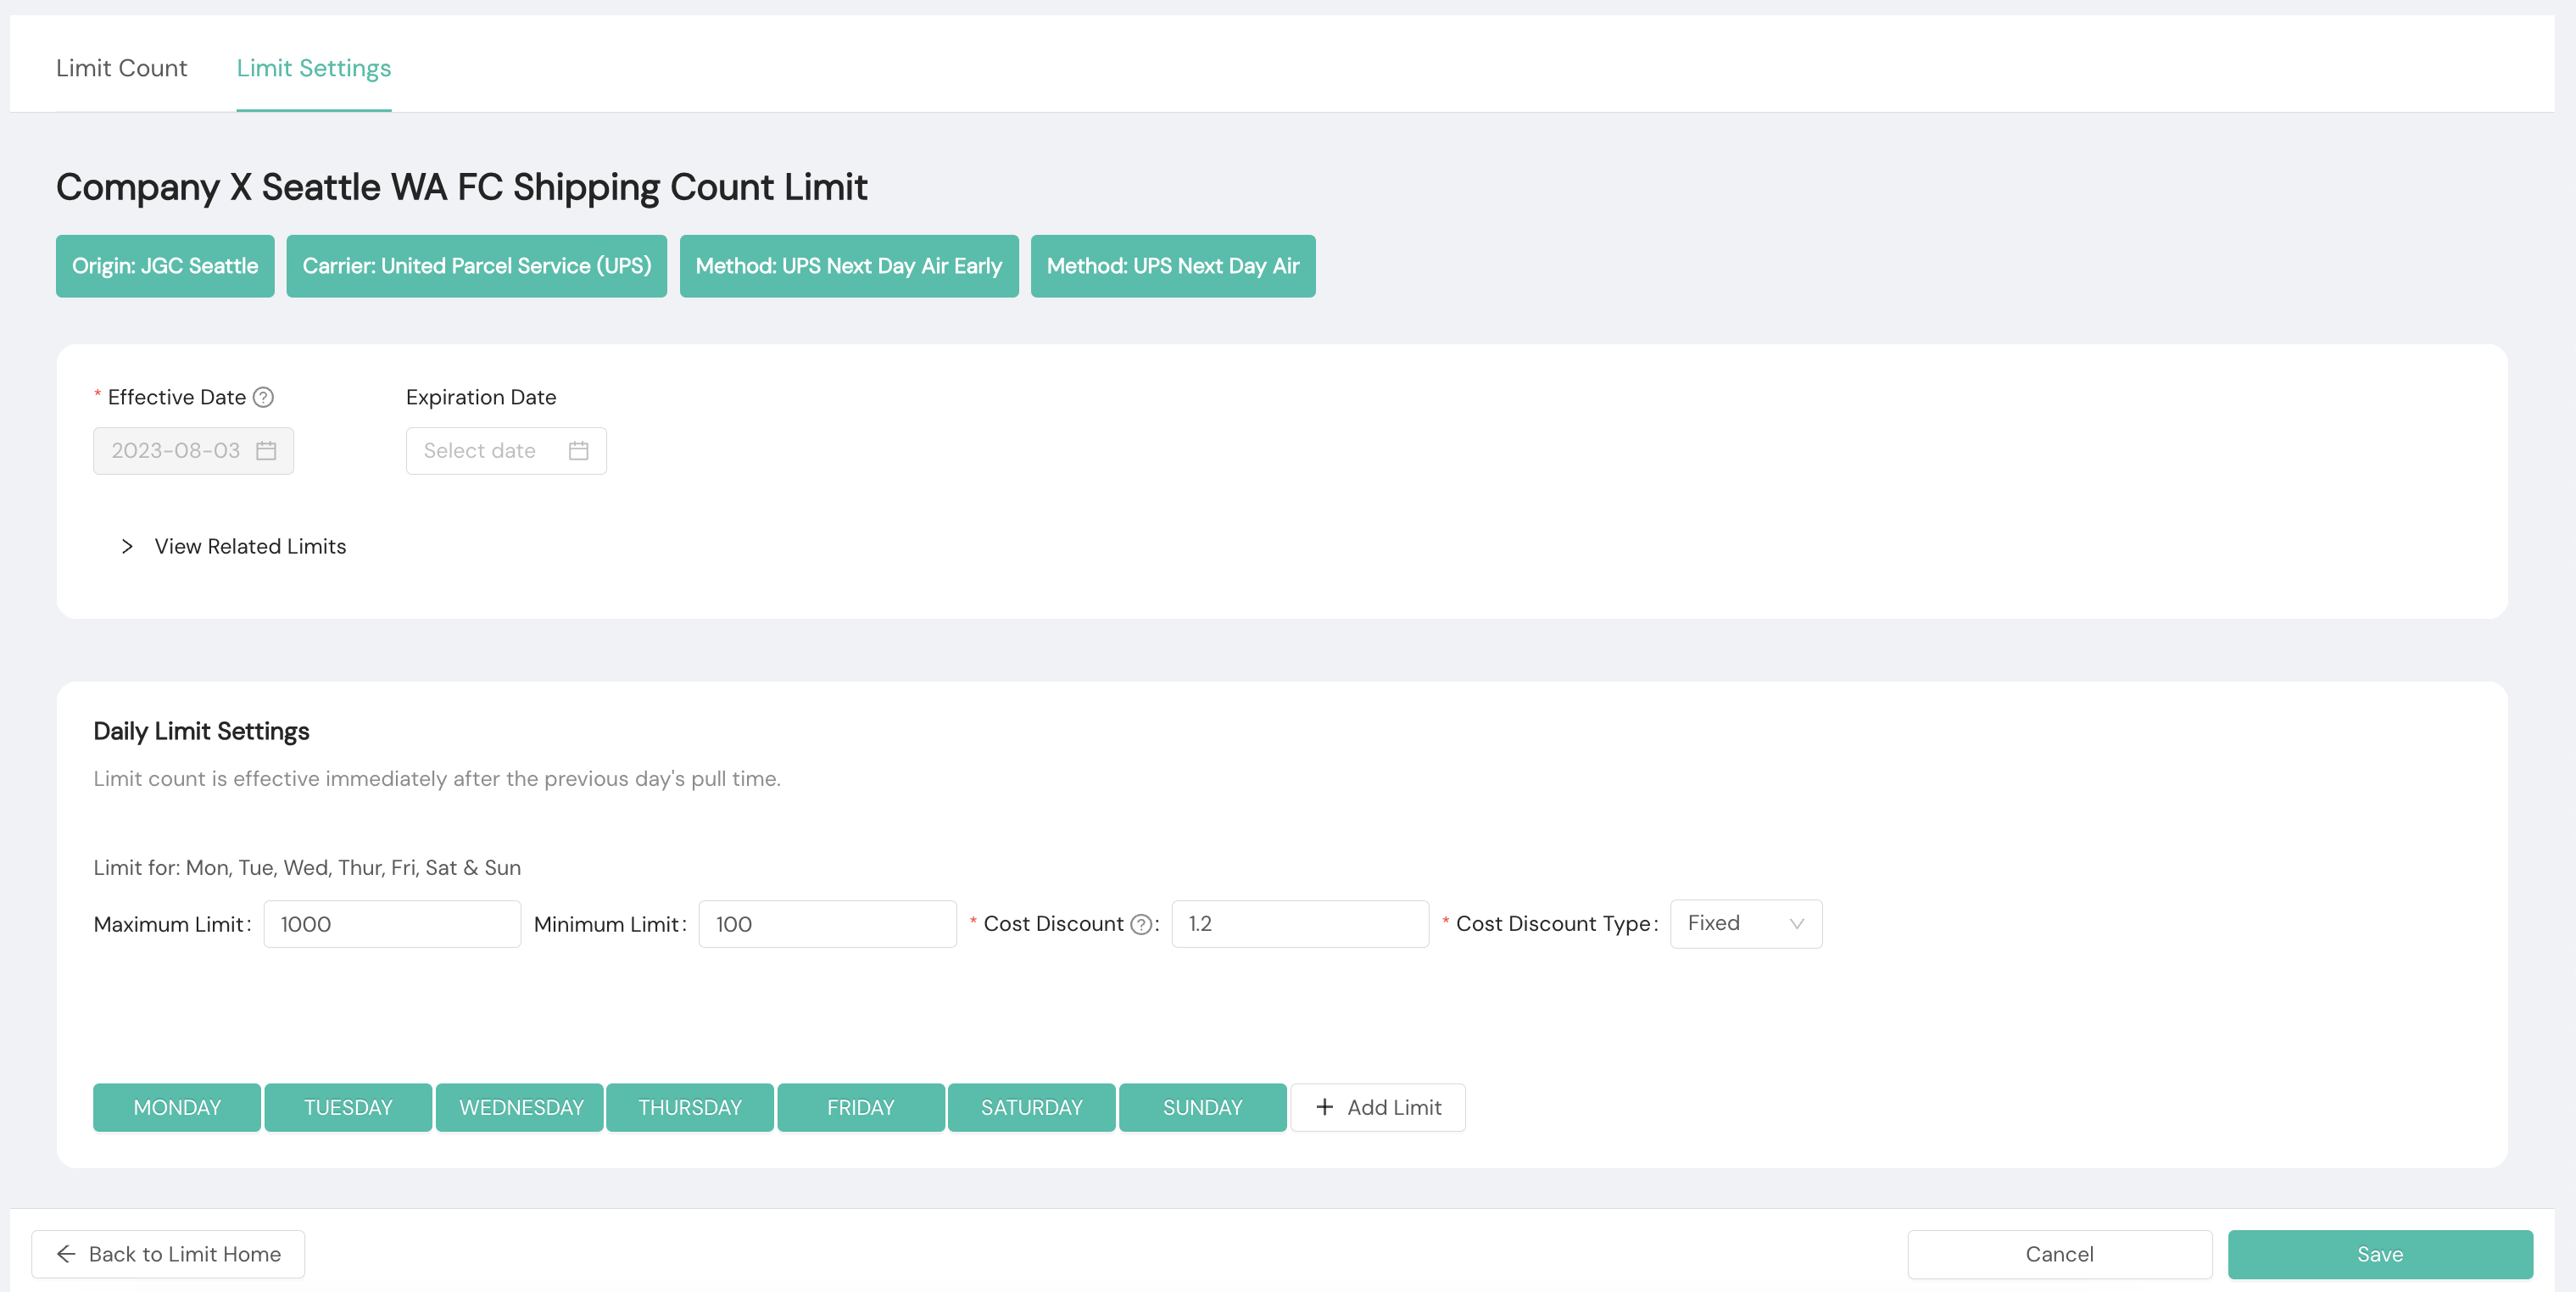
Static Daily Limit Settings. You'll set your preferences for maximum and/or minimum shipments and which days the limits apply.

- Maximum Limit. This is the maximum number of shipments your organization wishes to allow to be shipped from the selected origin and any other categories you've configured for this limit, per day.
- Minimum Limit. This is the minimum number of shipments your organization wishes to be shipped from the selected origin and any other categories you've configured for this limit, per day.
- Cost Discount. This value is either a fixed-price or percentage discount your organization wants to assign in order to reach any minimum shipment threshold you may have in your carrier contract for certain carrier service methods. During the carrier selection process, Shipium will treat the selected carrier service methods for this minimum limit as if they are much cheaper and ensuring they're selected toward meeting your required minimum volume. This category does not appear until a value is entered in the Minimum Limit field.
- Cost Discount Type. This defines the cost discount you provided in the previous step. You'll select either Fixed or Percentage from the dropdown menu. This category does not appear until a value is entered in the Minimum Limit field.
- Effective Days. You'll select each day of the week you wish for the limit to be applied.
- You also may add a new limit in this setting, using the + Add Limit button next to the days of the week.
- Once you've configured the limit settings, you'll select the Save button.
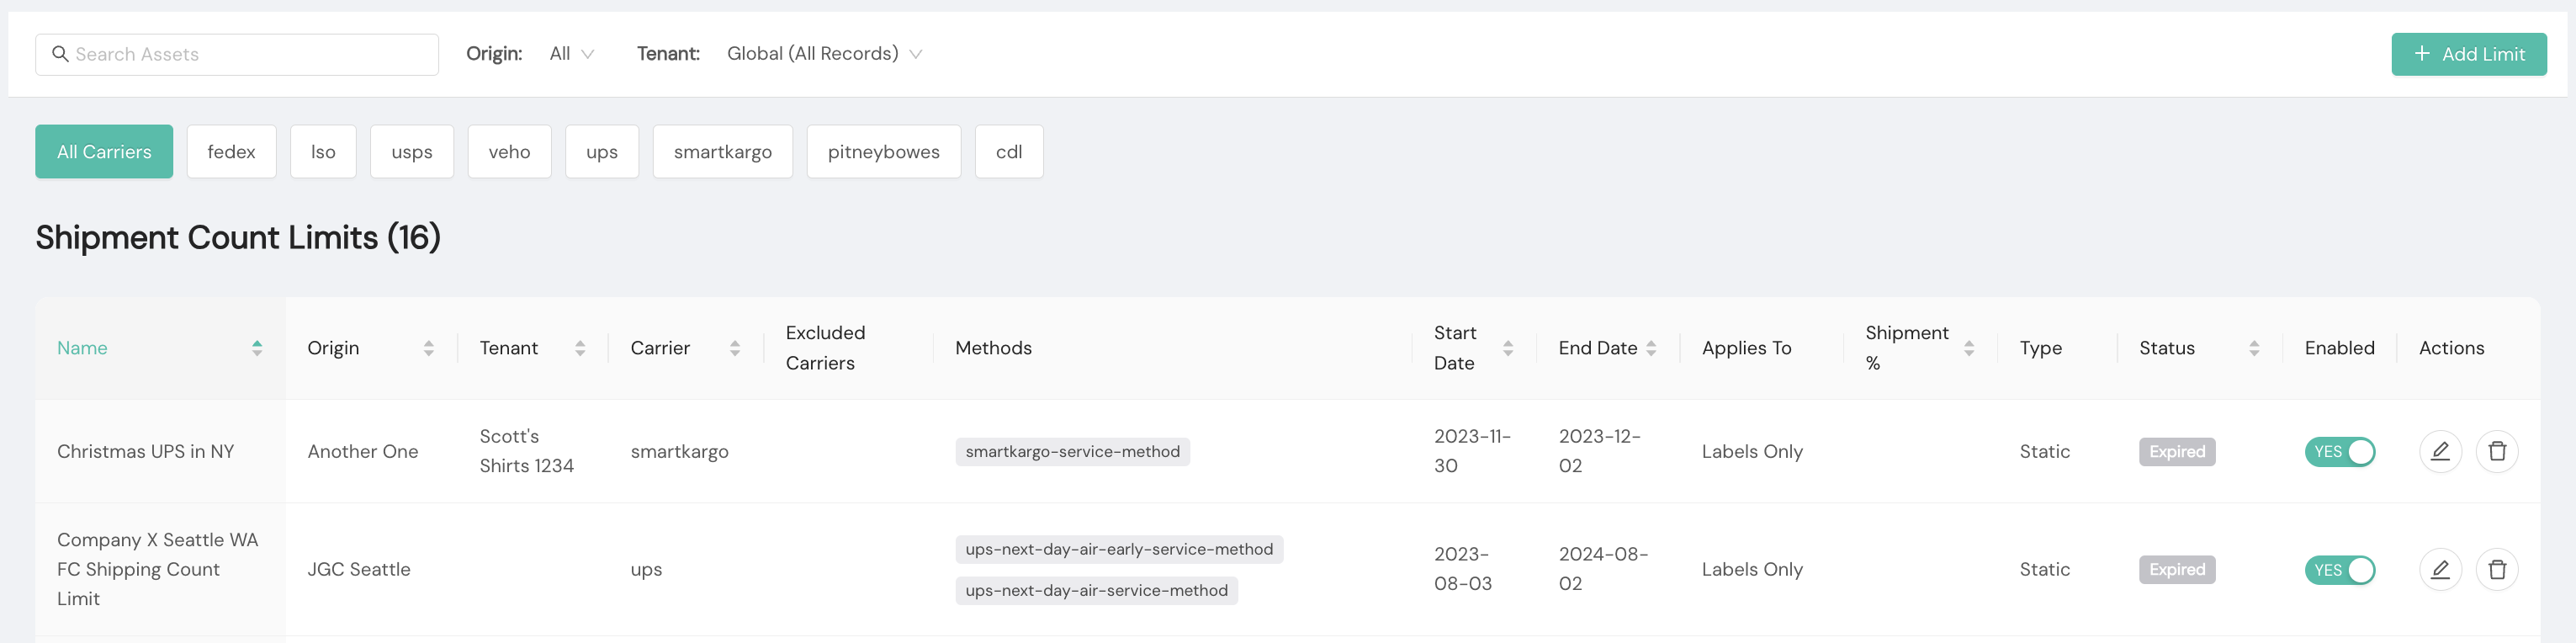
- In the Shipment Count Limits homepage table, you should see your new limit. To edit or view details about the limit, you'll select the Edit icon in its table row, highlighted in the screenshot below. To delete the limit, you'll select the Delete icon in its table row. The row view allows you to see the limit's name, origin, tenant, carrier, service methods, start and end dates, if the limit applies to both rate shopping and label generation counts or to label counts only, and status as well as if the limit has been enabled. To cancel a carrier selection rate shop request to not have it count in your total (if you're applying the limit to both carrier selection and labels), you can refer to the Cancel a Shipment documentation.

A newly created limit is set to Enabled; a limit is not available for application unless it has been set to Enabled. The status can be Live, Live Not Enabled, Upcoming, Upcoming Not Enabled, Expired, and Expired Not Enabled. Only limits in a Live status are considered during calls to Shipium's Carrier Selection service.
- Live means that the limit has been created and is enabled, or eligible to be applied within the defined time period.
- Live Not Enabled means that the limit has been created but is not enabled, so it's not eligible to be applied.
- Upcoming means that the limit has been created and is enabled but its effective start date is still in the future.
- Upcoming Not Enabled indicates that the limit has been created with a start date in the future but it hasn't been enabled.
- Expired means that the limit's end date has passed but it's still set to a status of enabled.
- Expired Not Enabled refers to a limit with an end date that has already passed and set to a status of not enabled.
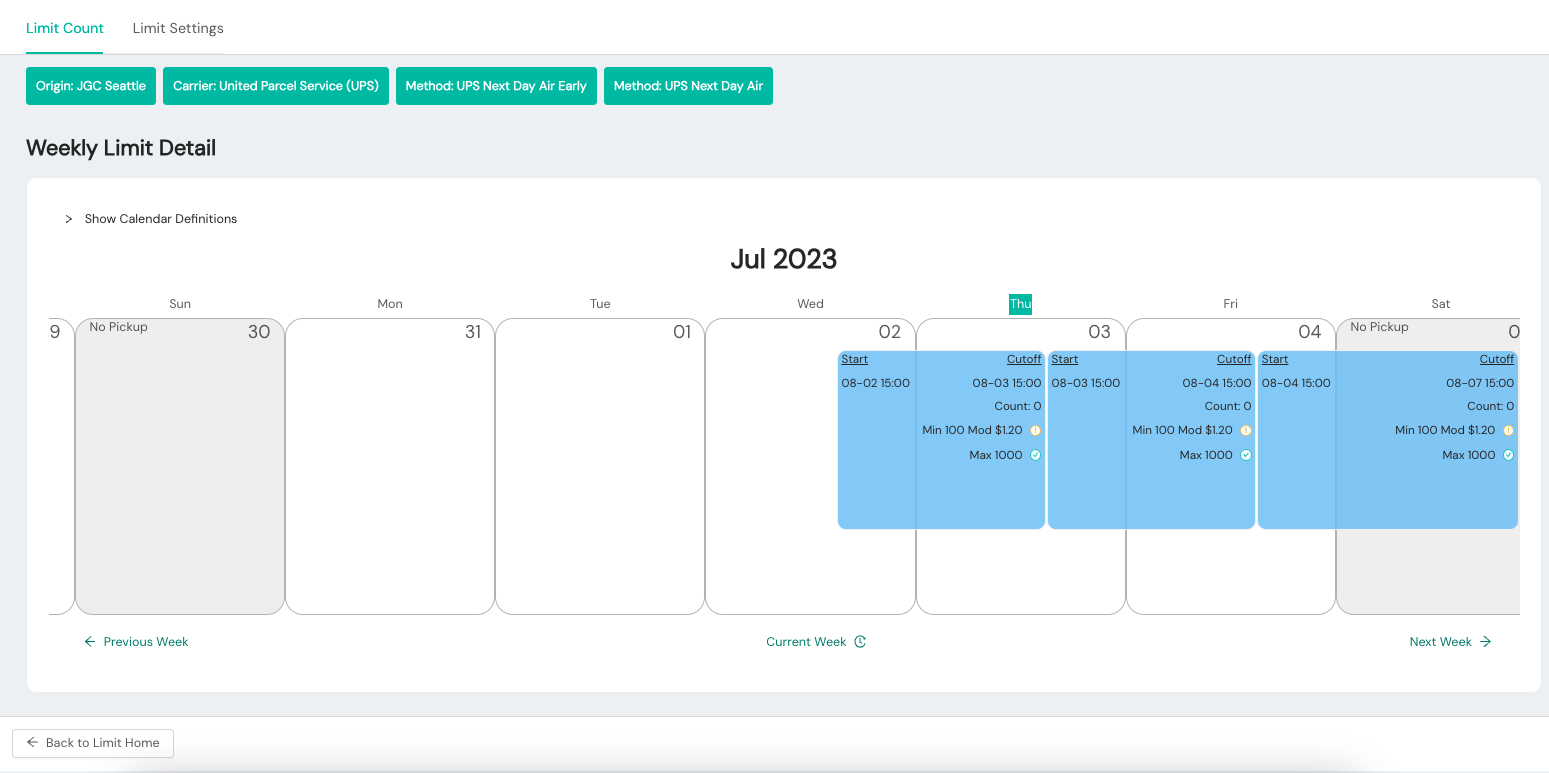
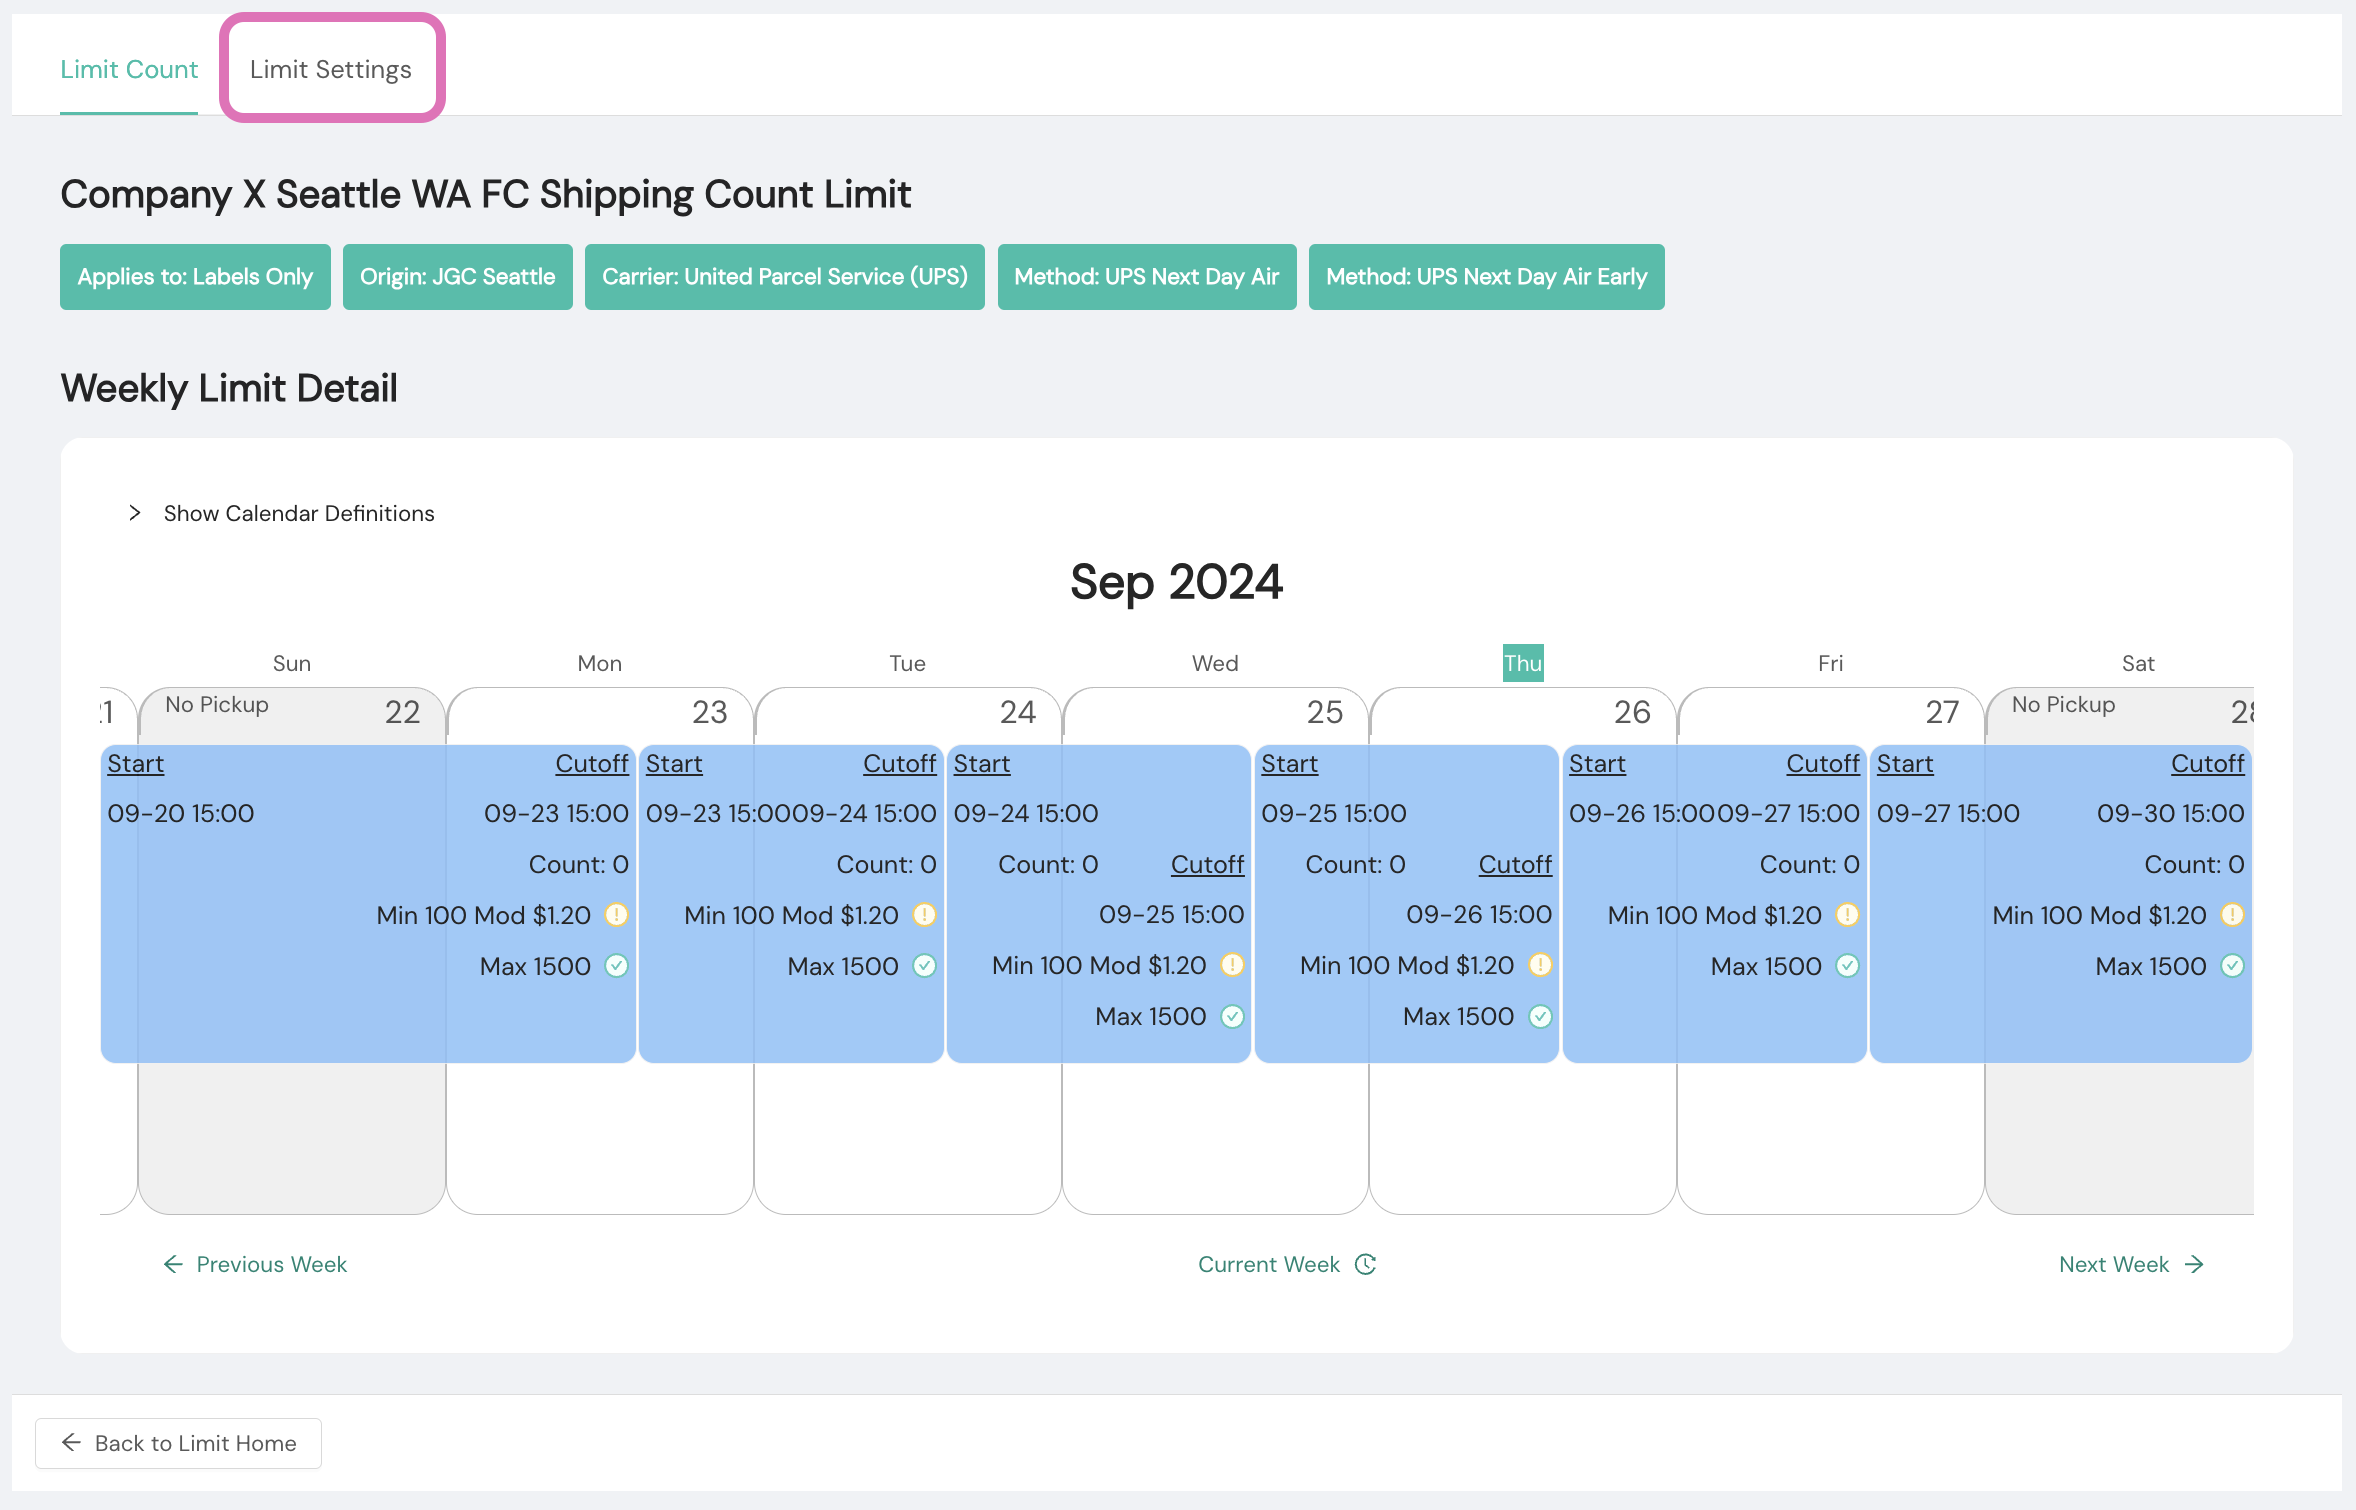
- The detailed view provides a weekly calendar view of the Limit Count, as shown in the following screenshot. You also can view and edit Limit Settings from the detailed view.
Manage your organization's shipment count limits
You can access your organization's profile and update your desired shipment count limits in the Shipium Console. Your changes will be effective immediately for the start date you select and will remain in place until updated and saved with new values.
- To edit an existing limit, you'll need to select the Edit icon in the same row as the limit you wish to manage, as shown in the following screenshot. You also can delete the limit directly by choosing the Delete icon in the same row as the limit you wish to delete.
- The edit view displays the Limit Count dashboard with weekly limit details in a calendar view. To edit the limit, you'll select the Limit Settings tab near the top left of the screen.
- Selecting the Limit Settings tab results in the limit's settings being displayed. You can make changes to the Daily Limit Settings in this environment.
Resources
Your Shipium team member is available to help along the way. However, you might find these resources helpful:
FAQ
Q: How do I cancel a carrier selection request?
A: To cancel a carrier selection request or void a label, you can use the cancel shipment endpoint. You can find guidance for doing so in Cancel a Shipment.