
Pack Application (Pack App)
Generate labels to ship packages via the Shipium Pack App.
About the Shipium Pack App
The Shipium Pack Application (Pack App) enables you to ship packages from your pack stations within your warehouse management system. This ability allows for more efficient order fulfillment via streamlined packing processes, standardization, improved labor efficiency, and cost savings. Using the Pack App, you can create a partial or complete shipment from any origin in your network and create a label in the Shipium Console, whether scanning a barcode or manually entering product information. Once you create a shipment, you can cancel it and re-run the carrier selection process.
The Pack App supports two authentication methods: single sign-on (SSO) and username/password. If you want to use SSO, see SSO for Your Shipium Account for setup guidance, or reach out to your Shipium contact during onboarding to determine the best fit for your organization.
Within the Pack App, your organization can:
- assign users with varying permission levels;
- configure origins within your network;
- schedule pickups;
- scan barcodes;
- pack orders;
- print labels; and
- maintain a network address book.
This document provides guidance for using the Pack App in the console.
Fulfillment context configuration requiredIn order to use the Pack App, you'll need to have a fulfillment context configured with at least one origin and carrier contract. You can find information in the Fulfillment Contexts documentation.
Configure users in the Pack App
To begin, you'll log in to the Shipium Pack App. Within the application, you can configure users and assign them to origins. Your Implementation team member can assist you with bulk uploading of user and origin data.
User roles
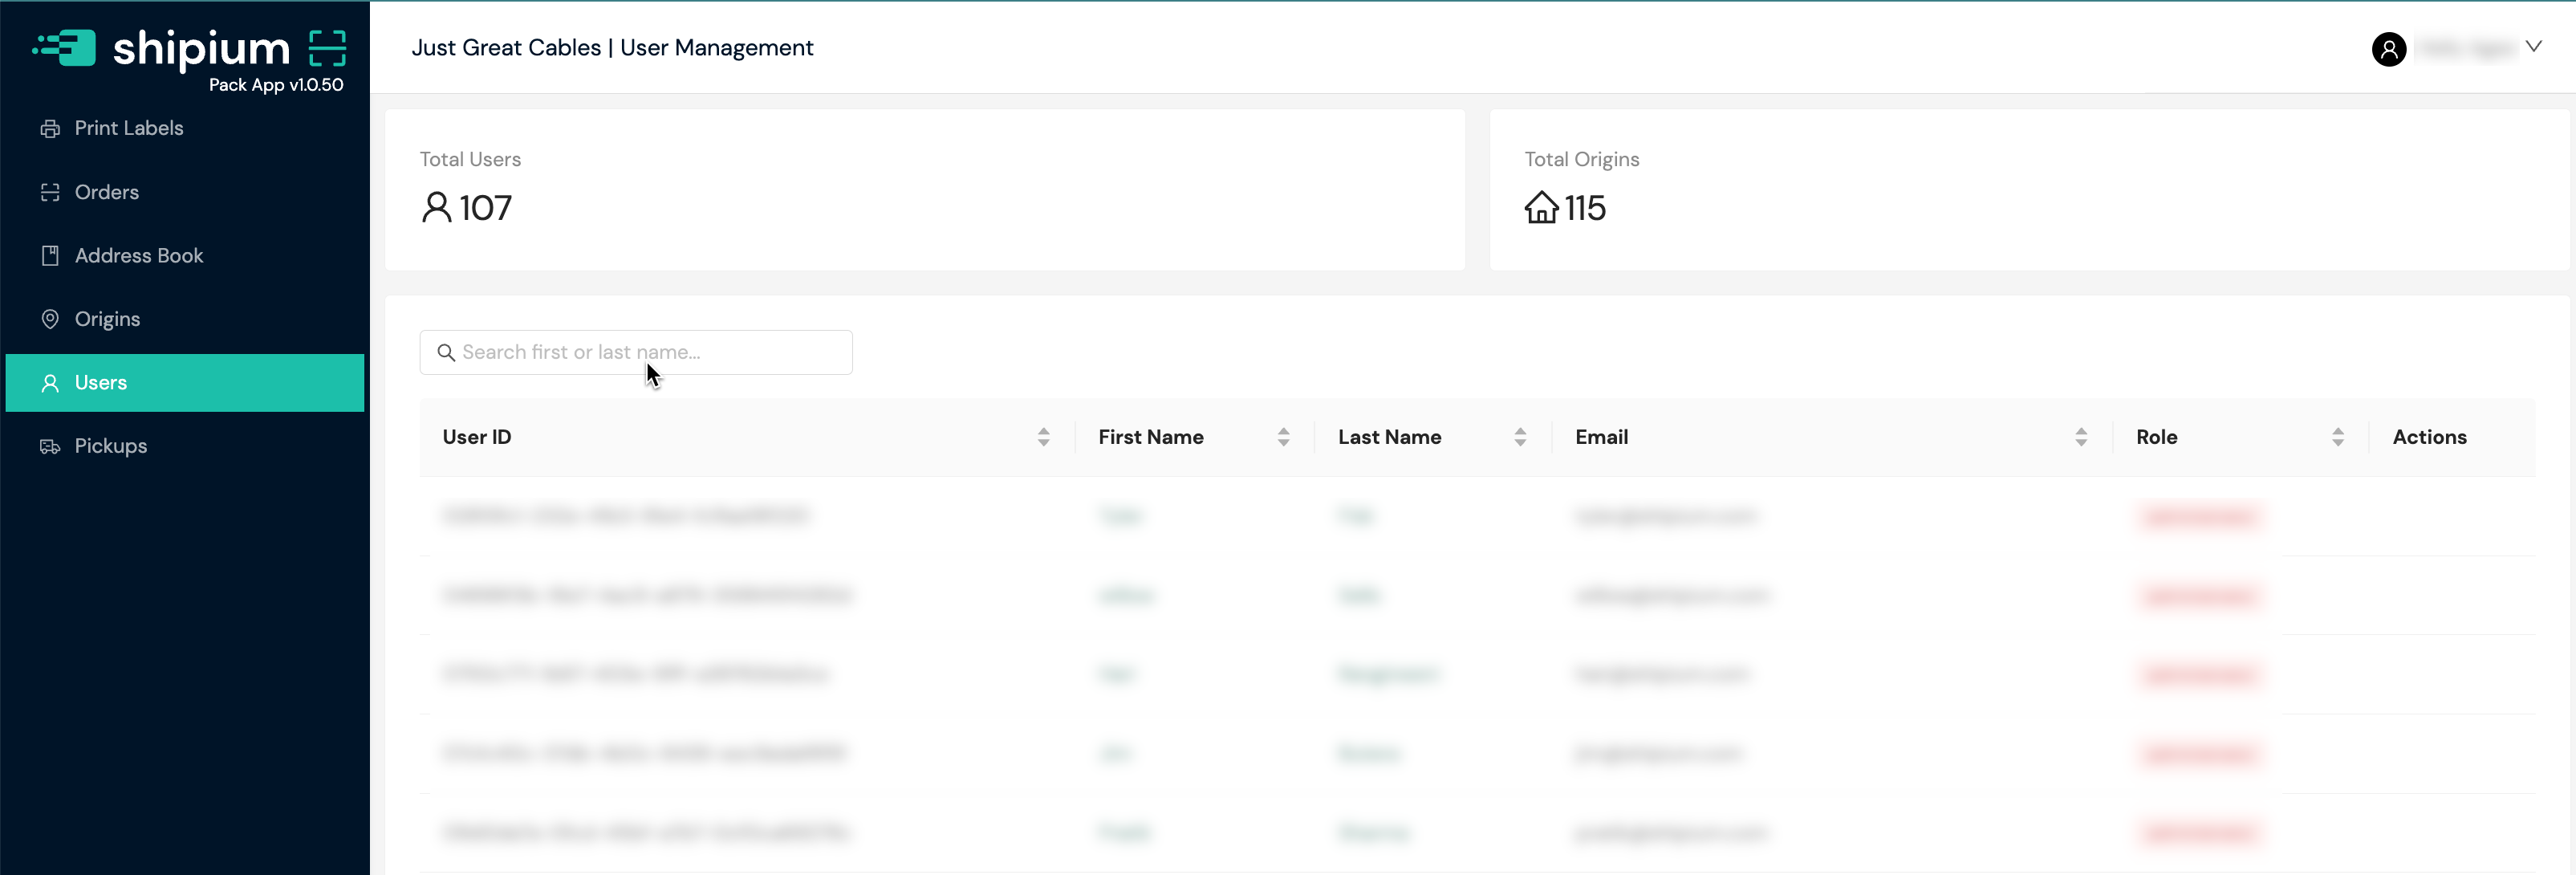
Console access and functionality are defined for the three user roles within the Pack App: Administrator (Admin), Site Manager, and Site Associate. You can access users by selecting Users in the lefthand navigation menu.
Administrator (Admin)
Administrators in the Pack App have the most user permissions. The Administrator role has:
- the ability to assign Site Managers and Site Associates (Packers and Shippers) to origins;
- organization-level access to the Shipium Console; and
- all capabilities of the Site Manager role.
Site Manager
The Site Manager has more user permissions than the Site Associate but less than the Administrator. The Site Manager role has:
- the ability to assign Site Associates (Packers and Shippers) to origins;
- access to assigned stores;
- the ability to view all pages inside the Pack App for their assigned store;
- the ability to action all orders with weights and dimensions;
- the ability to change an order address by canceling the order and resending it with the corrected address;
- the ability to create, edit, and delete addresses in the address book;
- the ability to print a shipping label for their assigned store;
- the ability to view the Order search page via the Pack App for their assigned store;
- the ability to create orders via the Pack App Print Label Tool;
- the ability to cancel an order;
- the ability to configure autoship for assigned origins;
- the ability to split shipments, add weights and dimensions, specify items per box, mark reason codes, and preview and confirm splits; and
- all capabilities of the Site Associate role.
Site Associate
Site Associates (Packers and Shippers) have the most basic user permissions, with less than the Administrator and Site Manager. The Site Associate role has:
- access only to the store(s) to which they are assigned;
- the ability to action all orders with weights and dimensions for their assigned store, but not cancel the order;
- the ability to print a shipping label for their assigned store;
- the ability to view all pages inside the Pack App for their assigned store;
- the ability to create orders via the Pack App Print Label Tool;
- the ability to use autoship (based on origin configuration);
- the ability to update orders ahead of time split parameters and submit pre-confirmed splits; and
- the ability to create addresses in the address book, but not delete or edit them.
Assign users to origins
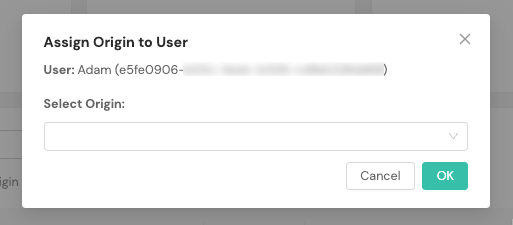
Once a user has been added to your Pack App network, you can assign origins to that user by selecting the + Assign Origin button for that user. Depending on permission levels, some users can only view the origin(s) to which they are assigned.

A modal will appear allowing you to select the origin to which you wish to assign the user from a dropdown menu.
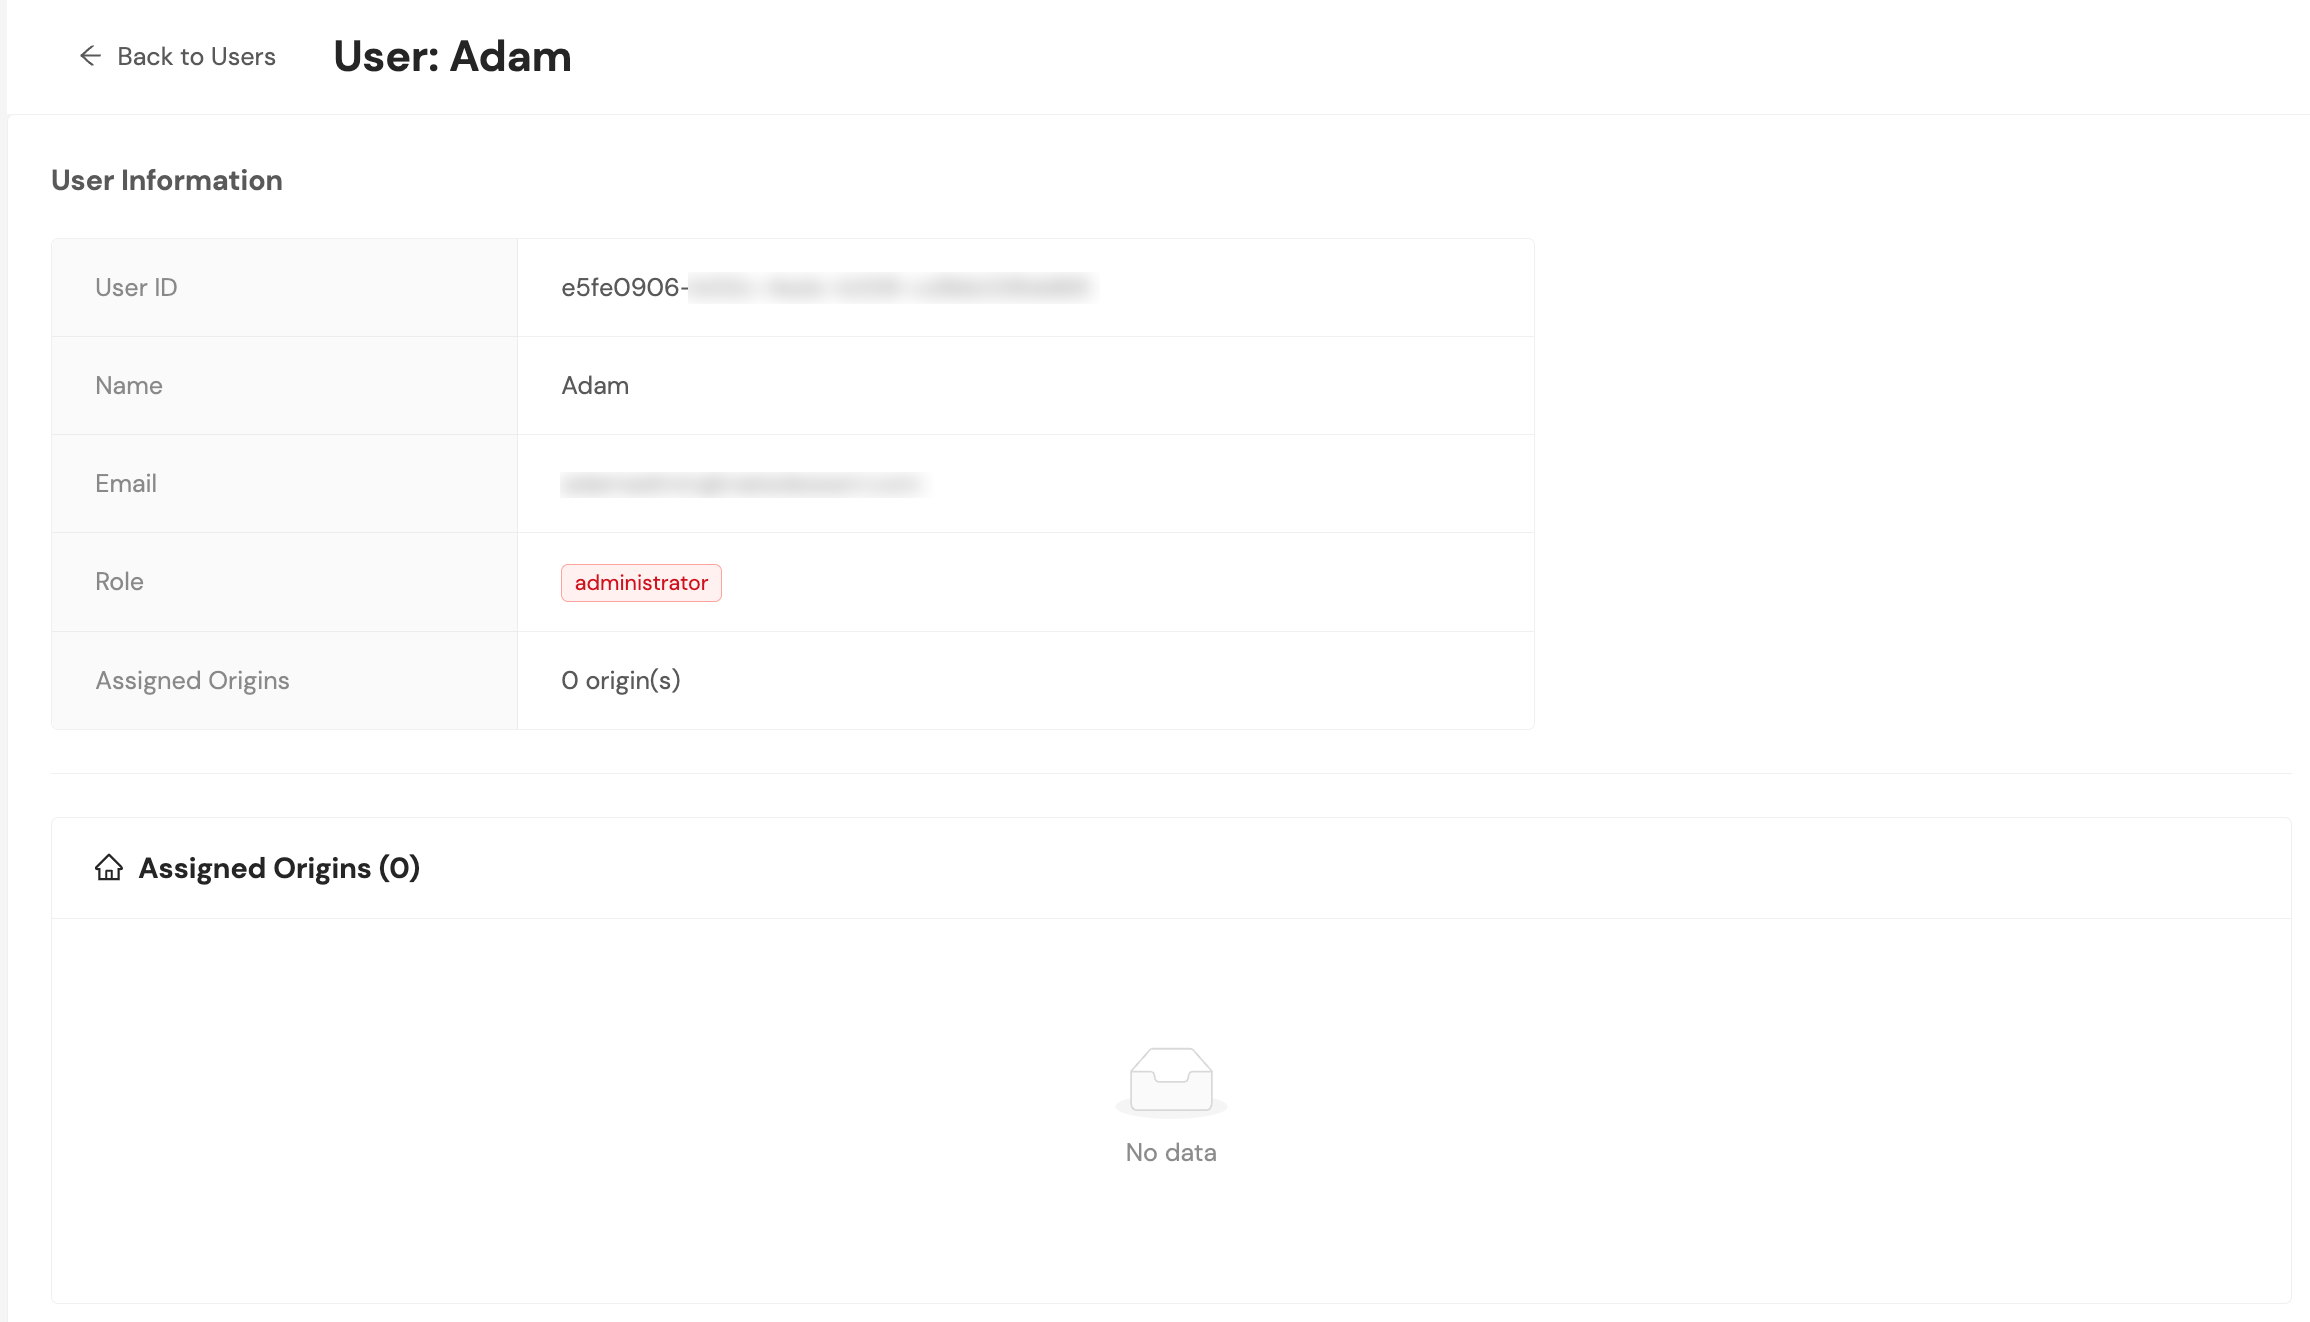
You also can access user details by clicking on the user's name on the primary Users screen, which opens the user screen, as shown in the screenshots below.

Configure origins (fulfillment centers or stores) in the Pack App
Within the Pack App, you'll select Origins from the navigation menu at left to access the Origins primary page.
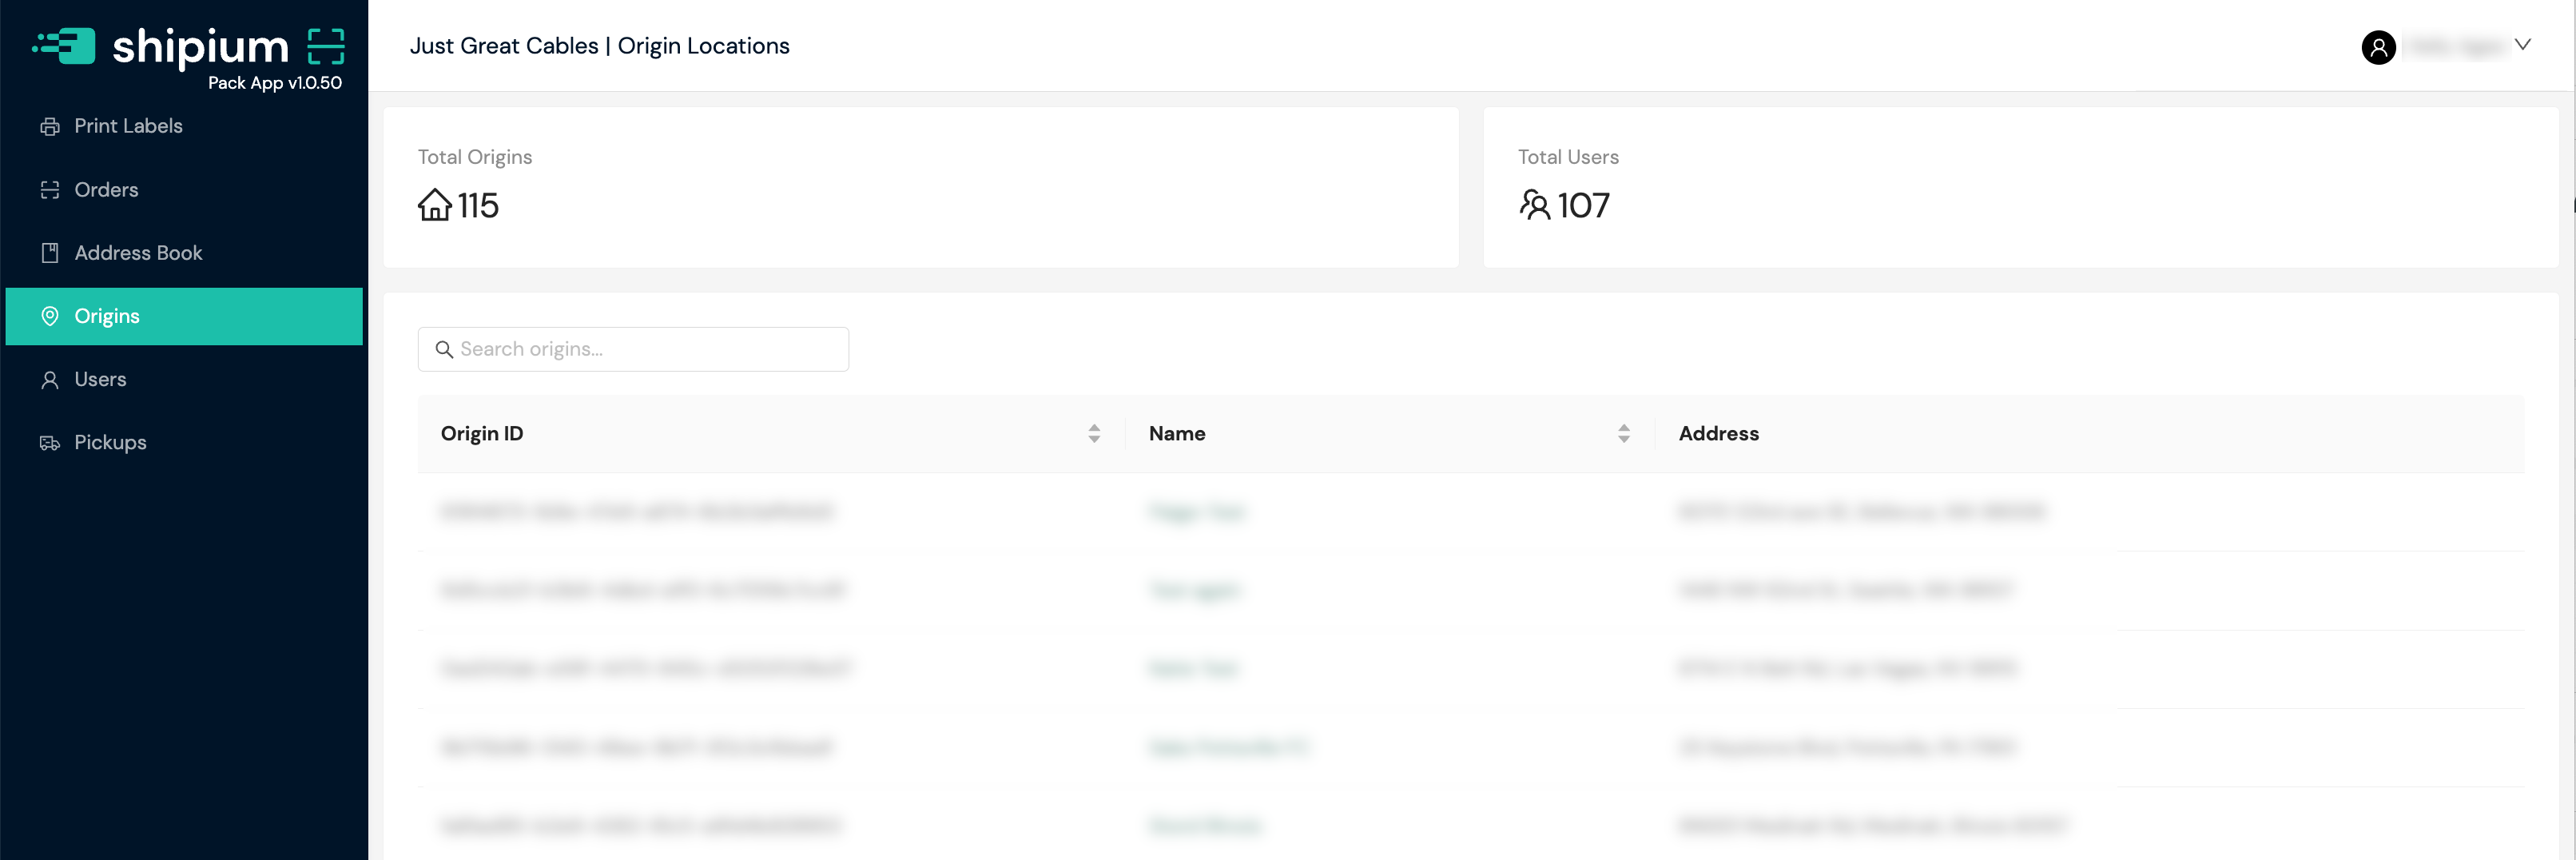
You can click on any origin name to access details for that origin. Within the origin's page, you can manage users for that origin and edit origin details, as shown in the screenshots below.

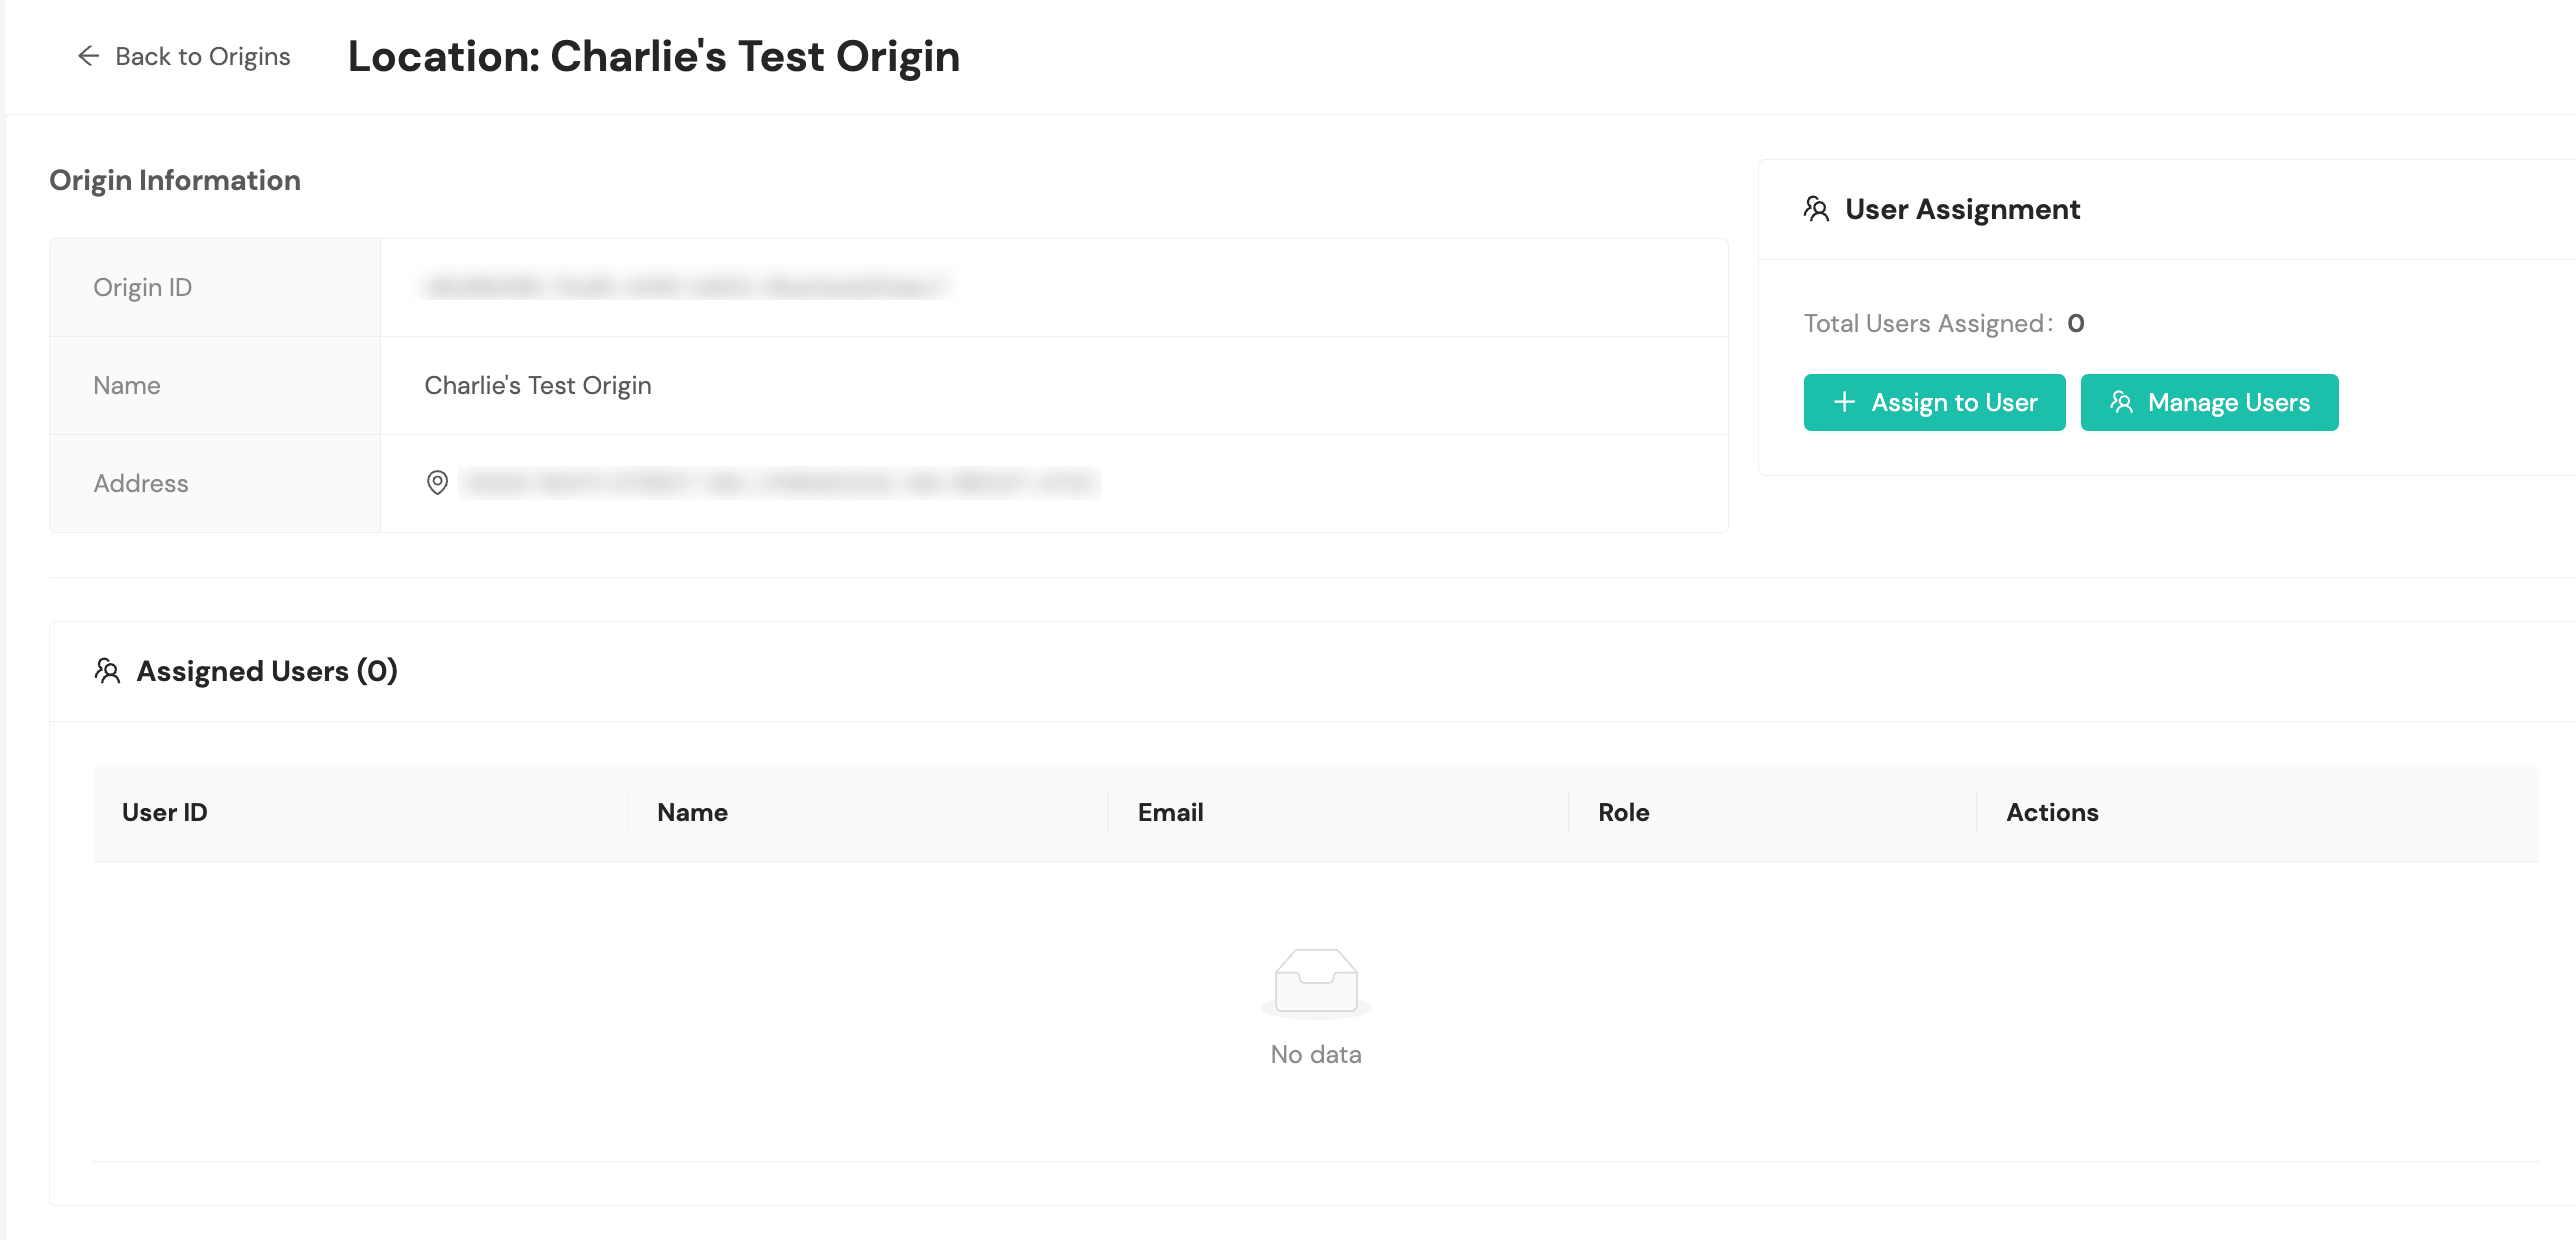
Within the origin's page, you can assign and manage users by selecting the + Assign User and Manage Users buttons, as shown in the image above.
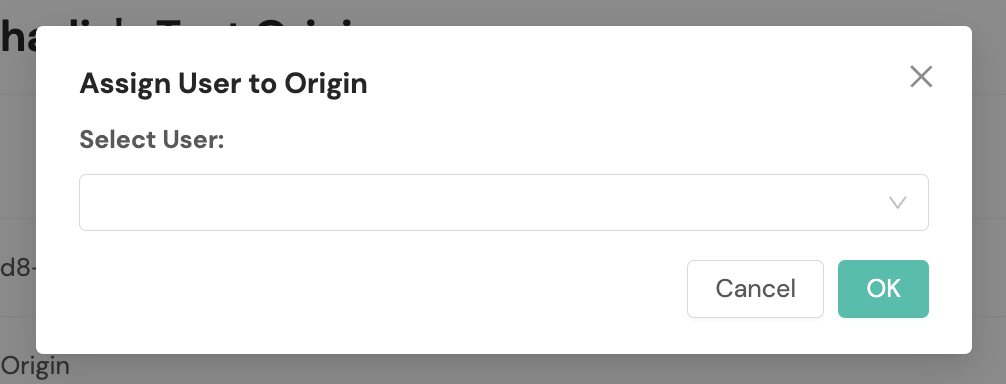
When you choose to assign a user to the origin, a new modal will prompt you to select the desired user from a dropdown menu.
Schedule carrier pickups in the Pack App
To schedule carrier pickups for your fulfillment center, you'll access Pickups from the lefthand navigation menu.
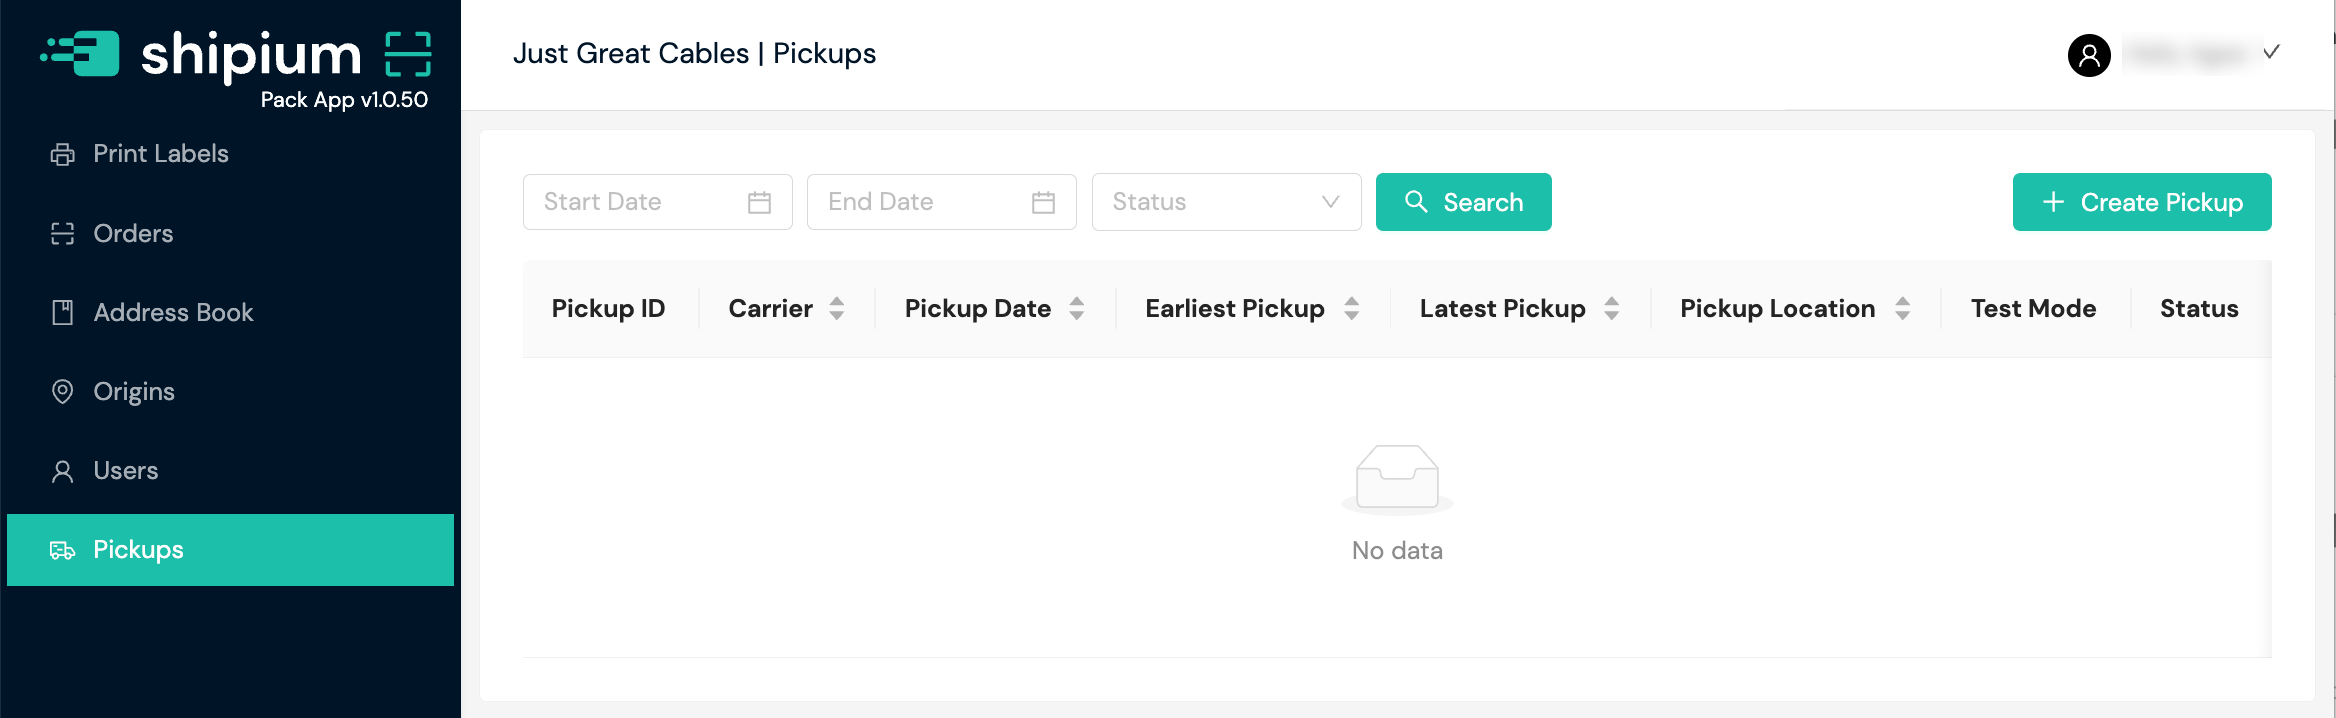
After selecting + Create Pickup, a modal will appear for you to provide the following information.
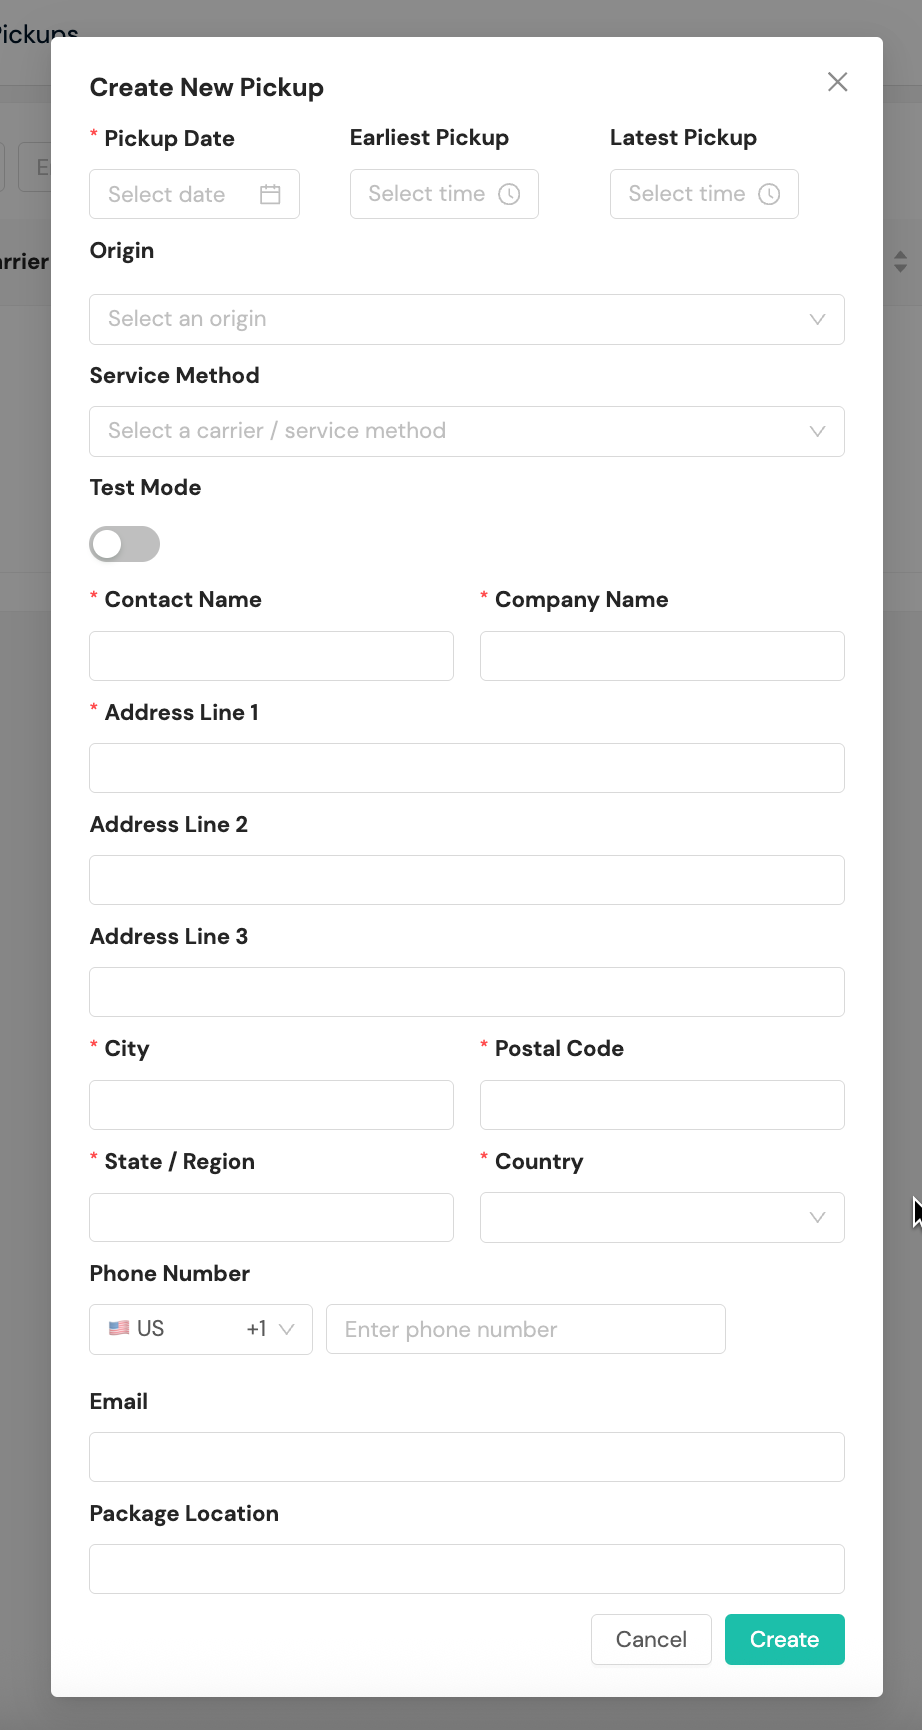
- Pickup Date. Required. The desired date for the carrier pickup
- Earliest Pickup. Optional. A time for the earliest possible pickup, including a Now option
- Latest Pickup. Optional. A time for the latest possible pickup, including a Now option
- Origin. Optional. The origin from which the shipment will be picked up
- Service Method. Optional. You can select a carrier and all its service methods or a single service method from the dropdown menu.
- Test Mode. Optional. You can toggle on Test Mode to indicate the shipment is being created in test mode.
- Contact Name. Required. The contact name of the person associated with the origin (fulfillment center) from which the shipment is being picked up
- Company Name. Required. The company name associated with the origin (fulfillment center) from which the shipment is being picked up
- Address Line 1. Required. The first address line for the origin (fulfillment center) from which the shipment is being picked up
- Address Line 2. Optional. The second address line for the origin (fulfillment center) from which the shipment is being picked up
- Address Line 3. Optional. The third address line for the origin (fulfillment center) from which the shipment is being picked up
- City. Required. The city where the origin (fulfillment center) from which the shipment is being picked up is located
- Postal Code. Required. The postal code where the origin (fulfillment center) from which the shipment is being picked up is located
- State/Region. Required. The state (or region) where the origin (fulfillment center) from which the shipment is being picked up is located
- Country. Required. The country where the origin (fulfillment center) from which the shipment is being picked up is located
- Phone Number. Optional. The phone number associated with the origin (fulfillment center) from which the shipment is being picked up
- Email. Optional. The email address associated with the origin (fulfillment center) from which the shipment is being picked up
- Package Location. Optional. An optional description of where the package is located in the fulfillment center
Scan barcodes with the package scanner
The Pack App's package scanner functionality is designed to dramatically improve the speed and accuracy of your packing and shipping operations. By scanning barcodes, you can eliminate manual data entry and reduce the risk of errors.
Scanning workflows
The Pack App supports two main scanning workflows:
- Autoship (single scan). This workflow is designed for maximum efficiency. Simply scan a single barcode (e.g., an LPN on the packing slip), and the Pack App will automatically fetch the order, run carrier selection, and print the shipping label. This is ideal for simple, single-package shipments where the weight and dimensions are known.
- Double scan. This workflow provides more flexibility. First, you scan the order's LPN to bring up the shipment details. Then, you scan a second barcode corresponding to a pre-defined package type. The Pack App will then associate the dimensions and weight of that package type with the shipment, and you can proceed to print the label.
Configure devices
To access device settings, you'll select the printer icon near the top right of the screen. Hovering over the icon displays a status popover showing the current connection status for Auto-Ship, Printer, Doc Printer, and Scale independently.
Clicking the icon opens the Devices modal, which has three tabs: Label Printer, Document Printer, and Scale. Each tab displays a status badge indicating whether the device is connected and ready.
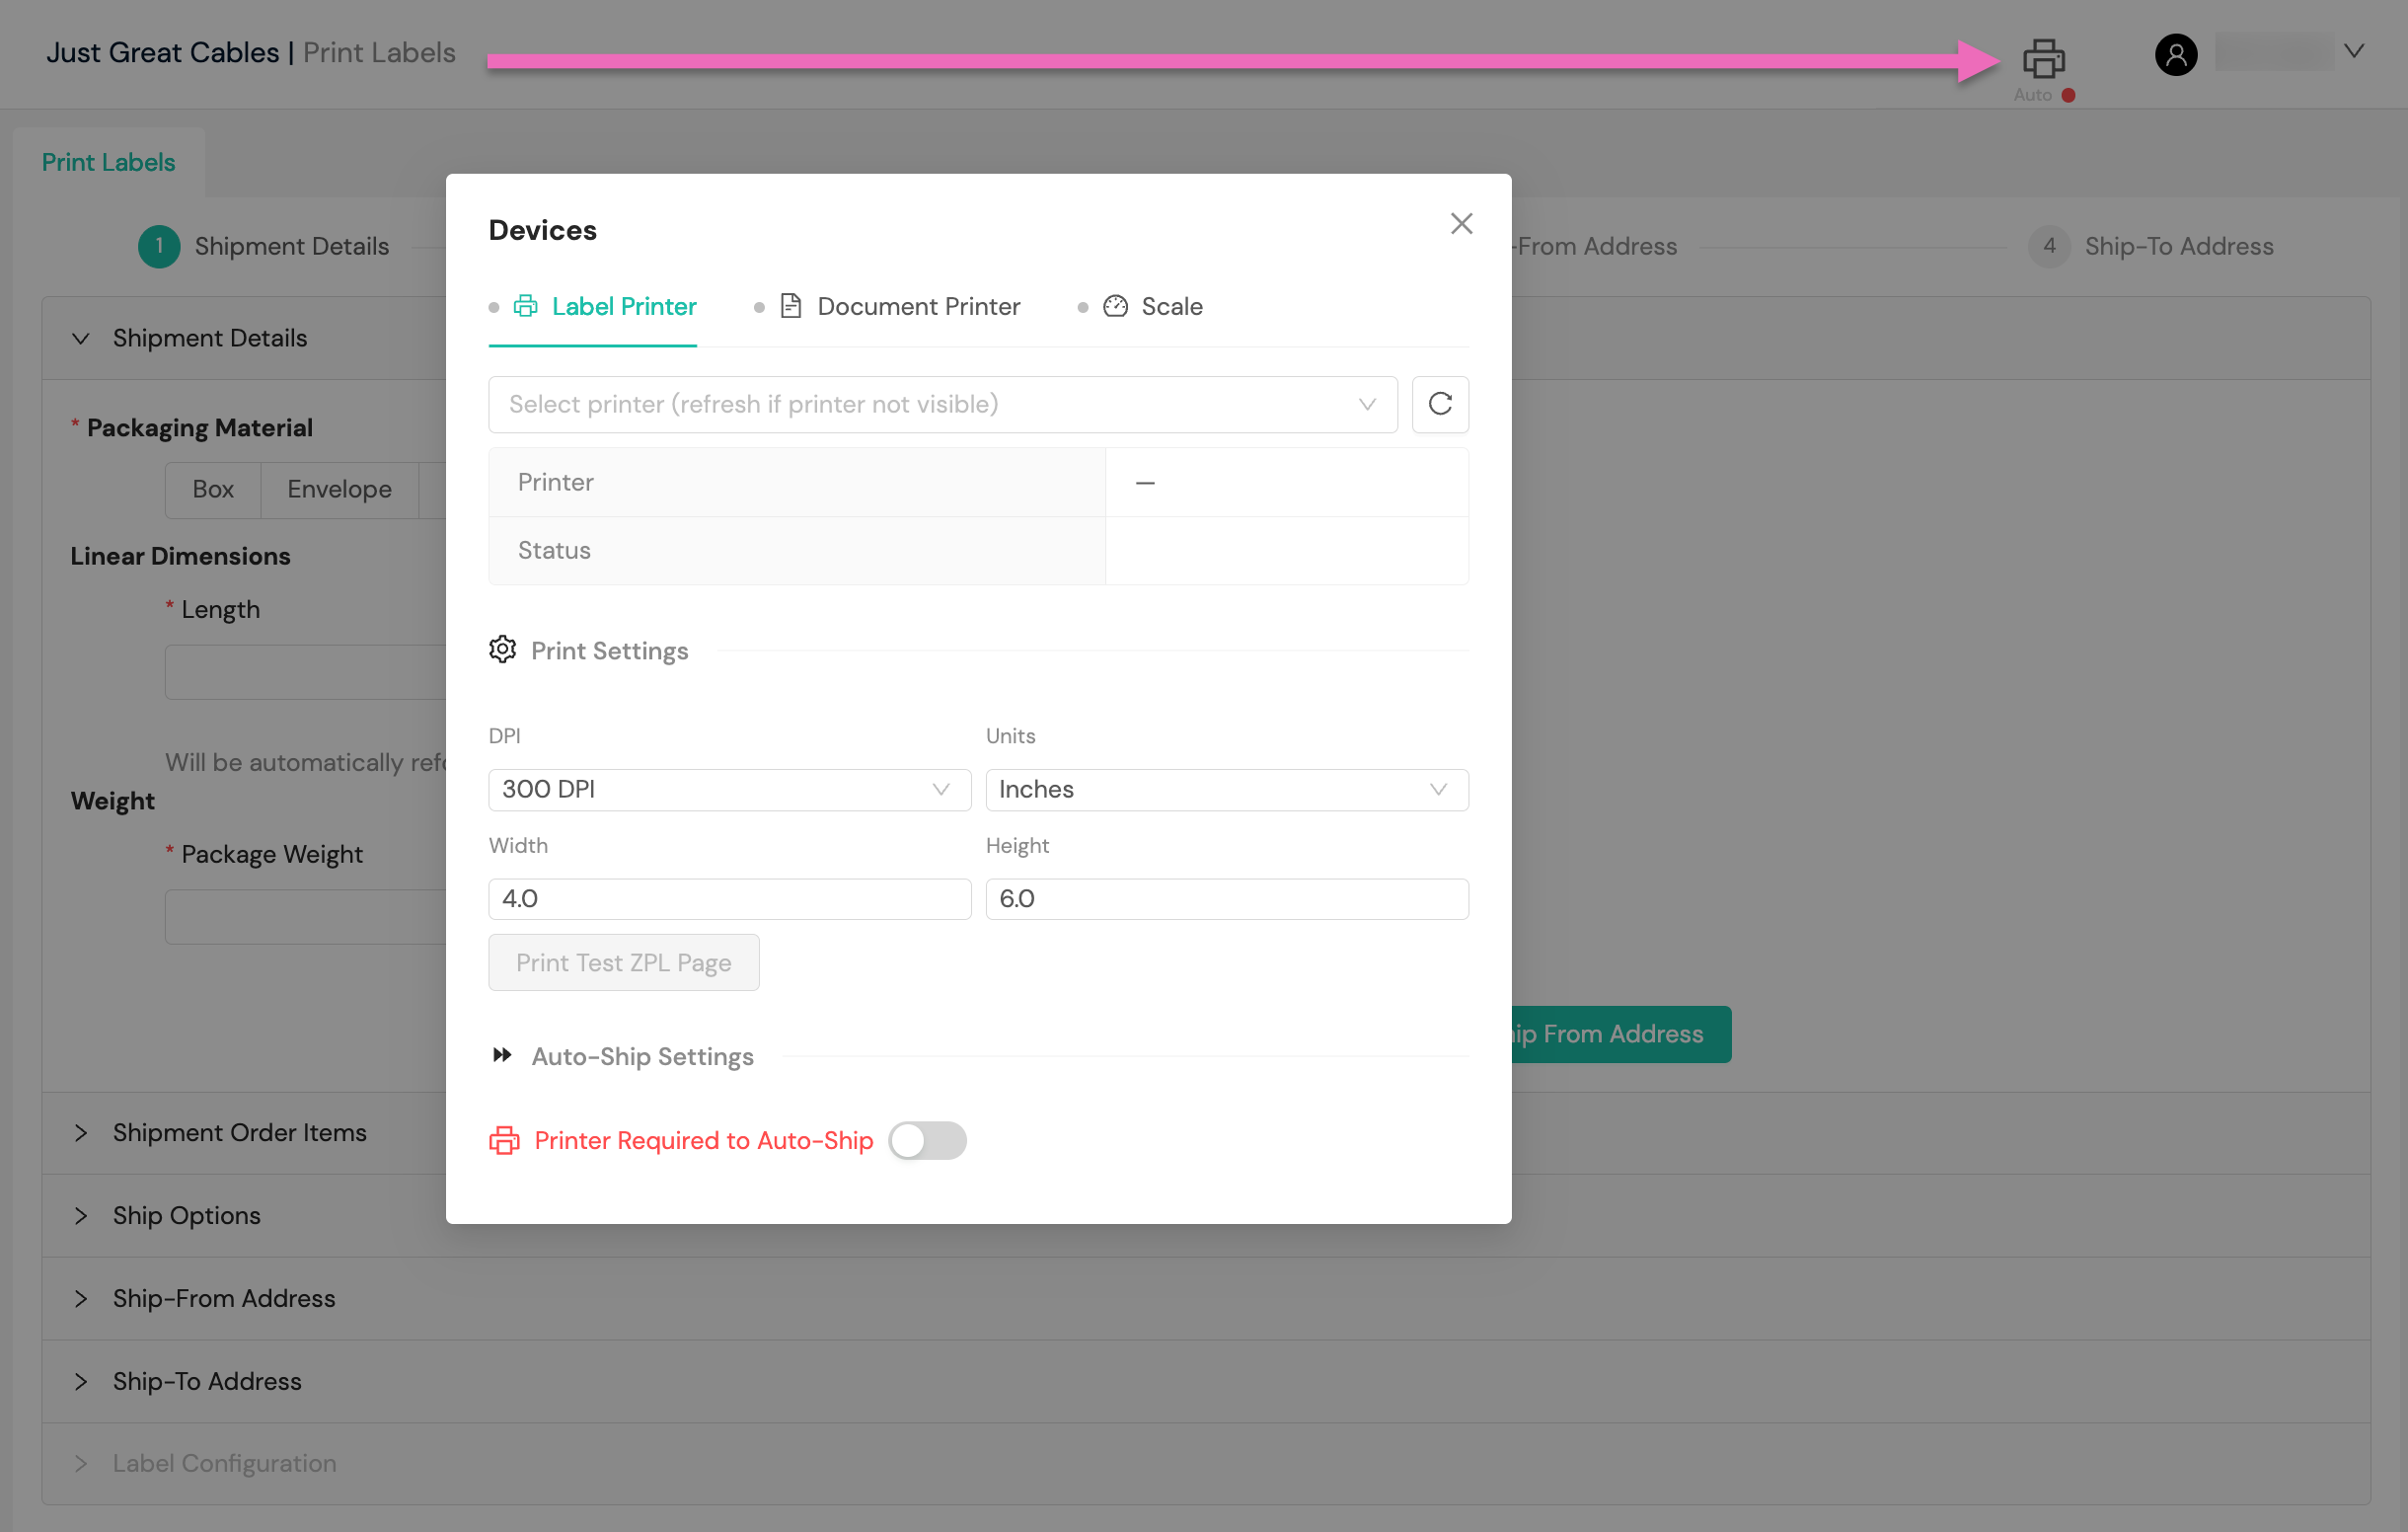
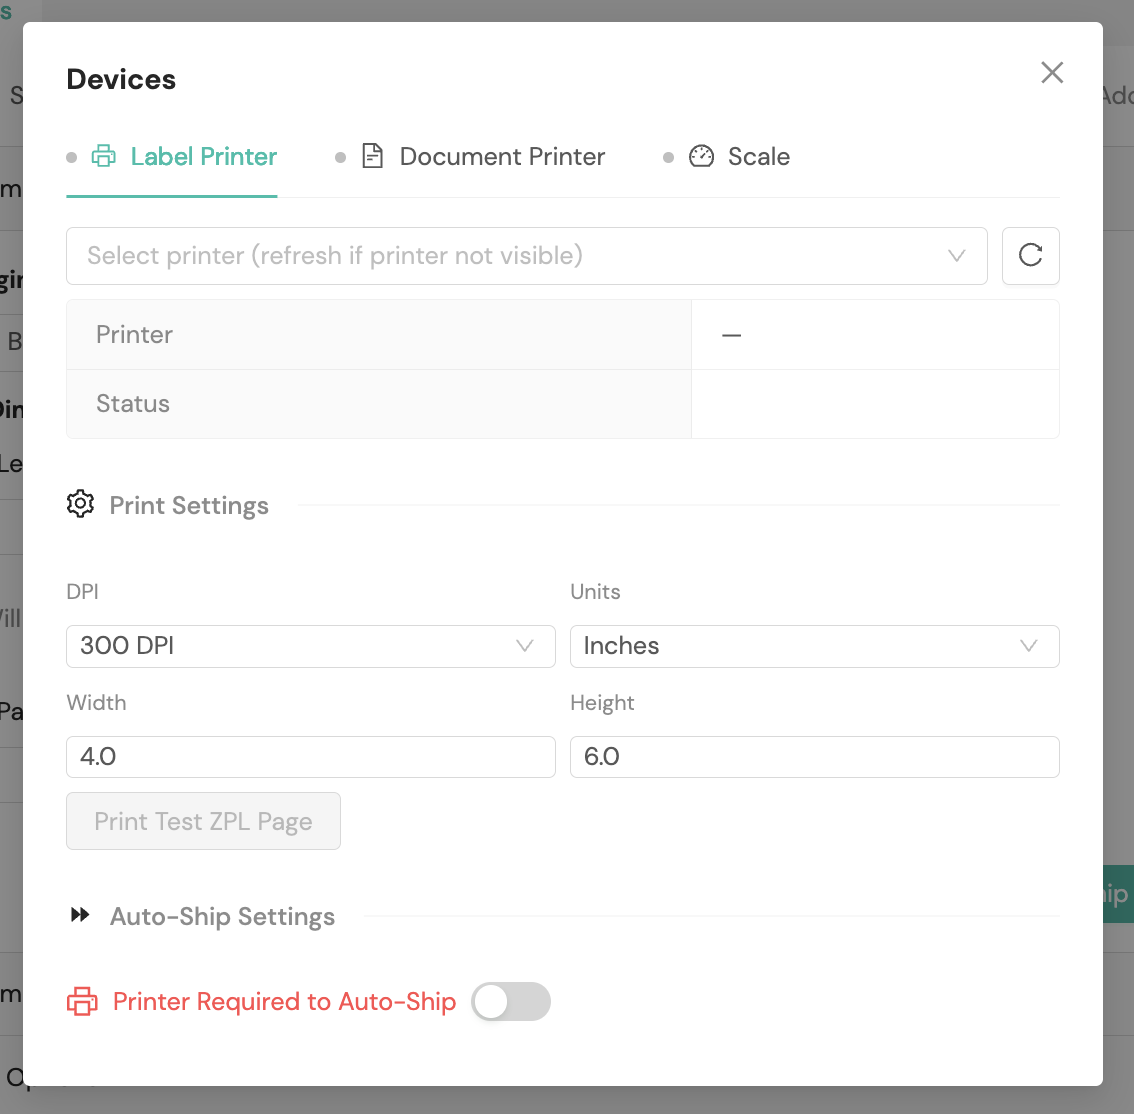
Label Printer
The Label Printer tab is where you'll configure your thermal or ZPL-compatible printer for shipping labels. Select your printer from the dropdown menu (click the refresh icon if your printer isn't visible). Under Print Settings, you can configure the following:
- DPI. Select the dots per inch for label printing (default: 300 DPI).
- Units. Select the unit of measurement for label dimensions (inches or centimeters).
- Width / Height. Set the label dimensions (default: 4.0 × 6.0 inches).
Click Print Test ZPL Page to verify your printer is working correctly.
Under Auto-Ship Settings, you can toggle Printer Required to Auto-Ship to require a connected label printer before AutoShip will process a shipment.
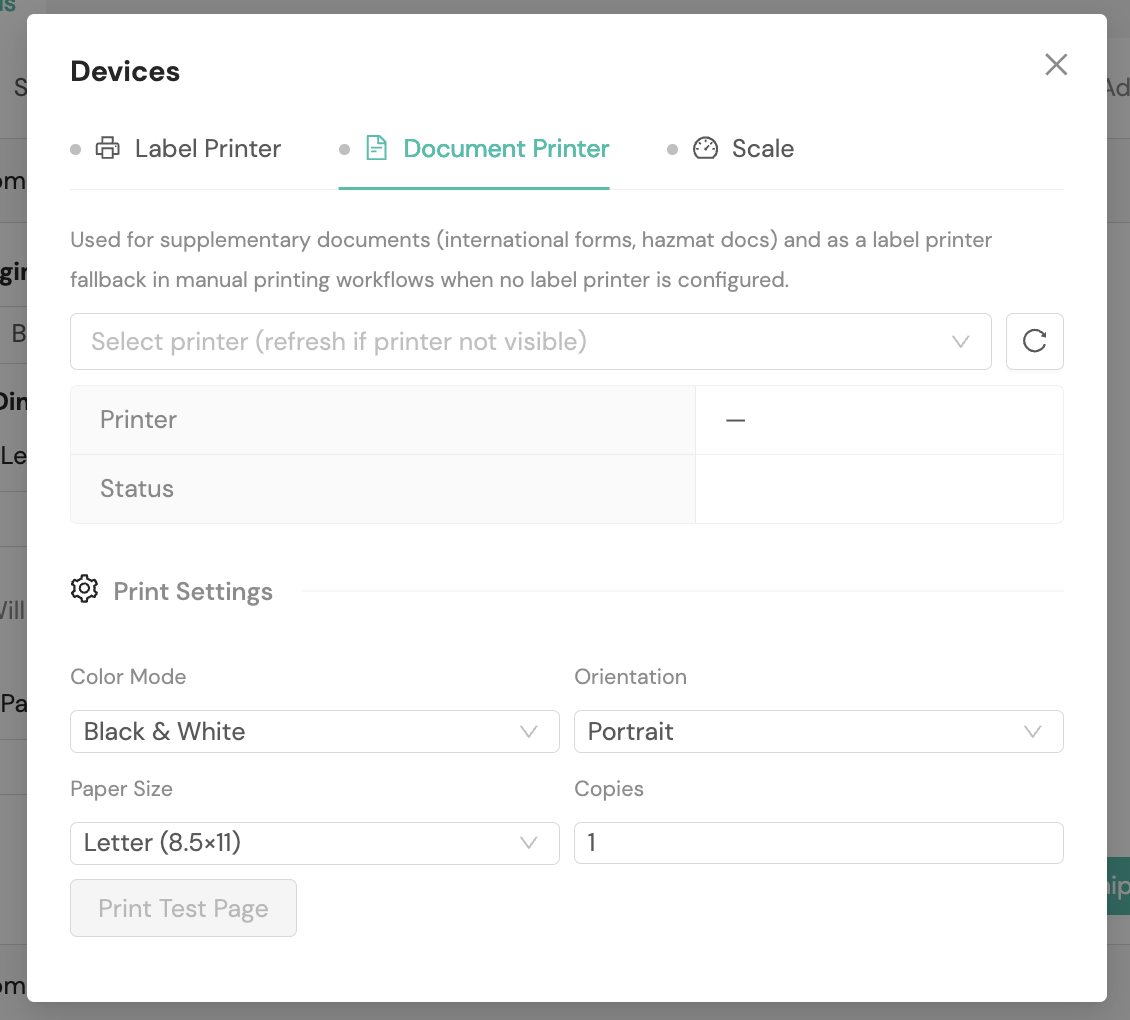
Document Printer
The Document Printer tab is where you'll configure a laser or standard printer for supplementary documents. The document printer is used to automatically print supplementary documents attached to a shipment, such as international customs forms and hazmat documentation, after a label prints successfully, including via AutoShip. ZPL-format documents will continue to route to the Label Printer.
The document printer can also serve as a fallback for label printing from the Print Labels tool and the Shipment Details page if no label printer is configured. If neither a label printer nor a document printer is configured and an international shipment has supplementary documents, the AutoShip workflow will display a Supplementary Documents — skipped callout indicating that no printer is available. You can then navigate to the Label & Documents section of the Shipment Details page to view and print the documents manually from there. If neither printer type is configured, the app will fall back to browser printing.
Select your printer from the dropdown menu (click the refresh icon if your printer isn't visible). Under Print Settings, you can configure the following:
- Color Mode. Select Black & White, Grayscale, or Color.
- Orientation. Select Portrait or Landscape.
- Paper Size. Select Letter (8.5×11), A4, or 4×6.
- Copies. Set the number of copies to print (1–99).
Click Print Test Page to verify your printer is working correctly.
Scale
The Scale tab is where you'll connect a weight reading device. Select your scale from the dropdown menu (click the refresh icon if your scale isn't visible). The current weight reading from the connected device will be displayed.

Supported barcodes
The Pack App can be configured to work with a variety of barcode types, including:
- LPN (license plate number). A unique identifier for a specific order or shipment
- Package type barcodes. Barcodes that represent your pre-defined package types (e.g., "small box", "medium box")
Error handling
If an error occurs during the scanning process (e.g., an invalid barcode is scanned, or the order cannot be found), the Pack App will provide clear on-screen feedback, allowing you to quickly resolve the issue and continue with the packing process.
Orders in the Pack App
When you scan an order barcode, you can access details of that order in the Pack App's Orders section.
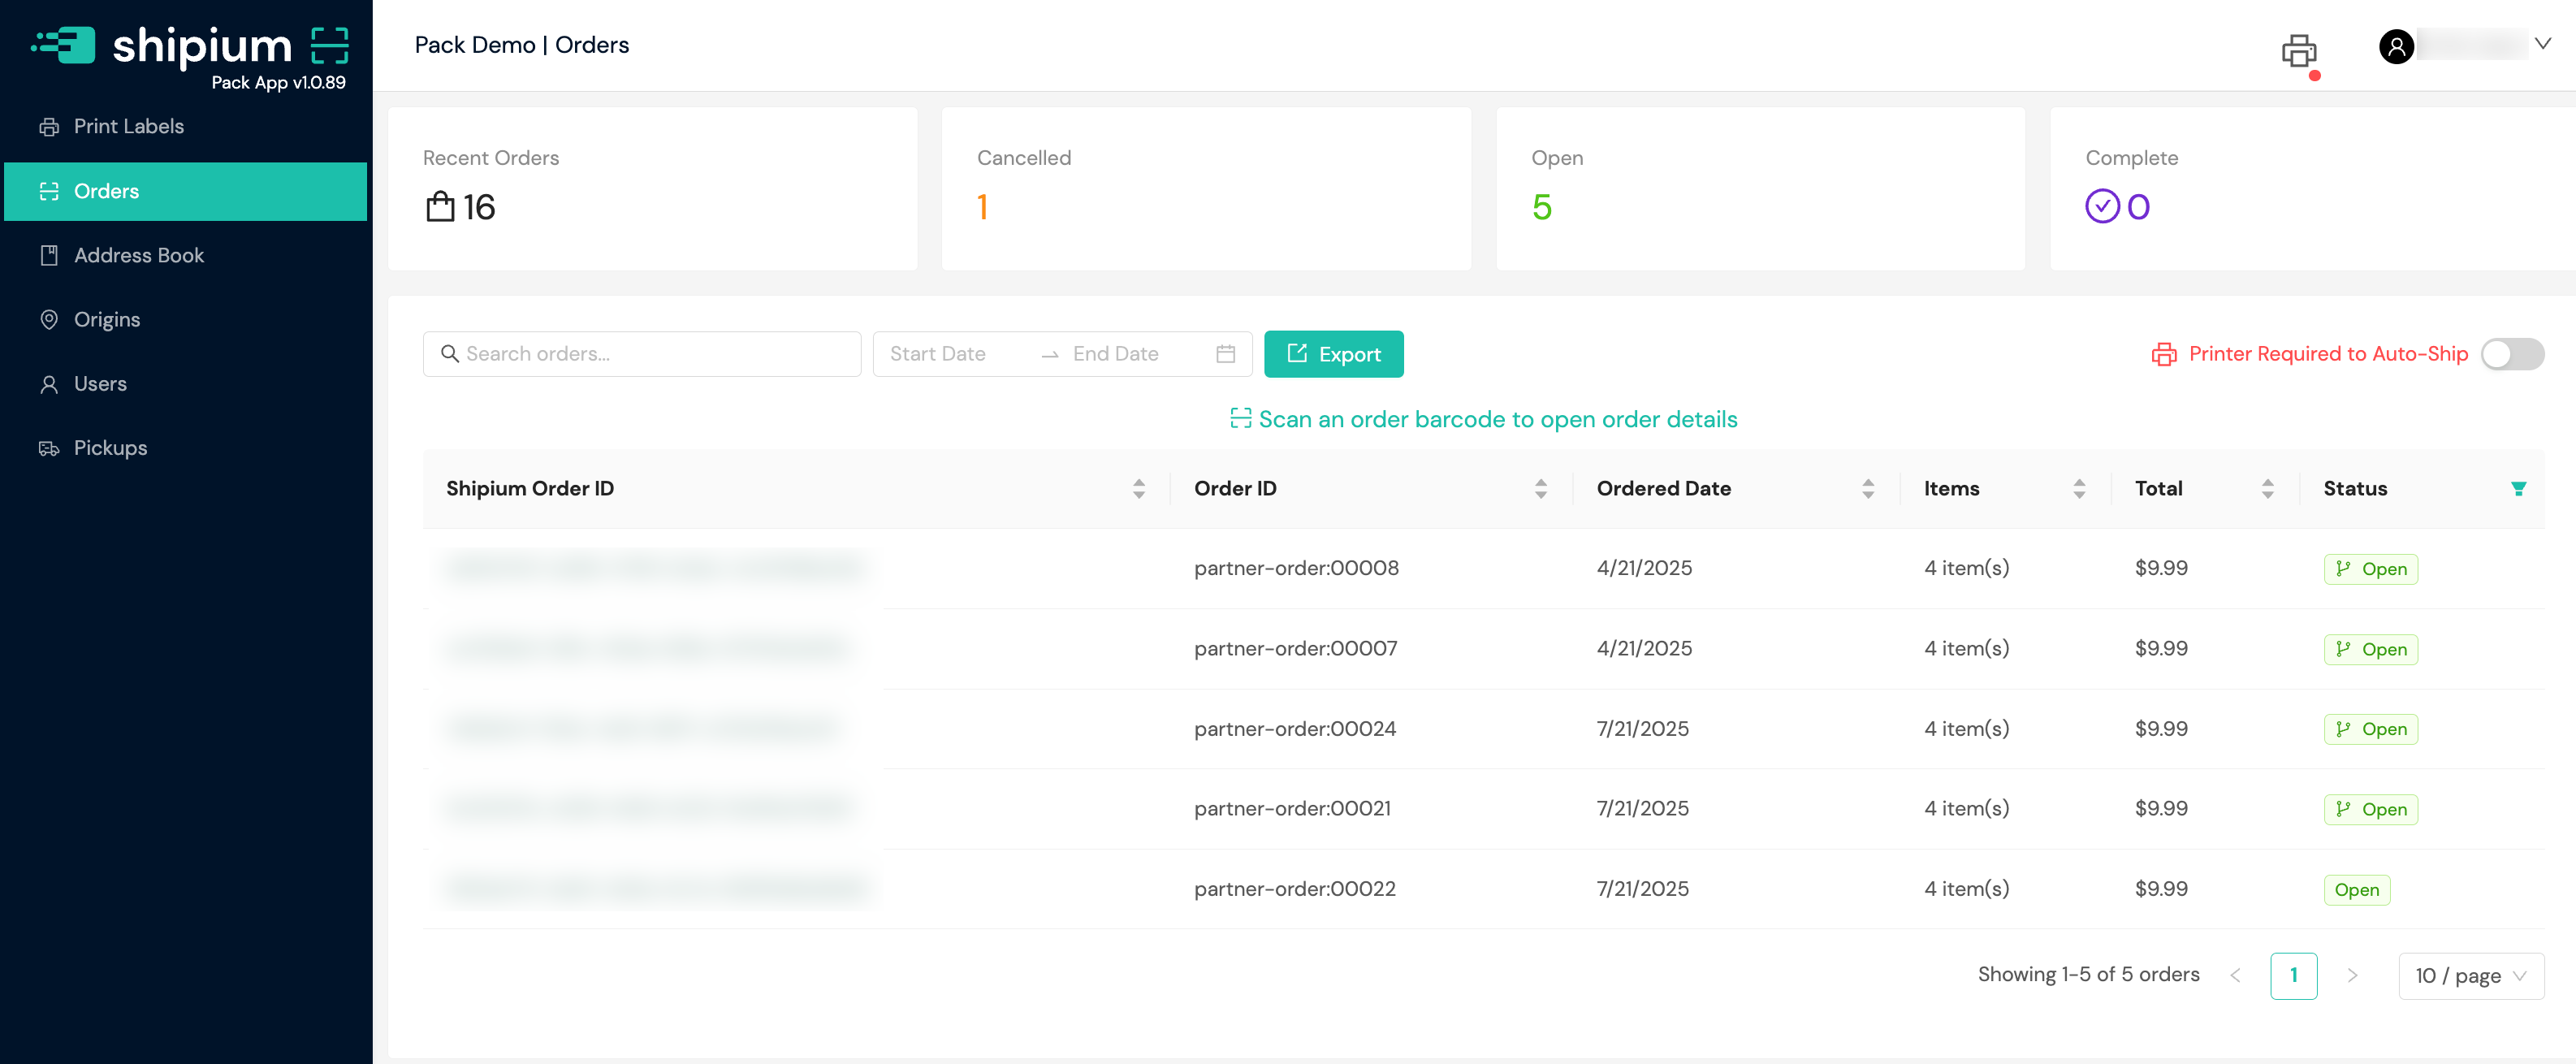
You can use the order status cards at the top of the display window to filter orders by their status. For example, if you select Complete, the list of orders appearing on screen will be limited to only those with a Complete status.
When you select any individual order, you'll see all details associated with it, including the order information such as the order ID, order date, status, shipping address, order ID, and cost; the packing information including packaging material, weight, and dimensions; and packing progress. You'll populate values for the packaging information and interact with the items to pack below. You also can toggle on Test Mode, which means you won't print a label with this order.
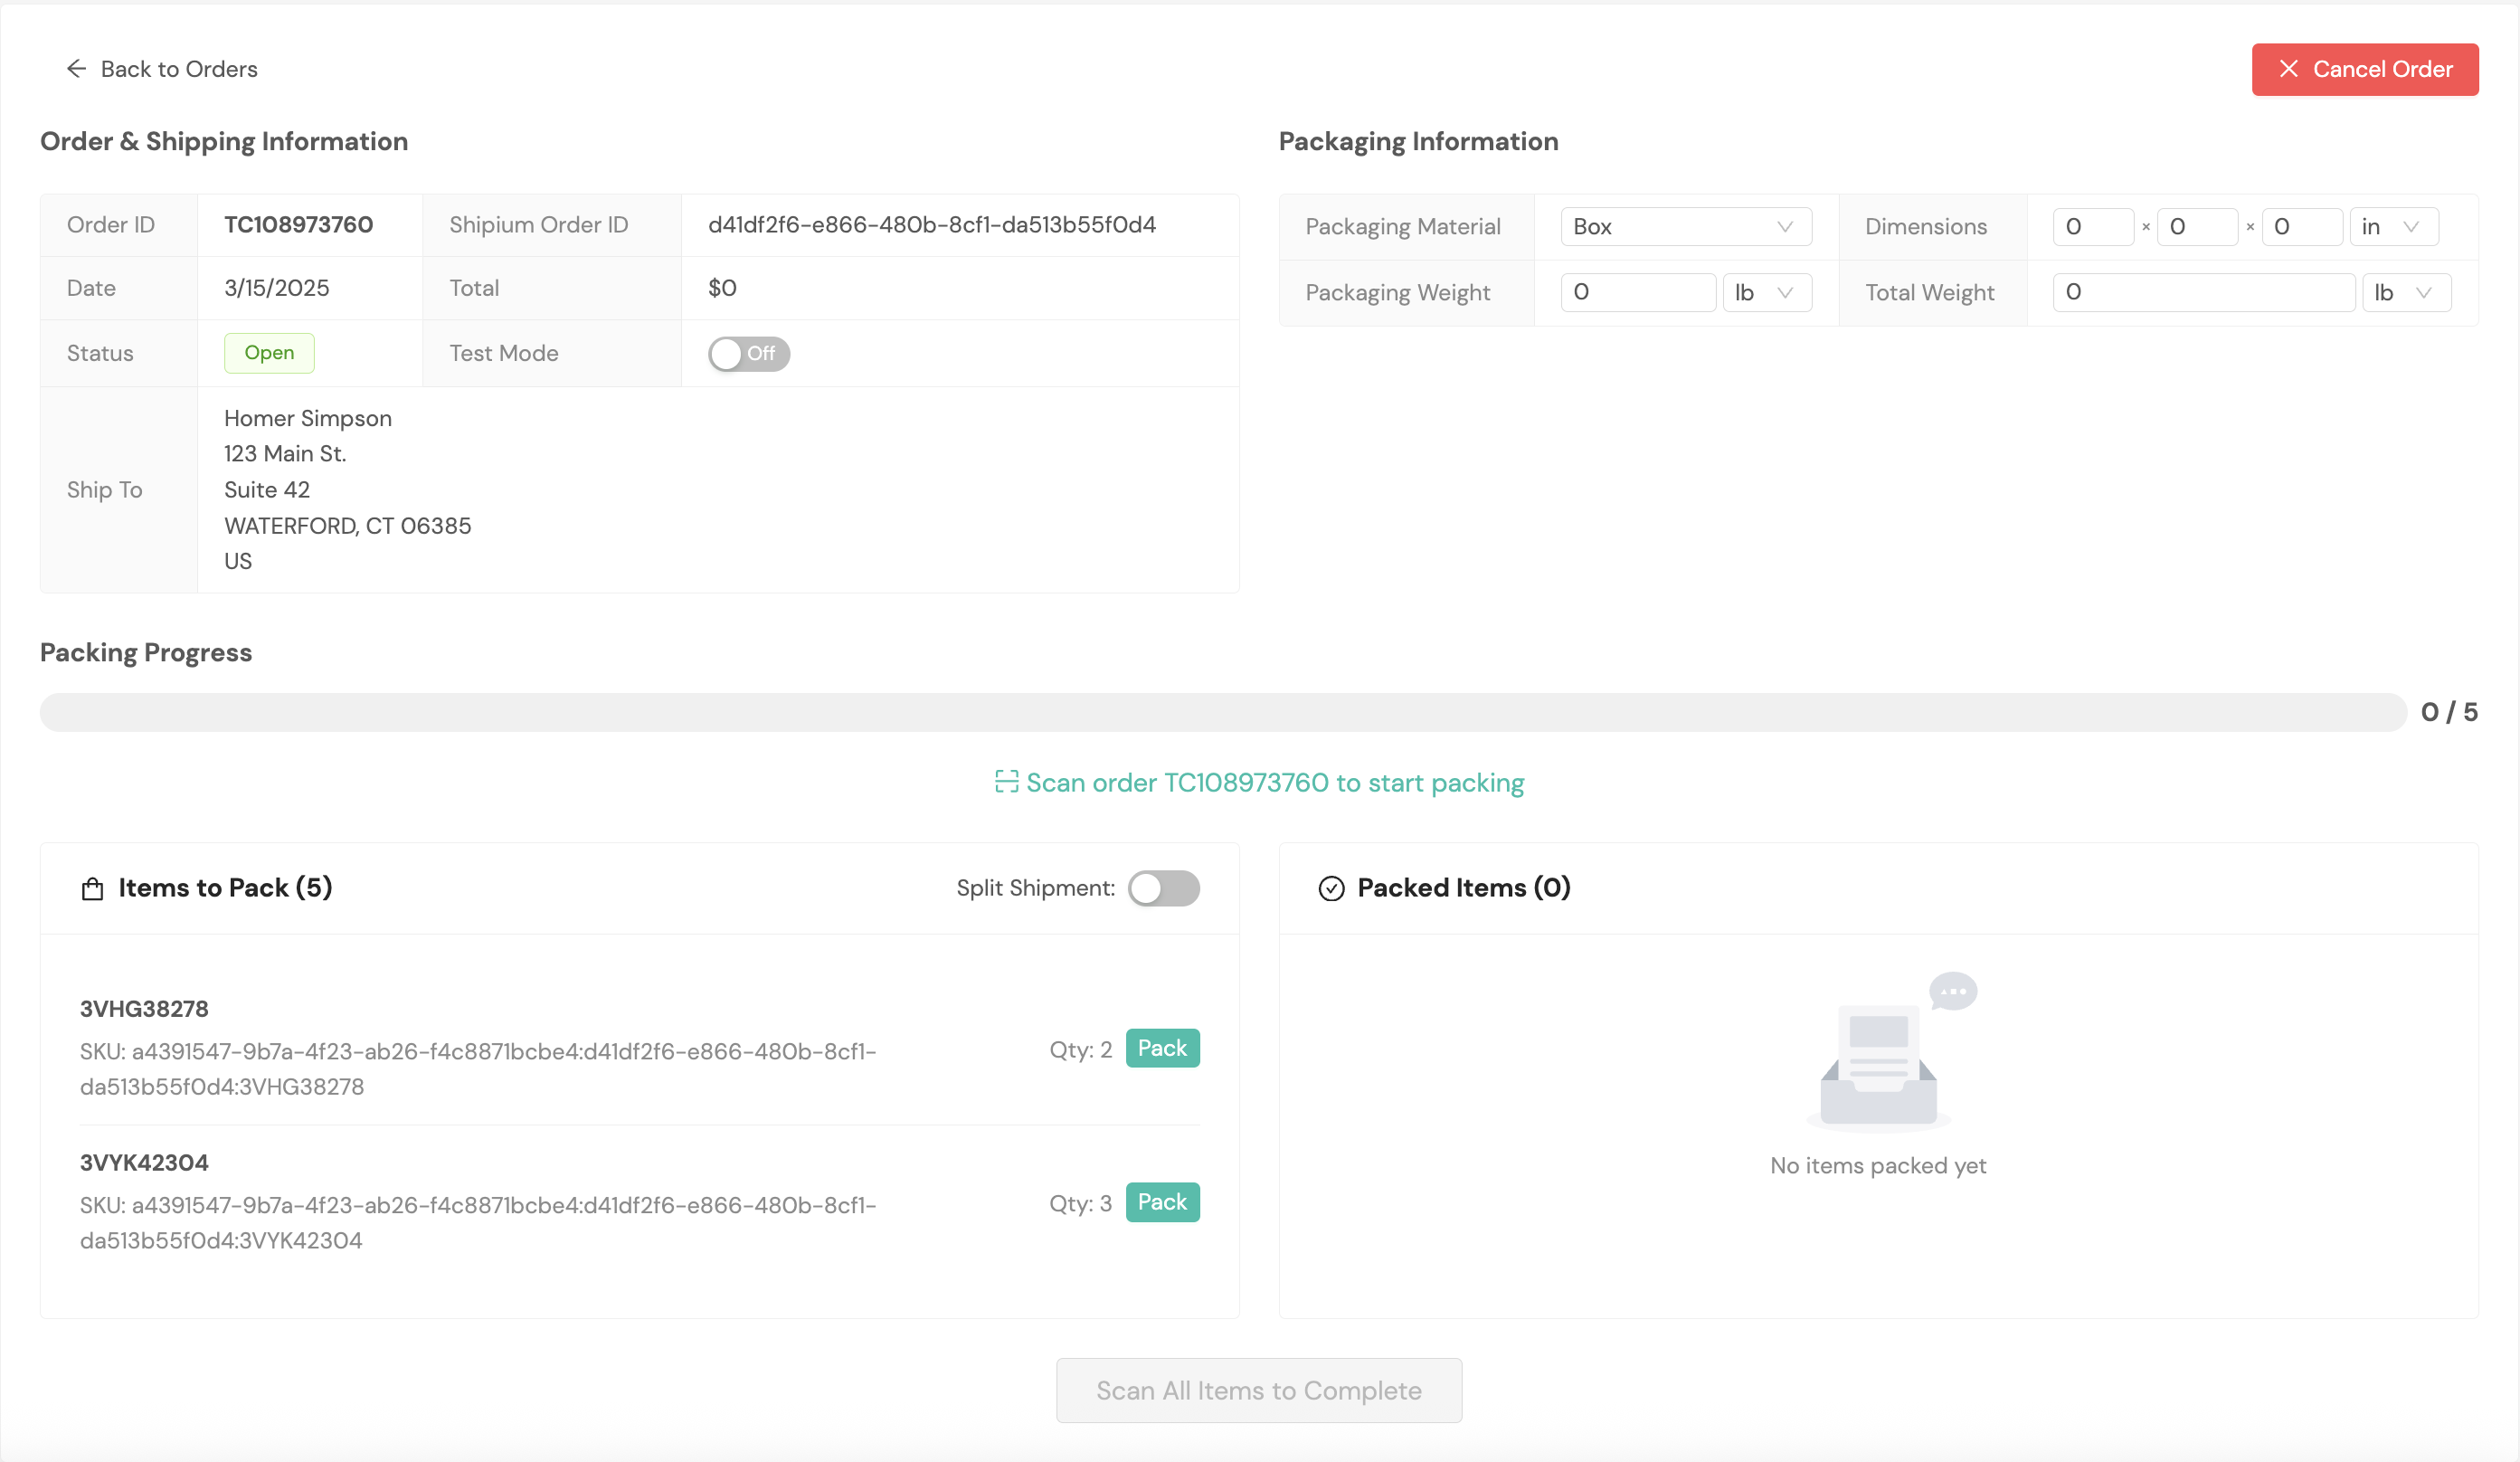
You can scan individual items from the Items to Pack list to pack them, or you can select the Pack button next to the item to pack it. Each pack action applies to one quantity for each product/item. You can use the Unpack button at any time to unpack the item.

Once all items in the order have been packed, either via scanner or the manual entry in the console, you'll see your packing progress represented as a green line with the option to click the Complete Order button.

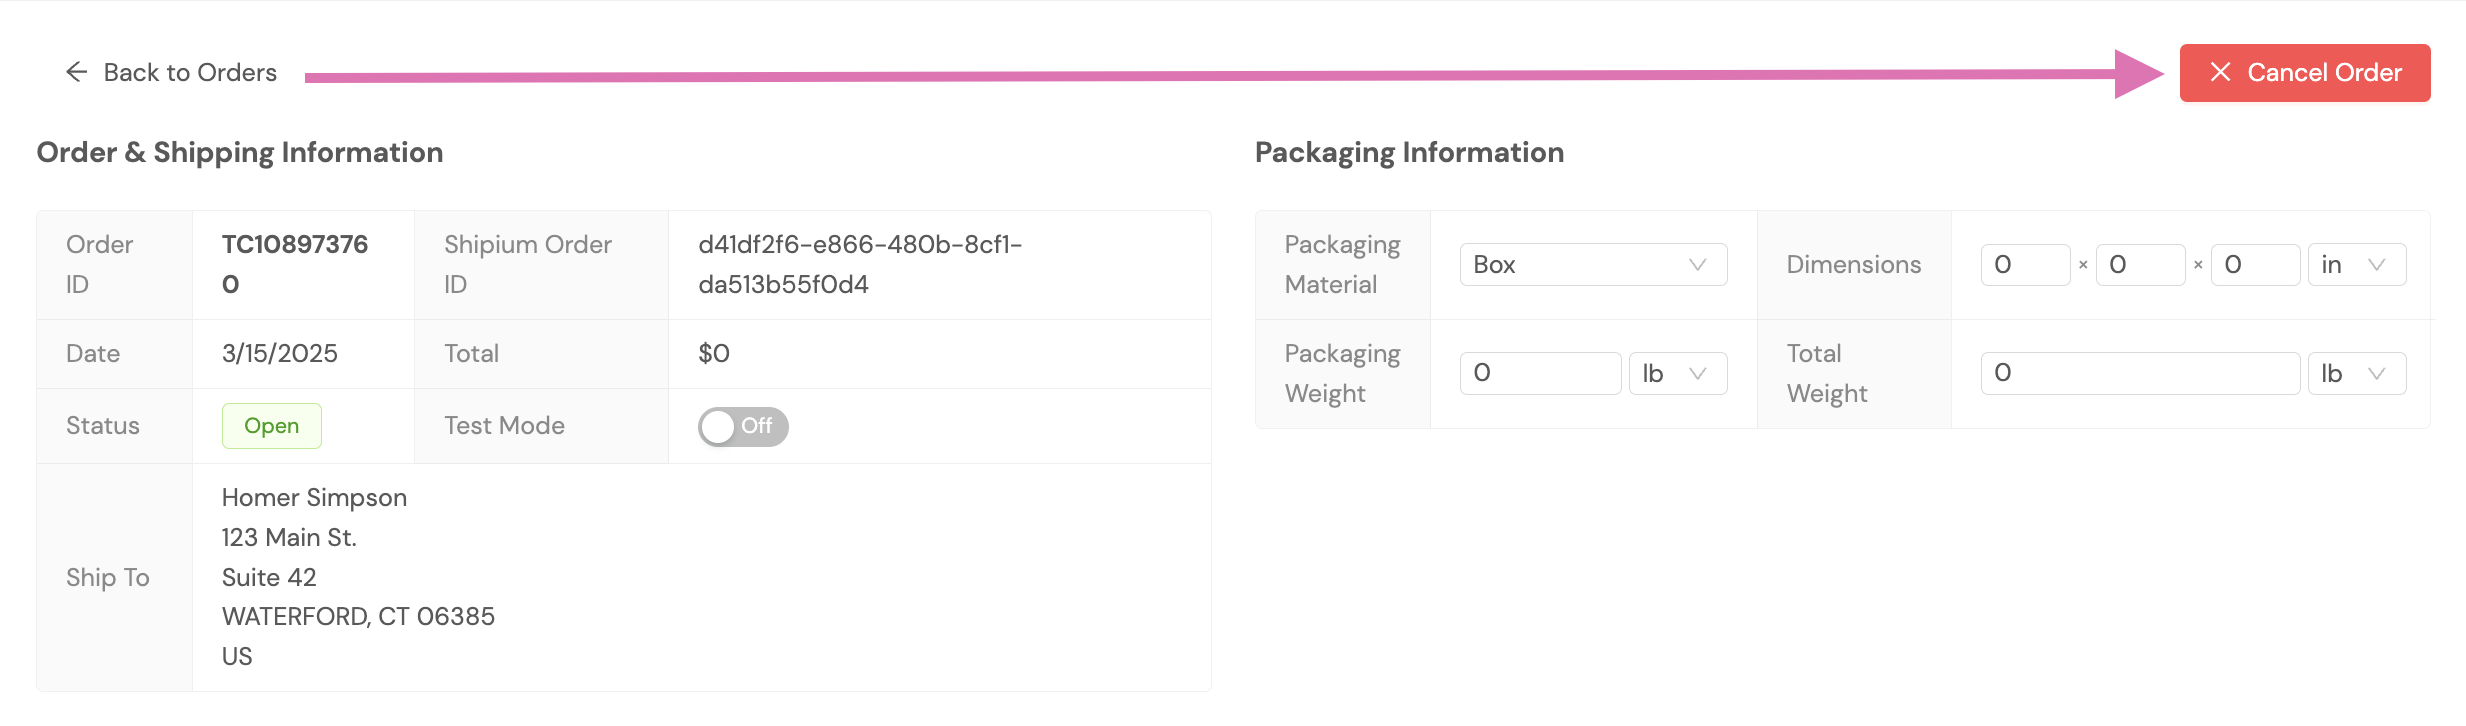
If you need to cancel an order, you can do so by selecting the red Cancel Order button on the order details screen.
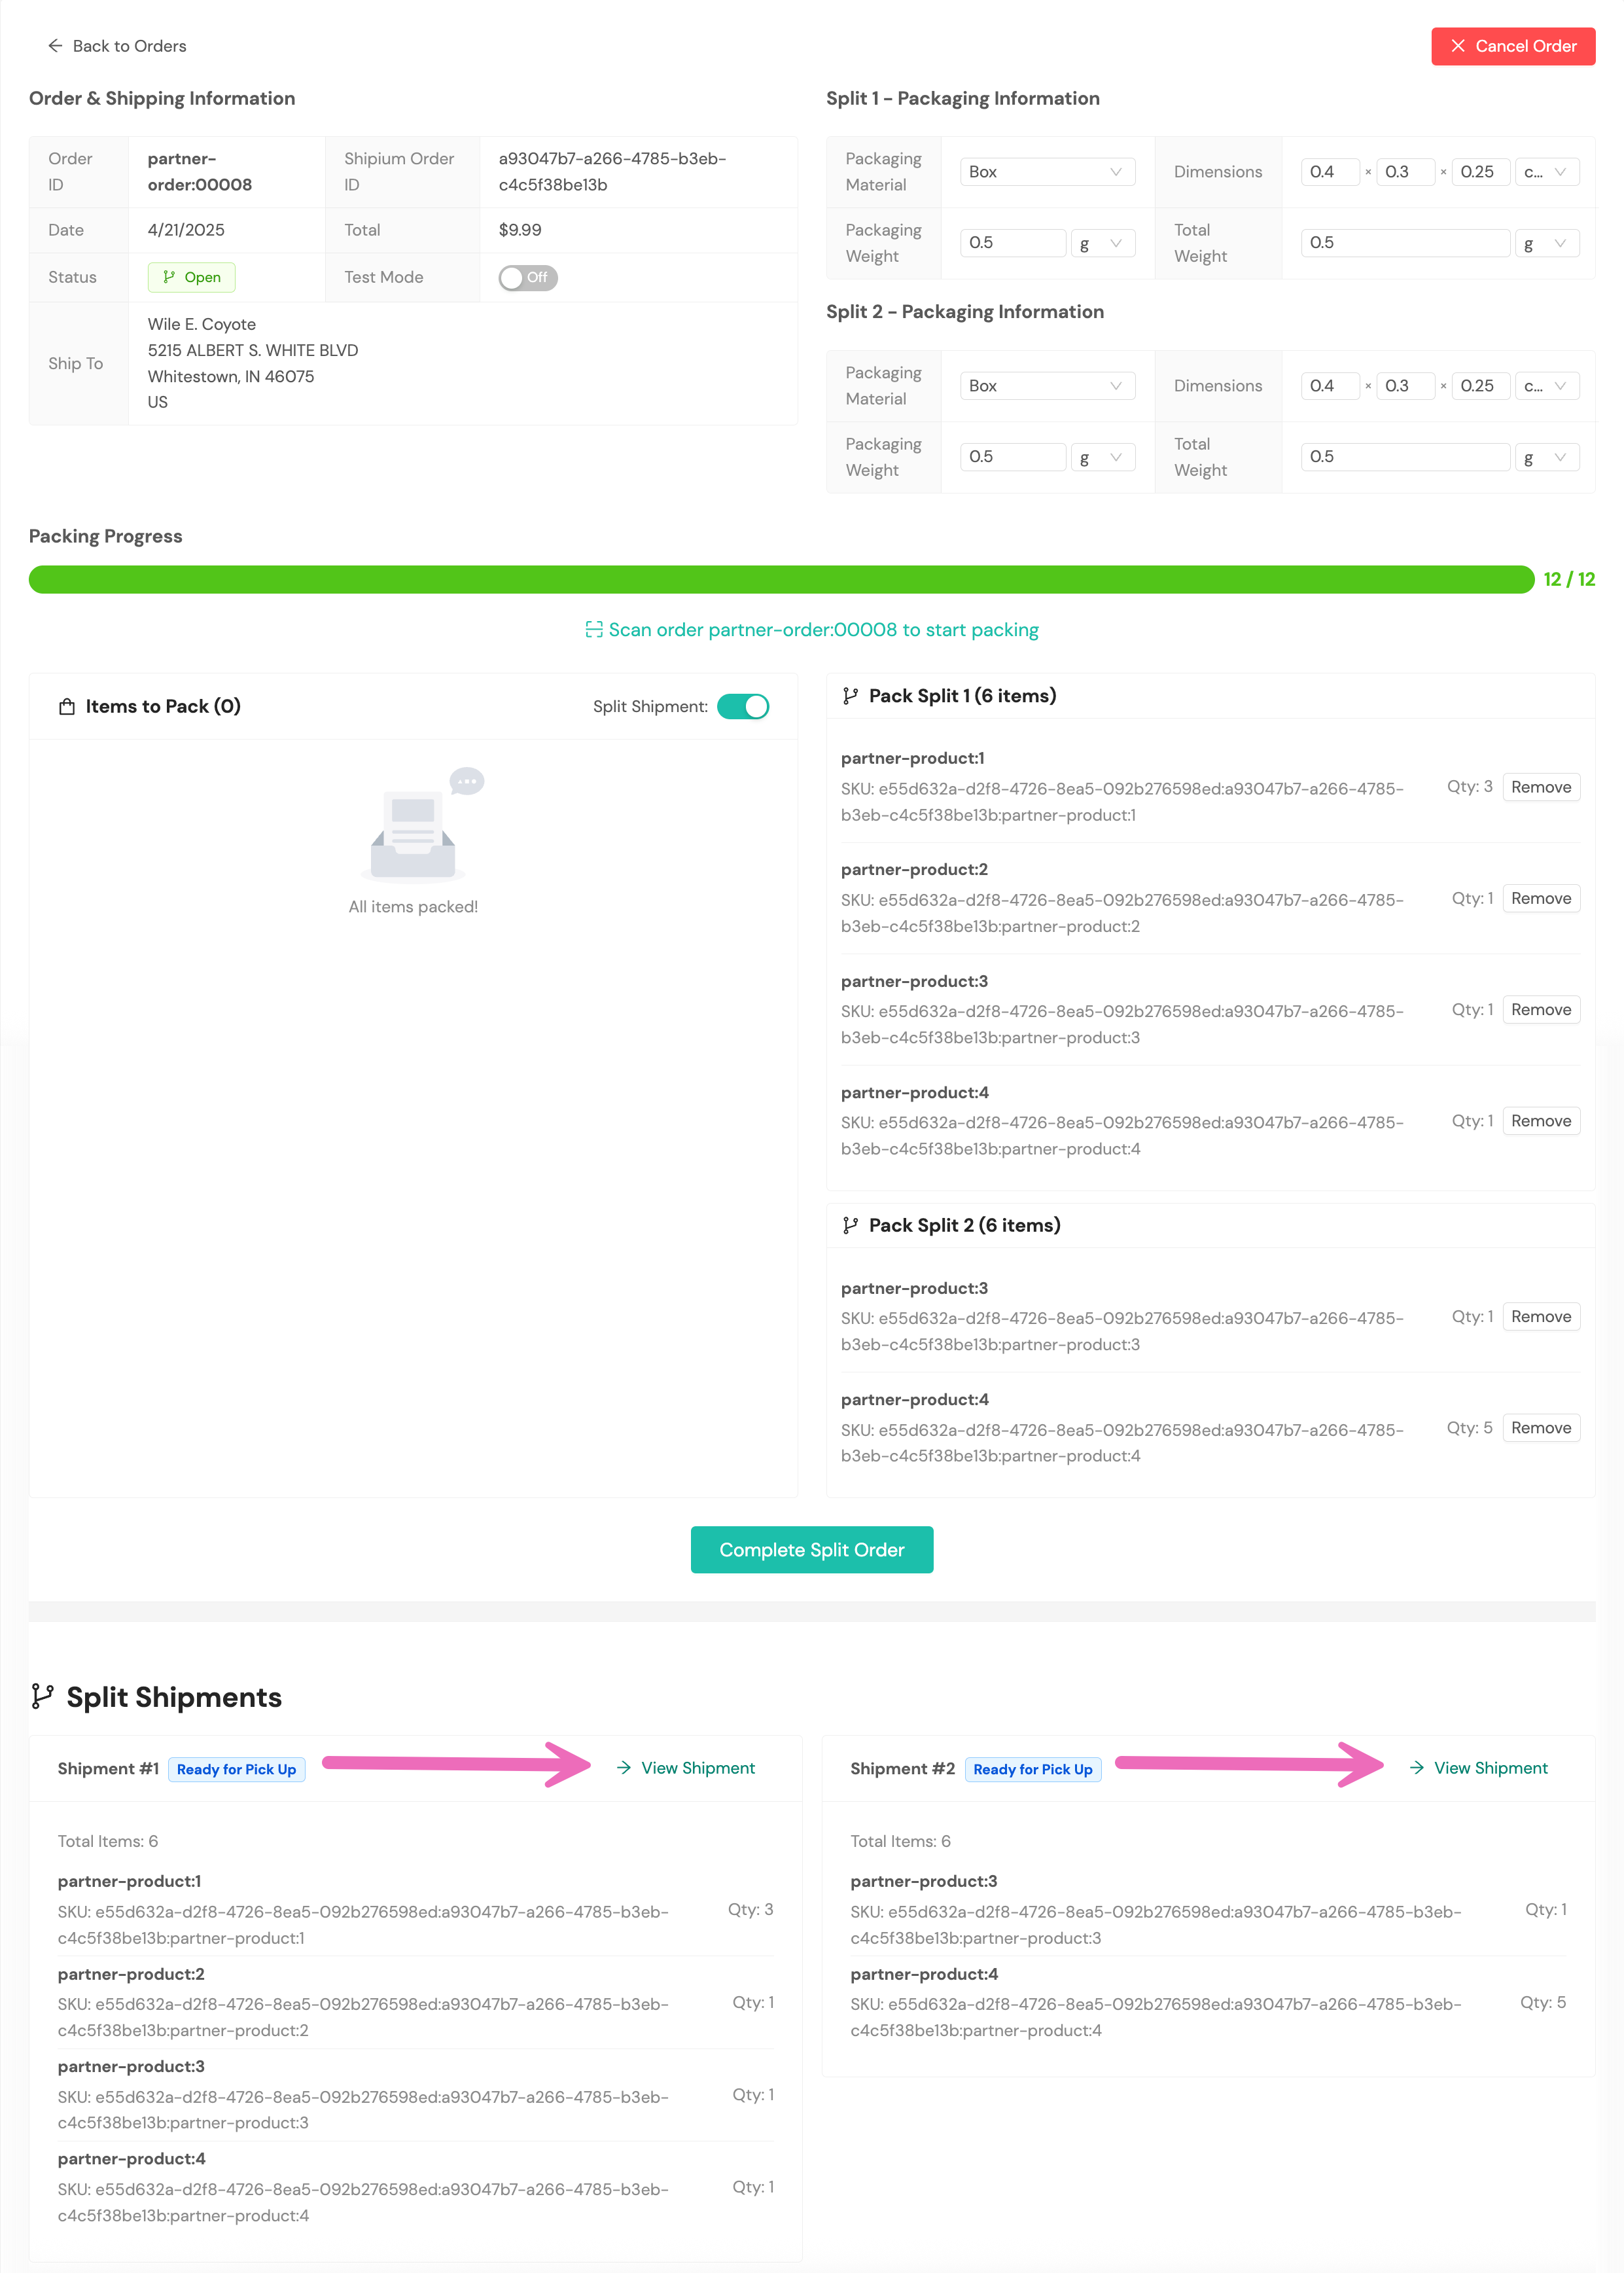
Split shipments
The Pack App allows you to split a single order into multiple shipments. This is useful when an order contains items that need to be shipped in separate packages, for example, due to size or weight constraints, or if items are being shipped from different locations.
Within the Orders workflow, when you select an order to view details and enter information about the order, you'll see a Split Shipment toggle button in the Packing Progress section of the screen.
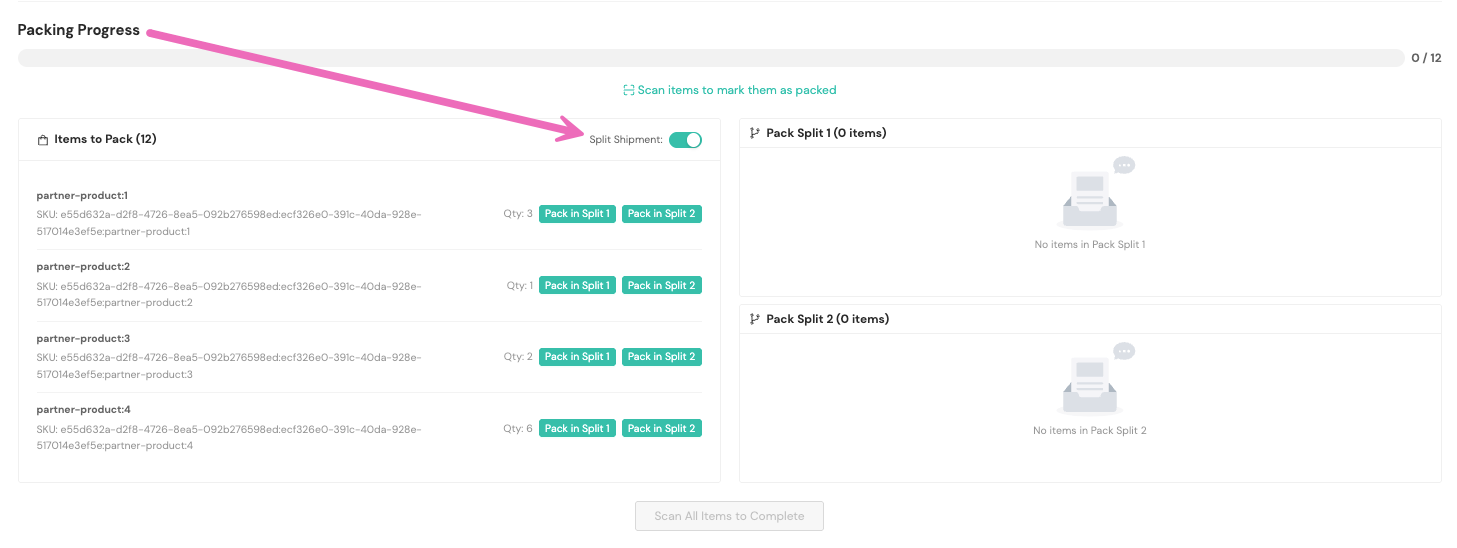
Next, you'll assign items to a specific shipment. You can also specify the quantity of each item to include in each shipment. Once you've assigned each item/product to a shipment, you'll have the option to Complete Split Order by selecting the button at the bottom of the Packing Progress section.
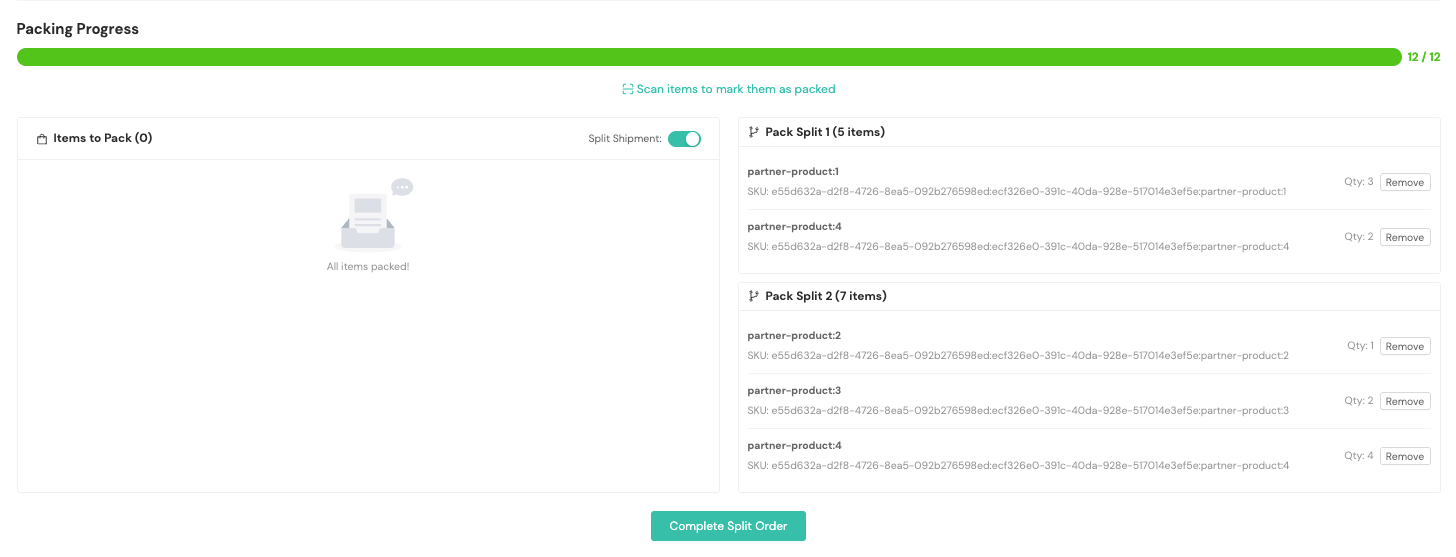
Once an order is complete and has shipped, you can find information about it in the order details page. Within the Split Shipments section, you can click on View Shipment to access additional information.
Track split shipments
Once an order has been split, you can track each individual shipment separately. The original order will be updated to show that it has been split, and it will contain links to the new individual shipments. Each split shipment will have its own tracking number and shipping label.
Generate labels via the Pack App Print Label Tool
To print labels, you'll need to be logged into the Shipium Pack App. You'll select Print Labels from the lefthand navigation menu. The Print Labels page includes two tabs: Print Labels and Print Labels (v2). The original Print Labels tool is available via the Print Labels tab. The updated multi-step wizard experience is available via the Print Labels (v2) tab and is the recommended workflow for new users. Both workflows are described in this section.
Barcode scanning optionAs an alternative to manual entry, you can use the scanner in the Pack App to directly scan package barcodes.
About printing labels from the Pack App
If you are in a fulfillment center situation where you need to print labels directly from the Pack App, there are options to do so that will automatically push labels to an attached printer.
There are two common cases for printing labels from the Pack App:
- Re-print labels that were previously printed on fulfillment center equipment
- Print labels that were created by the Pack App tool in the console
For either of these cases, there are two basic options for printing. The first option is to download the ZPL, PNG, or PDF files locally and then print them from the computer on which they were downloaded. The second option is to use Shipium's built-in support for QZ Tray, which is an application that sits on your local computer and allows direct printing from the Pack App to an attached printer.
Print from the Pack App
You'll need to complete a few steps to print labels from the Pack App, depending on your use case. Before printing, ensure your devices are configured; see Configure devices for guidance on setting up your label printer, document printer, and scale via QZ Tray. This section includes guidance for installing QZ Tray, re-printing a label, and printing from the Pack App Print Labels tool.
Install QZ Tray
On the computer on which you would like to install QZ Tray (and on which a compatible printer is installed), go to QZ's application page and download the correct application for that computer.
Corporate managed computersIf you're trying to print labels from a company-managed computer, you may need to work with your company's IT team to get the QZ Tray software installed and configured on your fulfillment center's workstations.
Re-print a label
When viewing a particular label, you can print it again by using the toolbar that is next to the label and clicking the Print button. This will feed the ZPL for the label directly to your printer, and you should get a label.

If for some reason there has been a problem configuring the printer or you don't want to configure it, you can also always download the ZPL and print it directly from the computer's desktop.
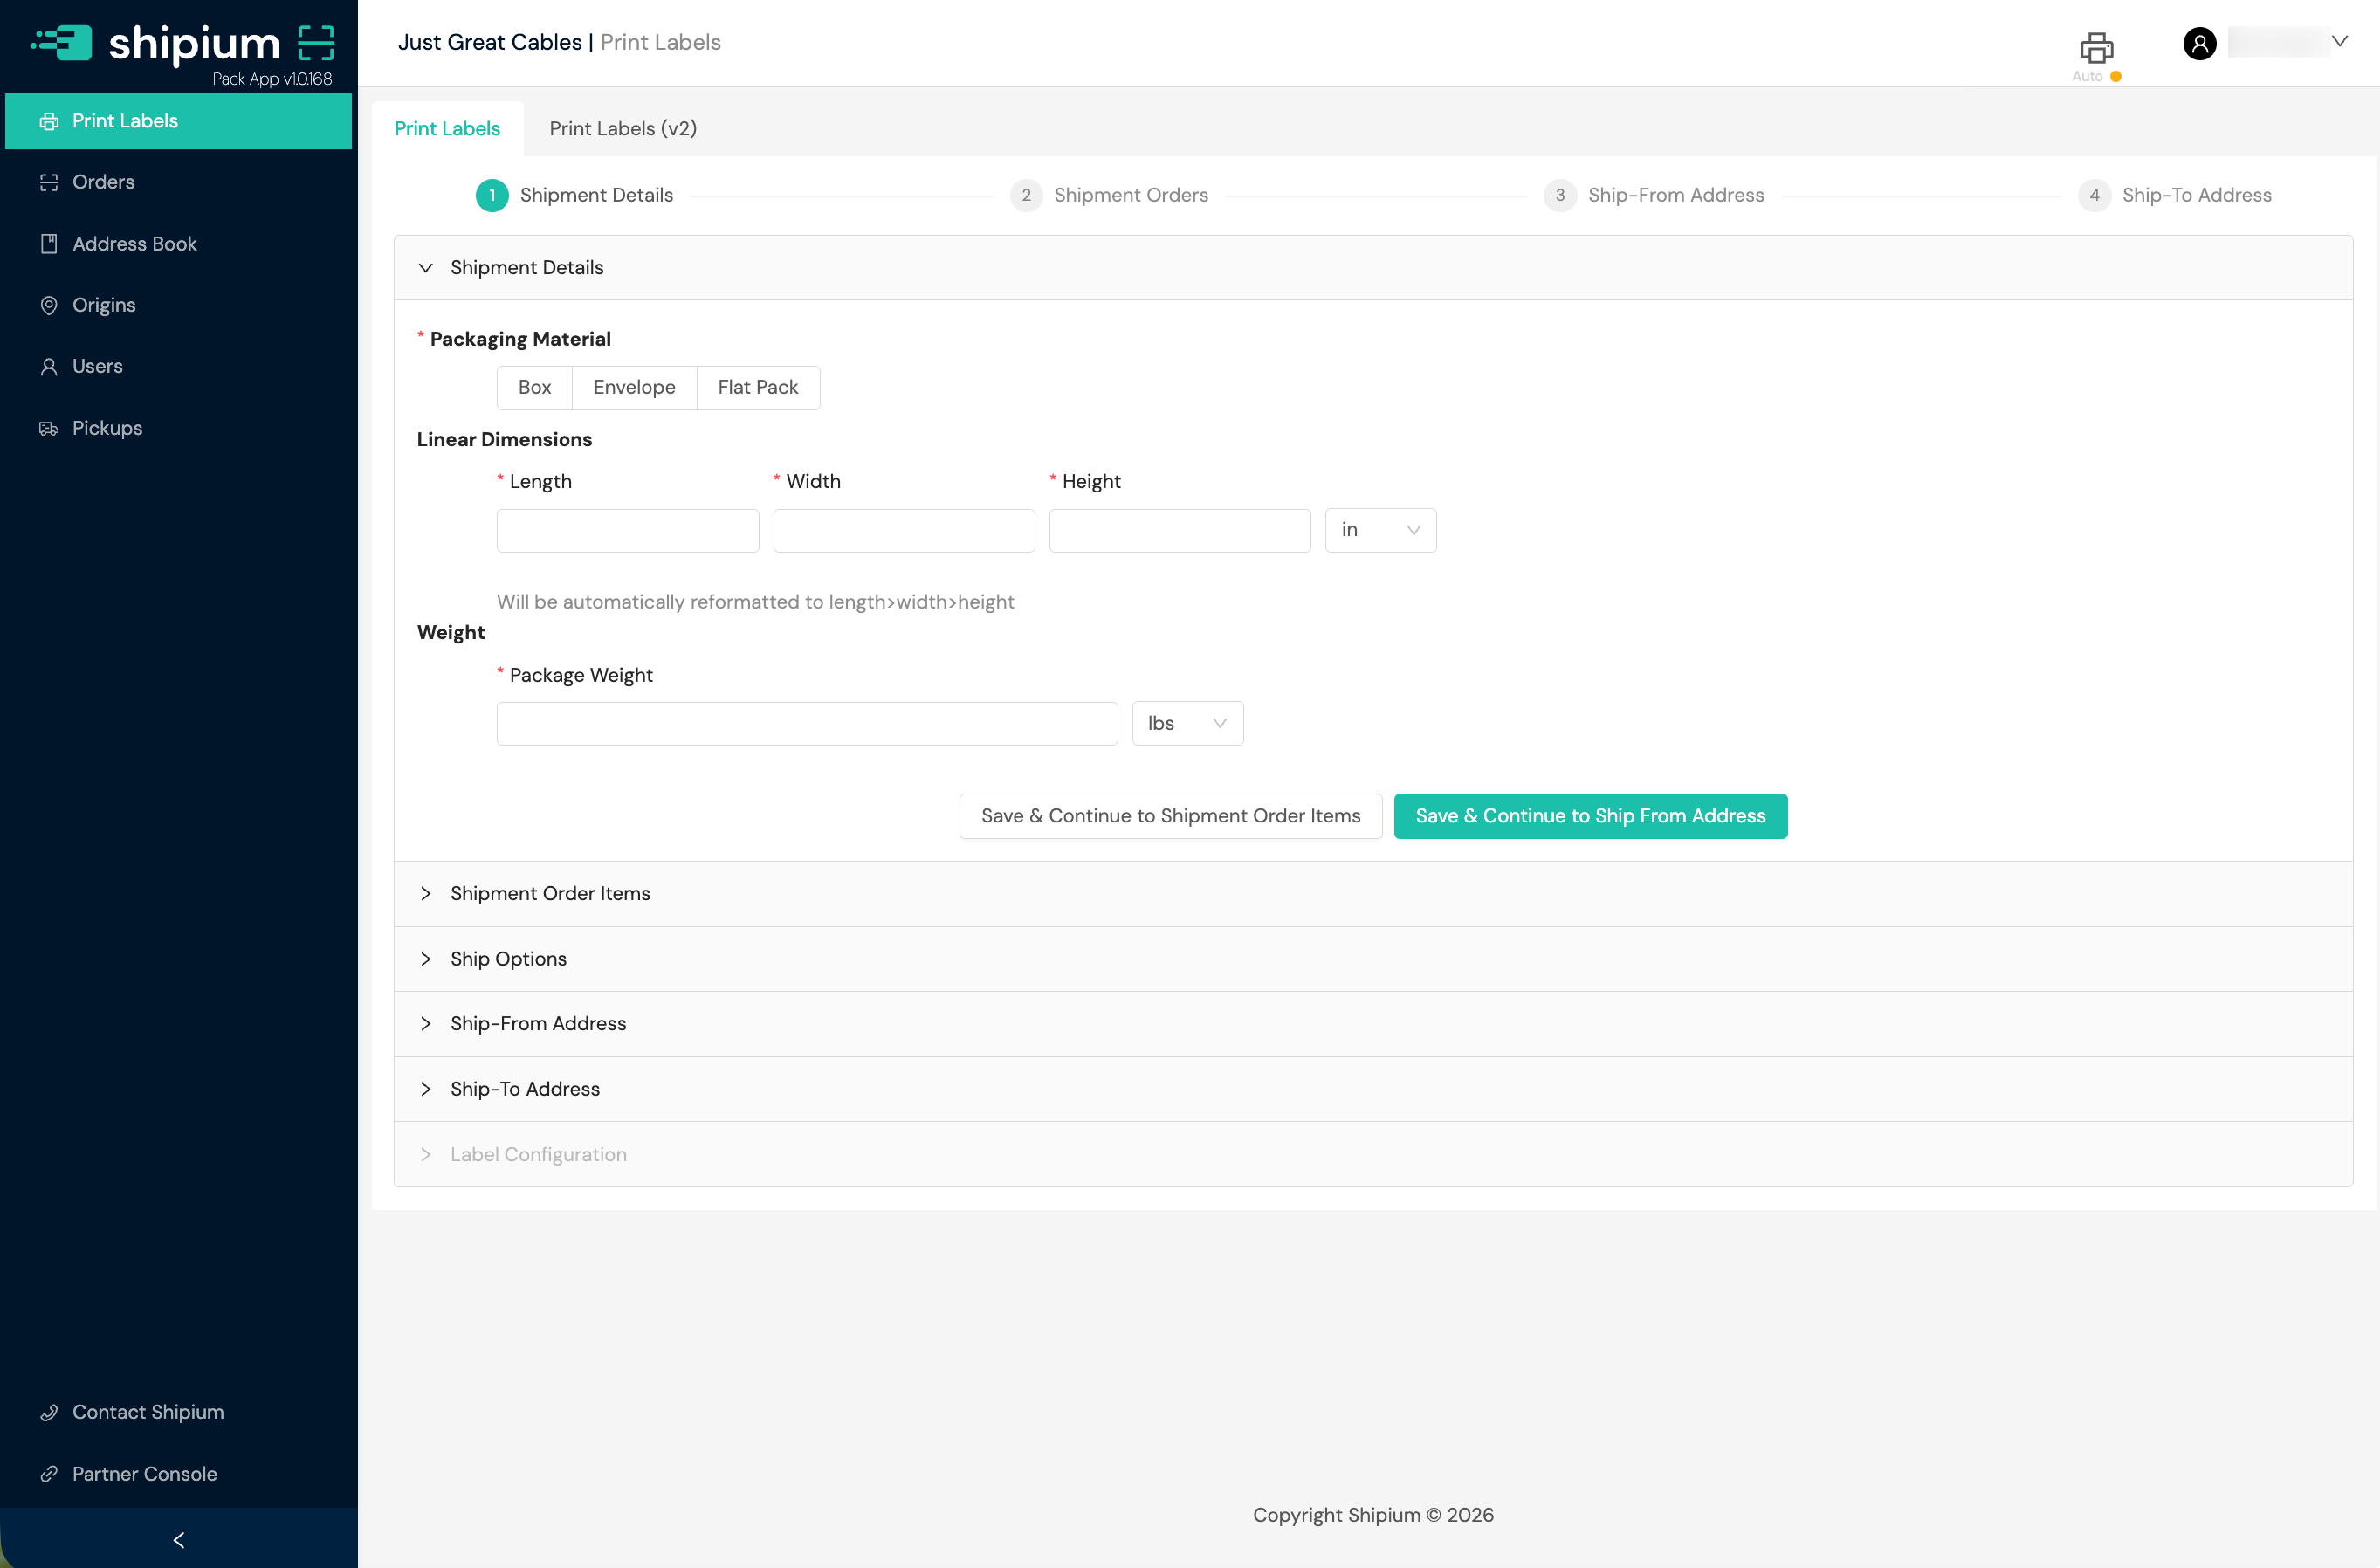
Print from the Pack App Print Labels tool
You'll access Print Labels from the left navigation menu within the Pack App. You'll provide shipment details, ship options (optional), origin and destination addresses, and any preferred label configurations.
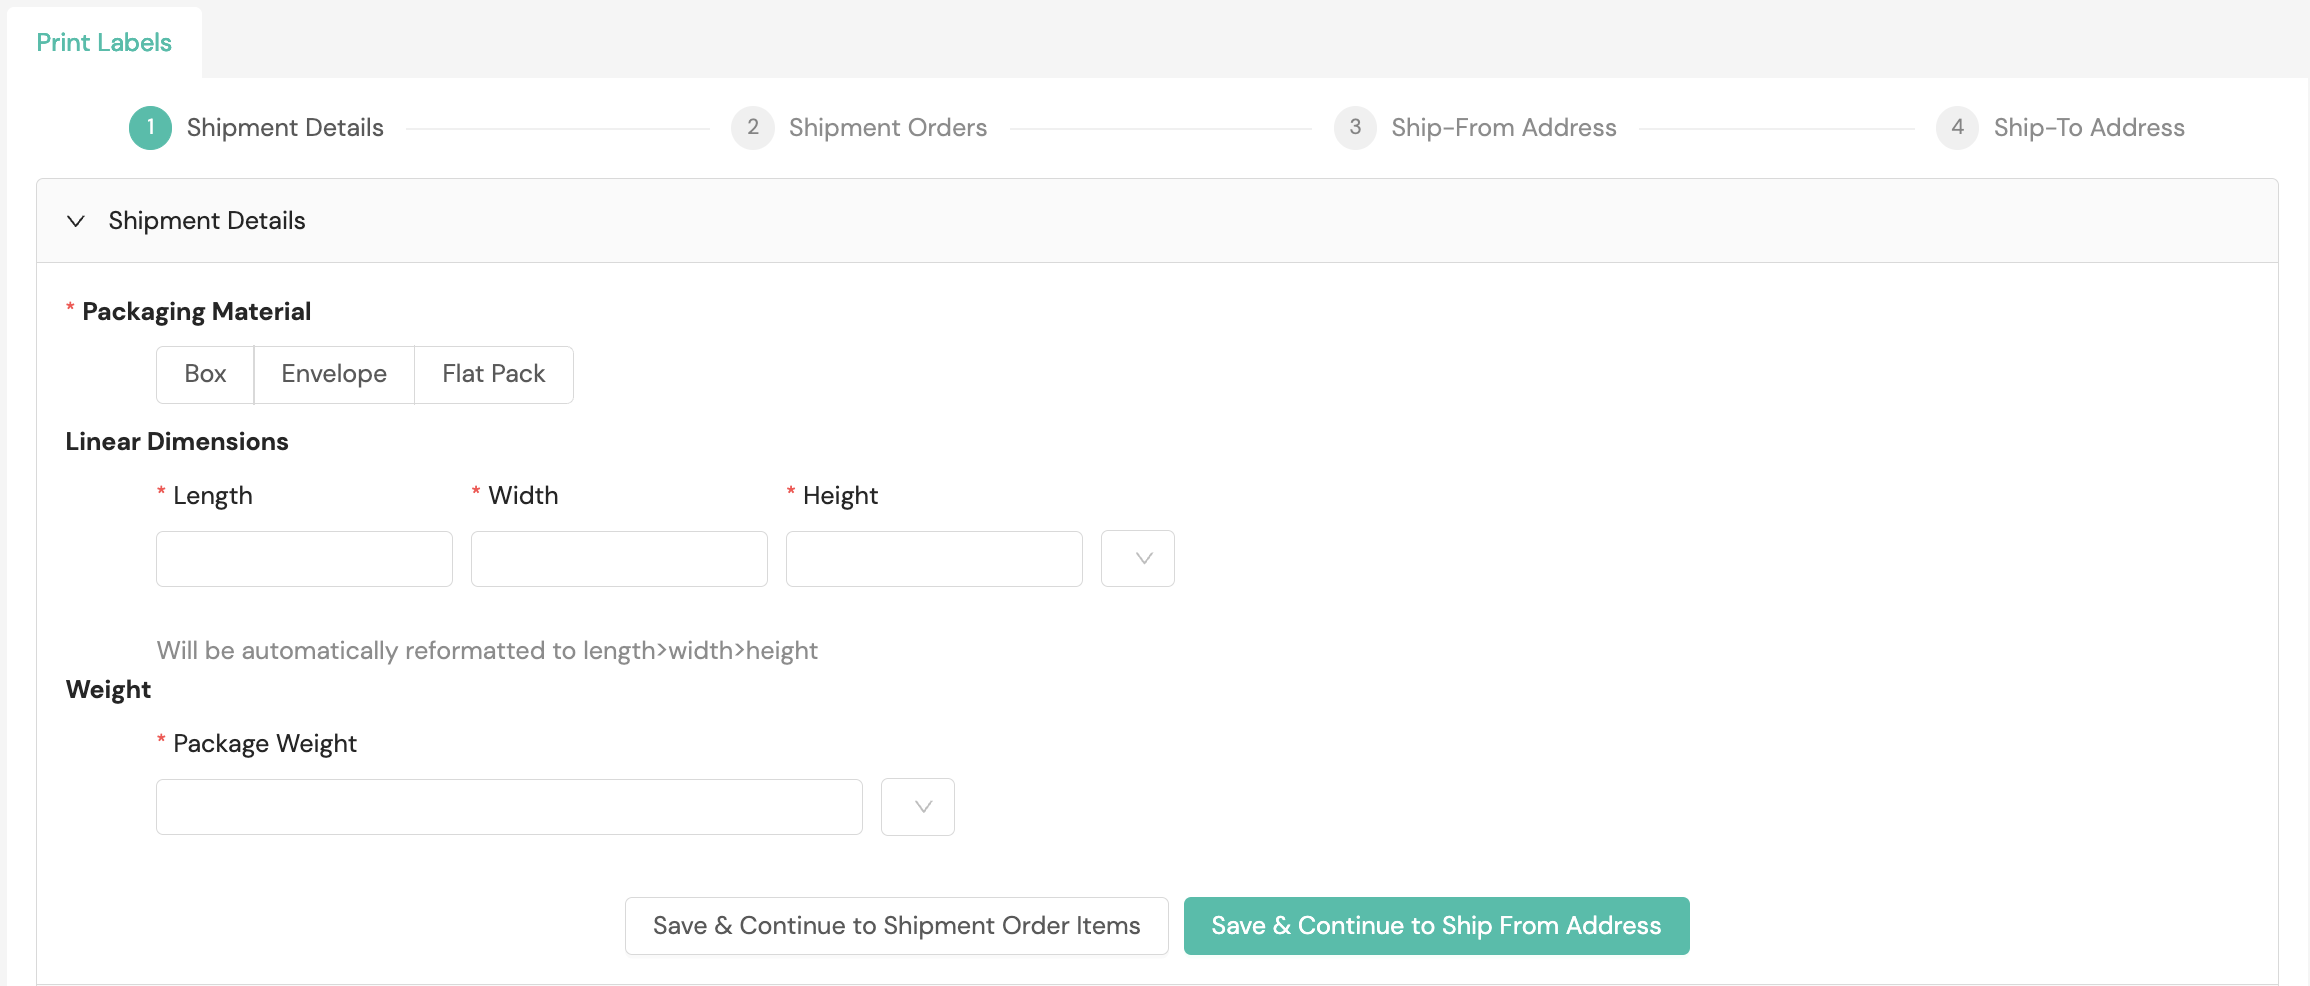
Shipment details
Information about the package, including the packaging material, linear dimensions, and weight, is required. Be sure to select the applicable units for your package dimensions (inches or centimeters) and weight (pounds or kilograms).
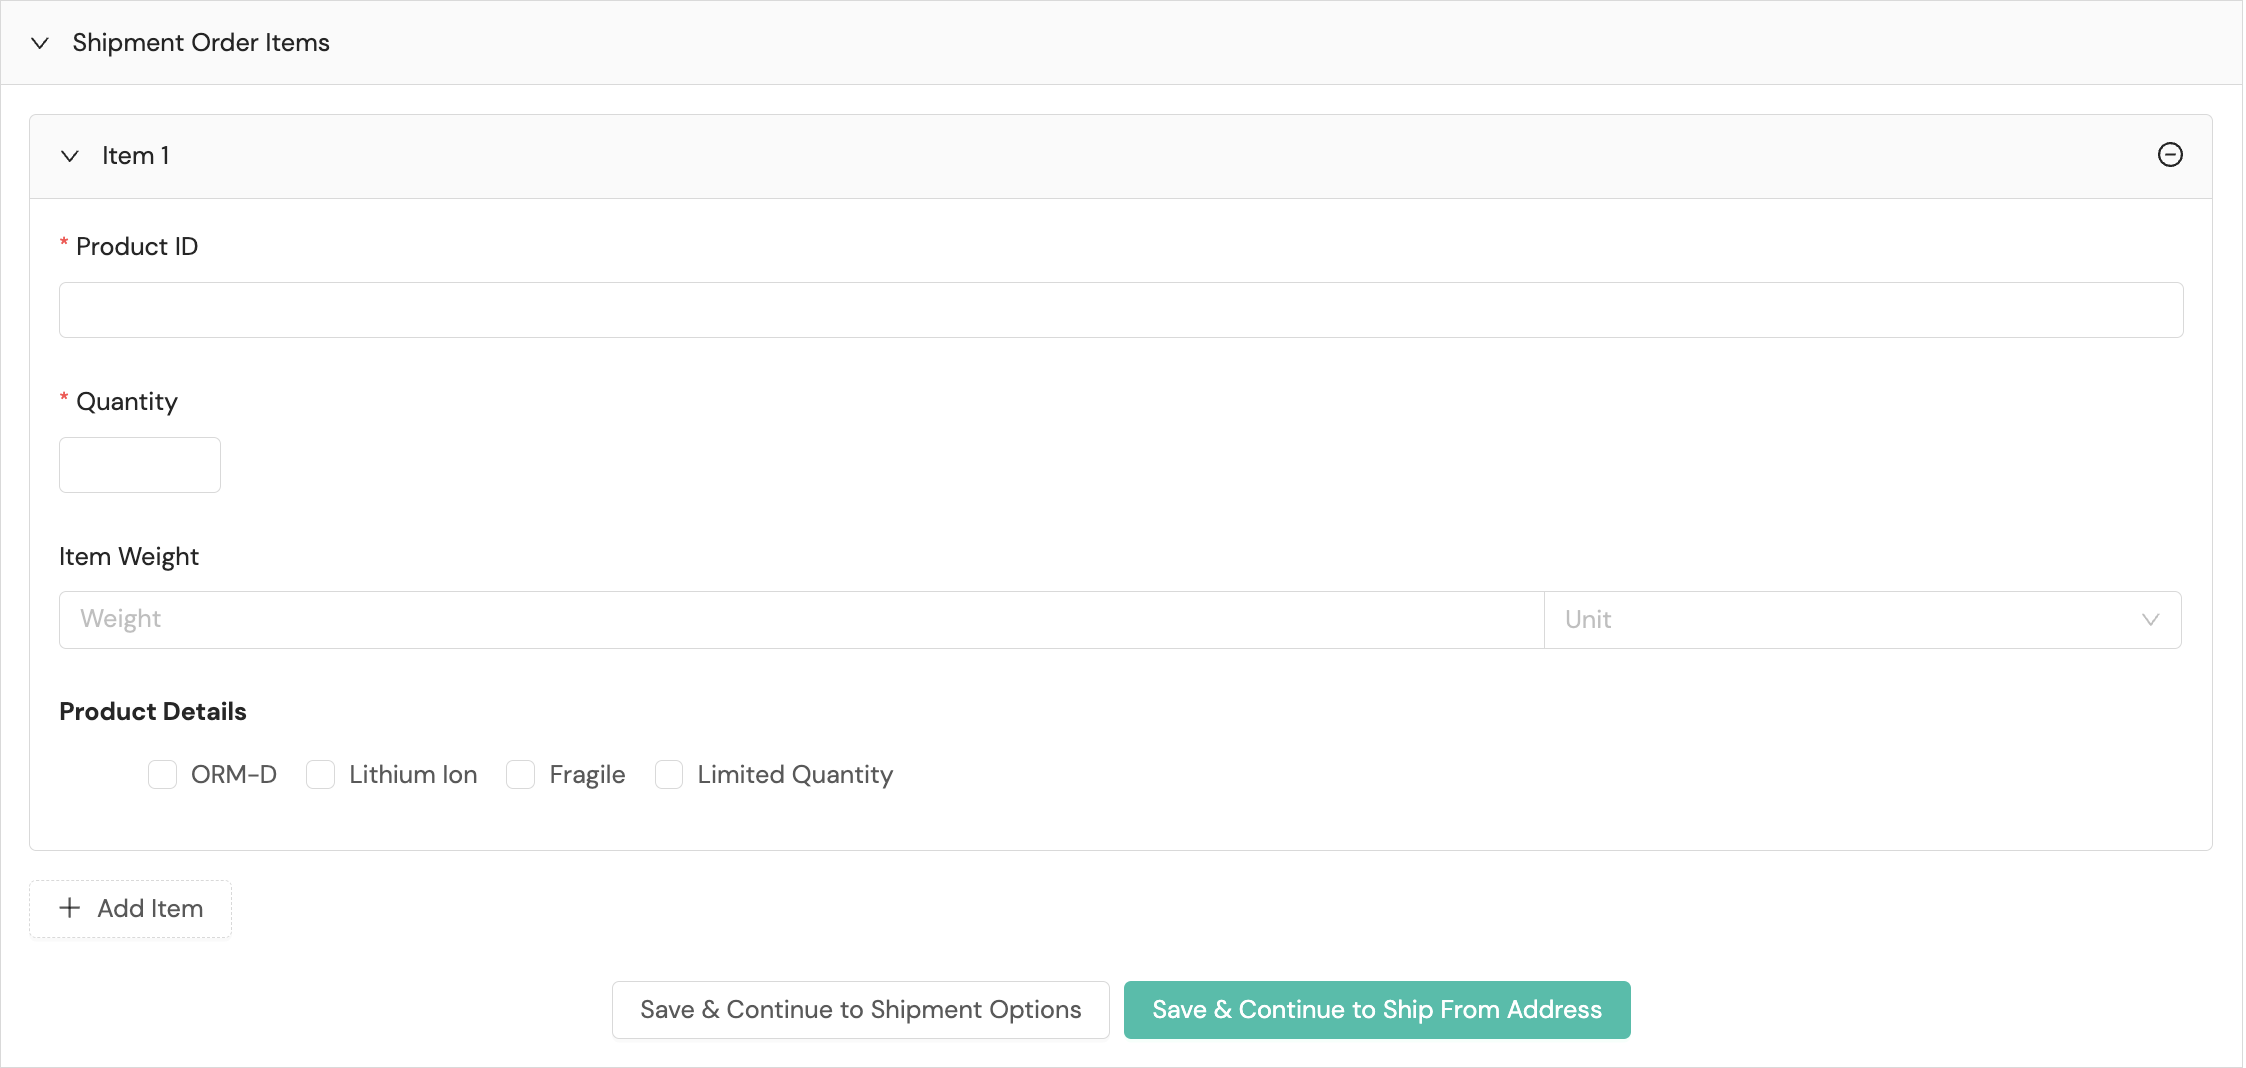
Shipment order items
You'll add each item for your order by selecting + Add Item, as shown in the following screenshot.

Then you will need to provide details including a product identifier, the number of units of the item, item weight, and other special product properties for each item you add.
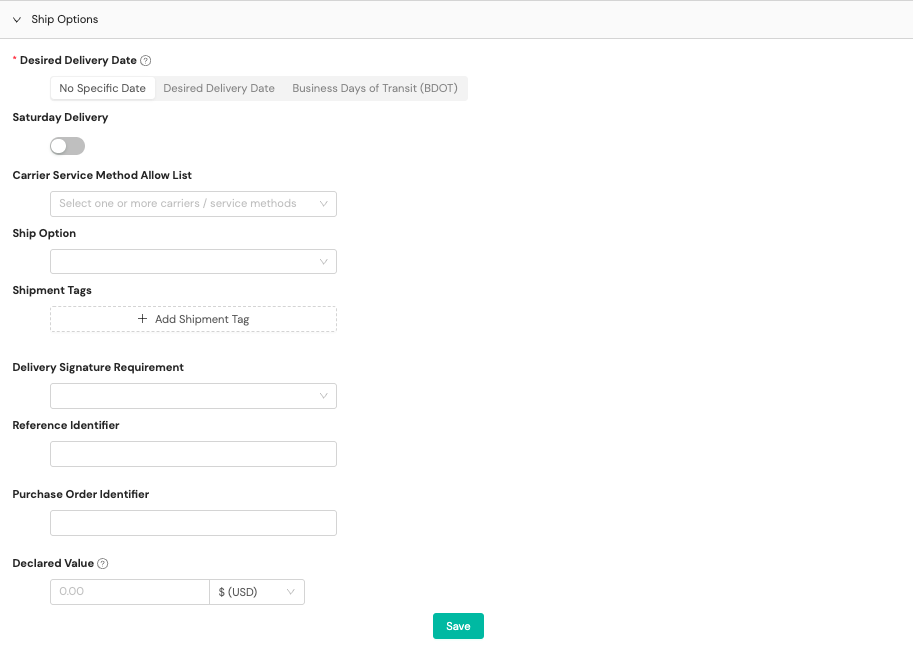
Ship options
Ship options include preferences for shipping, including special delivery properties (e.g, delivery signature), identification tags, and unique identifiers. A desired delivery date option is required; the default value is set to No Specific Date. If you wish to set a desired delivery date or business days of transit value, you'll select the appropriate tab. You also can narrow the carriers and service methods that will be considered during carrier selection by choosing desired carriers and service methods from the carrier service method allow list dropdown menu. The Ship Option dropdown menu offers your organization's configured ship options as well as Shipium standard ship options. The ship option serves as a group of service methods and/or levels that allow you to specify the kind of shipment performance you want. You also can establish other optional settings, including adding shipment tags, requesting a delivery signature requirement, adding a reference identifier or purchase order identifier, and declaring a monetary value for the shipment.
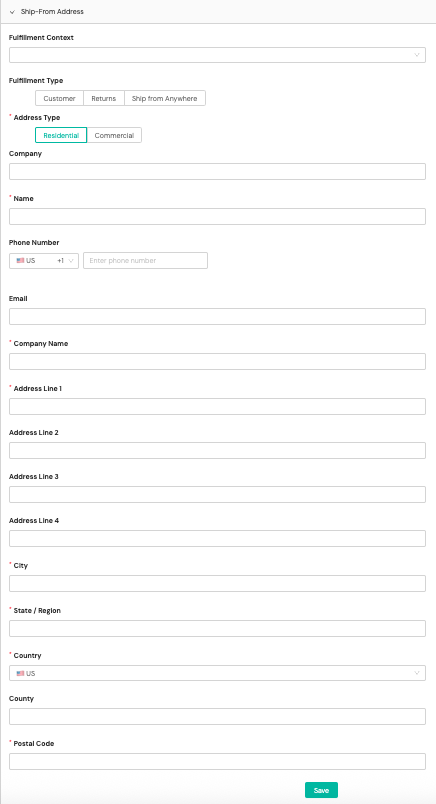
Ship-from address
You can select from the Fulfillment Context dropdown menu to select a fulfillment context configured for your network in the Shipium platform. The fulfillment context name and type (Customer, Returns, Ship from Anywhere) and any associated tenants will be displayed in the Fulfillment Context bar.

You can optionally select the Fulfillment Type for the fulfillment center associated with the shipment (the default value is customer). However, Address Type is required.
If you selected a fulfillment context, the remaining fields will be populated with data for the fulfillment context you chose. Alternatively, you can enter details about the fulfillment center address from which the package is shipping. Information requirements vary by carrier; Shipium recommends completing as many data fields as possible.
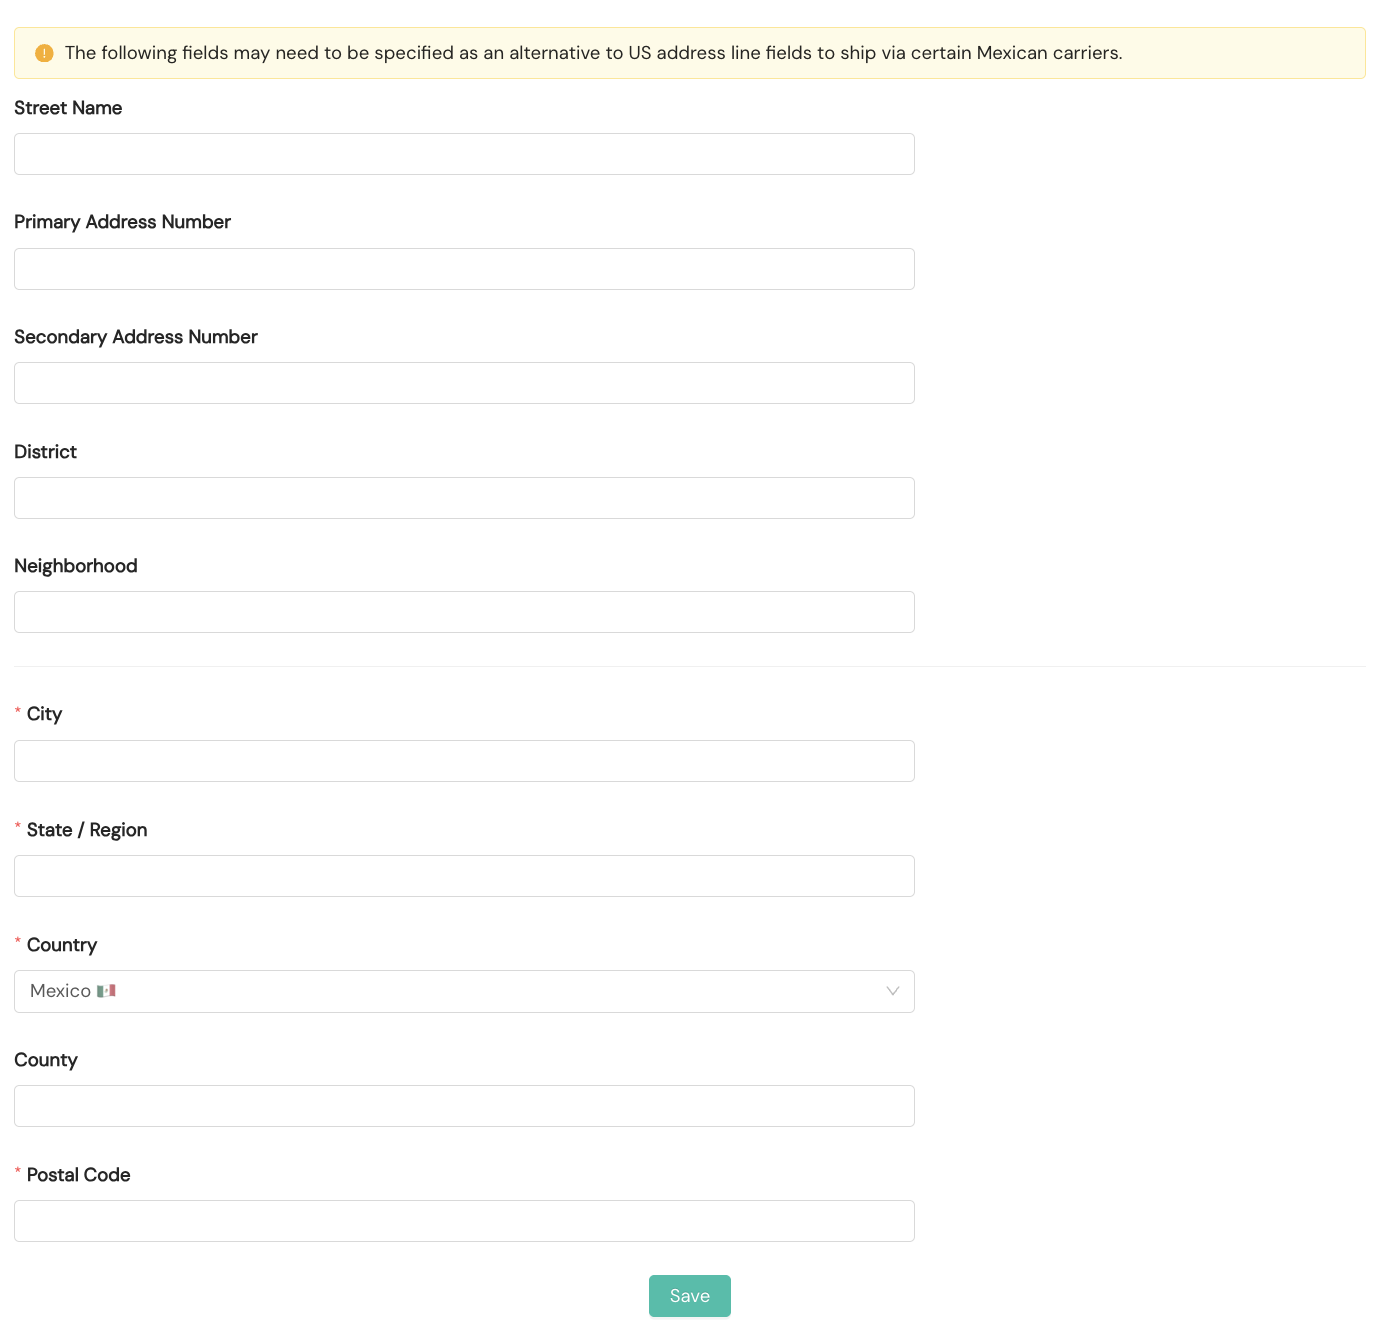
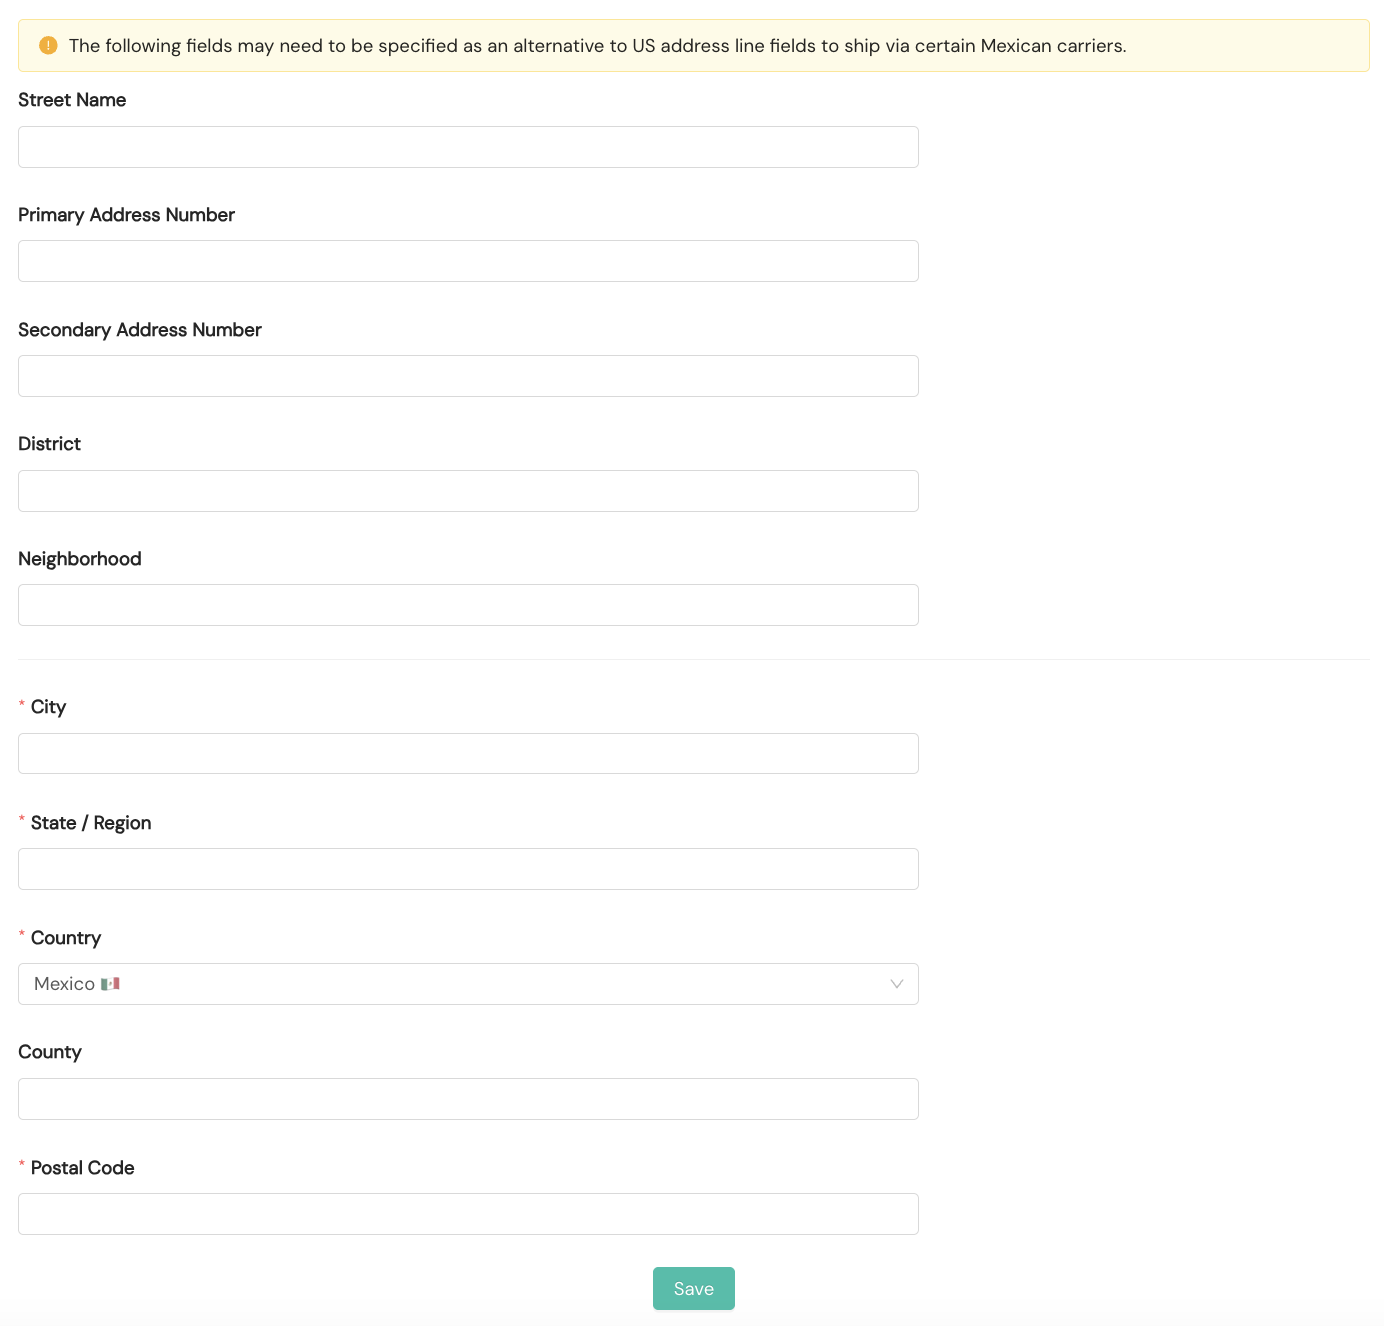
For non-U.S. addresses, different address components may be required. For example, if you select Mexico as the origin country, additional data fields will appear for you to complete.
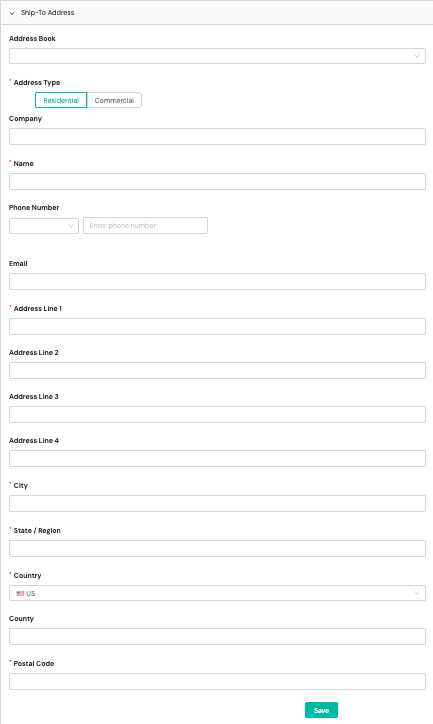
Ship-to address
If you have an address book set up for the Pack App, you can select an entry from the Address Book dropdown menu. Address Type is required.
If you selected an address book entry, the remaining fields will be populated with data for the address book entry you chose. Alternatively, you can enter details about the destination address to which the package is shipping. Information requirements vary by carrier; Shipium recommends completing as many data fields as possible.
For non-U.S. addresses, different address components may be required. For example, if you select Mexico as the origin country, additional data fields will appear for you to complete.
Print the label
Once you have used the Pack App Print Labels tool to print a label, you can immediately print by using the toolbar that is next to the label and clicking the Print button. This will feed the ZPL for the label directly to your printer, and you should get a label.

If for some reason there has been a problem configuring the printer or you don't want to configure it, you can also always download the ZPL and print it directly from the computer's desktop.
Print from the Pack App Print Labels v2 wizard tool
The updated Print Labels tool uses a multi-step wizard layout. You can access it by selecting the Print Labels (v2) tab at the top of the Print Labels page. The original Print Labels tool remains accessible via the Print Labels tab.
The wizard uses a progress indicator at the top to show your current step, and a Shipment Summary sidebar on the right displays a real-time summary of the information you've entered as you move through the steps. Each section in the sidebar includes an edit button so you can jump back to a previous step at any time.
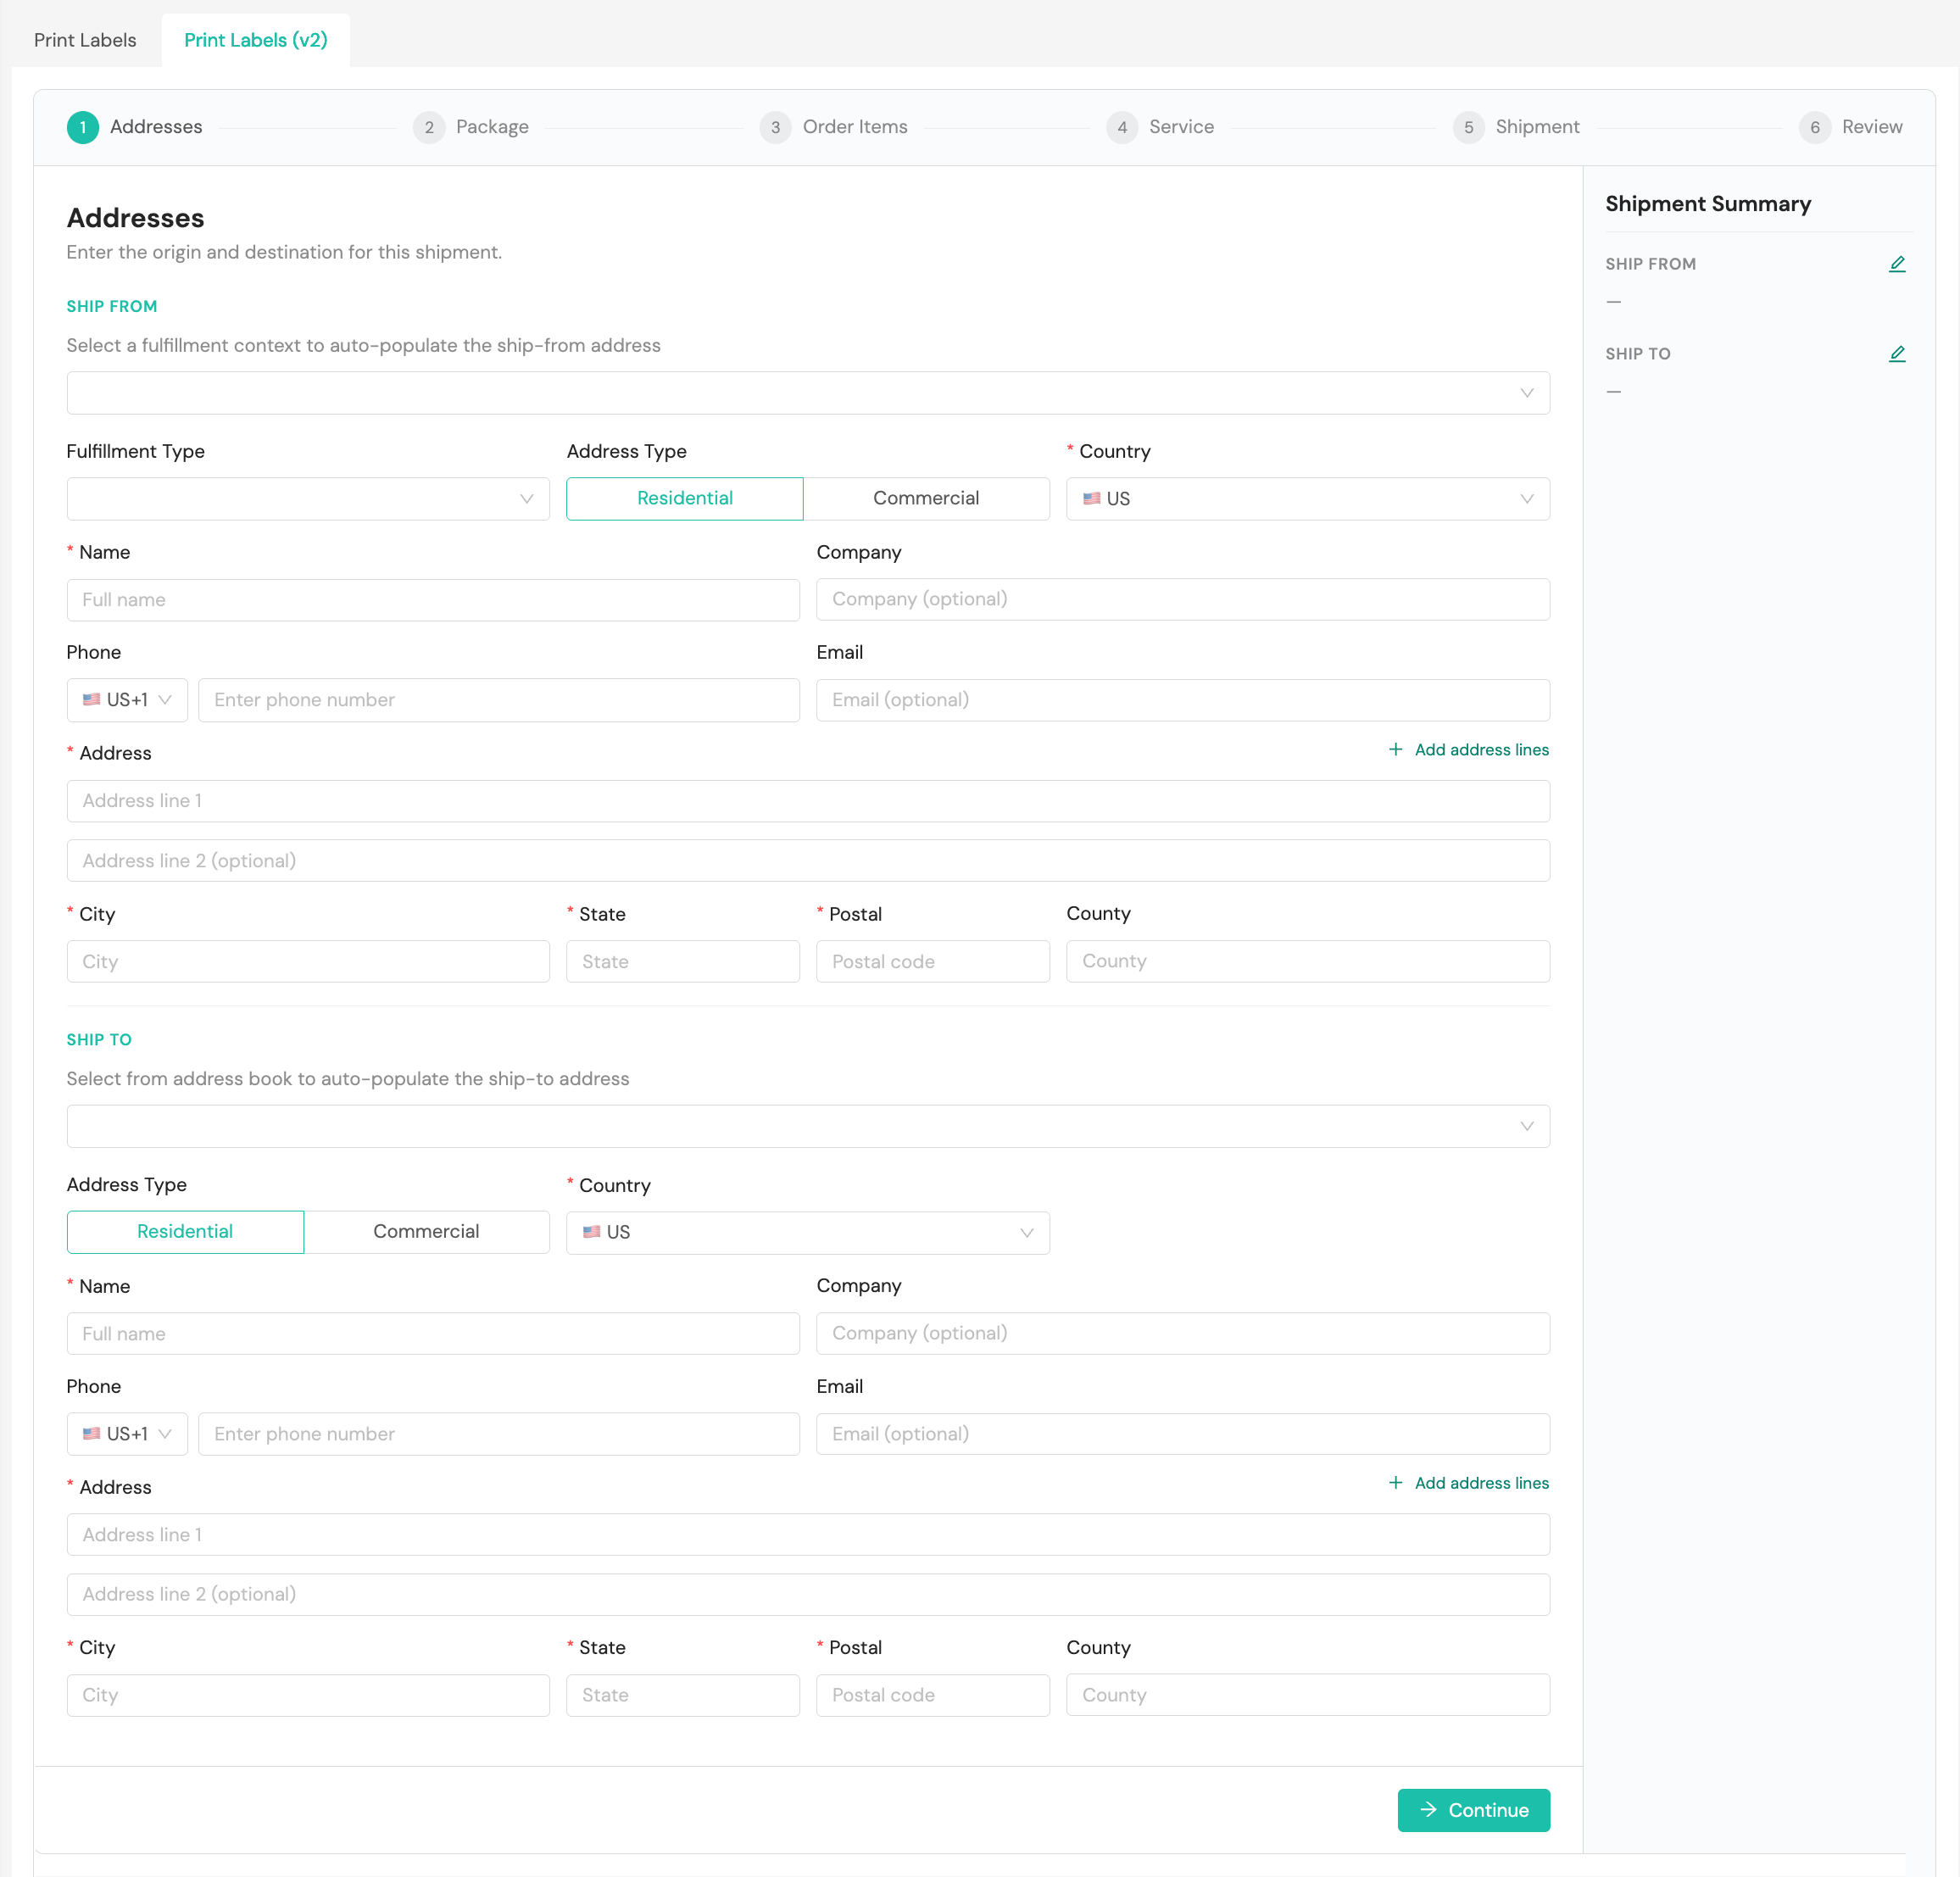
Step 1. Addresses
The Addresses step is where you'll enter the origin and destination for your shipment. It includes two sections: Ship From and Ship To.
Ship From. Select a fulfillment context to auto-populate the ship-from address. If you have fulfillment contexts configured for your network in the Shipium platform, you can select from a list of fulfillment contexts. You also can select the Fulfillment Type and Address Type (required). If you selected a fulfillment context, all Ship From fields will be populated with the verified data for that fulfillment context, including Address Type, which will be set to commercial. Alternatively, you can enter details about the fulfillment center address from which the package is shipping. Information requirements vary by carrier; Shipium recommends completing as many data fields as possible.
Ship To. Select from the address book to auto-populate the ship-to address, or enter destination address details manually. Address Type is required. Information requirements vary by carrier; Shipium recommends completing as many data fields as possible.
For non-U.S. addresses, different address components may be required. If the origin country in the Ship From section and the destination country in the Ship To section do not match, a Customs step will appear later in the workflow to collect customs declaration information required for the international shipment.
Click Continue to proceed to the next step.
Step 2. Package
The Package step is where you'll describe the package size, weight, and material. Enter the following information:
- Packaging Type. Select the packaging material from the dropdown menu.
- Total Weight. Enter the total weight of the package, including packaging, and select the applicable unit (lb or kg).
- Dimensions. Enter the length, width, and height of the package, and select the applicable unit (in or cm).
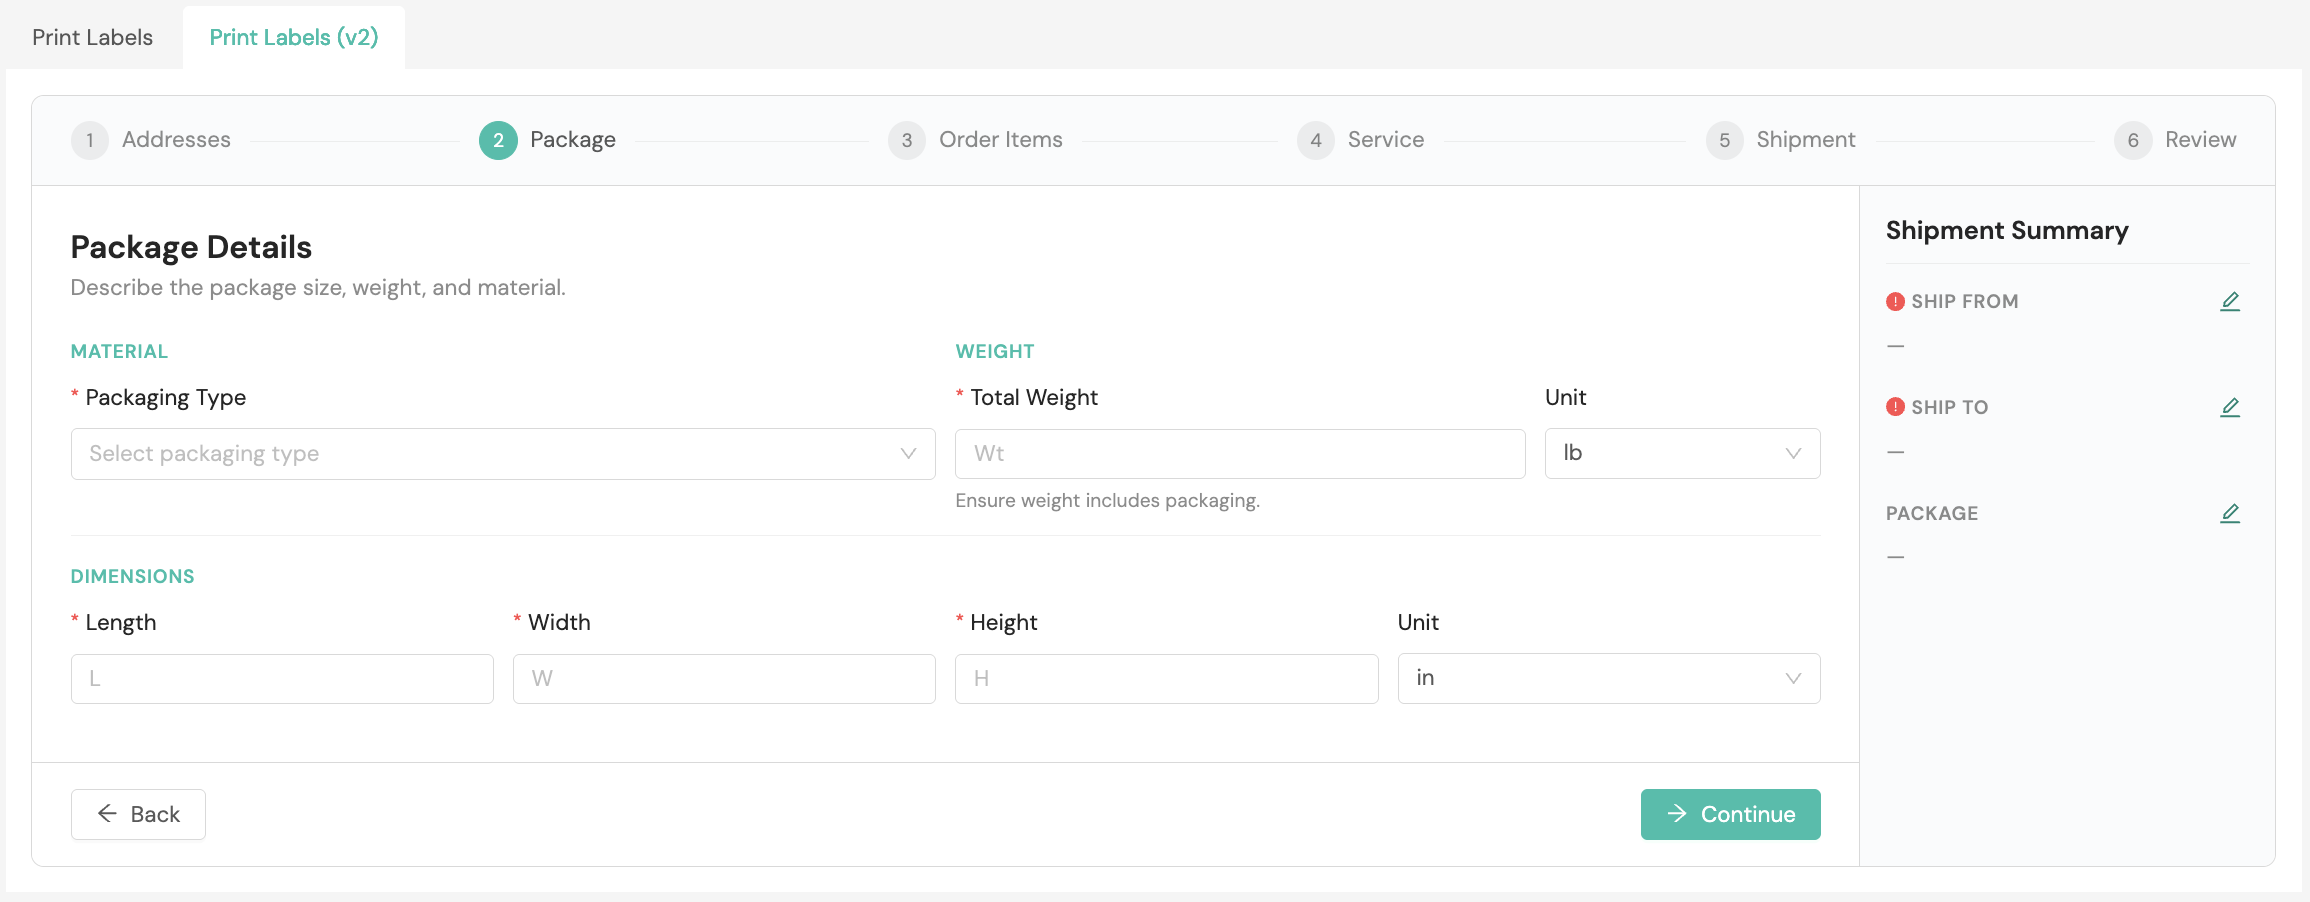
Click Continue to proceed to the next step.
Step 3. Order Items
The Order Items step is optional. You can add product details for the items included in the shipment. Select + Add Item to add an item, then provide the following information for each:
- Product ID. A product identifier for the item
- Quantity. The number of units of the item
- Weight. The weight of the item and the applicable unit (lb or kg)
- Product Details. Check any applicable flags: ORM-D, Lithium Ion, Fragile, or Limited Quantity.
You can add multiple items by selecting + Add Item for each additional product.
If the shipment is international, the product information you enter here will auto-populate in the Customs step later in the workflow.
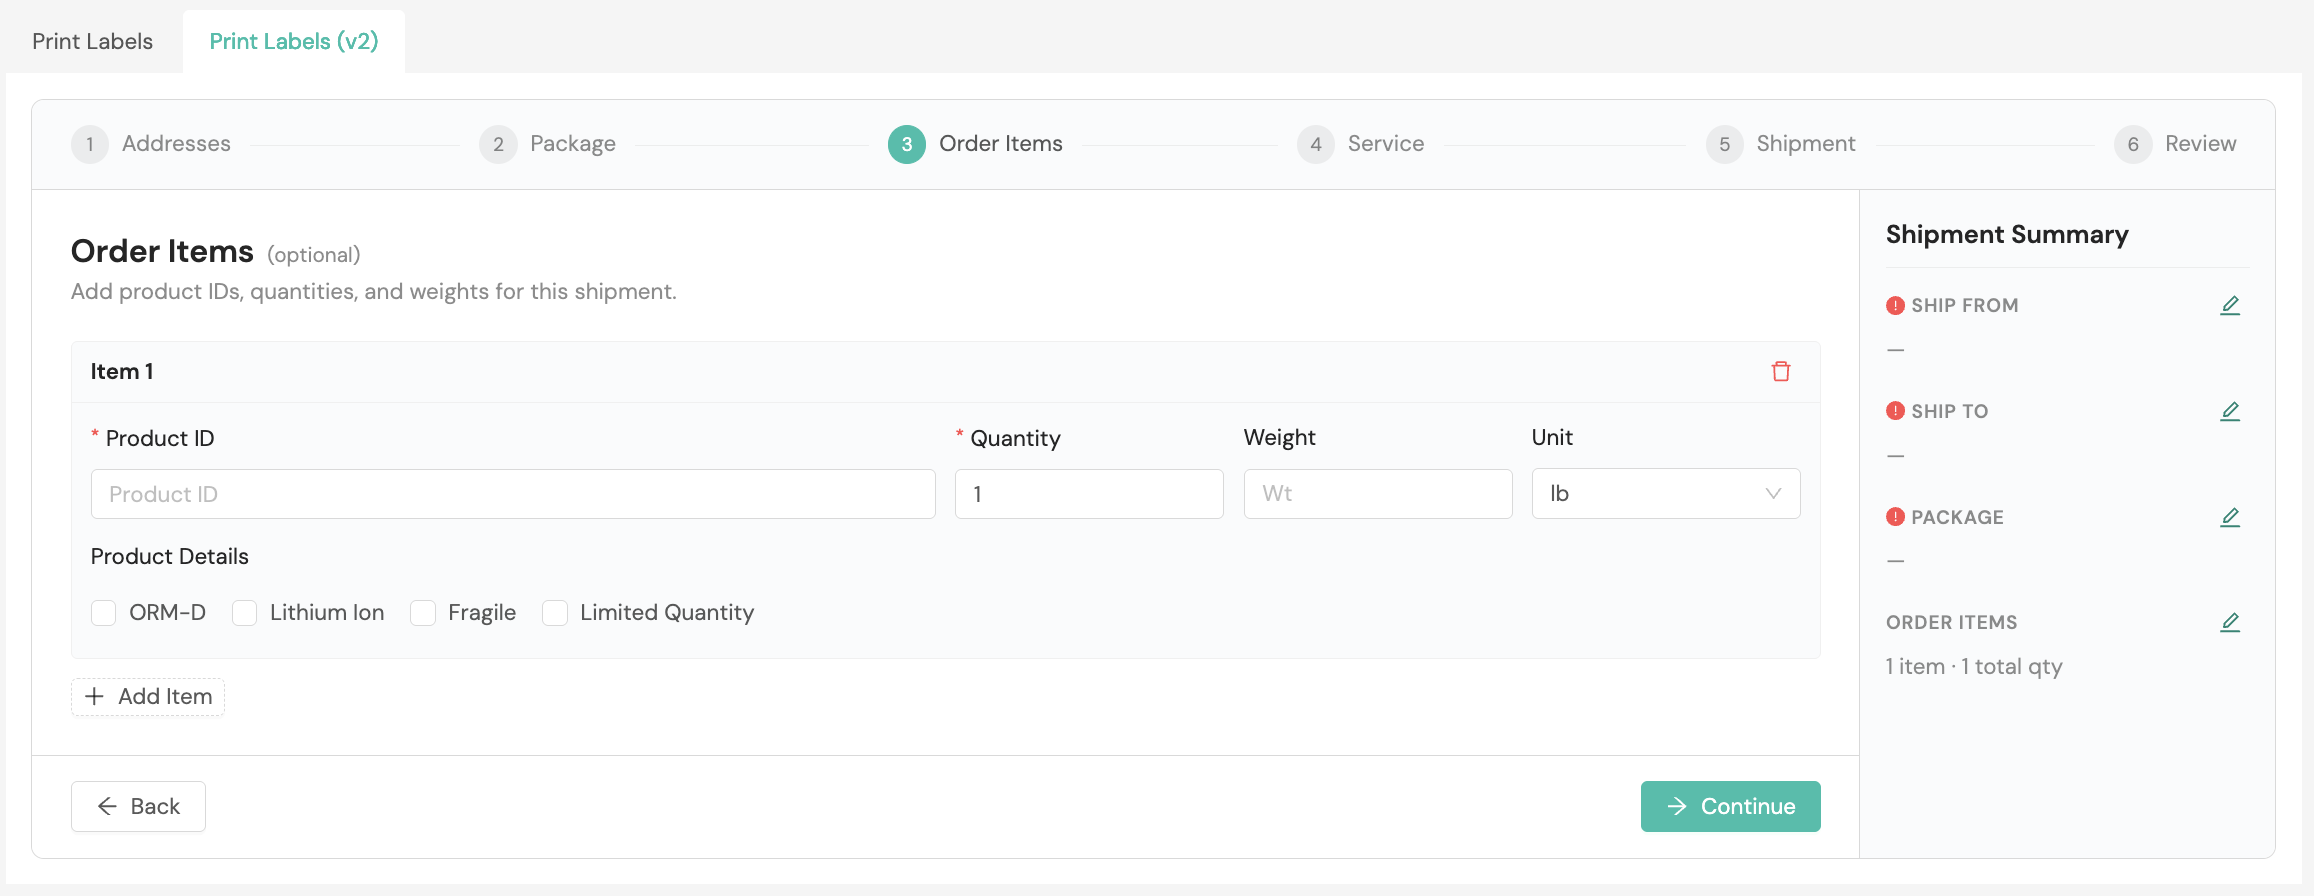
Click Continue to proceed to the next step.
Step 4. Service & Delivery
The Service & Delivery step is optional. It allows you to configure carrier selection preferences and delivery constraints.
Under Carrier Selection, you can specify the following:
- Allowed Carrier Service Methods. Select one or more carrier service methods from the dropdown menu. Only the selected methods will be considered in the carrier selection call. Leave this field empty to allow all available service methods.
- Ship Option. Select from your organization's configured ship options or Shipium standard ship options.
Under Delivery Preferences, you can specify the following:
- Delivery Constraint. Choose from three options using the tab selector: None (default), Delivery Date (to set a desired delivery date), or Days of Transit (to set a business days of transit value).
- Signature. Select a signature requirement from the dropdown menu.
- Saturday Delivery. Toggle on to request Saturday delivery.
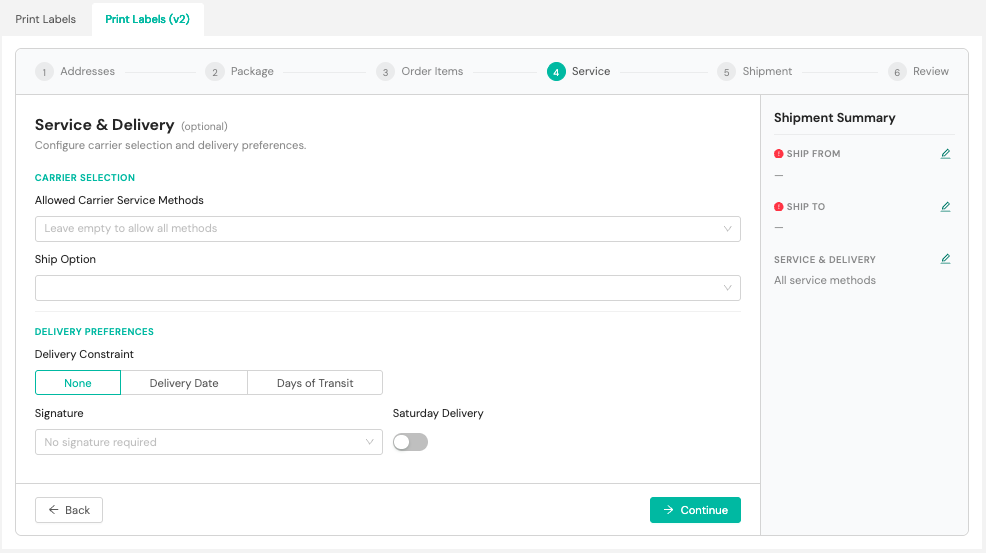
Click Continue to proceed to the next step.
Step 5. Shipment Details
The Shipment Details step is where you'll configure references, declared value, and label settings.
Under References, you can provide optional identifiers:
- Reference Identifier. An internal reference for the shipment
- Purchase Order Identifier. A purchase order number associated with the shipment
- Shipment Tags. Type and press Enter to add one or more tags to the shipment.
Under Declared Value, you can enter a monetary value for the shipment and select the applicable currency.
Under Label Settings, configure the following:
- Content Description. A brief description of the shipment contents, no more than 35 characters; the description is required for return shipments.
- Currency. Select the currency value for the shipment.
- Test Mode. Toggle on to generate a test label instead of a production label.
- Custom Label Entries. Click + Add Entry to add optional custom key-value pairs to the label.
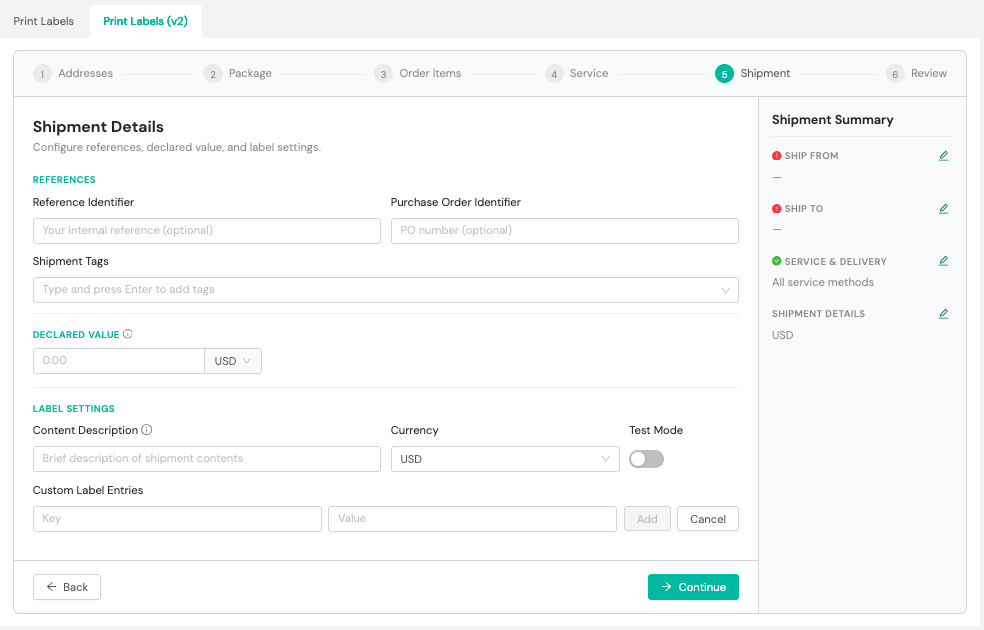
Click Continue to proceed to the next step.
International shipmentsIf the origin and destination countries in the Addresses step do not match, the workflow will include an additional Customs step between Shipment Details and Review. The Customs step is where you'll complete a customs declaration for the shipment, including a customs description, reason for export, incoterms (international trade terms that define responsibilities for shipping costs and risks), and line items with HS (Harmonized System) codes, country of origin, quantities, unit values, and weights. A running total is displayed as you add items. Product information entered in the Order Items step will auto-populate in the Customs step.
A validation error will appear if required customs information is missing before you can generate a label. Contact your Shipium team member for more information about international shipping.
Step 6: Review & Ship
The Review & Ship step displays a read-only summary of all the information you've entered, organized by section: Addresses, Order Items, Package, Service & Delivery, and Shipment Details. Each section includes an Edit button if you need to go back and make changes.
Sections marked with a validation indicator require attention before you can generate a label. Review any flagged sections and complete any missing required information before proceeding.
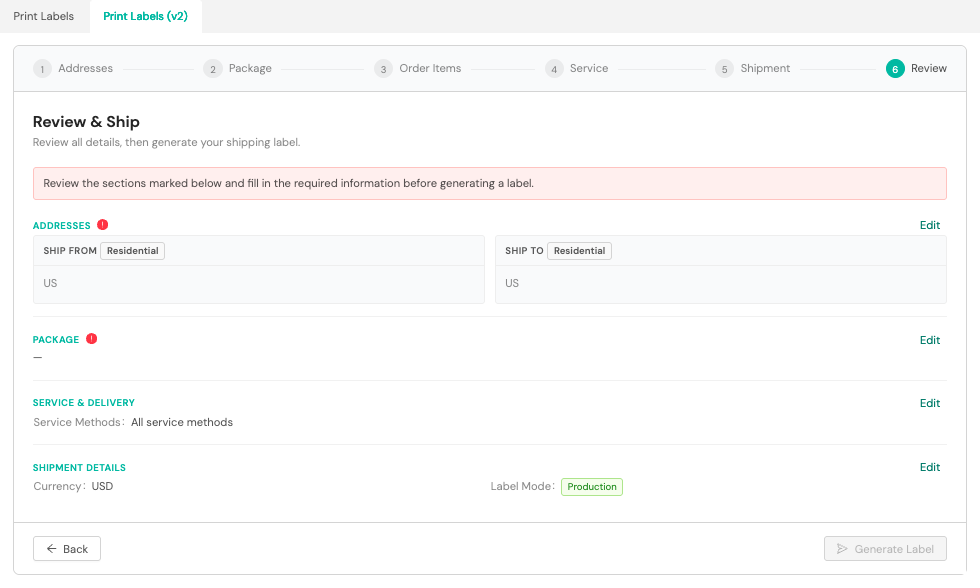
Generate the label
Once all required information is complete, click Generate Label to create the shipping label. A Label Generated confirmation will appear when the label has been successfully created. If supplementary documents are associated with the shipment (such as international customs forms), an additional success callout will appear confirming those documents have printed as well.
If no printer is configured, the app will fall back to a browser print window.
Manage the Pack App address book
Your organization can create an address book within the Pack App to expedite order processing. You can upload your address book information via CSV file, or you can manually input the data for each entry within the Pack App in the console. Your Implementation team member can help you with bulk uploading of addresses.
You can make changes to the address book at any time, depending on your user role, by selecting Address Book from the lefthand navigation menu. Once you've established your address book, you can select a default address as your primary shipping destination.
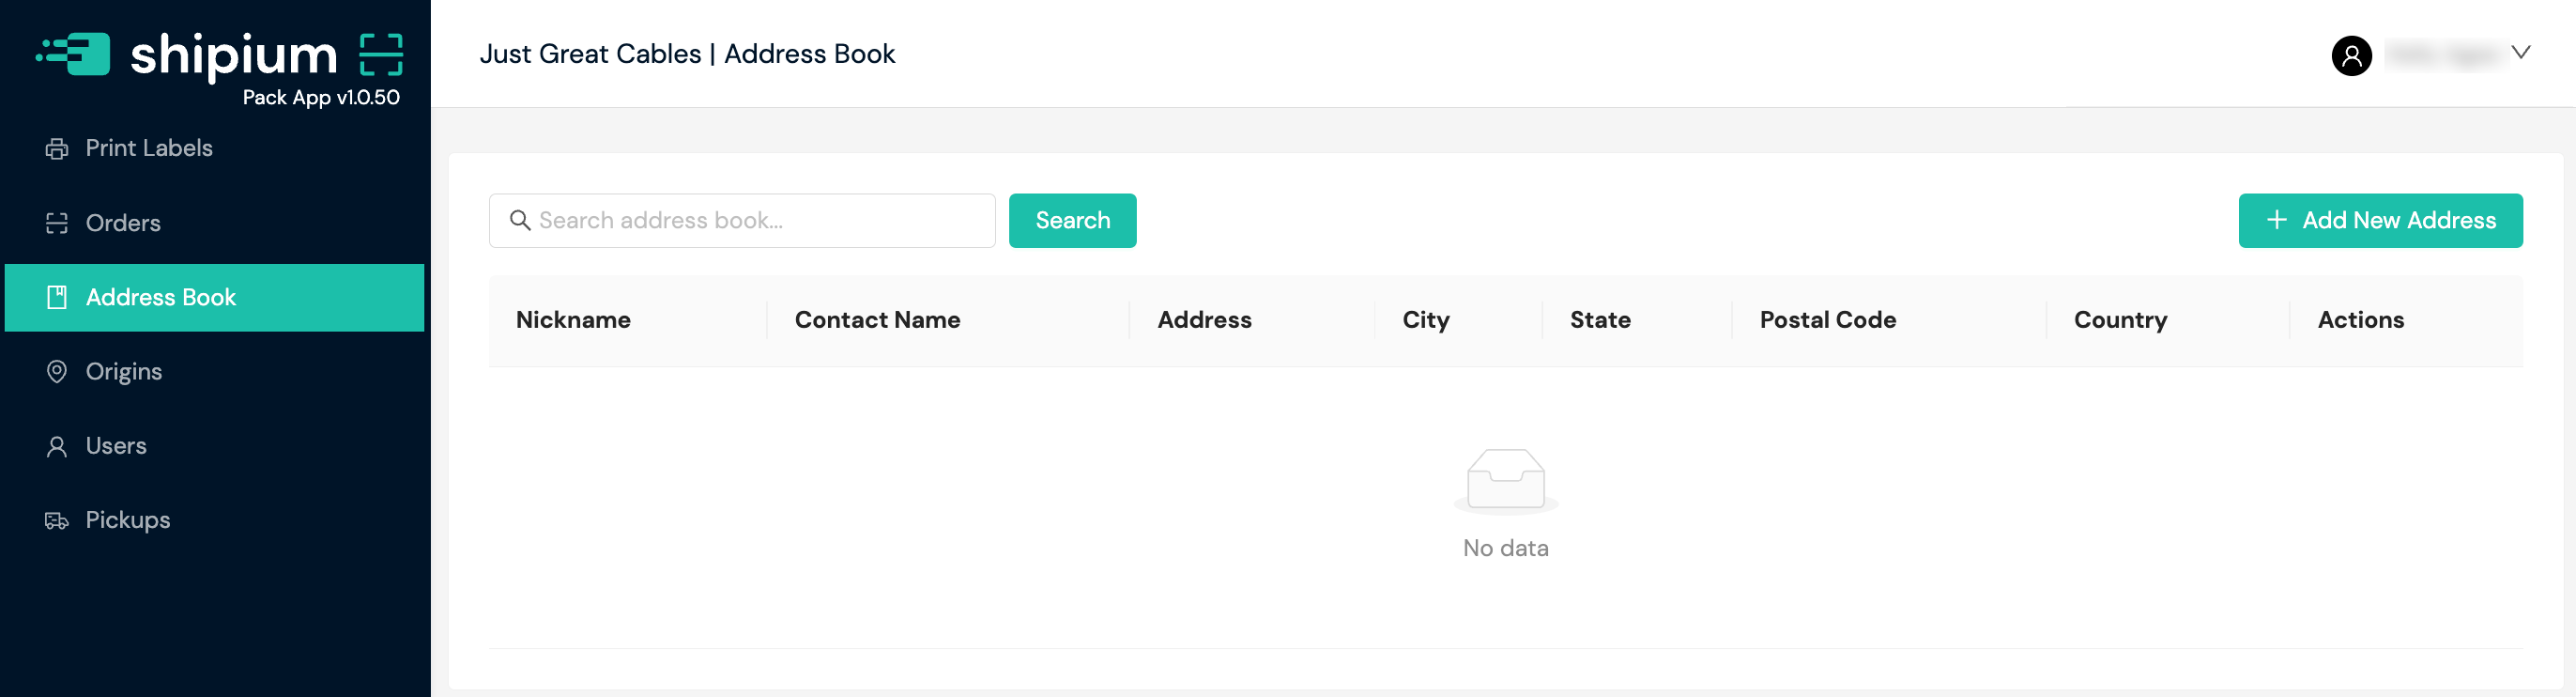
After selecting + Add New Address, a modal will appear for you to provide the following information.
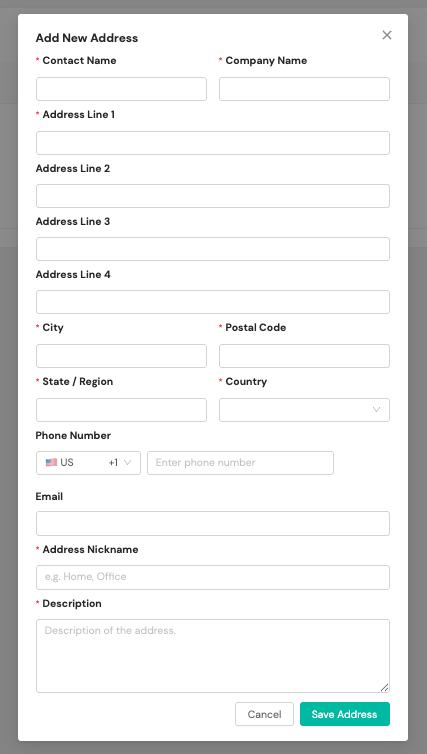
- Contact name. The name of the contact associated with the address entry
- Company name. The name of the company associated with the address entry
- Address line 1. The first address line
- Address line 2. The second address line
- Address line 3. The third address line
- Address line 4. The fourth address line
- City. The city of the address entry
- State/Region. The state/region of the address entry
- Postal code. The country-appropriate postal code of the address entry
- Country. The country of the address entry
- Phone number. The phone number, including country code, of the contact associated with the address entry
- Email. The email address of the contact associated with the address entry
- Address nickname (optional). A human readable name your organization will use to refer to the address book entry (e.g., Warehouse A)
- Description. A description for the address entry
- Address line components. For non-U.S. addresses, different address components may be required
Set up webhooks for event notifications
You can set up optional webhooks to be notified automatically of order and shipment event updates. The Webhooks for Pack App Order Lifecycle documentation includes guidance for setting up a webhook to be notified of order lifecycle events. The Webhooks for Carrier Selection & Label Updates document provides instructions for enabling a webhook for notifications related to carrier selection and label generation events.
Resources
Your Shipium team member is available to help along the way. However, you might find these resources helpful:
Updated about 1 month ago