
Configure SSO with Google Workspace
Set up single sign-on (SSO) logins with Google Workspace as your identity provider.
About SSO with Google Workspace
Shipium supports single sign-on (SSO) using Google Workspace as your SAML identity provider. This document provides guidance for configuring SSO with Google Workspace in the Shipium system. For more general information about SSO requirements and Shipium, see SSO for Your Shipium Account.
Configure SSO for your Shipium account using Google Workspace as the identity provider
Your Shipium team member is available to assist as you set up Google Workspace as your SAML identity provider, but the process is outlined in the following steps.
Step 1. Obtain values from Shipium
To start the process, Shipium's IT team will provide your team with two values that you will enter into the Google Admin Console during setup:
- ACS URL. The Assertion Consumer Service URL where Google sends the SAML response. This value will look similar to
https://sso.shipium.com/login/callback?connection=your-organization. - Entity ID. The unique identifier for the Shipium service provider. This value will look similar to
urn:sso:shipium-prod:your-organization.
Values needed in a later stepKeep these values accessible, as you will need them in Step 4.
Step 2. Access the Google Admin Console and navigate to web and mobile apps
Sign in to the Google Admin Console with a super administrator account. From the left-side navigation menu, navigate to Apps and then select Web and mobile apps.
Super administrator account required for setupOnly Google Workspace super administrators can create and manage SAML applications. If you aren't using a super administrator account, you won't be able to complete these steps.
Step 3. Create the Shipium SAML application
You'll select Add app and then Add custom SAML app from the dropdown menu.
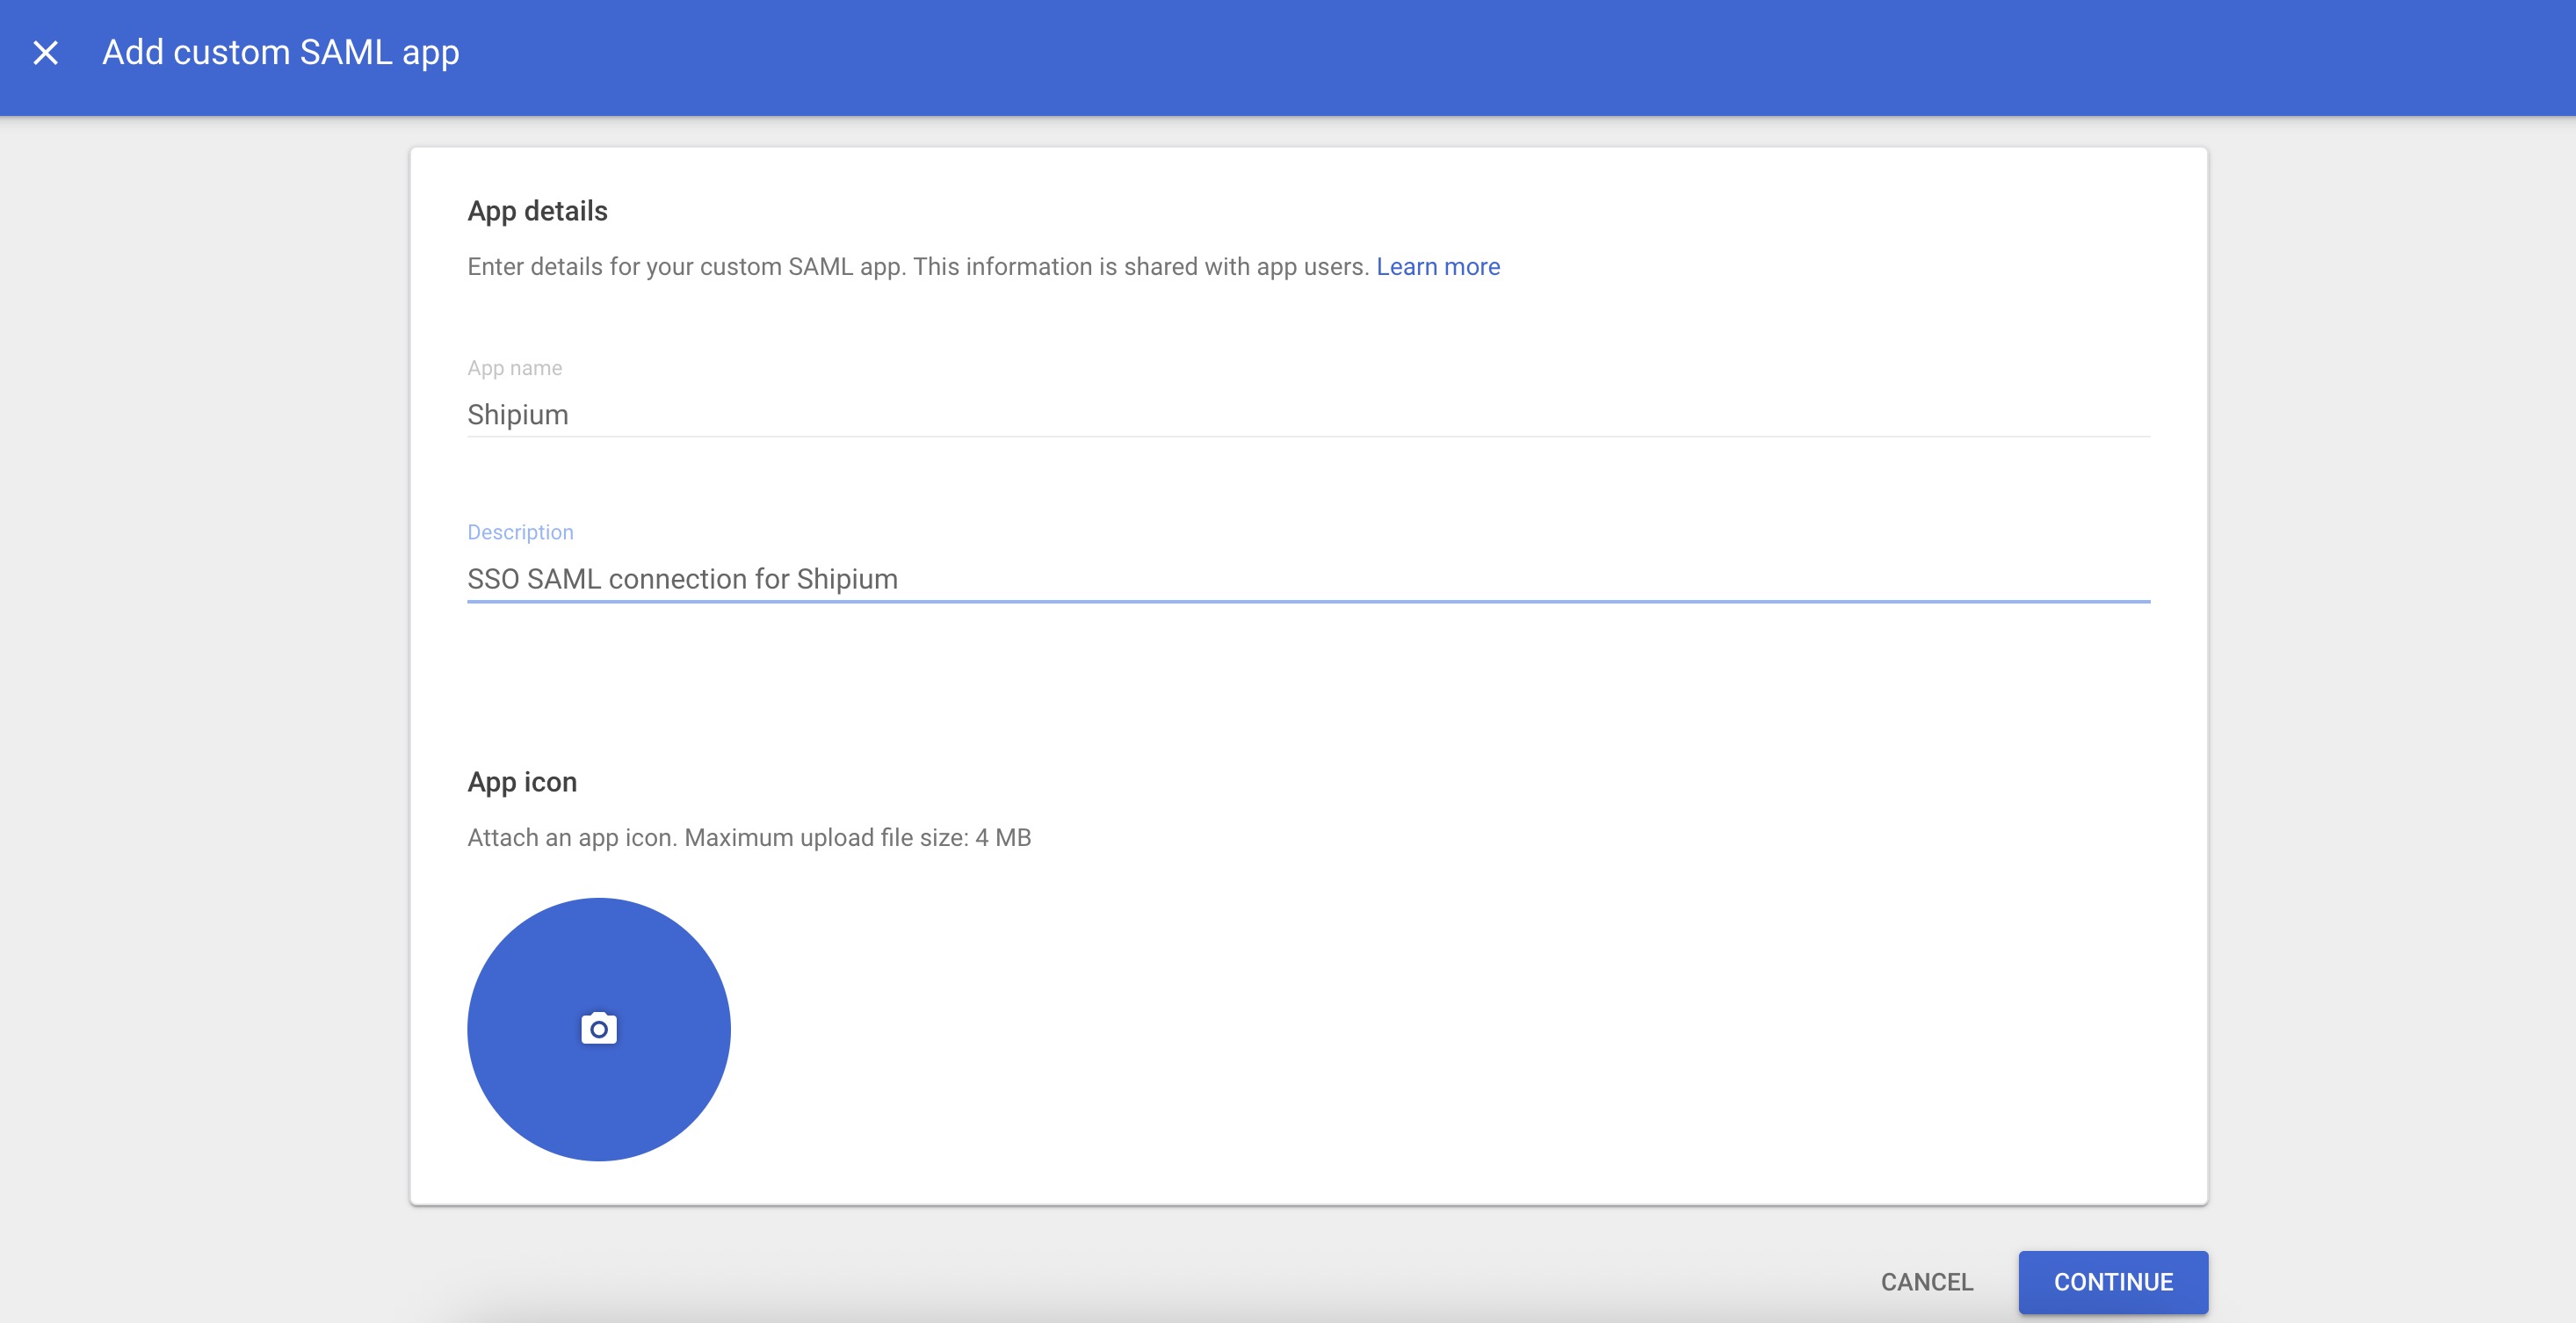
On the App details page, enter the following information:
- App name. Enter Shipium.
- Description. Optional. Enter a description such as SSO SAML connection for Shipium.
- App icon. Optional. Upload an icon for the application.
Select Continue.
Step 4. Download Google identity provider details
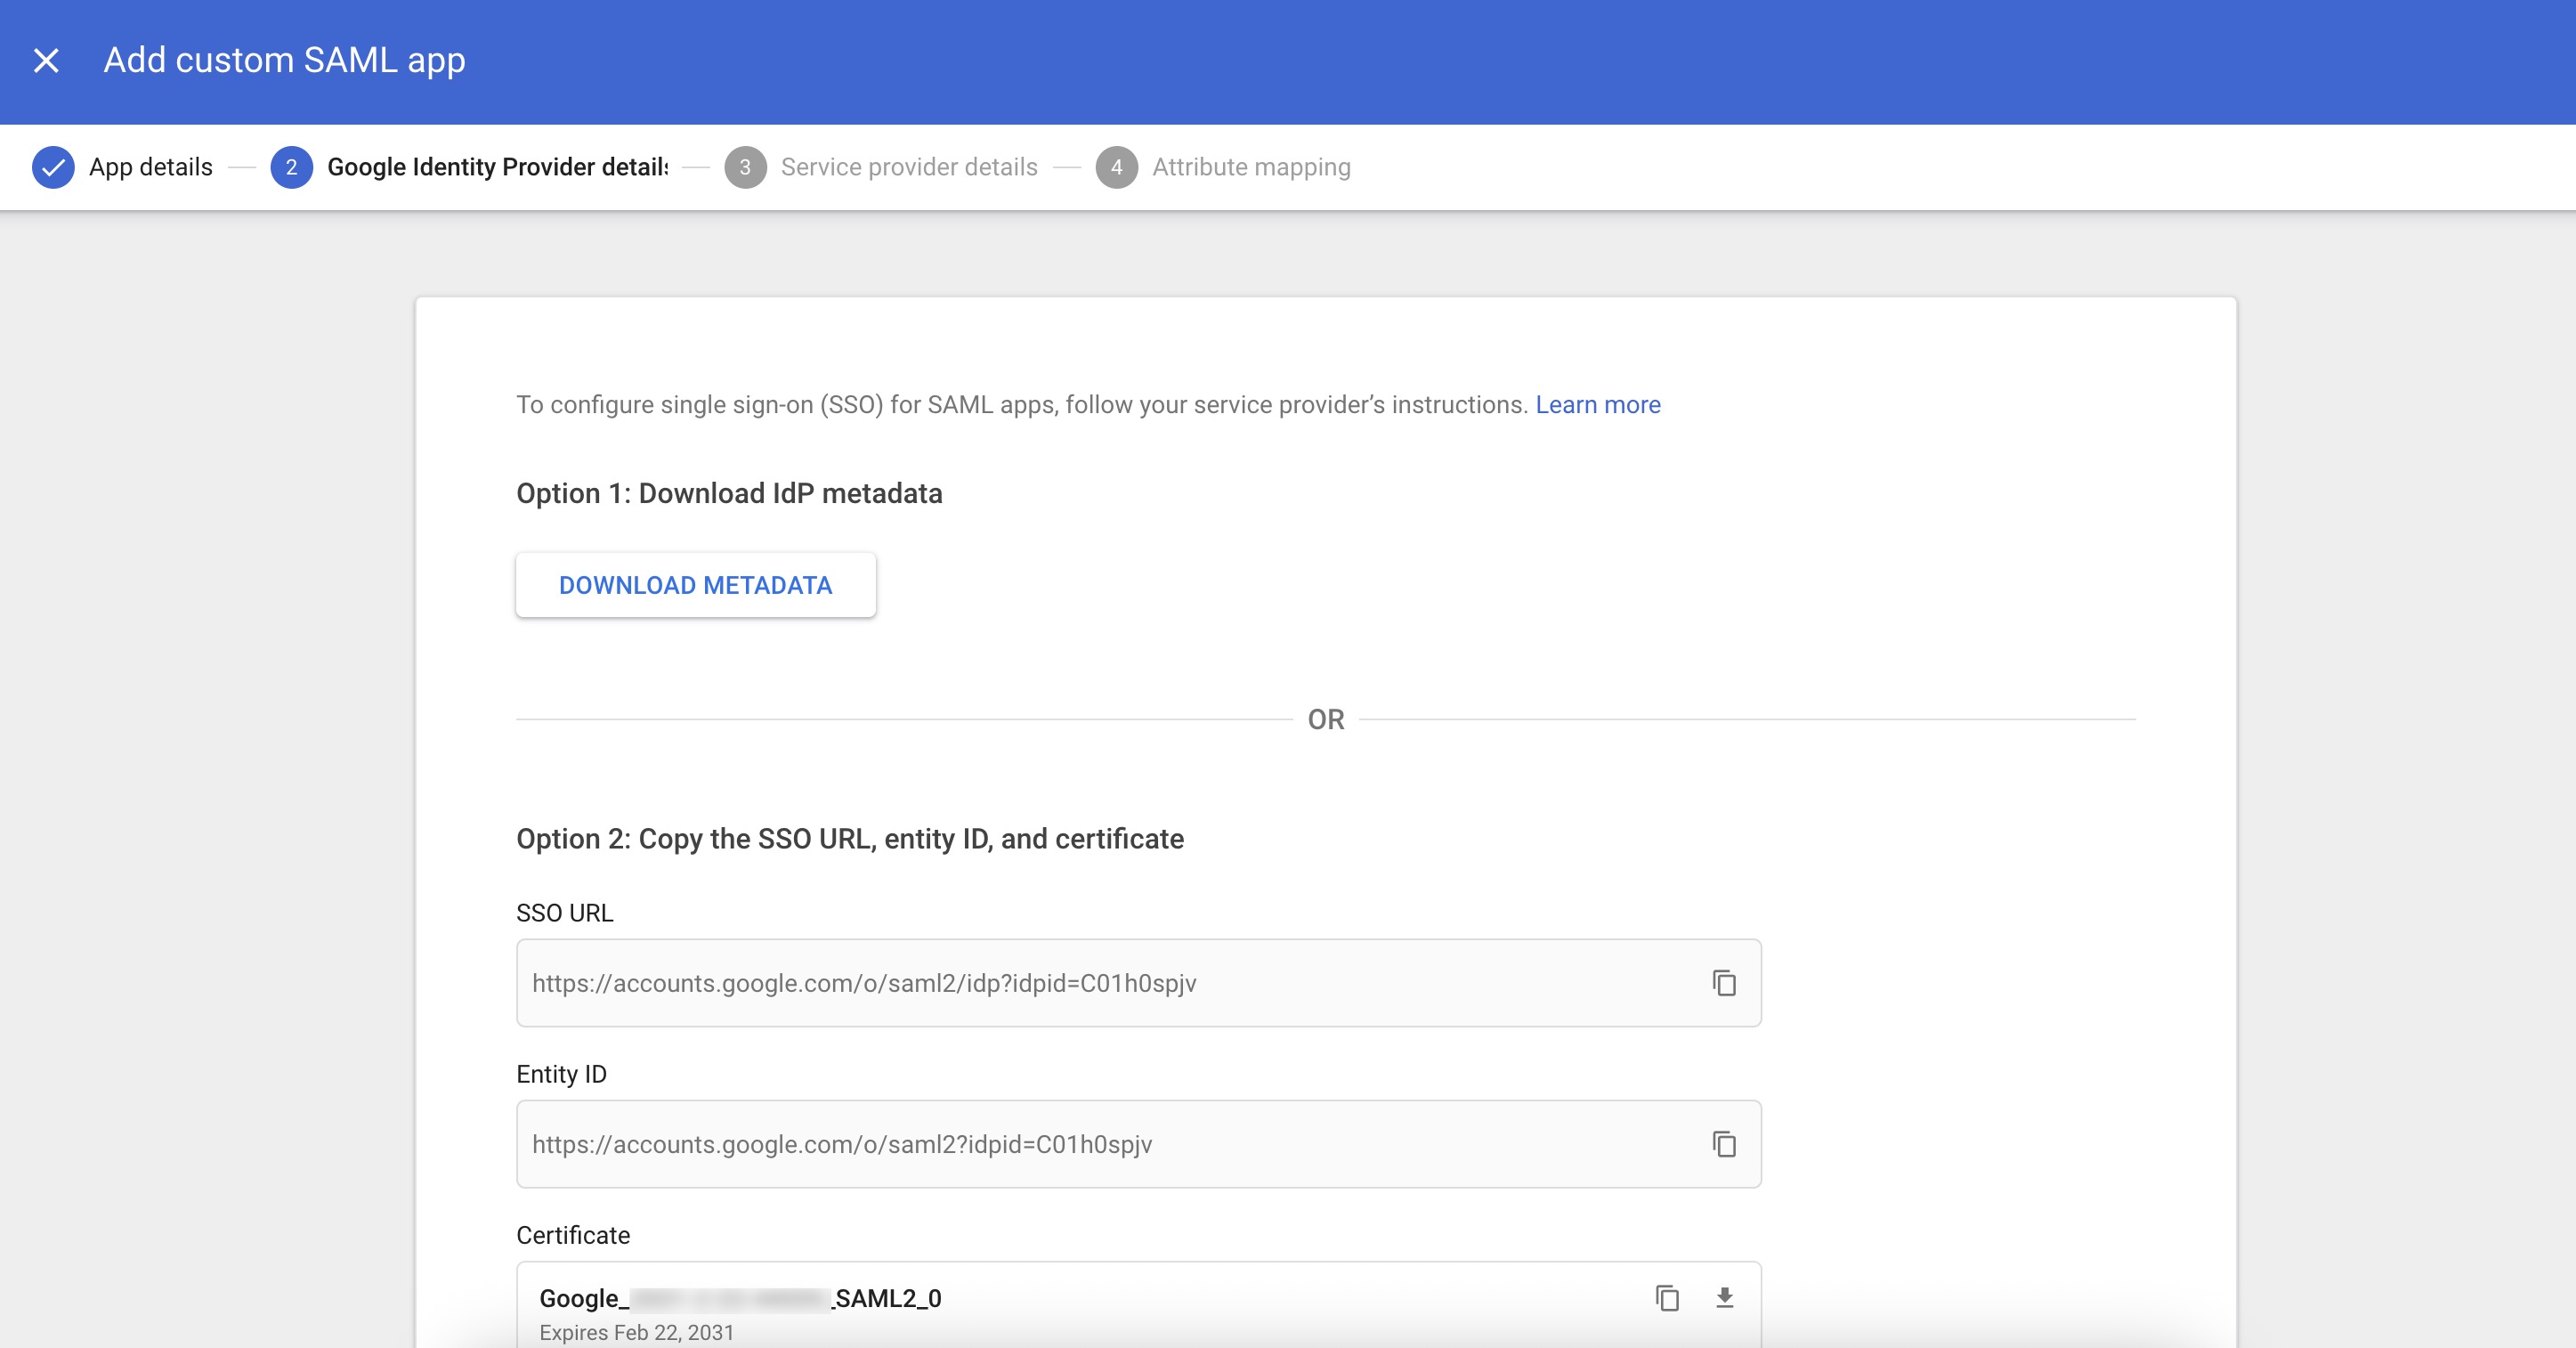
After creating the app, Google will display the Google Identity Provider details page. This page contains the information Shipium needs to complete the SSO configuration on our end.
You can provide this information to your Shipium team member using either of the following options:
- Option 1. Select Download Metadata to download the complete IdP metadata as an XML file. Provide this file to your Shipium team member.
- Option 2. Copy the SSO URL and Entity ID and download the Certificate, and provide these three values to your Shipium team member individually.
If you scroll down, you can also view the certificate contents and the SHA-256 fingerprint.
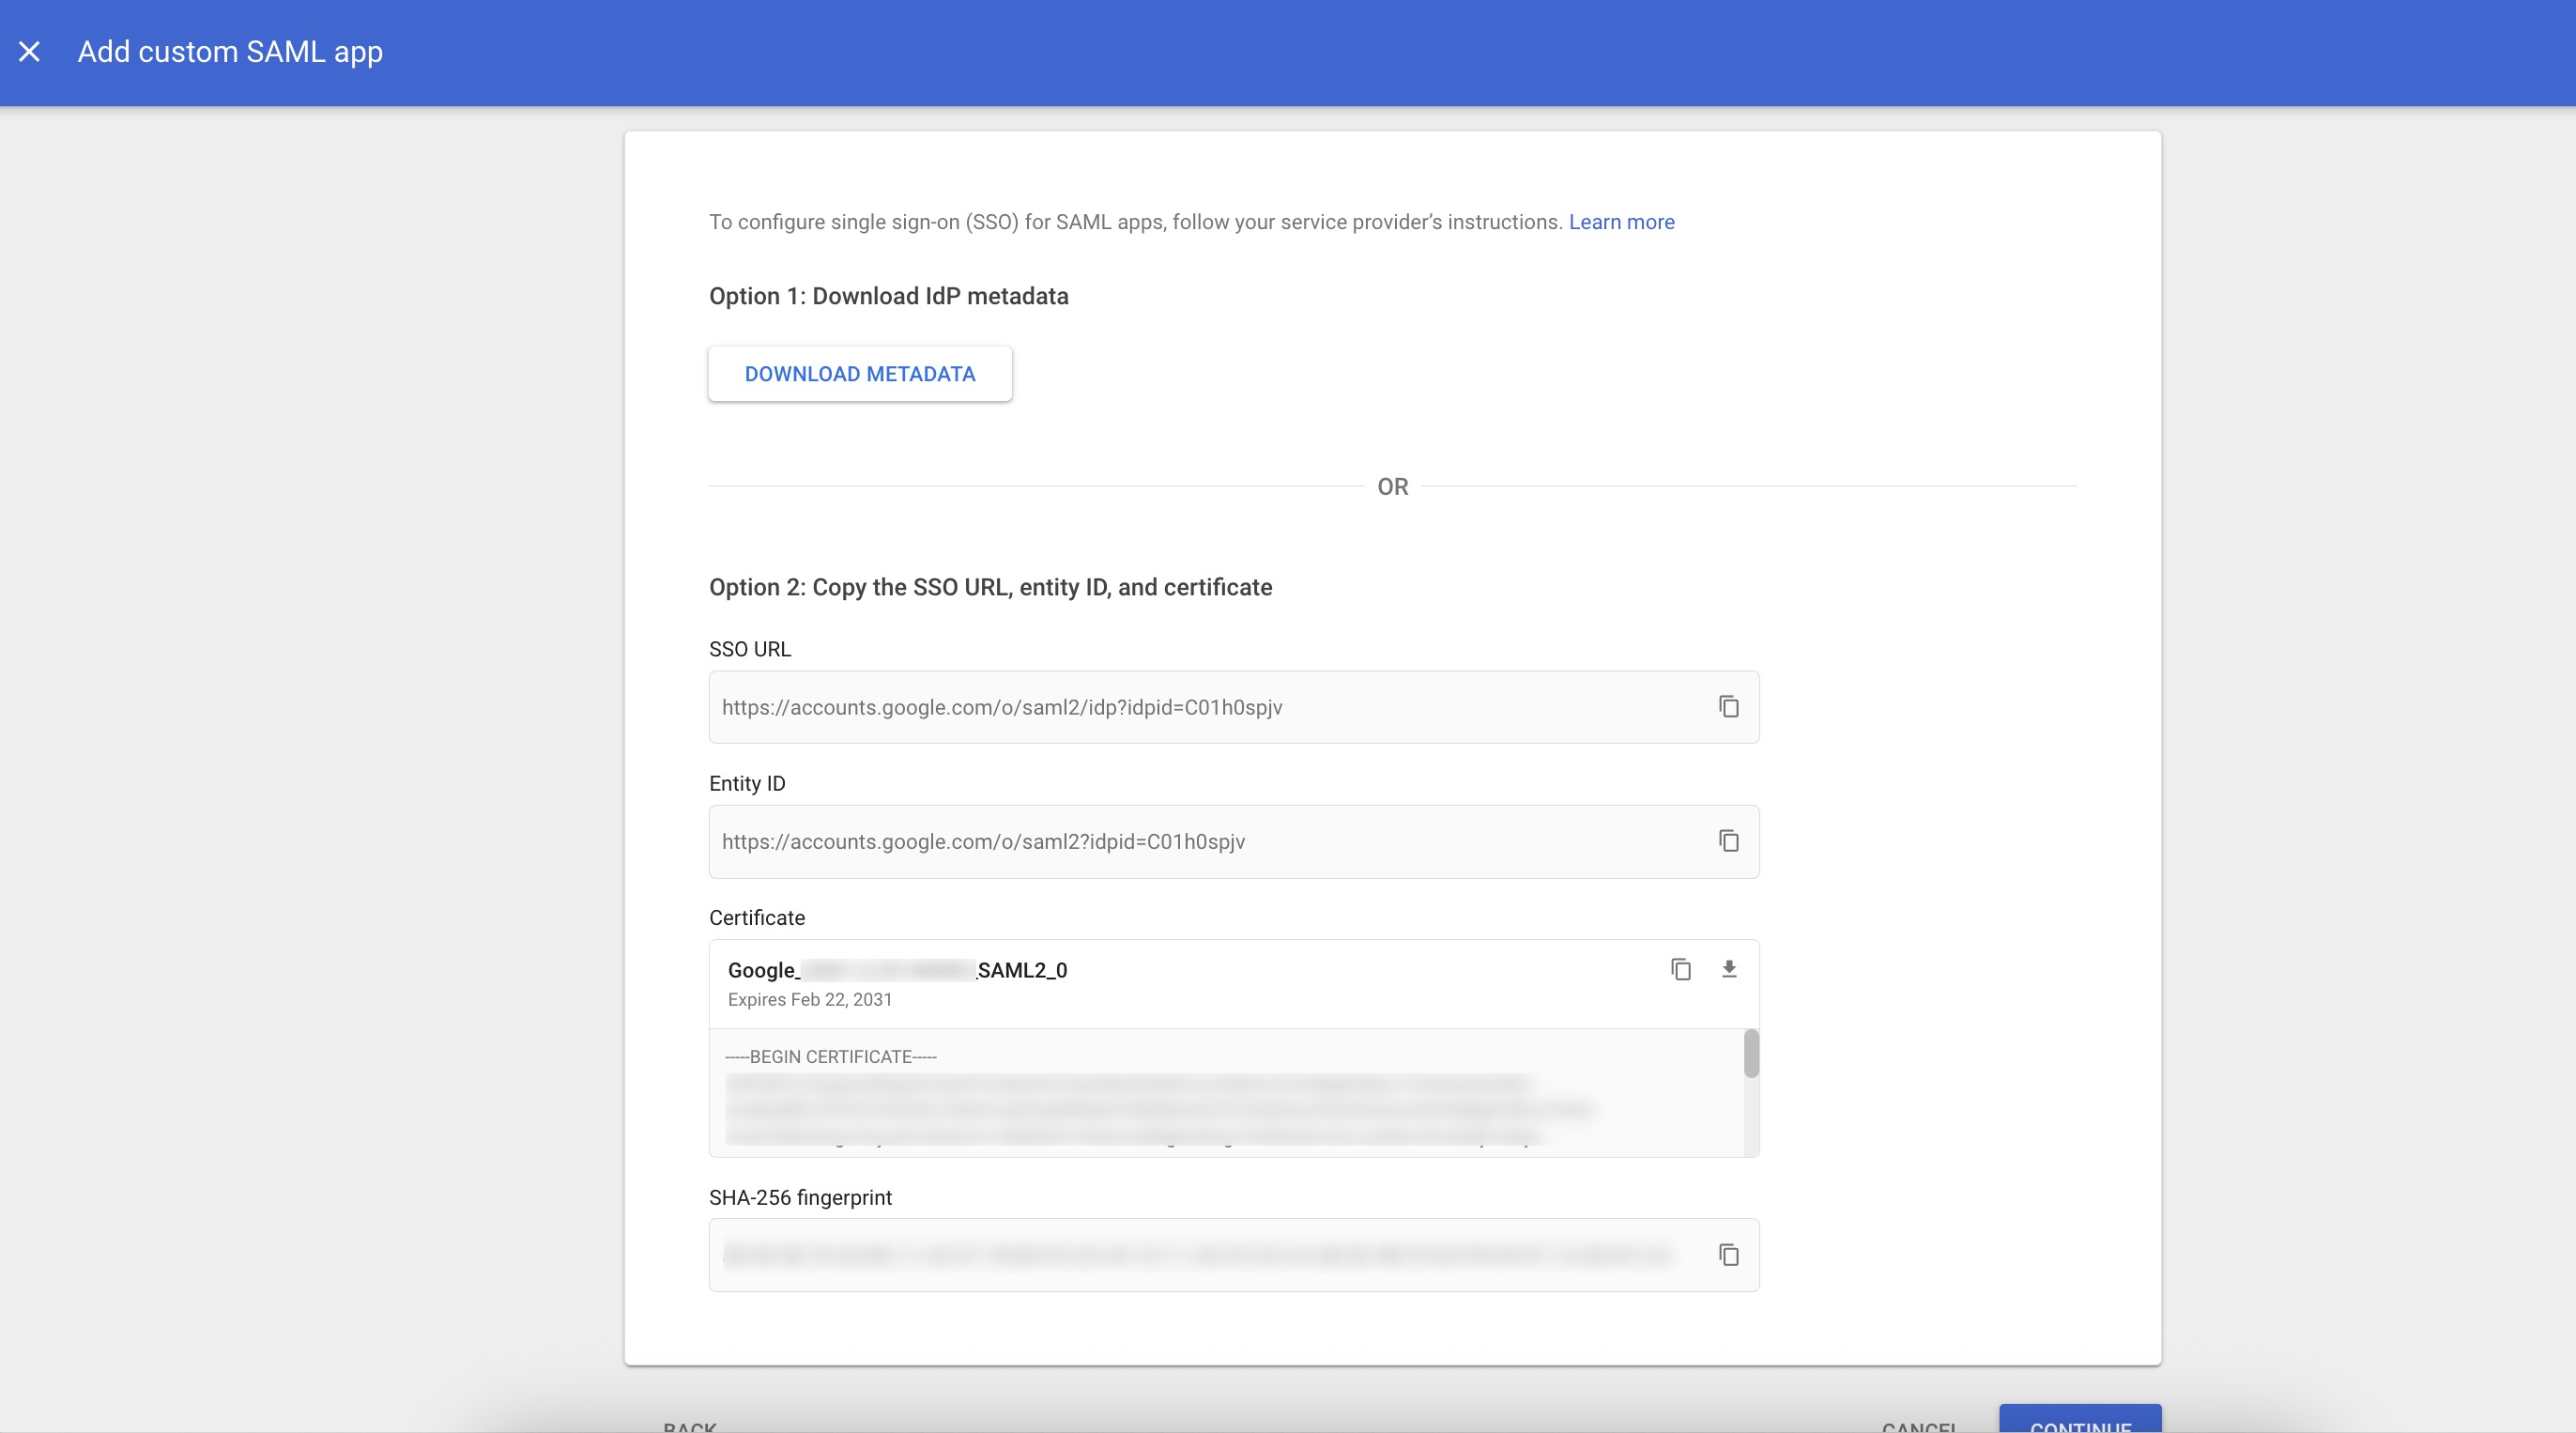
After downloading or copying the identity provider details, select Continue.
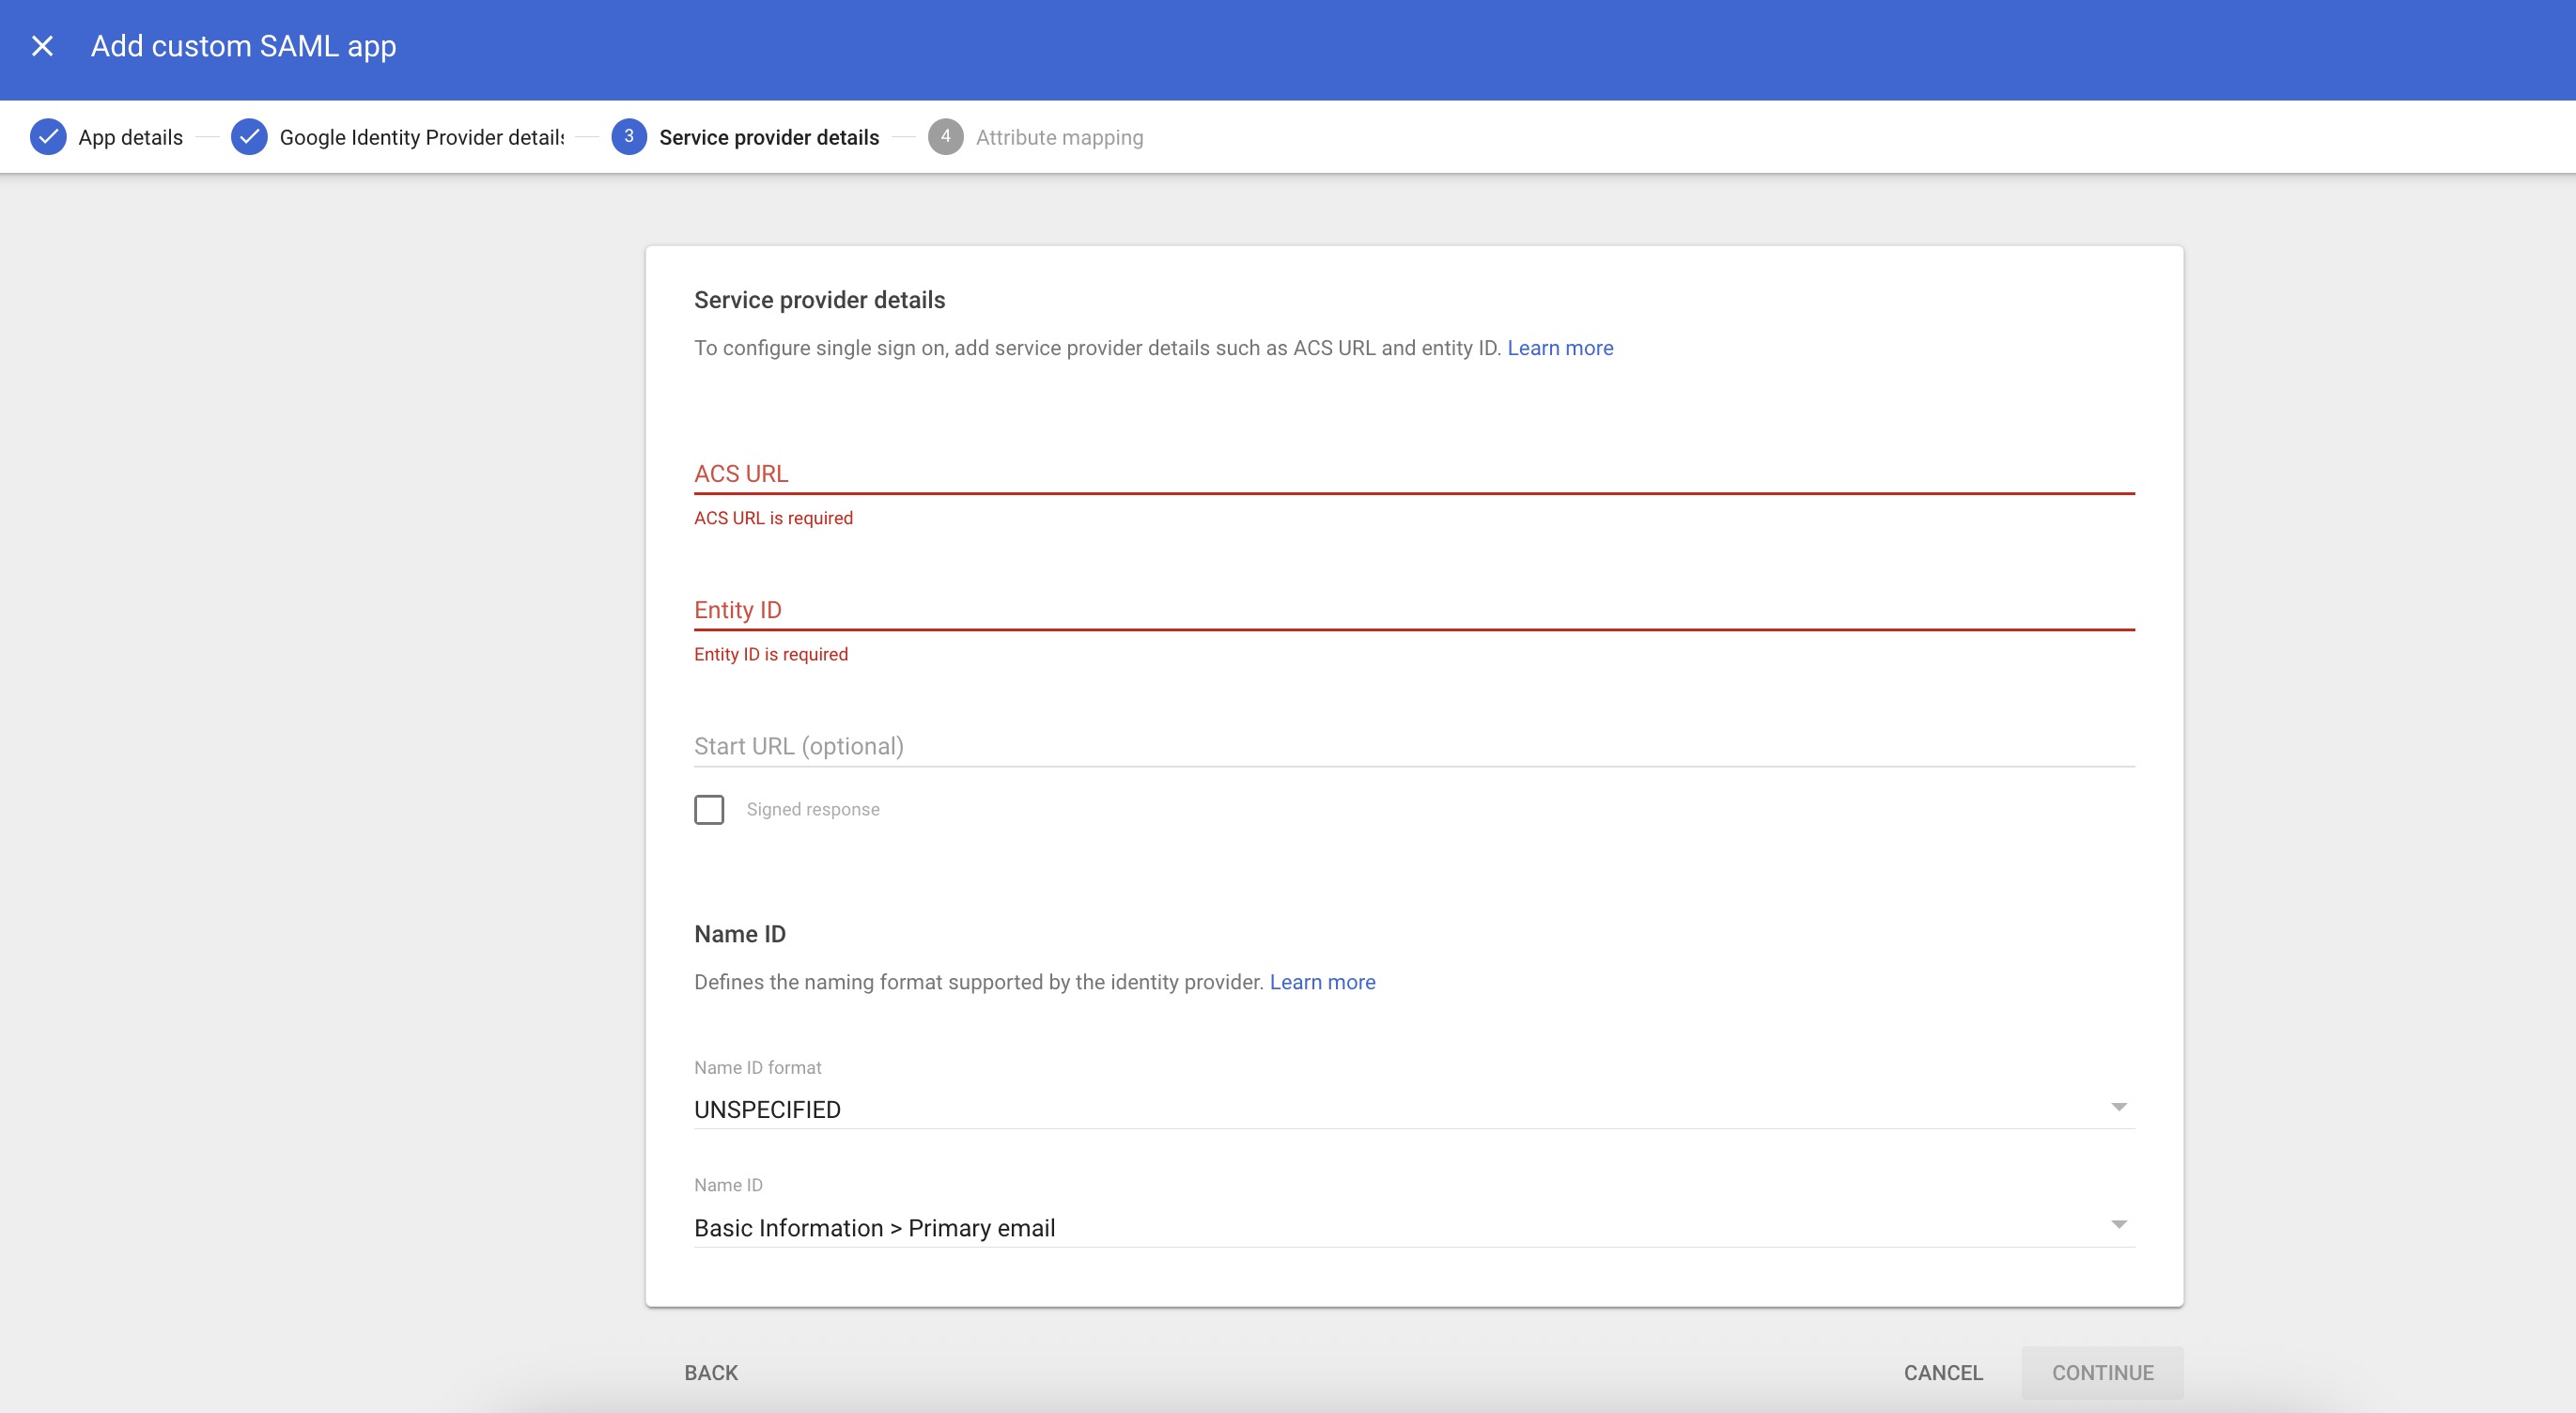
Step 5. Configure service provider details
On the Service provider details page, enter the values provided by Shipium in Step 1.
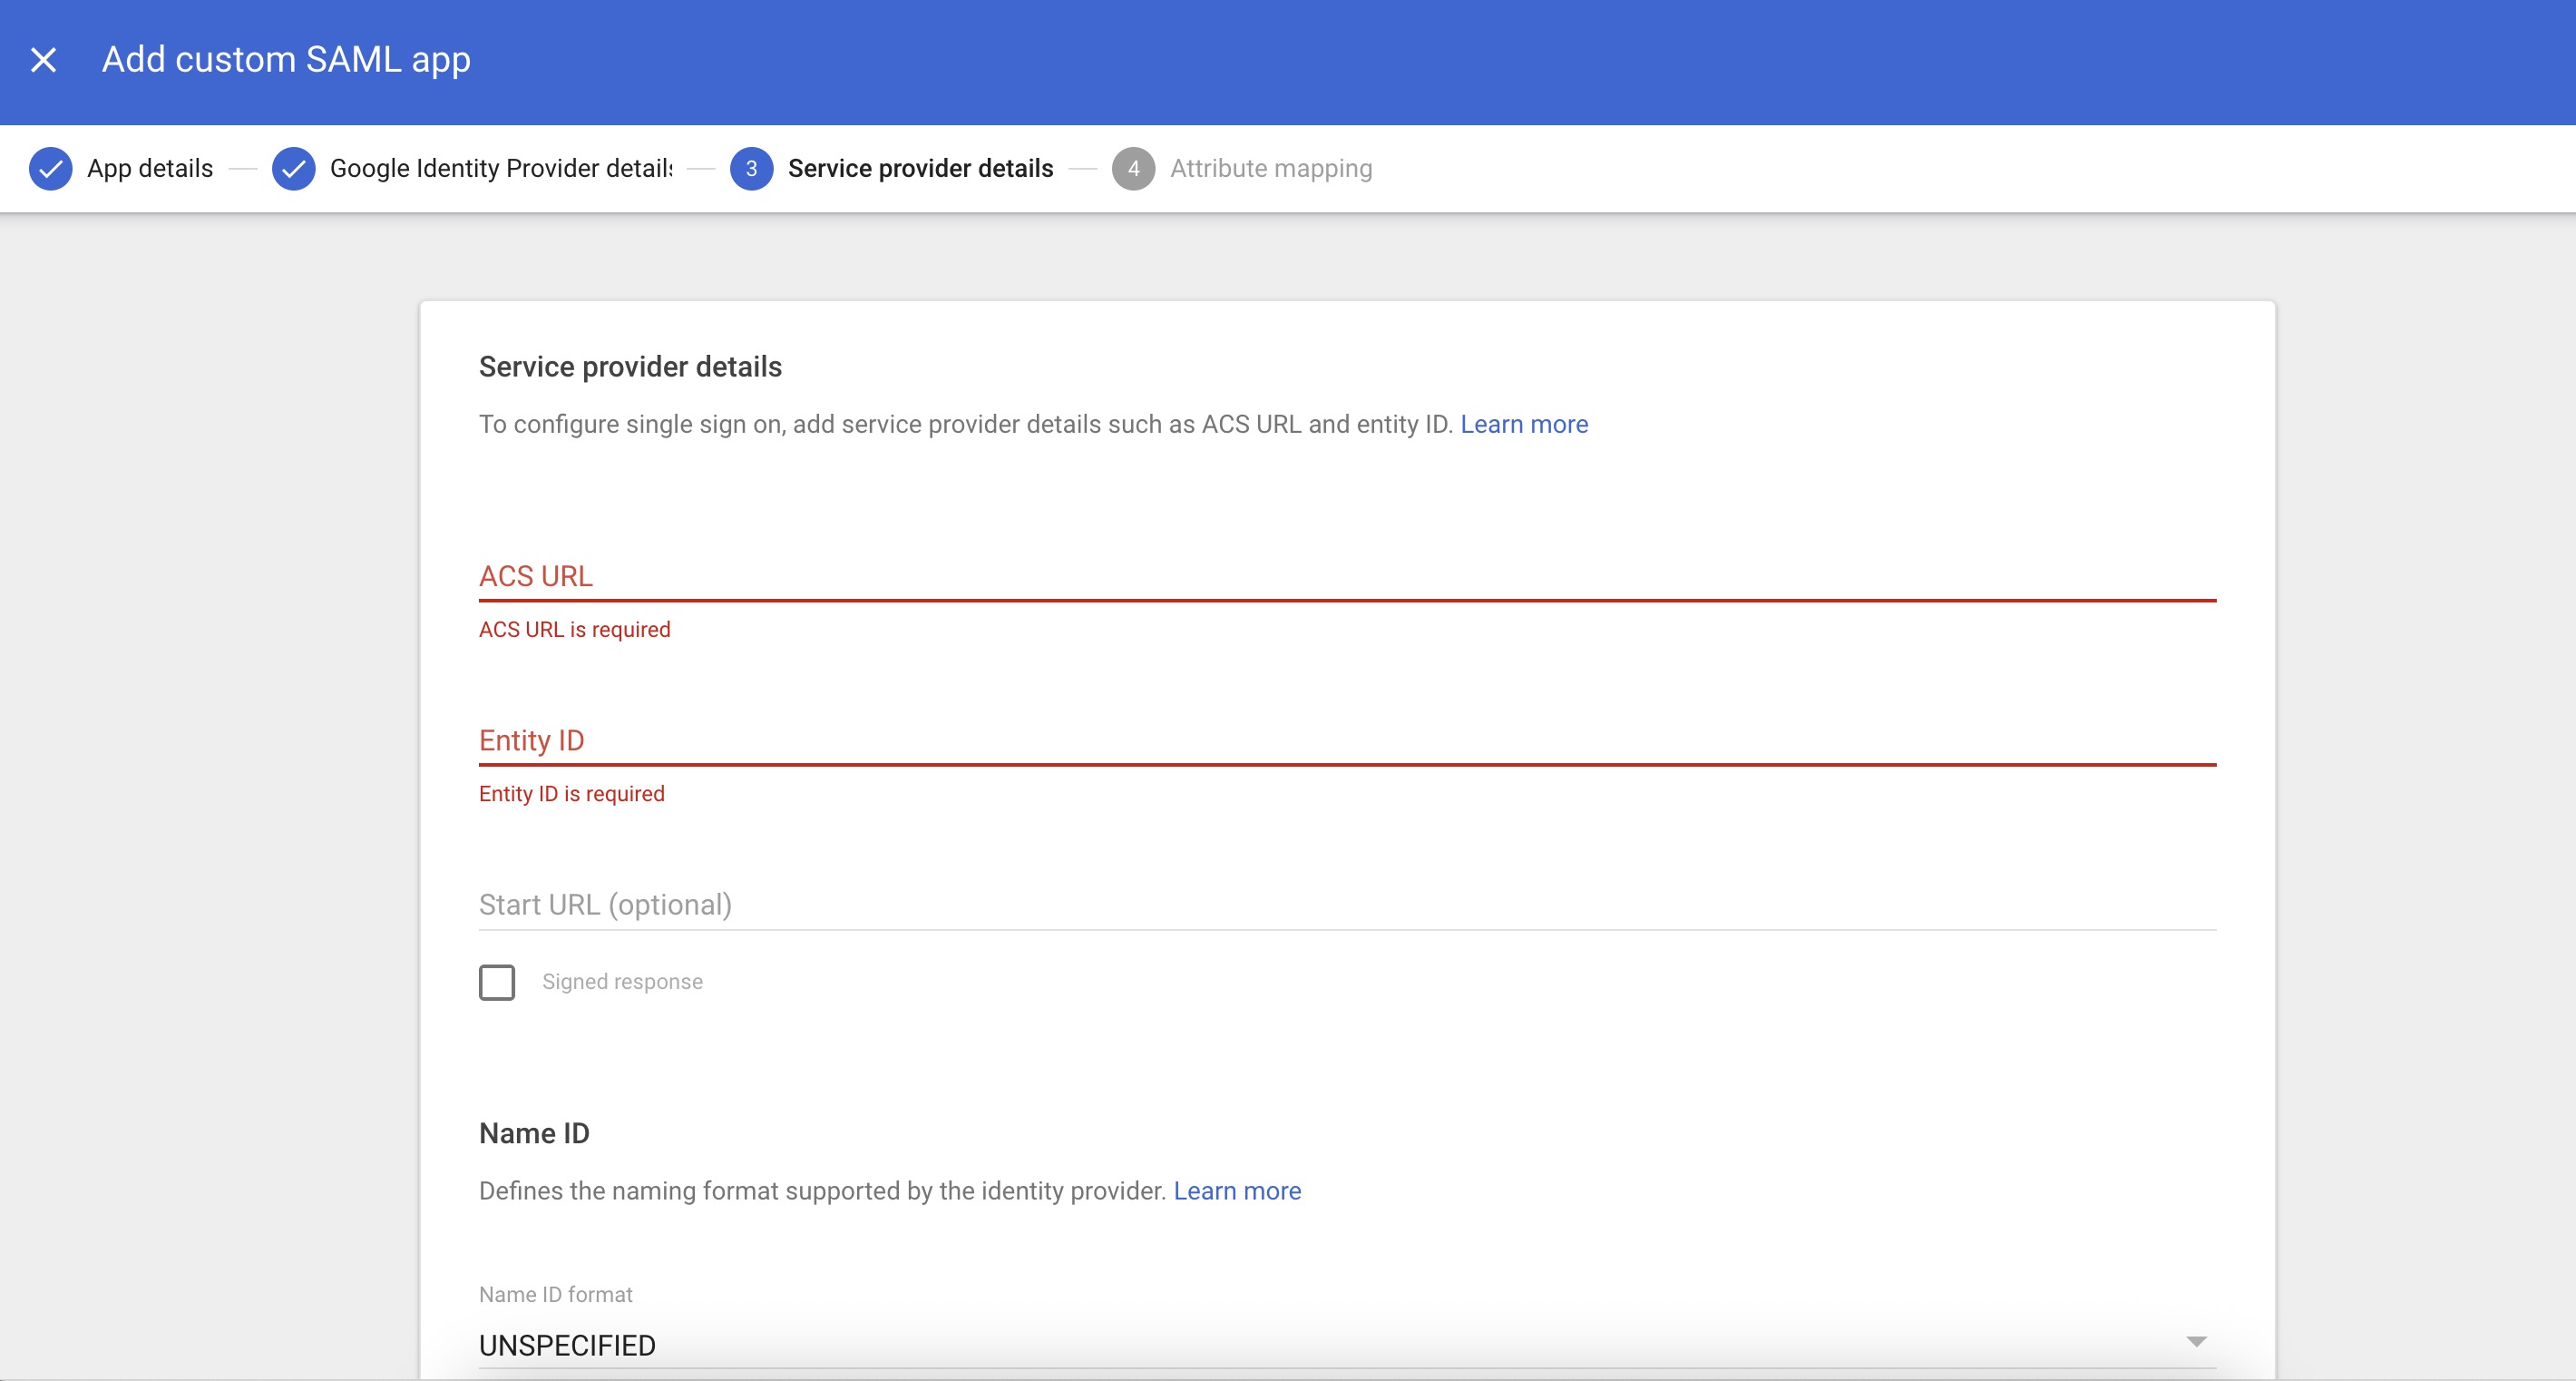
- ACS URL. Enter the ACS URL value provided by your Shipium team member.
- Entity ID. Enter the Entity ID value provided by your Shipium team member.
- Start URL. Optional. Leave this blank unless instructed otherwise by your Shipium team member.
- Signed response. Leave this unchecked.
Under Name ID, configure the following:
- Name ID format. Select UNSPECIFIED from the dropdown menu.
- Name ID. Select Basic Information > Primary email from the dropdown menu.
Select Continue.
Step 6. Configure attribute mapping
On the Attribute mapping page, you'll map Google directory attributes to Shipium application attributes. Select Add Mapping to add each of the following attribute mappings:
| Google Directory attributes | App attributes |
|---|---|
| Basic Information > First name | given_name |
| Basic Information > Last name | family_name |
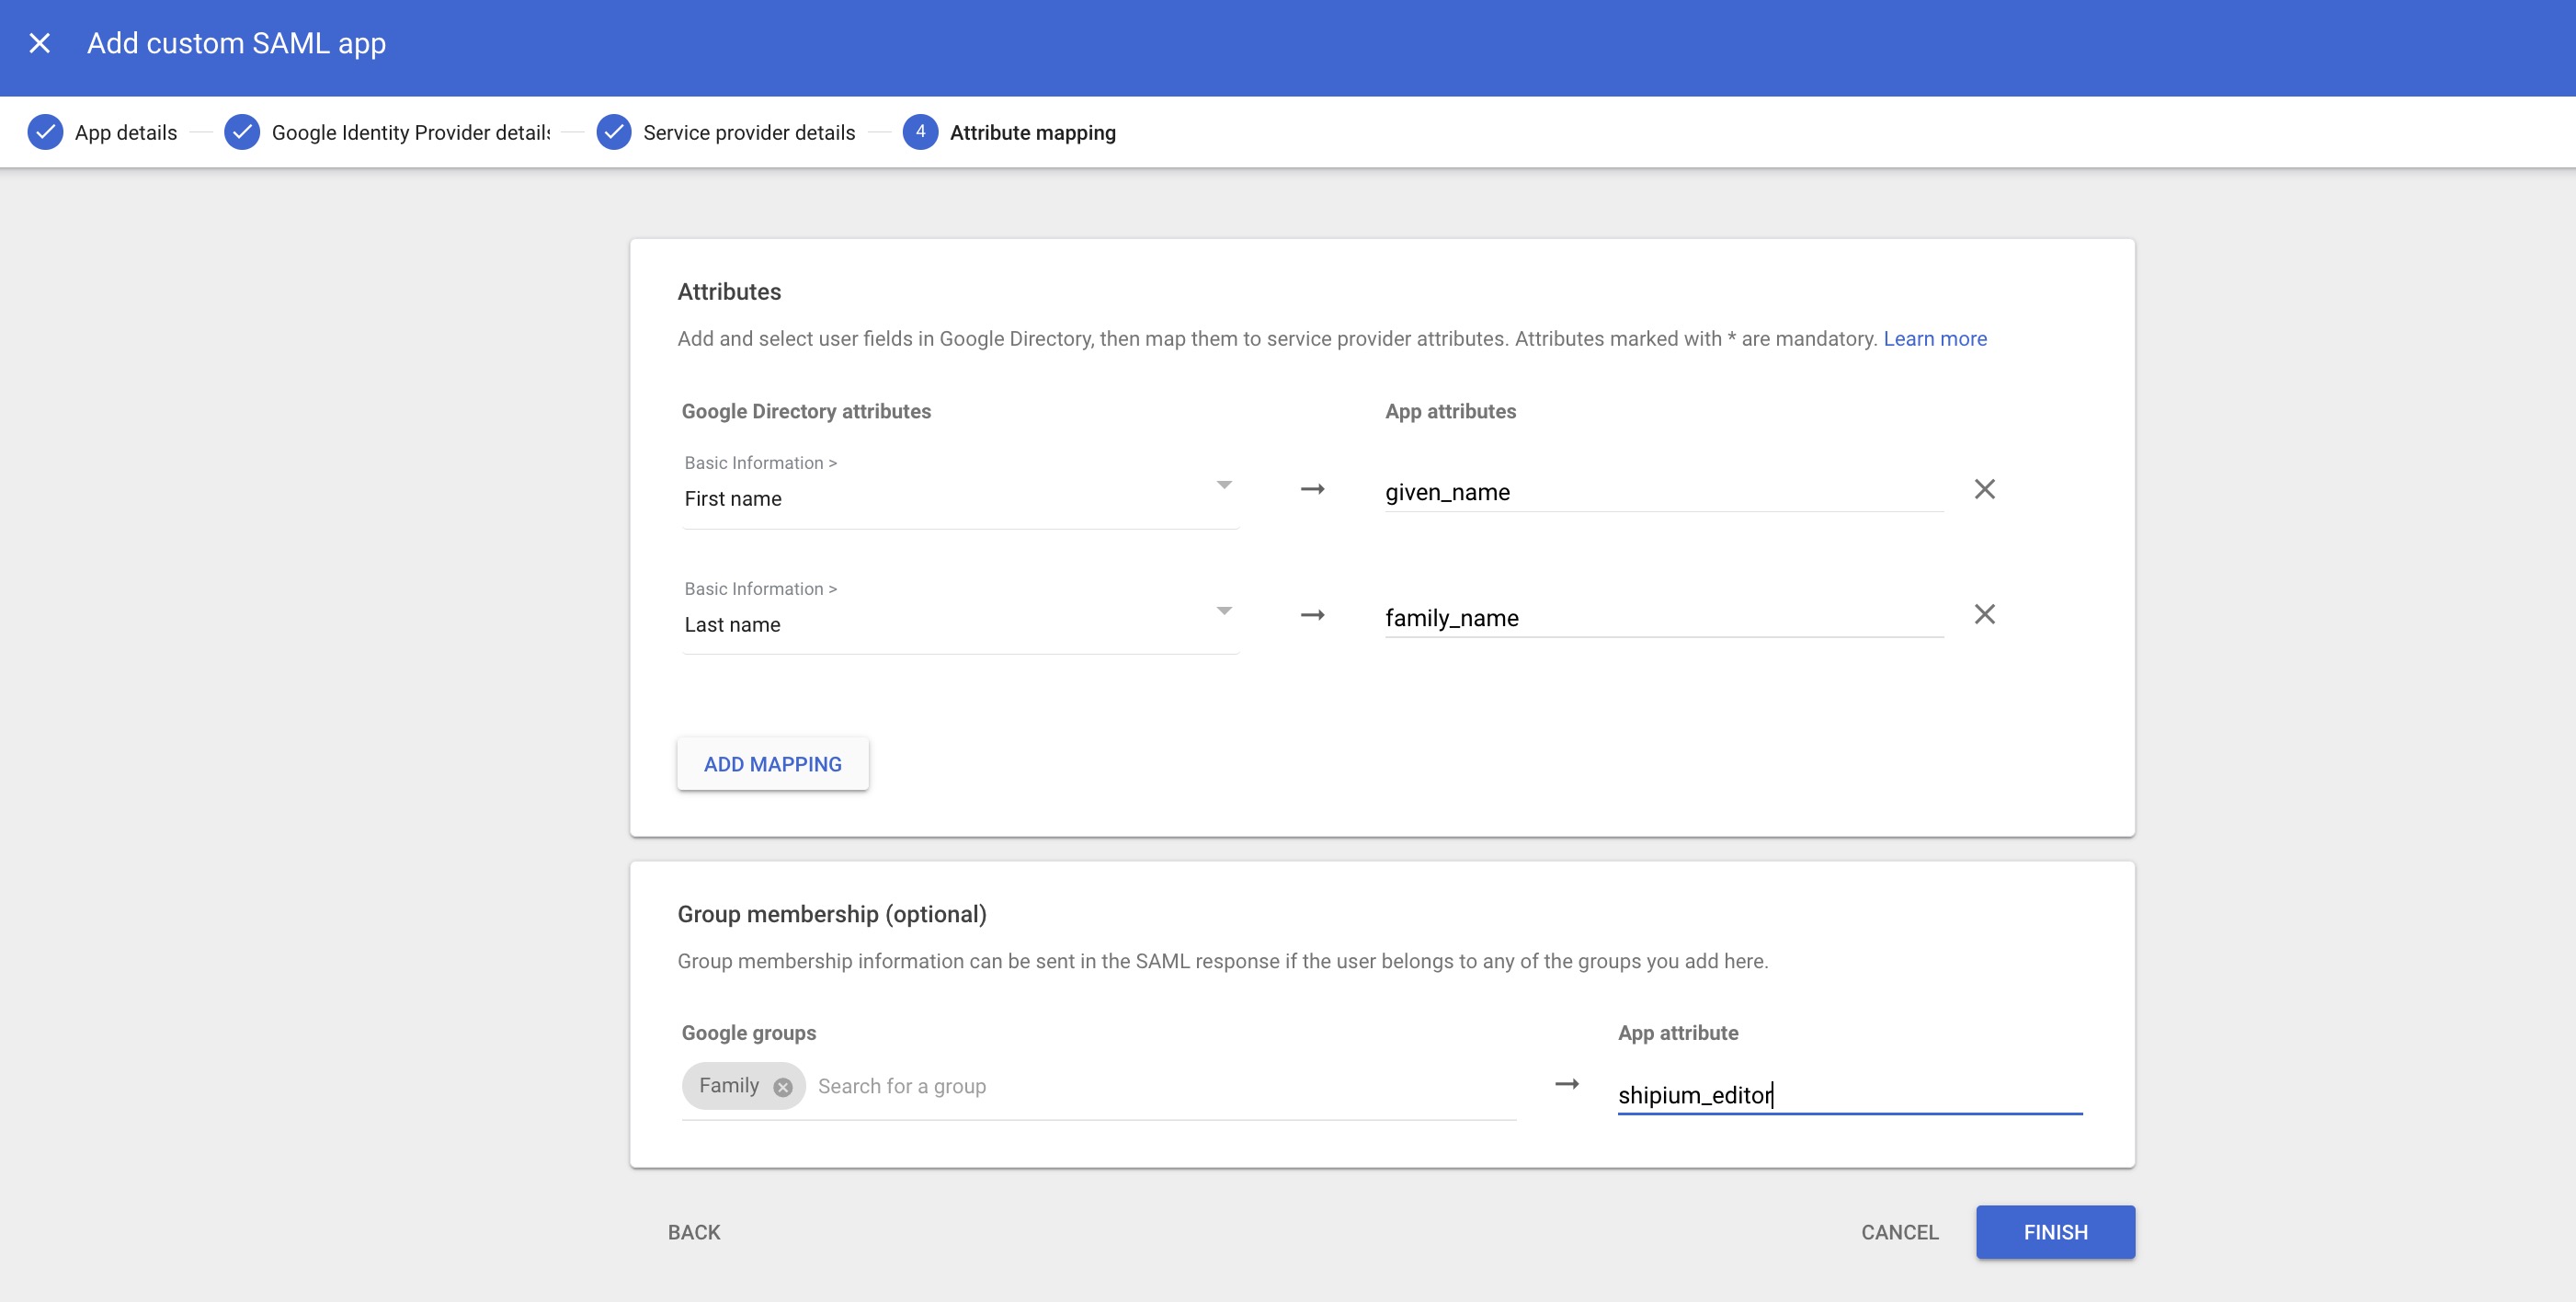
Group membership (optional)
The Group membership section enables you to map Google Groups to Shipium user roles, eliminating the need for manual role configuration in the Shipium Console after integration.
To configure group mapping, you'll search for and select the Google Group that contains the users who should be assigned a specific Shipium role, and enter the corresponding Shipium role name as the App attribute. We suggest using shipium_role as the app attribute name for consistency.
The Shipium role names that can be used as Google Group names are:
- shipium_admins. Full administrative access to the Shipium Console.
- shipium_editors. Edit access to the Shipium Console.
- shipium_viewers. View-only access to the Shipium Console.
- shipium_site_managers. Site manager access, specific to the Shipium Pack App.
- shipium_site_associates. Site associate access, specific to the Shipium Pack App.
Group membership configuration is optionalIf you choose not to configure group mapping, all users who sign in through SSO will be assigned the viewer role by default. You can change individual user roles within the Shipium Console after they sign in for the first time.
TipIf you use a different app attribute name than shipium_role, please notify your Shipium team member so the mapping can be configured correctly on the Shipium side.
Select Finish to complete the SAML application setup.
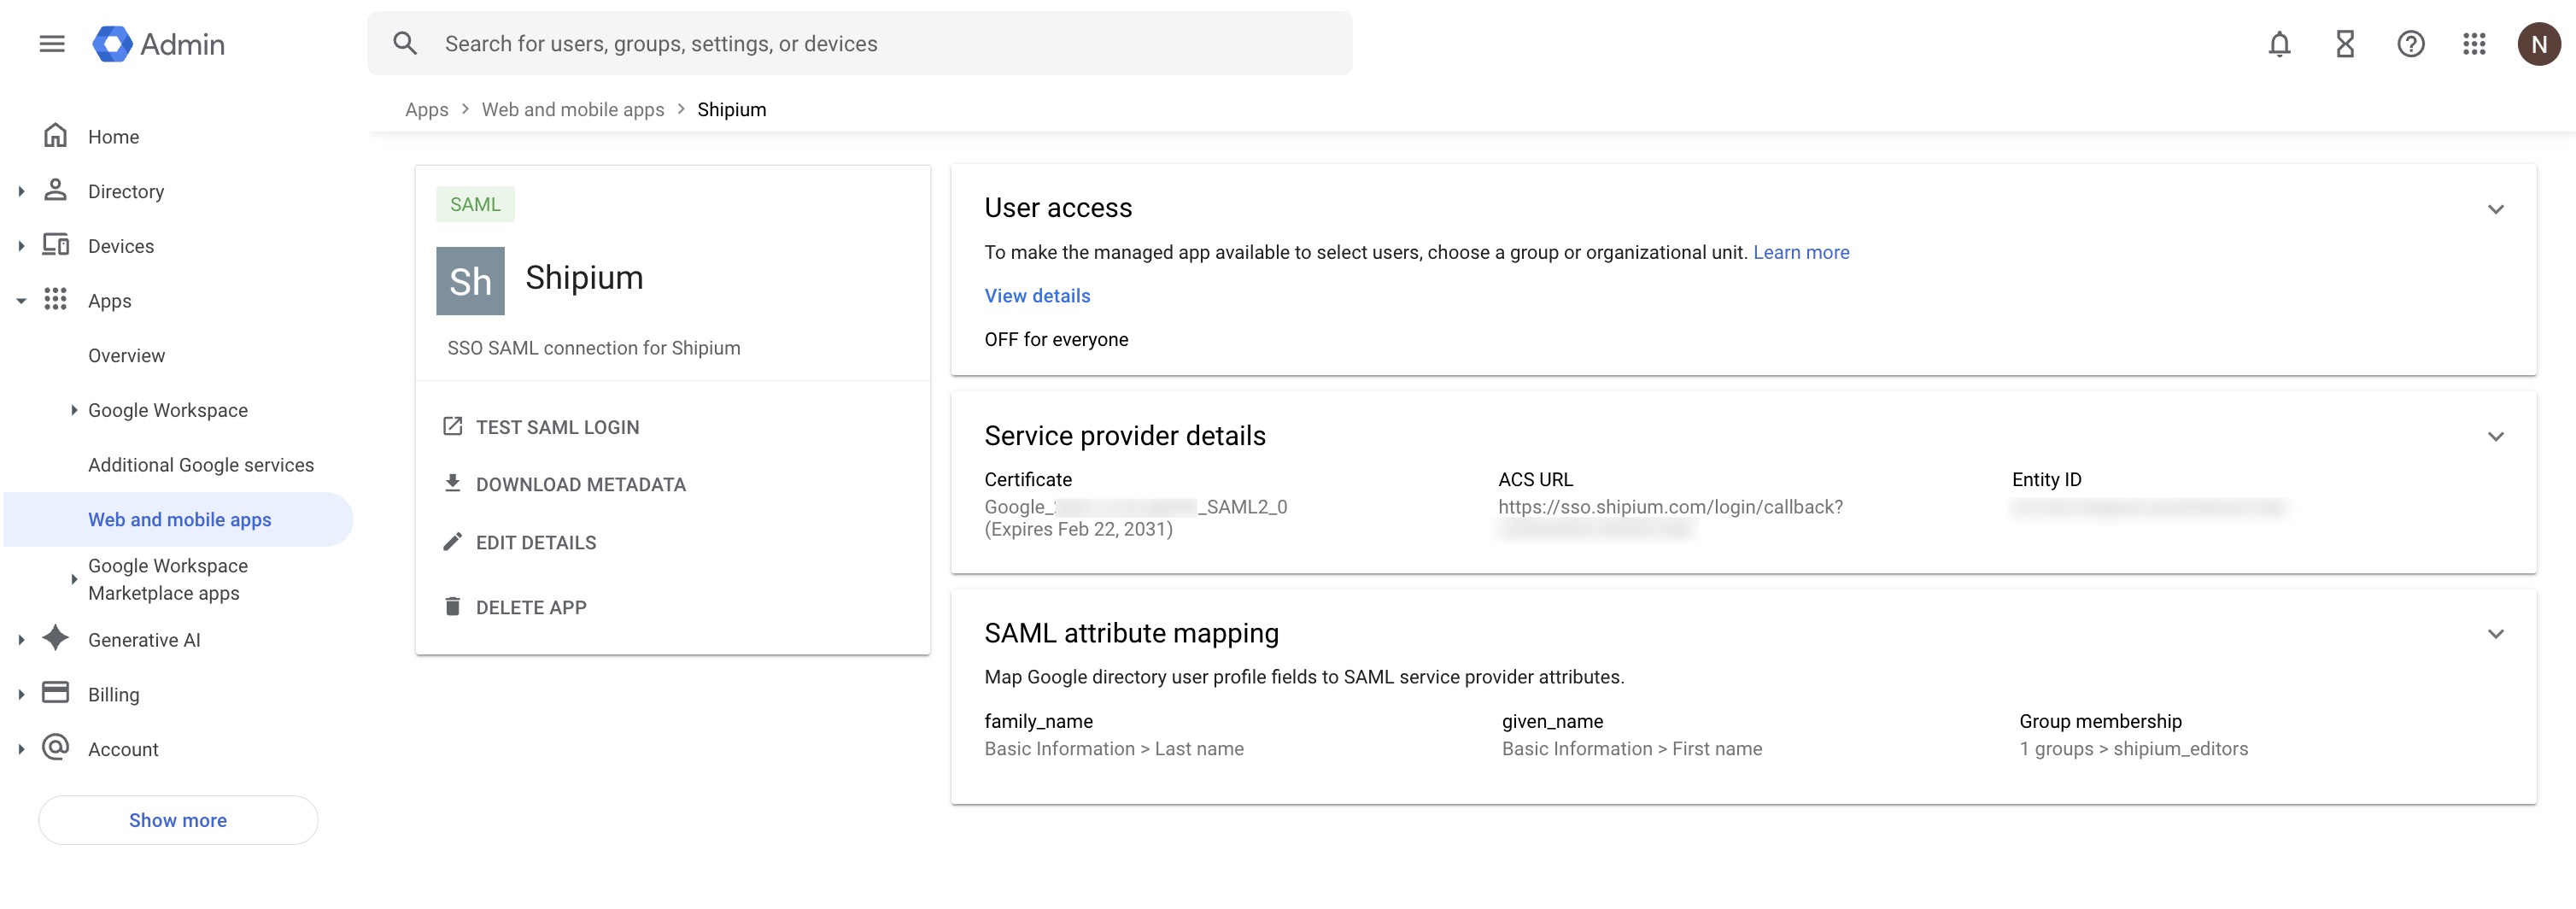
Step 7. Turn on the SAML application for users
After creating the SAML application, you'll be directed to the Shipium application overview page. You'll notice that User access is set to OFF for everyone by default.
To enable SSO access, select User access (or select View details within the User access section). On the Service Status page, you have two options:
- ON for everyone. Enables the Shipium SAML app for all users in your organization.
- Groups or Organizational Units. Enables the app for specific groups or organizational units only, using the options in the left-side panel.
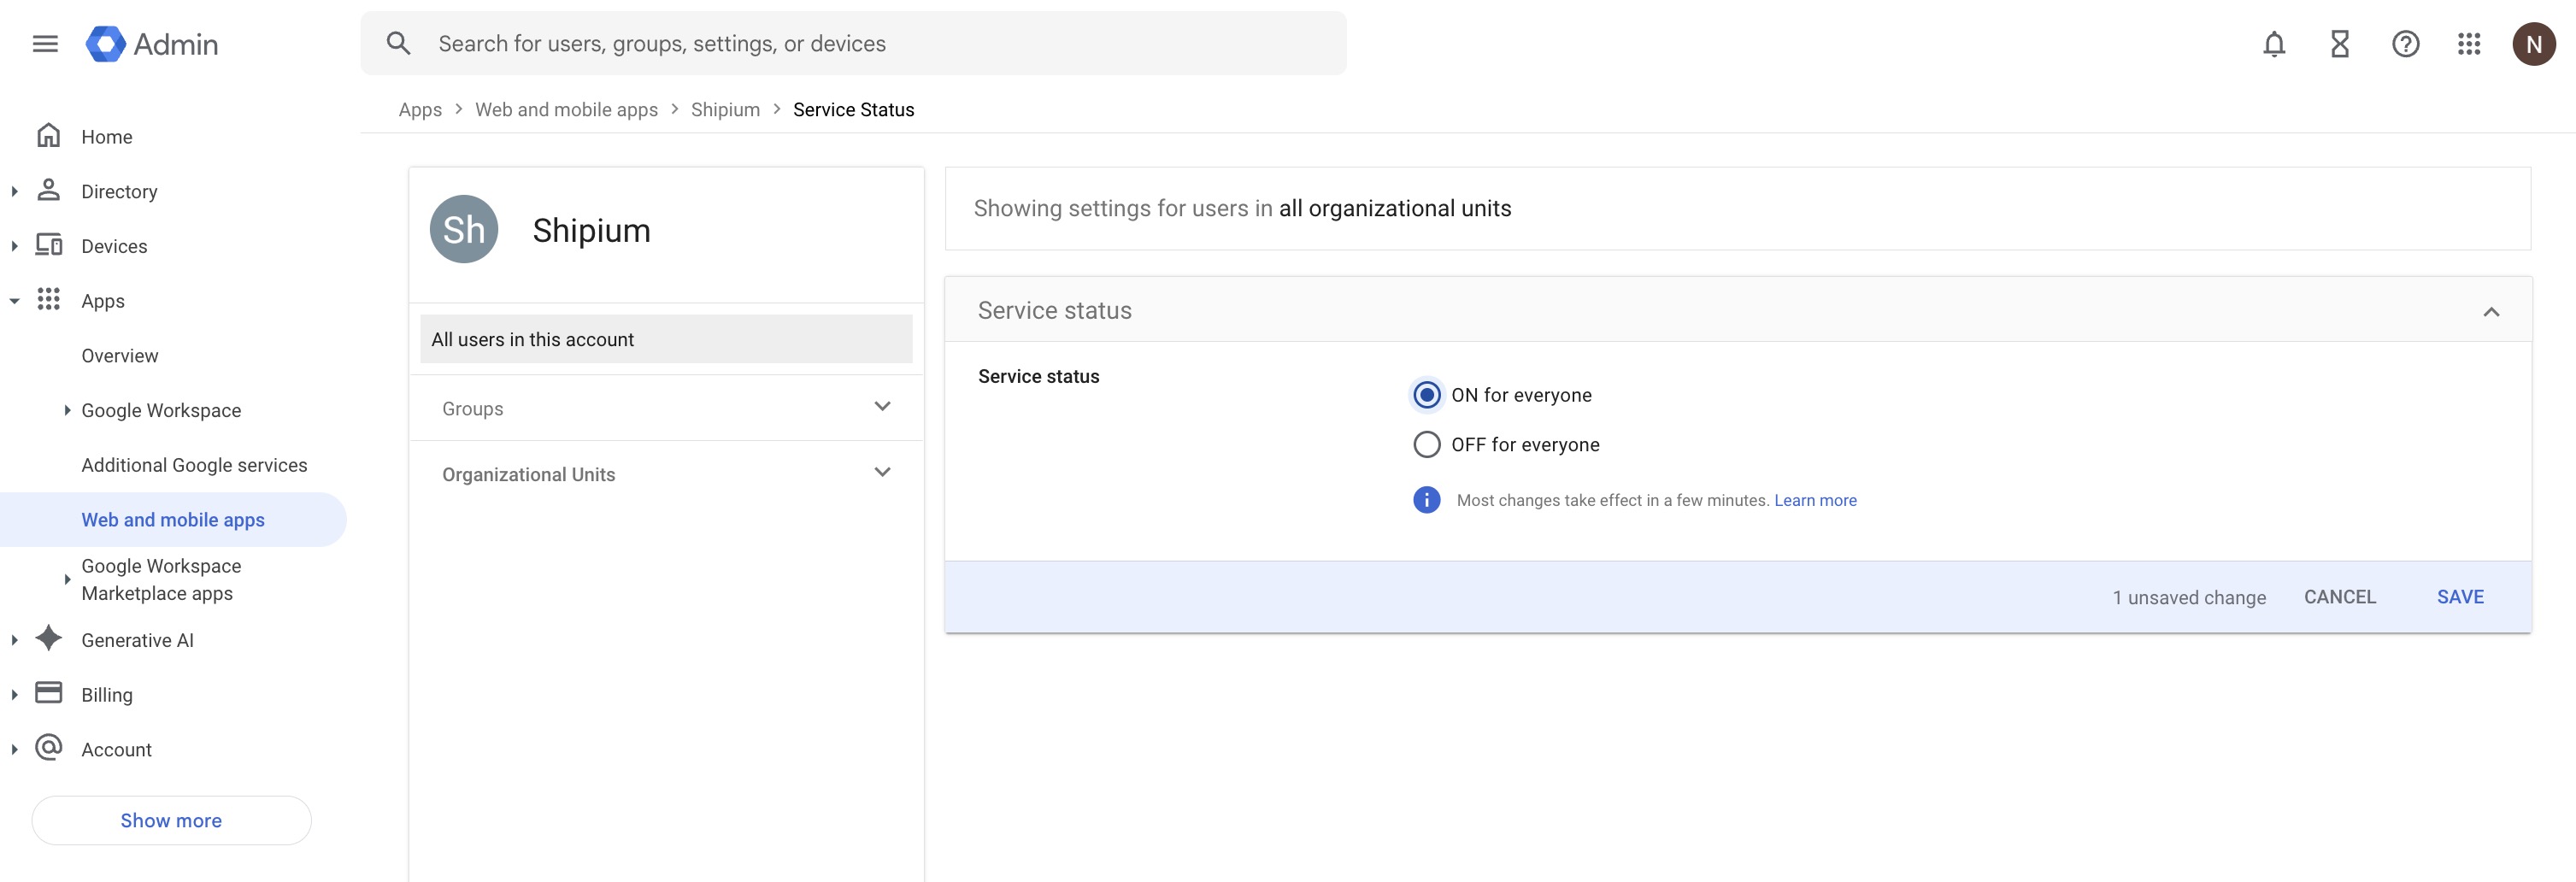
Select Save to apply your changes. Most changes take effect within a few minutes.
RecommendedIf you configured group membership in Step 6, consider enabling the SAML application only for the same Google Group(s) you mapped to Shipium roles. This ensures that only the intended users have access to the Shipium Console through SSO.
Step 8. Provide identity provider information to Shipium
If you haven't already shared your Google identity provider details from Step 4 with your Shipium team member, do so now. Shipium needs these values to complete the SSO connection on our end:
- The SSO URL (identity provider single sign-on URL)
- The Entity ID (identity provider entity ID)
- The Certificate file (or the complete IdP metadata XML file)
Your Shipium team member will confirm when the configuration is complete on the Shipium side.
Step 9. Test the SSO connection
Once your Shipium team member confirms that the Shipium-side configuration is complete, you can test the SSO connection.
From the Google Admin Console, navigate to Apps > Web and mobile apps and select the Shipium application. Select Test SAML login from the left-side menu. The Shipium Console should open in a new browser tab. If the login is successful, SSO is configured correctly.
You can also test the connection from the Shipium Console login page by selecting Sign in with SSO and entering a user's email address. The email domain will be recognized and redirect to Google for authentication.
After signing in, you can verify that user details were mapped correctly by navigating to Account settings in the Shipium Console, where you should see the user's first name, last name, and email address, as well as the correct role assignment.
User permissions
Thinking about your account users' permission levels before configuring SSO can save time during setup. Users in the Shipium Console can be administrators, editors, or viewers. Be sure to discuss your permission level needs for users with your Shipium team member prior to configuration.
If you configured group membership mapping in Step 6, user roles will be assigned automatically based on their Google Group membership. If you did not configure group mapping, all SSO users will default to the viewer role, and an administrator can adjust individual roles within the Shipium Console.
Resources
Your Shipium team member is available to help along the way. However, you might find these resources helpful:
- SSO for Your Shipium Account
- Managing Users and Roles
- Terms and Definitions
- Troubleshooting Guide
- Contact Shipium Support
Updated 5 months ago